C1252/52 Brake Booster Pump Motor on Time Abnormally Long
Diagnostic trouble codes · Vehicles built Sep 2011 – Dec 2011
DESCRIPTION
The motor relay (semiconductor relay) is built into the master cylinder solenoid and drives the pump motor based on a signal from the skid control ECU.| DTC Code |
DTC Detection Condition |
Trouble Area |
| C1252/52 |
The motor operates for 3 minutes or more. |
|
- HINT:
- The pump motor continues operation for the first 3 minutes, then repeats start and stop.
WIRING DIAGRAM
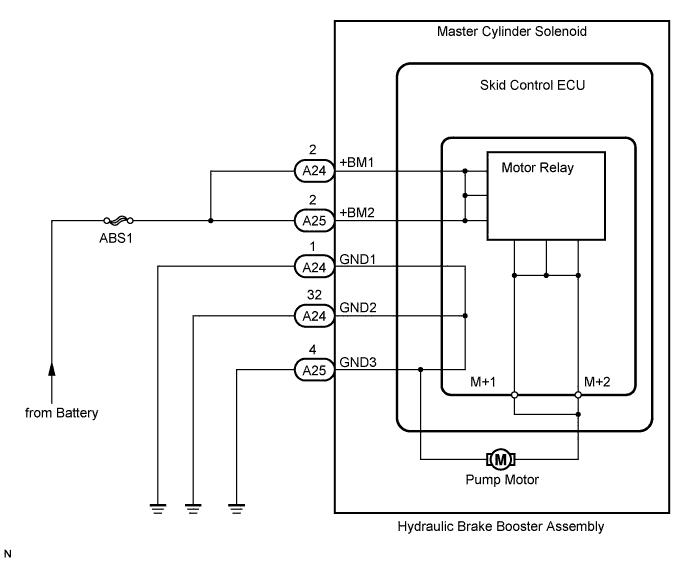

INSPECTION PROCEDURE
- NOTICE:
- When replacing the hydraulic brake booster assembly (master cylinder solenoid), perform zero point calibration (Click here).
- HINT:
- When C1253/53, C1254/54, or C1256/56 is output together with C1252/52, inspect and repair the trouble area indicated by C1253/53, C1254/54, or C1256/56 first.
| 1. CHECK PUMP MOTOR OPERATION |

Turn the ignition switch off.
Depress the brake pedal more than 20 times.
Turn the ignition switch to ON.
Check how the pump motor operates.
Result Result
Proceed to
Pump motor does not operate
A
Pump motor operates continuously, and does not stop
LHD
B
RHD
C
Pump motor operates intermittently
D
Pump motor operates, then stops
E
|
|
||||
|
|
||||
|
|
||||
|
|
||||


| A | |
 |
| 2. CHECK CONNECTION OF PUMP MOTOR WIRE HARNESS |
Remove the hydraulic brake booster assembly (LHD: Click here/RHD: Click here).
Using a screwdriver, remove the 2 plugs from the hydraulic brake booster assembly (LHD: Click here/RHD: Click here).
Check the tightening torque of the 2 screws which tighten the wire harness connecting the hydraulic brake booster assembly and brake booster pump (LHD: Click here/RHD: Click here).
- OK:
- The harness is tightened to the specific torque.
- Torque:
- 2.9 N*m{ 30 kgf*cm , 26 in.*lbf }
|
|
||||
| OK | |
|
| 3. CHECK RESISTANCE OF PUMP MOTOR WIRE HARNESS |
Using a screwdriver, remove the 2 screws and pull the wire harness from the hydraulic brake booster assembly.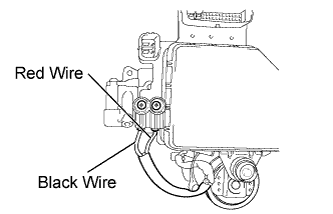
Measure the resistance according to the value(s) in the table below.
- Standard Resistance:
Tester Connection
Condition
Specified Condition
Red wire terminal - Black wire terminal
Always
2 Ω
Result Result
Proceed to
OK
A
NG
LHD
B
RHD
C
|
|
||||
|
|
||||
| A | |
|
| 4. READ VALUE USING INTELLIGENT TESTER (ACCUMULATOR SENSOR) |
Connect the intelligent tester to the DLC3.
Turn the ignition switch to ON and turn the intelligent tester on.
Enter the following menus: Chassis / ABS/VSC/TRC / Data List.
ABS/VSC/TRC Tester Display
Measurement Item/Range
Normal Condition
Diagnostic Note
Accumulator Sensor
Accumulator pressure sensor reading / min.: 0.00 V, max.: 5.00 V
3.58 to 5 V
If the value is constant regardless of the pump operation, an accumulator pressure sensor malfunction is suspected.
Check the accumulator output value.
Result Result
Proceed to
Output value is within the "Normal Condition" range
A
Output value is out of the "Normal Condition" range
LHD
B
RHD
C
Output value is constant regardless of pump operation
LHD
D
RHD
E
|
|
||||
|
|
||||
|
|
||||
|
|
||||
| A | |
|
| 5. RECONFIRM DTC |
Clear the DTC (Click here).
Turn the ignition switch off.
Turn the ignition switch to ON.
Wait for more than 5 minutes.
Check if the same DTC is output (Click here).
- HINT:
- Reinstall the sensors, connectors, etc. and restore the previous vehicle conditions before rechecking for DTCs.
Result Result
Proceed to
DTC is output
LHD
A
RHD
B
DTC is not output
LHD
C
RHD
D
|
|
||||
|
|
||||
|
|
||||
| A | ||
 |
||
| ||