Images from All Cameras are Abnormal
Circuit diagnosis · Vehicles built Sep 2011 – Dec 2011
DESCRIPTION
The parking assist ECU displays images for the parking assist monitor, front monitor*1 and side monitor*1 screens. Each image signal is sent from the parking assist ECU to the display and navigation module display through the digital communication cable.*1: w/ Side Monitor System
WIRING DIAGRAM
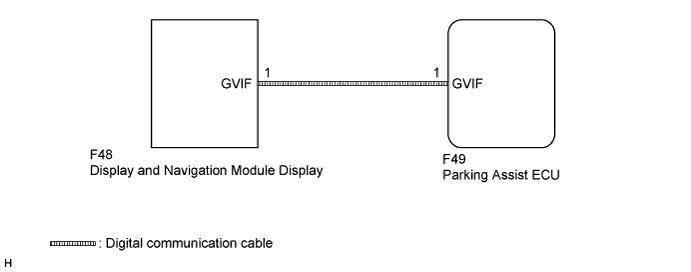

INSPECTION PROCEDURE
- NOTICE:
- When "System initializing" is displayed on the display and navigation module display after the battery terminal disconnected, correct the steering angle neutral point (Click here).
- Depending on the parts that are replaced or operations that are performed during vehicle inspection or maintenance, calibration of other systems as well as the parking assist monitor system may be needed (Click here).
- When "System initializing" is displayed on the display and navigation module display after the battery terminal disconnected, correct the steering angle neutral point (Click here).
- HINT:
- Images are difficult to discern even in normal conditions if:
- Noise may occur in the image depending on electrical devices used in the cabin.
- Noise may occur in the image if accessories that generate radio waves have been installed.
- The camera screen is frosted over (the image immediately after turning the engine switch on (IG) may be blurred or darker than normal).
- The camera lens is dirty with snow, mud, etc.
- A strong beam of light, such as a sunbeam or headlight, hits the camera.
- It is too dark around the camera (at night etc.).
- The ambient temperature around the camera is either too high or too low.
- The vehicle is tilted at a steep angle.
- The ambience of the camera is too bright. (When a strong light, such as a sunbeam reflected off the vehicle body, hits the camera, the image may be blurred. This is called the "SMEAR" phenomenon, peculiar to the CCD camera.)
- Noise may occur in the image depending on electrical devices used in the cabin.
| 1. READ VALUE USING INTELLIGENT TESTER |

Connect the intelligent tester to the DLC3.
Turn the engine switch on (IG).
Turn the intelligent tester on.
Enter the following menus: Chassis / Parking Assist Monitor System / Data List.
Check the Data List for proper functioning of the following items.
Parking Assist Monitor System Tester Display
Measurement Item/Range
Normal Condition
Diagnostic Note
AISIC Output Status
Output condition of camera display/OK or NG
OK: Output condition of camera display is normal
NG: Output condition of camera display is abnormal
-
|
|
||||

| OK | |
 |
| 2. CHECK DIGITAL COMMUNICATION CABLE CONNECTOR |
Check the digital communication cable connector.
Check the digital communication cable connectors between the parking assist ECU and display and navigation module display for any connection problems (Click here).
Check if the same malfunction recurs when the parking assist monitor, front monitor and side monitor screens are displayed.
Result Result
Proceed to
Malfunction does not reoccur
(returns to normal)
A
Malfunction reoccurs
B
|
|
||||

| A | ||
 |
||
| ||
| 3. REPLACE WIRE HARNESS (DIGITAL COMMUNICATION CABLE) |
Replace the digital communication cable between the parking assist ECU and display and navigation module display with a new one.
Check if the same malfunction recurs when the parking assist monitor, front monitor and side monitor screens are displayed.
Result Result
Proceed to
Malfunction does not reoccur
(returns to normal)
A
Malfunction reoccurs
B
|
|
||||
| A | ||
|
||
| ||
| 4. REPLACE DISPLAY AND NAVIGATION MODULE DISPLAY |
Replace the display and navigation module display with a new or normally functioning one (Click here).
Check if the same malfunction recurs when the parking assist monitor screen is displayed.
Result Result
Proceed to
Malfunction does not reoccur
(returns to normal)
A
Malfunction reoccurs
B
|
|
||||
| A | ||
|
||
| ||