Engine does not Start
Circuit diagnosis · Vehicles built from Jan 2012
Versions by build date: Sep 2011 – Dec 2011 from Jan 2012
DESCRIPTION
| ENGINE START SYSTEM OPERATION |
When the engine switch is pressed with the brake pedal depressed and the shift lever in P (for A/T) or the clutch pedal depressed (for M/T), the main body ECU determines that it is an engine start request.
The certification ECU (smart key ECU assembly) and other ECUs perform key verification via the LIN communication line. The engine switch indicator light illuminates in green.
The main body ECU activates the IG1 No. 3 relay, ACC relay and integration relay (IG2 relay).
The certification ECU (smart key ECU assembly) outputs a steering unlock signal. The signal is sent to the steering lock ECU via the LIN communication line.
The main body ECU sends an engine start request signal to the ECM.
The main body ECU deactivates the ACC relay until the ECU detects an engine start.
The ECU reactivates the ACC relay and turns off the engine switch indicator light.
Symbols of Main Body ECU
Signals
SSW1/SSW2
Engine switch on (ACC, IG) signal
IG1D
IG1 No. 3 relay operation signal
ACCD
ACC relay operation signal
IG2D
Integration relay (IG2 relay) operation signal
STP
Stop light switch signal
P (for A/T)
Shift lock signal
TACH
Engine start detection signal
STSW
Starter activation request signal
ACCR
ACC cut request signal
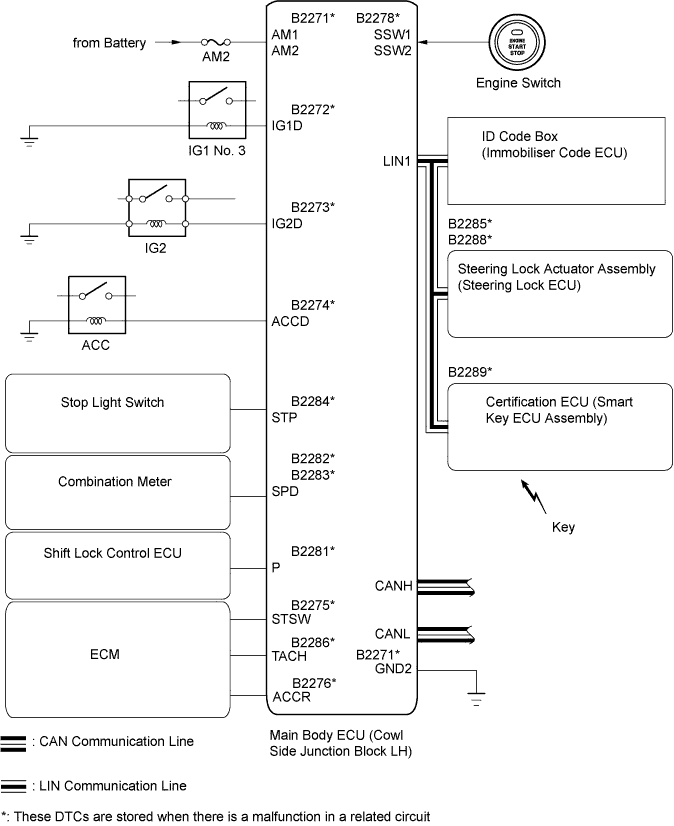

WIRING DIAGRAM
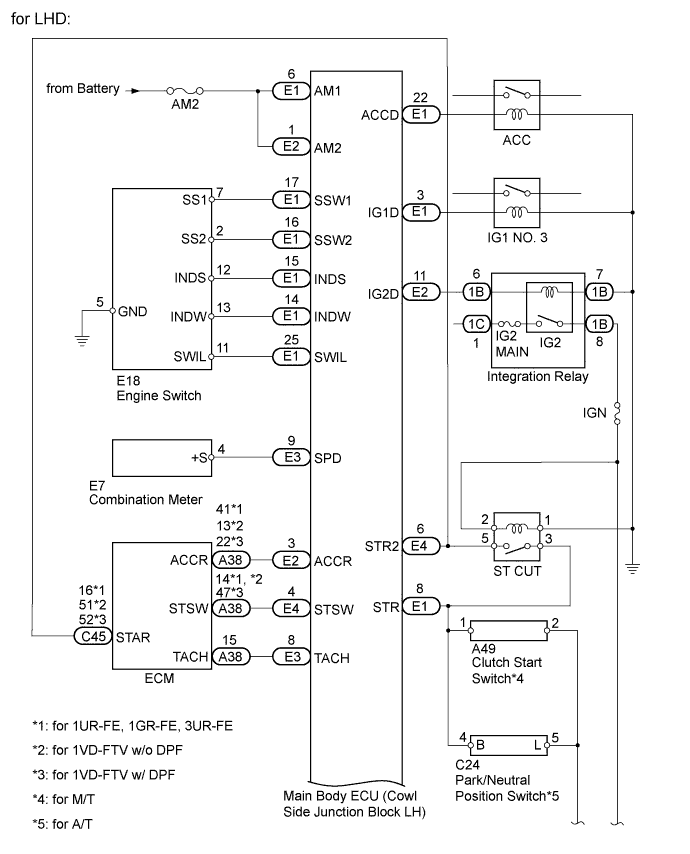
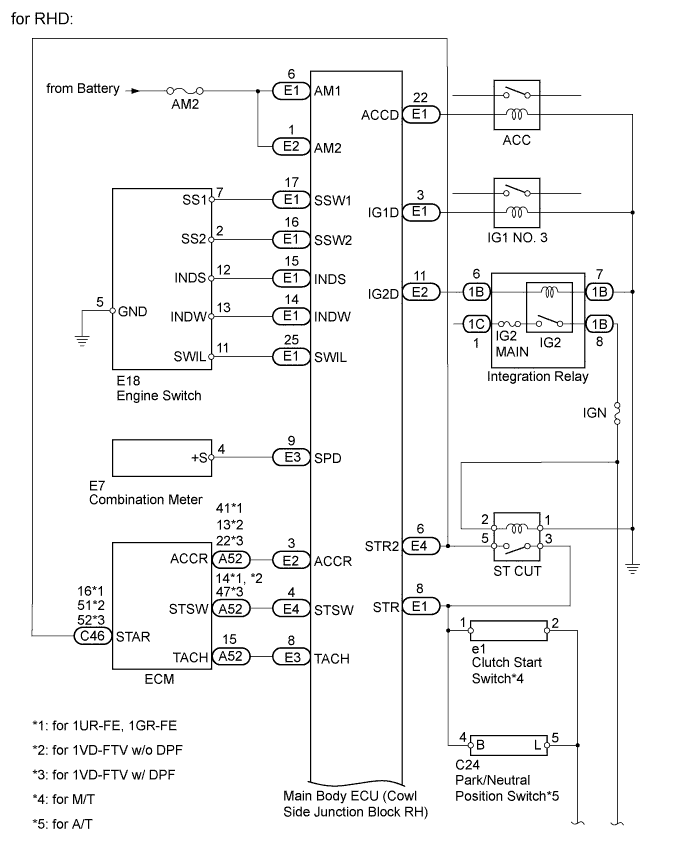
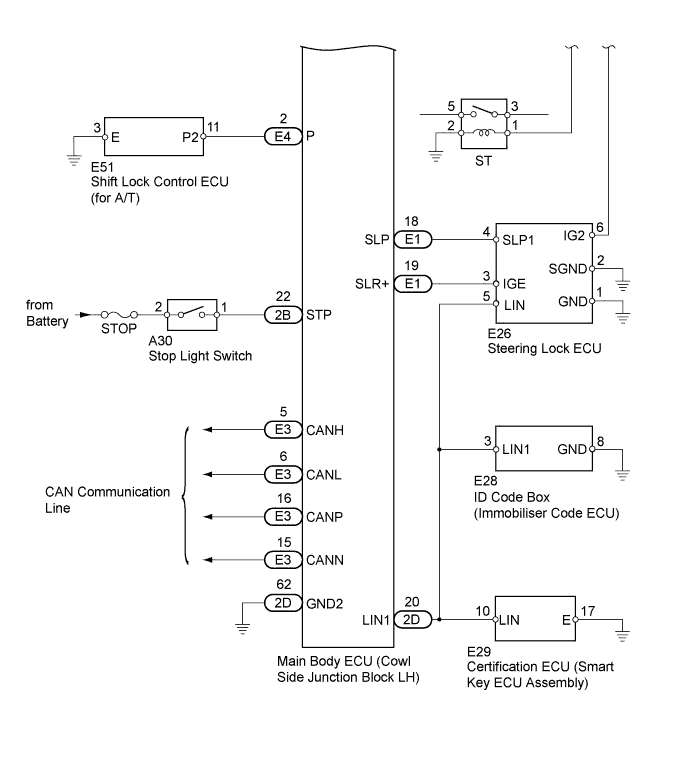
INSPECTION PROCEDURE
| 1. CHECK ENGINE SWITCH (SWITCH CONDITION) |

Check the power source mode change.
When the key is inside the vehicle and the shift lever is in P (for A/T), check that pressing the engine switch causes the power source mode to change as follows:
- OK:
- off → on (ACC) → on (IG) → off
|
|
||||

| OK | |
 |
| 2. CHECK WHETHER DTC OUTPUT RECURS |
Clear the DTCs (Click here).
Check whether the trouble recurs 5 seconds after the engine switch is turned on (IG).
Check whether DTCs for the main body ECU or certification ECU (smart key ECU assembly) are output.
Result Result
Proceed to
No DTC output
A
Main body ECU
Entry and start system (for start function)
B
Certification ECU (Smart key ECU assembly)
Steering lock system
C
Certification ECU (Smart key ECU assembly)
Engine immobiliser system
D
|
|
||||
|
|
||||
|
|
||||
| A | |
|
| 3. CHECK CRANKING FUNCTION |
Check the engine cranking function.
for A/T:When there is fuel in the fuel tank, the key is inside the vehicle and the shift lever is in P, check that depressing the brake pedal and pressing the engine switch cranks the engine. for M/T:When there is fuel in the fuel tank and the key is inside the vehicle, check that depressing the clutch pedal and pressing the engine switch cranks the engine.
- OK:
- Engine cranks.
|
|
||||

| OK | |
|
| 4. READ VALUE USING INTELLIGENT TESTER (L CODE) |
Use the Data List to check if L code certification is functioning properly.
Entry&Start Tester Display
Measurement Item/Range
Normal Condition
Diagnostic Note
L Code Check
L code certification result/NG or OK
OK: L code certification result is normal
NG: L code certification result is abnormal
-
- OK:
- OK is displayed on the intelligent tester.
|
|
||||
| OK | |
|
| 5. READ VALUE USING INTELLIGENT TESTER (ENGINE START CONDITION) |
Use the Data List to check if the engine start is functioning properly.
Entry&Start Tester Display
Measurement Item/Range
Normal Condition
Diagnostic Note
Engine Start Condition
Engine start condition by certification ECU (smart key ECU assembly)/OK or NG
OK: Engine start is permitted
NG: Engine start is prohibited
-
- OK:
- OK is displayed on the intelligent tester.
|
|
||||
| OK | |
|
| 6. READ VALUE USING INTELLIGENT TESTER (S CODE) |
Use the Data List to check if S code certification is functioning properly.
Entry&Start Tester Display
Measurement Item/Range
Normal Condition
Diagnostic Note
S Code Check
S code certification result/NG or OK
OK: S code certification result is normal
NG: S code certification result is abnormal
-
- OK:
- OK is displayed on the intelligent tester.
|
|
||||
| OK | |
|
| 7. REPLACE ID CODE BOX (IMMOBILISER CODE ECU) |
Replace the ID code box (immobiliser code ECU).
Register the recognition code (ECU code).
Check that the engine starts.
Result Result
Proceed to
Engine starts
A
Engine does not start (for 1GR-FE)
B
Engine does not start (for 1UR-FE)
C
Engine does not start (for 3UR-FE)
D
Engine does not start (for 1VD-FTV)
E
|
|
||||
|
|
||||
|
|
||||
|
|
||||
| A | ||
 |
||
| ||
| 8. READ VALUE USING INTELLIGENT TESTER (PARK/NEUTRAL POSITION SWITCH OR CLUTCH START SWITCH) |
Use the Data List to check if the park/neutral position switch (for A/T) or clutch start switch (for M/T) is functioning properly.
Main Body Tester Display
Measurement Item/Range
Normal Condition
Diagnostic Note
Neutral SW/ Clutch SW
Park/neutral position switch (A/T), clutch start switch (M/T)/ON or OFF
ON: Shift lever in P or N (A/T), clutch pedal depressed (M/T)
OFF: Shift lever not in P or N (A/T), clutch pedal released (M/T)
-
Result Result
Proceed to
for A/T:
ON (shift lever in P or N) and OFF (shift lever not in P or N) displayed on the intelligent tester.
A
for M/T:
ON (clutch pedal depressed) and OFF (clutch pedal released) displayed on the intelligent tester.
B
for A/T:
ON (shift lever in P or N) and OFF (shift lever not in P or N) not displayed on the intelligent tester.
for M/T:
ON (clutch pedal depressed) and OFF (clutch pedal released) not displayed on the intelligent tester.
C
|
|
||||
|
|
||||
| A | |
|
| 9. READ VALUE USING INTELLIGENT TESTER (SHIFT LOCK CONTROL ECU) |
Use the Data List to check if the shift position signal is functioning properly.
Main Body Tester Display
Measurement Item/Range
Normal Condition
Diagnostic Note
Shift P Signal
Shift P position signal/ON or OFF
ON: Shift lever in P
OFF: Shift lever not in P
-
- OK:
- ON (shift lever in P) and OFF (shift lever not in P) are displayed on the intelligent tester.
|
|
||||
| OK | |
|
| 10. READ VALUE USING INTELLIGENT TESTER (STOP LIGHT SWITCH) |
Use the Data List to check if the stop light switch is functioning properly.
Main Body Tester Display
Measurement Item/Range
Normal Condition
Diagnostic Note
Stop Light SW
Stop light switch/ON or OFF
ON: Brake pedal is depressed
OFF: Brake pedal is released
-
- OK:
- ON (brake pedal is depressed) and OFF (brake pedal is released) are displayed on the intelligent tester.
|
|
||||
| OK | |
|
| 11. CHECK STEERING LOCK |
Check if the steering lock is released when turning the engine switch on (ACC).
- OK:
- The steering lock is released.
|
|
||||
| OK | |
|
| 12. CHECK MAIN BODY ECU |
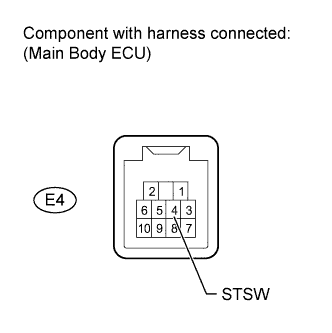 |
Measure the voltage according to the value(s) in the table below.
- HINT:
- The voltage is generated at terminal STSW for 0.3 seconds when the engine cranks.
- Standard Voltage:
Tester Connection
Condition
Specified Condition
E4-4 (STSW) - Body ground
for A/T:
Brake pedal depressed, engine switch depressed
for M/T:
Clutch pedal depressed, engine switch depressed
11 to 14 V
Result Result
Proceed to
Outside specified range
A
Within specified range (for 1GR-FE)
B
Within specified range (for 1UR-FE)
C
Within specified range (for 3UR-FE)
D
Within specified range (for 1VD-FTV)
E
|
|
||||
|
|
||||
|
|
||||
|
|
||||
| A | ||
|
||
| ||
| 13. CHECK HARNESS AND CONNECTOR (MAIN BODY ECU - SHIFT LOCK CONTROL ECU AND BODY GROUND) |
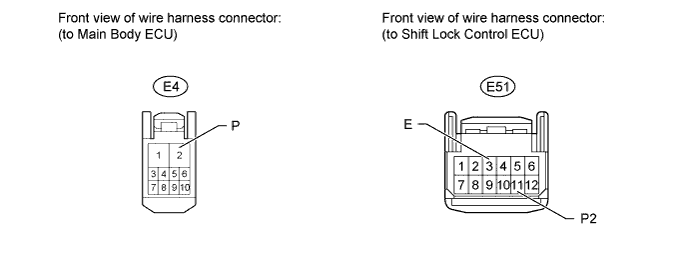
Disconnect the E4 main body ECU connector.
Disconnect the E51 shift lock control ECU connector.
Measure the resistance according to the value(s) in the table below.
- Standard Resistance:
Tester Connection
Condition
Specified Condition
E4-2 (P) - E51-11 (P2)
Always
Below 1 Ω
E51-3 (E) - Body ground
Always
Below 1 Ω
E4-2 (P) or E51-11 (P2) - Body ground
Always
10 kΩ or higher
|
|
||||
| OK | |
|
| 14. INSPECT SHIFT LOCK CONTROL ECU |
Check the signal waveform according to the condition(s) in the table below.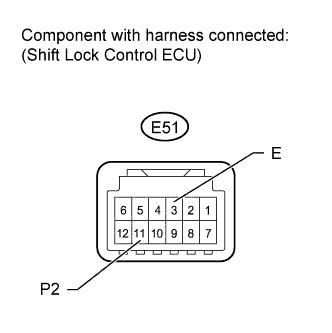
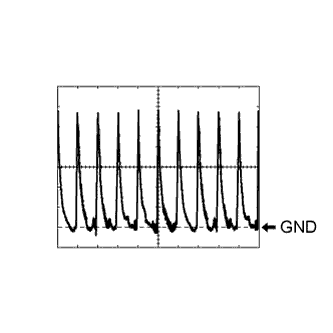
Reference Terminal No. (Symbol)
Tool Setting
Condition
E51-11 (P2) - E51-3 (E)
2 V/DIV., 20 msec./DIV.
Shift lever in P
- OK:
- The waveform is similar to that shown in the illustration.
Result Result
Proceed to
OK
A
NG
for 1GR-FE
B
for 1VD-FTV, 3UR-FE, 1UR-FE
C
|
|
||||
|
|
||||
| A | ||
|
||
| ||
| 15. INSPECT STARTER RELAY (ST) |
Remove the ST relay from the engine room relay block.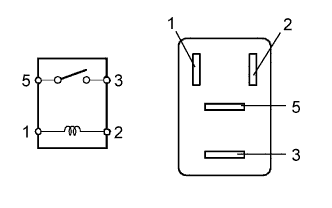
Measure the resistance according to the value(s) in the table below.
- Standard Resistance:
Tester Connection
Condition
Specified Condition
3 - 5
Battery voltage not applied to terminals 1 and 2
10 kΩ or higher
3 - 5
Battery voltage applied to terminals 1 and 2
Below 1 Ω
| Result |
Proceed to |
| Within specified range (for A/T) |
A |
| Within specified range (for M/T) |
B |
| Outside specified range |
C |
|
|
||||
|
|
||||
| A | |
|
| 16. INSPECT PARK/NEUTRAL POSITION SWITCH |
Disconnect the C24 park/neutral position switch connector.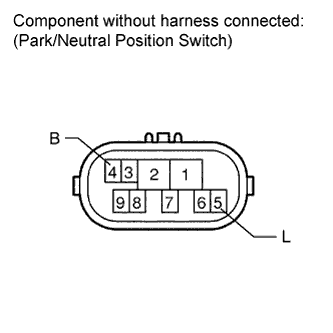
Measure the resistance according to the value(s) in the table below.
- Standard Resistance:
Tester Connection
Condition
Specified Condition
4 (B) - 5 (L)
P
Below 1 Ω
4 (B) - 5 (L)
N
Below 1 Ω
4 (B) - 5 (L)
Not in P or N
10 kΩ or higher
Result Result
Proceed to
Outside specified range (for A750F)
A
Outside specified range (for AB60F)
B
Within specified range
C
|
|
||||
|
|
||||
| A | ||
|
||
| ||
| 17. INSPECT CLUTCH START SWITCH |
Disconnect the A49 (for LHD) or e1 (for RHD) clutch start switch connector.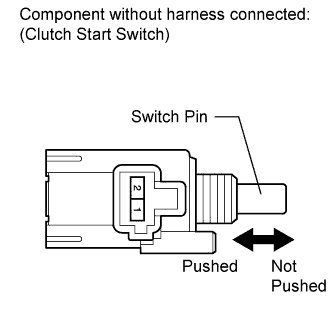
Measure the resistance according to the value(s) in the table below.
- Standard Resistance:
Tester Connection
Condition
Specified Condition
1 - 2
Clutch start switch pin pushed
Below 1 Ω
1 - 2
Clutch start switch pin not pushed
10 kΩ or higher
|
|
||||
| OK | |
|
| 18. CHECK HARNESS AND CONNECTOR (MAIN BODY ECU - PARK/NEUTRAL POSITION SWITCH OR CLUTCH START SWITCH AND BODY GROUND) |
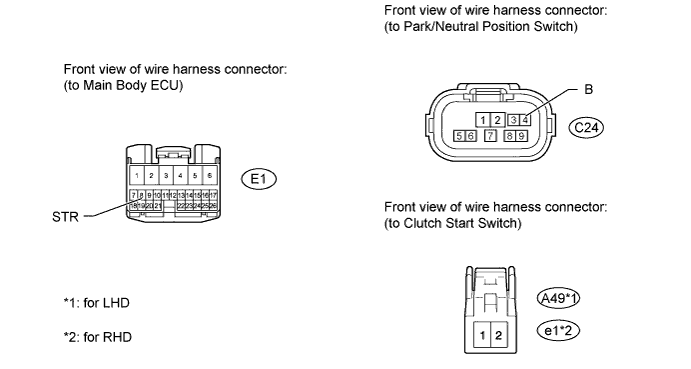
Measure the resistance according to the value(s) in the table below.
- Standard Resistance (for A/T):
Tester Connection
Condition
Specified Condition
E1-8 (STR) - C24-4 (B)
Always
Below 1 Ω
E1-8 (STR) or C24-4 (B) - Body ground
Always
10 kΩ or higher
- Standard Resistance (for M/T):
Tester Connection
Condition
Specified Condition
for LHD:
E1-8 (STR) - A49-1
Always
Below 1 Ω
for LHD:
E1-8 (STR) or A49-1 - Body ground
Always
10 kΩ or higher
for RHD:
E1-8 (STR) - e1-1
Always
Below 1 Ω
for RHD:
E1-8 (STR) or e1-1 - Body ground
Always
10 kΩ or higher
|
|
||||
| OK | |
|
| 19. CHECK HARNESS AND CONNECTOR (PARK/NEUTRAL POSITION SWITCH OR CLUTCH START SWITCH - STARTER RELAY AND BODY GROUND) |
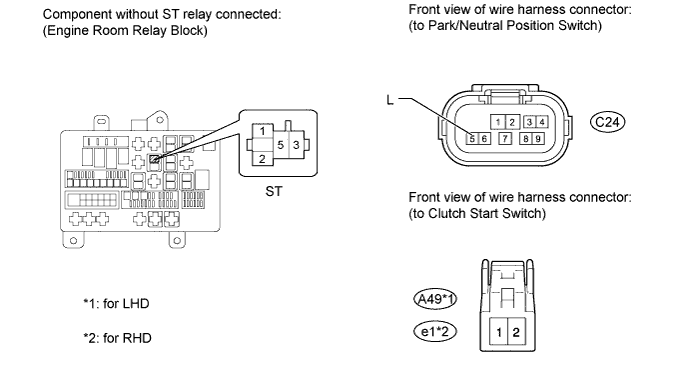
Measure the resistance according to the value(s) in the table below.
- Standard Resistance (for A/T):
Tester Connection
Condition
Specified Condition
C24-5 (L) - Relay block ST relay terminal 1
Always
Below 1 Ω
C24-5 (L) or Relay block ST relay terminal 1 - Body ground
Always
10 kΩ or higher
Relay block ST relay terminal 2 - Body ground
Always
Below 1 Ω
- Standard Resistance (for M/T):
Tester Connection
Condition
Specified Condition
for LHD:
A49-2 - Relay block ST relay terminal 1
Always
Below 1 Ω
for LHD:
A49-2 or Relay block ST relay terminal 1 - Body ground
Always
10 kΩ or higher
for RHD:
e1-2 - Relay block ST relay terminal 1
Always
Below 1 Ω
for RHD:
e1-2 or Relay block ST relay terminal 1 - Body ground
Always
10 kΩ or higher
Relay block ST relay terminal 2 - Body ground
Always
Below 1 Ω
|
|
||||
| OK | ||
|
||
| ||
| 20. INSPECT FUSE (STOP) |
Remove the STOP fuse from the engine room relay block.
Measure the resistance according to the value(s) in the table below.
- Standard Resistance:
Tester Connection
Condition
Specified Condition
STOP fuse
Always
Below 1 Ω
|
|
||||
| OK | |
|
| 21. INSPECT STOP LIGHT SWITCH |
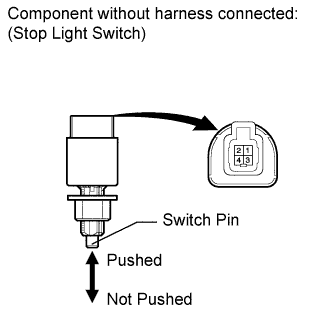 |
Disconnect the A30 stop light switch connector.
Measure the resistance according to the value(s) in the table below.
- Standard Resistance:
Tester Connection
Switch Condition
Specified Condition
1 - 2
Stop light switch pin not pushed
Below 1 Ω
3 - 4
Stop light switch pin pushed
Below 1 Ω
1 - 2
Stop light switch pin pushed
10 kΩ or higher
3 - 4
Stop light switch pin not pushed
10 kΩ or higher
|
|
||||
| OK | |
|
| 22. CHECK HARNESS AND CONNECTOR (MAIN BODY ECU - STOP LIGHT SWITCH AND BODY GROUND) |
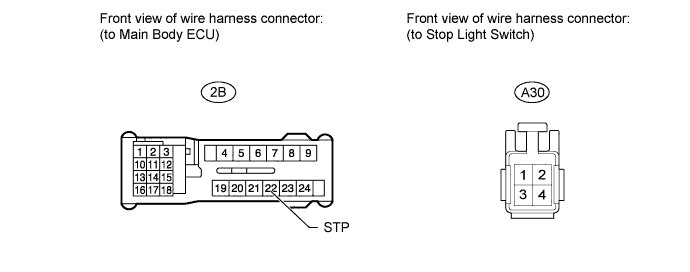
Disconnect the 2B main body ECU connector.
Disconnect the A30 stop light switch connector.
Measure the voltage and resistance according to the value(s) in the table below.
- Standard Voltage:
Tester Connection
Condition
Specified Condition
A30-2 - Body ground
Always
11 to 14 V
- Standard Resistance:
Tester Connection
Condition
Specified Condition
2B-22 (STP) - A30-1
Always
Below 1 Ω
2B-22 (STP) or A30-1 - Body ground
Always
10 kΩ or higher
|
|
||||
| OK | ||
|
||
| ||
| 23. REPLACE STEERING LOCK ACTUATOR ASSEMBLY (STEERING LOCK ECU) |
Replace the steering lock actuator assembly (steering lock ECU).
- HINT:
- For Power tilt and telescopic, use the following procedures Click here
- For Manual tilt and telescopic, use the following procedures Click here
- For Power tilt and telescopic, use the following procedures Click here
Register the recognition code (ECU code).
Check that the engine starts.
- OK:
- Engine starts.
|
|
||||
| OK | ||
|
||
| ||
| 24. REPLACE CERTIFICATION ECU (SMART KEY ECU ASSEMBLY) |
Replace the certification ECU (smart key ECU assembly).
Register the recognition code (ECU code).
Check that the engine starts.
- OK:
- Engine starts.
|
|
||||
| OK | ||
|
||
| ||