1VD-FTV FUEL FUEL INJECTOR(w/o DPF) INSTALLATION
CAUTION / NOTICE / HINT
- NOTICE:
-
When replacing an injector (including interchanging injectors between cylinders) or common rail, replace the corresponding injection pipes with new ones.
PROCEDURE

 1.INSTALL FUEL INJECTOR LH
- NOTICE:
-
Be sure to install the injector, holder clamp and bolt to their original positions.
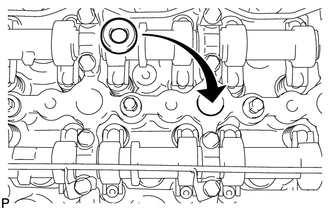
Install 4 new injection nozzle seats to the cylinder head.
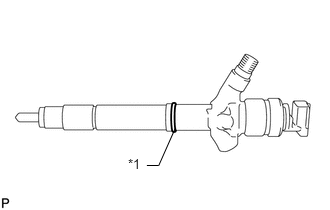
Apply a light coat of clean engine oil to 4 new O-rings.
| *1 | New O-Ring |
Install the O-rings to each injector as shown in the illustration.
Insert the 4 injectors into the cylinder head.
- NOTICE:
- ·
Insert the injector until it touches the nozzle seat surface.
·After installing the injector to the cylinder head, the O-ring may prevent the injector from fully seating. If so, pull out the injector and reinstall it.
·Always return an injector to the same place it was removed from.
For an injector that has been replaced with a new injector, register the injector compensation code.
Temporarily install 4 new washers and the 4 nozzle clamps with the 4 clamp bolts.
- NOTICE:
- ·
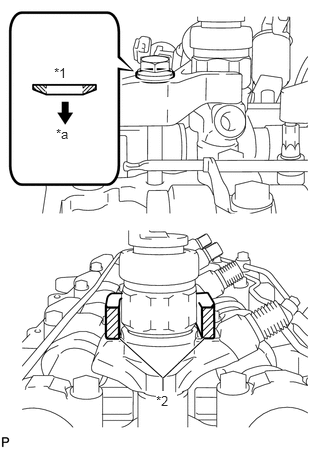 1.25,3.531 1.698,3.938 1.698,3.938 1.698,4.073 true 2.125,3.531 1.698,3.938 true 0.563,0.677 0.719,0.823 0.156,0.146 10 false *1 0.583,1.313 0.75,1.458 0.167,0.146 10 false *a 1.625,4.094 1.844,4.313 0.219,0.219 10 true *2
The fork portion of the nozzle holder clamp must be set on the injector.
·Before tightening the bolts, check that the nozzle holder clamp is set properly.
·To tighten the clamp bolts, first tighten them by hand until they cannot be turned further. Then, tighten the bolts to the specified torque in a later step.
·When tightening the bolts, be careful not to tilt the bolt and clamp.
·Do not reuse the washer.
| *1 | Washer |
| *2 | Nozzle Holder Clamp |
| *a | Downward |
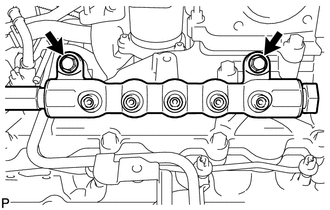
Temporarily install the common rail LH with the 2 bolts.
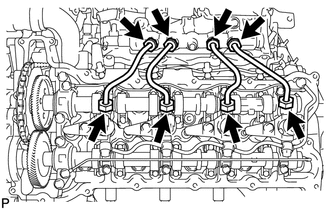
Temporarily install 4 new injection pipes to the common rail and injector.
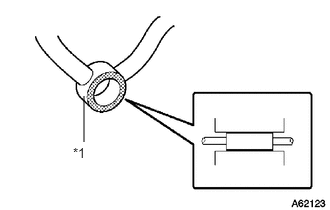
Check the nozzle leakage pipe. Check that there are no scratches or dents on the 5 union seal surfaces. If scratches or dents are present, replace the nozzle leakage pipe.
| *1 | Nozzle Leakage Pipe |
Set the leakage pipe and 5 new gaskets in place.
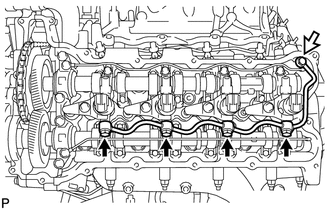
Temporarily install the leakage pipe with the 4 hollow screws and union bolt.

|
Union Bolt |
- HINT:
-
To position the injectors, loosely tighten the 4 hollow screws and union bolt.
Tighten the 4 holder clamp bolts.
- Torque:
- 25 N*m (255 kgf*cm, 18 ft.*lbf)
Remove the 4 injection pipes.
Remove the 2 bolts and common rail LH.
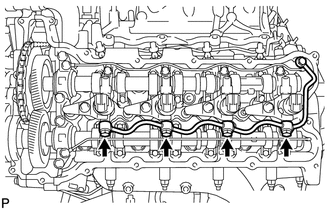
Tighten the 4 hollow screws.
- Torque:
- 18 N*m (184 kgf*cm, 13 ft.*lbf)
- NOTICE:
-
If a hollow screw is accidentally tightened beyond the torque specification, it must be replaced together with the nozzle leakage pipe.
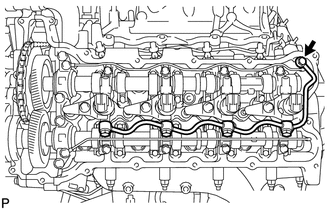
Tighten the union bolt.
- Torque:
- 21 N*m (214 kgf*cm, 15 ft.*lbf)
- NOTICE:
-
If the union bolt is accidentally tightened beyond the torque specification, it must be replaced together with the nozzle leakage pipe.
2.INSTALL FUEL INJECTOR RH
- NOTICE:
-
Be sure to install the injector, holder clamp and bolt to their original positions.
Install 4 new injection nozzle seats to the cylinder head.
Apply a light coat of clean engine oil to 4 new O-rings.
| *1 | New O-Ring |
Install the O-rings to each injector as shown in the illustration.
Insert the 4 injectors into the cylinder head.
- NOTICE:
- ·
Insert the injector until it touches the nozzle seat surface.
·After installing the injector to the cylinder head, the O-ring may prevent the injector from fully seating. If so, pull out the injector and reinstall it.
·Always return an injector to the same place it was removed from.
For an injector that has been replaced with a new injector, register the injector compensation code.
Temporarily install 4 new washers and the 4 nozzle clamps with the 4 clamp bolts.
- NOTICE:
- ·
1.25,3.531 1.698,3.938 1.698,3.938 1.698,4.073 true 2.125,3.531 1.698,3.938 true 0.563,0.677 0.719,0.823 0.156,0.146 10 false *1 0.583,1.313 0.75,1.458 0.167,0.146 10 false *a 1.625,4.094 1.844,4.313 0.219,0.219 10 true *2
The fork portion of the nozzle holder clamp must be set on the injector.
·Before tightening the bolts, check that the nozzle holder clamp is set properly.
·To tighten the clamp bolts, first tighten them by hand until they cannot be turned further. Then, tighten the bolts to the specified torque in a later step.
·When tightening the bolts, be careful not to tilt the bolt and clamp.
·Do not reuse the washer.
| *1 | Washer |
| *2 | Nozzle Holder Clamp |
| *a | Downward |
Temporarily install 4 new injection pipes to the common rail and injector.
Check the nozzle leakage pipe. Check that there are no scratches or dents on the 5 union seal surfaces. If scratches or dents are present, replace the nozzle leakage pipe.
| *1 | Nozzle Leakage Pipe |
Set the leakage pipe and 5 new gaskets in place.
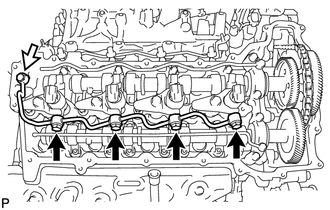
Temporarily install the leakage pipe with the 4 hollow screws and union bolt.
|
|
Union Bolt |
- HINT:
-
To position the injectors, loosely tighten the 4 hollow screws and union bolt.
Tighten the 4 holder clamp bolts.
- Torque:
- 25 N*m (255 kgf*cm, 18 ft.*lbf)
Remove the 4 injection pipes.
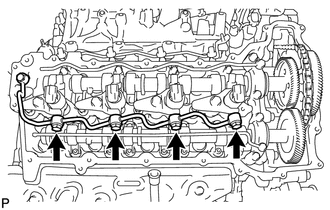
Tighten the 4 hollow screws.
- Torque:
- 18 N*m (184 kgf*cm, 13 ft.*lbf)
- NOTICE:
-
If a hollow screw is accidentally tightened beyond the torque specification, it must be replaced together with the nozzle leakage pipe.
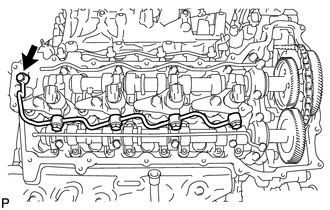
Tighten the union bolt.
- Torque:
- 21 N*m (214 kgf*cm, 15 ft.*lbf)
- NOTICE:
-
If the union bolt is accidentally tightened beyond the torque specification, it must be replaced together with the nozzle leakage pipe.
23682A
3.INSTALL NOZZLE HOLDER GASKET RH
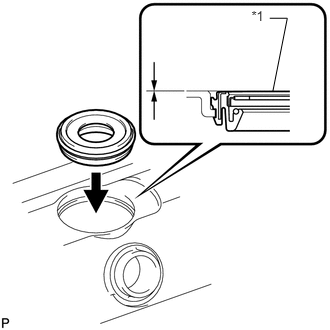
Press 4 new nozzle holder gaskets into the cylinder head cover RH.
- NOTICE:
-
After installing the nozzle holder gasket, check that it does not protrude from the cylinder head cover.
| *1 | Nozzle Holder Gasket |
11201
4.INSTALL CYLINDER HEAD COVER SUB-ASSEMBLY RH
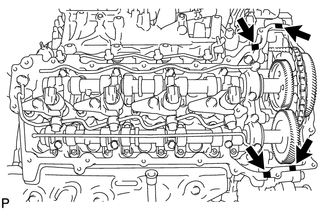
Apply seal packing as shown in the illustration.
- Seal packing:
Toyota Genuine Seal Packing Black, Three Bond 1207B or equivalent

|
Seal Packing |
- NOTICE:
- ·
Remove any oil from the contact surface.
·Install the cylinder head cover within 3 minutes and tighten the bolts within 15 minutes after applying seal packing.
·Do not start the engine for at least 2 hours after the installation.
Install a new gasket to the cylinder head cover.
- NOTICE:
-
Remove any oil from the contact surface.
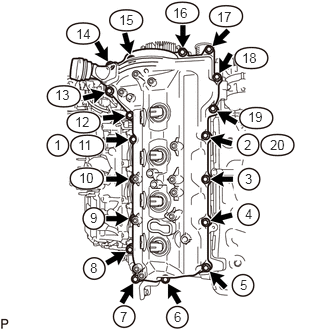
Temporarily install the cylinder head cover with the 18 bolts. Tighten the 18 bolts in the order shown in the illustration.
- Torque:
- 10 N*m (102 kgf*cm, 7 ft.*lbf)
- HINT:
-
After tightening the bolts, check that the bolts at step 11 and 20 are tightened to the specified torque.
23681D
5.INSTALL NOZZLE HOLDER SEAL RH
Press 4 new holder seals into the cylinder head cover RH.
11224
6.INSTALL CYLINDER HEAD COVER SILENCER RH (w/ Intercooler)
Install the cylinder head cover silencer with the 3 bolts.
- Torque:
- 5.0 N*m (51 kgf*cm, 44 in.*lbf)
12262
7.INSTALL NO. 2 VENTILATION HOSE
23682B
8.INSTALL NOZZLE HOLDER GASKET LH
Press 4 new nozzle holder gaskets into the cylinder head cover LH.
- NOTICE:
-
After installing the nozzle holder gasket, check that it does not protrude from the cylinder head cover.
| *1 | Nozzle Holder Gasket |
11202
9.INSTALL CYLINDER HEAD COVER SUB-ASSEMBLY LH
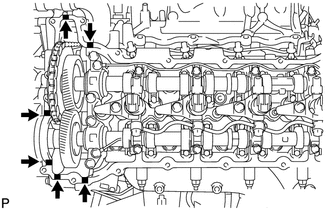
Apply seal packing as shown in the illustration.
- Seal packing:
Toyota Genuine Seal Packing Black, Three Bond 1207B or equivalent
|
|
Seal Packing |
- NOTICE:
- ·
Remove any oil from the contact surface.
·Install the cylinder head cover within 3 minutes and tighten the bolts within 15 minutes after applying seal packing.
·Do not start the engine for at least 2 hours after the installation.
Install a new gasket to the cylinder head cover.
- NOTICE:
-
Remove any oil from the contact surface.
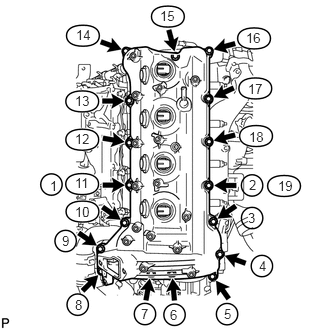
Temporarily install the cylinder head cover with the 17 bolts. Tighten the 17 bolts in the order shown in the illustration.
- Torque:
- 10 N*m (102 kgf*cm, 7 ft.*lbf)
- HINT:
-
After tightening the bolts, check that the bolts at step 11 and 19 are tightened to the specified torque.
12270
10.INSTALL OIL SEPARATOR ASSEMBLY
Install a new gasket to the oil separator.
- NOTICE:
-
Remove any oil from the contact surface.
Install the oil separator with the 3 bolts.
- Torque:
- 10 N*m (102 kgf*cm, 7 ft.*lbf)
23681E
11.INSTALL NOZZLE HOLDER SEAL LH
Press 4 new holder seals into the cylinder head cover LH.
11225
12.INSTALL CYLINDER HEAD COVER SILENCER LH (w/ Intercooler)
Install the cylinder head cover silencer with the 3 bolts.
- Torque:
- 5.0 N*m (51 kgf*cm, 44 in.*lbf)
12263
13.INSTALL NO. 3 VENTILATION HOSE
25706
14.INSTALL NO. 1 VACUUM TRANSMITTING PIPE SUB-ASSEMBLY
Install the vacuum transmitting pipe with the 3 bolts.
- Torque:
- 6.0 N*m (61 kgf*cm, 53 in.*lbf)
w/ Intercooler:
Connect the 2 vacuum hoses.
25860
15.INSTALL NO. 1 VACUUM SWITCHING VALVE ASSEMBLY (for Engine Mounting)
Install the vacuum switching valve with the bolt.
- Torque:
- 6.0 N*m (61 kgf*cm, 53 in.*lbf)
Connect the 2 vacuum hoses.
16.INSTALL NO. 2 ENGINE WIRE
23702
17.INSTALL INJECTION PIPE RH
23801L
18.INSTALL FUEL FILTER TO INJECTION PUMP FUEL PIPE SUB-ASSEMBLY
23820A
19.INSTALL COMMON RAIL ASSEMBLY LH
23701
20.INSTALL INJECTION PIPE LH
23706
21.INSTALL NO. 6 INJECTION PIPE SUB-ASSEMBLY
23802E
22.INSTALL NO. 2 FUEL PIPE SUB-ASSEMBLY
23.CONNECT ENGINE WIRE
16288
24.INSTALL NO. 4 WATER BY-PASS PIPE
16268M
25.INSTALL NO. 3 WATER BY-PASS PIPE (w/o Viscous Heater)
23274D
26.CONNECT FUEL HOSE
17885
27.INSTALL NO. 1 AIR CLEANER PIPE SUB-ASSEMBLY
87208
28.INSTALL HEATER WATER PIPE SUB-ASSEMBLY (w/ Viscous Heater)
17806
29.INSTALL NO. 2 AIR CLEANER PIPE SUB-ASSEMBLY
17364
30.INSTALL NO. 4 AIR TUBE
17342D
31.INSTALL NO. 2 AIR HOSE
17363K
32.INSTALL NO. 3 AIR TUBE
17861
33.INSTALL INTAKE AIR CONNECTOR
17881
34.TEMPORARILY INSTALL NO. 1 AIR CLEANER HOSE
17705
35.INSTALL AIR CLEANER CAP SUB-ASSEMBLY
26100G
36.INSTALL DIESEL THROTTLE BODY ASSEMBLY LH
17947B
37.INSTALL NO. 3 INTERCOOLER SUPPORT BRACKET
23265
38.INSTALL NO. 1 GAS FILTER
31489
39.INSTALL TUBE CONNECTOR TO FLEXIBLE HOSE TUBE (for Manual Transmission)
17972
40.INSTALL AIR TUBE SUB-ASSEMBLY LH
31418
41.INSTALL CLUTCH HOSE (for Manual Transmission)
42.INSTALL DIESEL THROTTLE BODY ASSEMBLY RH
17971
43.INSTALL AIR TUBE SUB-ASSEMBLY RH
44.INSTALL NO. 2 ENGINE OIL LEVEL DIPSTICK GUIDE
87209
45.CONNECT WATER HOSE SUB-ASSEMBLY
17972
46.INSTALL NO. 2 COOL AIR INLET (w/o Intercooler)
17973
47.INSTALL NO. 1 COOL AIR INLET (w/o Intercooler)
17940D
48.INSTALL INTERCOOLER ASSEMBLY (w/ Intercooler)
49.BLEED CLUTCH LINE (for Manual Transmission)
50.INSPECT FOR CLUTCH FLUID LEAK (for Manual Transmission)
51.CONNECT CABLE TO NEGATIVE BATTERY TERMINAL
- NOTICE:
-
When disconnecting the cable, some systems need to be initialized after the cable is reconnected (See page General>INTRODUCTION>REPAIR INSTRUCTION>INITIALIZATION).
Connect the cables to the negative (-) main battery and sub-battery terminals.
52.REGISTER INJECTOR COMPENSATION CODE
53.ADD ENGINE COOLANT
54.INSPECT FOR COOLANT LEAK
55.INSPECT FOR FUEL LEAK
56.INSPECT FOR OIL LEAK
53292A
57.INSTALL UPPER RADIATOR SUPPORT SEAL
51405A
58.INSTALL NO. 1 ENGINE UNDER COVER SUB-ASSEMBLY
53805
59.INSTALL FRONT FENDER SPLASH SHIELD SUB-ASSEMBLY RH
53806
60.INSTALL FRONT FENDER SPLASH SHIELD SUB-ASSEMBLY LH