1VD-FTV EMISSION CONTROL EXHAUST FUEL ADDITION INJECTOR(for DPF) INSTALLATION
CAUTION / NOTICE / HINT
- NOTICE:
- ·
When replacing an injector (including interchanging injectors between cylinders) or common rail, replace the corresponding injection pipes with new ones.
·When fuel lines are disconnected, air may enter the fuel lines, leading to engine starting trouble. Therefore, perform forced regeneration and bleed the air from the fuel lines (See page Engine / Hybrid System>1VD-FTV (EMISSION CONTROL)>EMISSION CONTROL SYSTEM>ON-VEHICLE INSPECTION).
PROCEDURE

 23255B
1.INSTALL FUEL INJECTOR SEAL
Install 2 new fuel injector seals.
23710B
2.INSTALL EXHAUST FUEL ADDITION INJECTOR ASSEMBLY
- NOTICE:
-
If there is foreign matter on the installation surface of the exhaust fuel addition injector, be sure to clean it before installation.
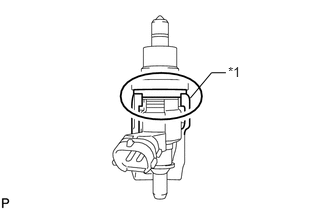
Install 2 new gaskets, the 2 exhaust fuel addition injectors, 2 nozzle holder clamps and 2 new washers with the 2 bolts.
- Torque:
- 28 N*m (286 kgf*cm, 21 ft.*lbf)
- HINT:
-
Align the nozzle holder clamp with the cutouts of the injector as shown in the illustration.
| *1 | Nozzle Holder Clamp |
23901H
3.CONNECT FUEL TUBE SUB-ASSEMBLY
Connect the 2 fuel tube connectors to the exhaust fuel addition injector.
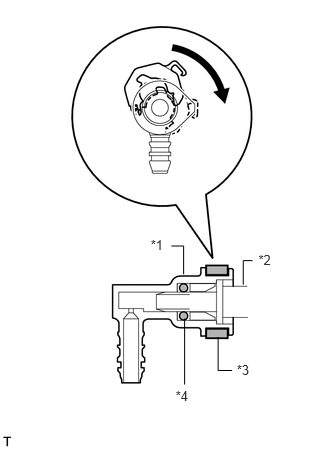
Turn the 2 retainers in the direction indicated by the arrow until they make a "click" sound.
- NOTICE:
- ·
If the fuel tube connector is not inserted to the correct position on the injector, the retainer cannot be turned far enough in the direction of the arrow.
·Before connecting the fuel tube connector and fuel pipe, check that there is no damage or foreign matter on the connecting part of the fuel pipe.
·After connecting the fuel tube connector and fuel pipe, check that they are securely connected by trying to pull them apart.
| *1 | Fuel Tube Connector |
| *2 | Exhaust Fuel Addition Injector |
| *3 | Retainer |
| *4 | O-Ring |
23711
4.INSTALL NO. 1 FUEL INJECTOR PROTECTOR
11224
5.INSTALL CYLINDER HEAD COVER SILENCER RH
23712
6.INSTALL NO. 2 FUEL INJECTOR PROTECTOR
11225
7.INSTALL CYLINDER HEAD COVER SILENCER LH
25706
8.INSTALL NO. 1 VACUUM TRANSMITTING PIPE SUB-ASSEMBLY
25860
9.INSTALL NO. 1 VACUUM SWITCHING VALVE ASSEMBLY
10.CONNECT ENGINE WIRE
16268M
11.INSTALL NO. 3 WATER BY-PASS PIPE (w/o Viscous Heater)
23274D
12.CONNECT FUEL HOSE
17885
13.INSTALL NO. 1 AIR CLEANER PIPE SUB-ASSEMBLY
87208
14.INSTALL HEATER WATER PIPE SUB-ASSEMBLY (w/ Viscous Heater)
17806
15.INSTALL NO. 2 AIR CLEANER PIPE SUB-ASSEMBLY
17364
16.INSTALL NO. 4 AIR TUBE
17342D
17.INSTALL NO. 2 AIR HOSE
17363K
18.INSTALL NO. 3 AIR TUBE
17341F
19.INSTALL NO. 1 AIR HOSE
17861
20.INSTALL INTAKE AIR CONNECTOR
17881
21.TEMPORARILY INSTALL NO. 1 AIR CLEANER HOSE
17705
22.INSTALL AIR CLEANER CAP SUB-ASSEMBLY
26100G
23.INSTALL DIESEL THROTTLE BODY ASSEMBLY LH
17947B
24.INSTALL NO. 3 INTERCOOLER SUPPORT BRACKET
23265
25.INSTALL NO. 1 GAS FILTER
17972
26.INSTALL AIR TUBE SUB-ASSEMBLY LH
27.INSTALL DIESEL THROTTLE BODY ASSEMBLY RH
17971
28.INSTALL AIR TUBE SUB-ASSEMBLY RH
29.INSTALL NO. 2 ENGINE OIL LEVEL DIPSTICK GUIDE
87209
30.CONNECT WATER HOSE SUB-ASSEMBLY
17940D
31.INSTALL INTERCOOLER ASSEMBLY
32.CONNECT CABLE TO NEGATIVE BATTERY TERMINAL
- NOTICE:
-
When disconnecting the cable, some systems need to be initialized after the cable is reconnected (See page General>INTRODUCTION>REPAIR INSTRUCTION>INITIALIZATION).
33.ADD ENGINE COOLANT
34.BLEED AIR FROM FUEL SYSTEM
35.PERFORM DPF FORCIBLE REGENERATION PROCEDURE
36.INSPECT FOR COOLANT LEAK
37.INSPECT FOR FUEL LEAK
38.INSPECT FOR OIL LEAK
53292A
39.INSTALL UPPER RADIATOR SUPPORT SEAL
51405A
40.INSTALL NO. 1 ENGINE UNDER COVER SUB-ASSEMBLY
53805
41.INSTALL FRONT FENDER SPLASH SHIELD SUB-ASSEMBLY RH
53806
42.INSTALL FRONT FENDER SPLASH SHIELD SUB-ASSEMBLY LH