SUSPENSION CONTROL STABILIZER CONTROL VALVE(w/ KDSS) INSTALLATION
PROCEDURE

 48860A
1.INSTALL STABILIZER CONTROL WITH ACCUMULATOR HOUSING ASSEMBLY
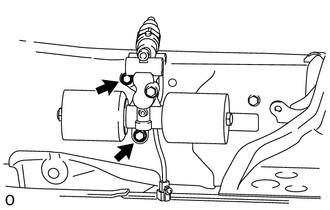
Install the stabilizer control with accumulator housing with the 2 bolts.
- Torque:
- 32 N*m (326 kgf*cm, 24 ft.*lbf)
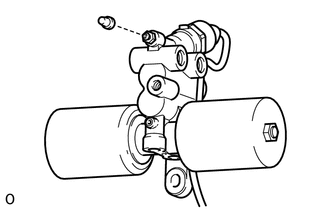
Install the bleeder plug.
- Torque:
- 8.3 N*m (85 kgf*cm, 73 in.*lbf)
- HINT:
-
The bleeder plug cap will be installed after bleeding air.
48880A
2.CONNECT REAR NO. 2 STABILIZER CONTROL TUBE ASSEMBLY
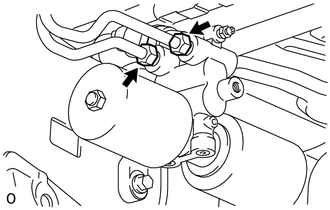
Connect the rear No. 2 stabilizer control tube to the stabilizer control with accumulator housing.
48880
3.TEMPORARILY INSTALL REAR NO. 1 STABILIZER CONTROL TUBE ASSEMBLY (for Stabilizer Control Adapter 2 Type)
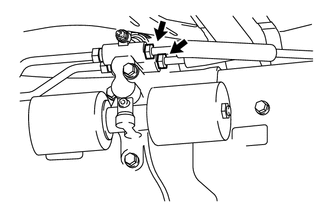
Temporarily install the rear No. 1 stabilizer control tube to the stabilizer control with accumulator housing.
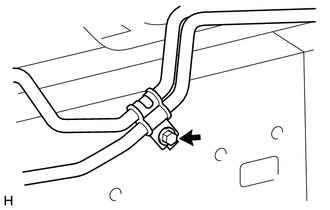
Install the bolt to the vehicle.
- Torque:
- 29 N*m (296 kgf*cm, 21 ft.*lbf)
48890A
4.TEMPORARILY INSTALL FRONT NO. 2 STABILIZER CONTROL TUBE ASSEMBLY (for Stabilizer Control Adapter 2 Type)
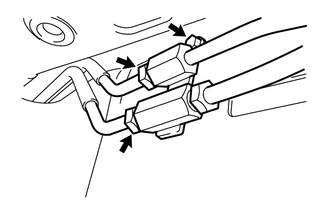
Temporarily install the front No. 2 stabilizer control tube to the front No. 1 stabilizer control tube.
Install the bolt to the vehicle.
- Torque:
- 29 N*m (296 kgf*cm, 21 ft.*lbf)
48890A
5.TEMPORARILY INSTALL FRONT NO. 2 AND REAR NO. 1 STABILIZER CONTROL TUBE ASSEMBLY (for Stabilizer Control Adapter 2 Type)
Temporarily install the front No. 2 and rear No. 1 stabilizer control tube to the 2 stabilizer control adapters.
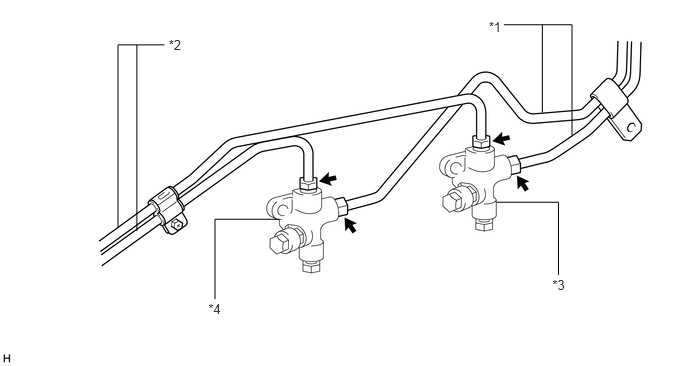
| *1 | Rear No. 1 Stabilizer Control Tube | *2 | Front No. 2 Stabilizer Control Tube |
| *3 | Stabilizer Control Adapter for Upper Chamber Side | *4 | Stabilizer Control Adapter for Lower Chamber Side |
48890A
6.TEMPORARILY INSTALL FRONT NO. 2 STABILIZER CONTROL TUBE ASSEMBLY (for Stabilizer Control Adapter 1 Type)
Temporarily install the front No. 2 stabilizer control tube to the front No. 1 stabilizer control tube, stabilizer control adapter for lower chamber side and stabilizer control with accumulator housing assembly.
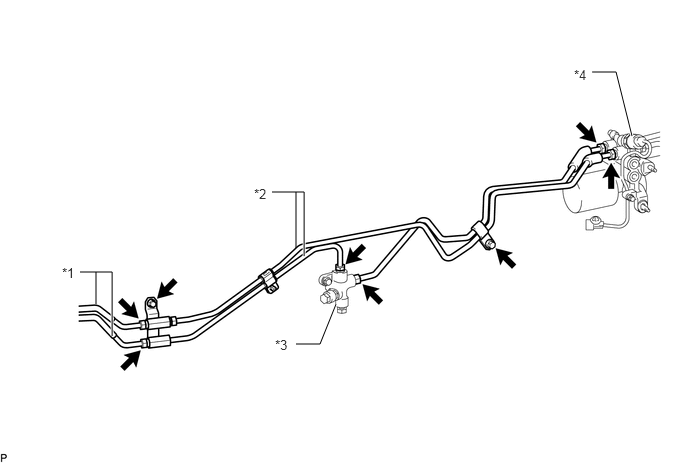
| *1 | Front No. 1 Stabilizer Control Tube | *2 | Front No. 2 Stabilizer Control Tube |
| *3 | Stabilizer Control Adapter for Lower Chamber Side | *4 | Stabilizer Control with Accumulator Housing Assembly |
Install the 2 bolts to the vehicle.
- Torque:
- 29 N*m (296 kgf*cm, 21 ft.*lbf)
7.INSTALL STABILIZER CONTROL ADAPTER SUB-ASSEMBLY
Install the 2 stabilizer control adapters to the vehicle with the 2 bolts.
- Torque:
- 32 N*m (326 kgf*cm, 24 ft.*lbf)
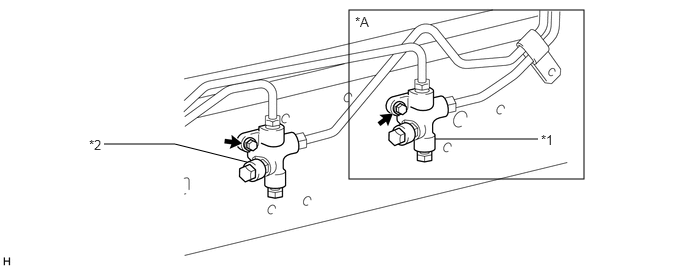
| *A | for Stabilizer Control Adapter 2 Type | - | - |
| *1 | Stabilizer Control Adapter for Upper Chamber Side | *2 | Stabilizer Control Adapter for Lower Chamber Side |
48880
8.TIGHTEN REAR NO. 1 STABILIZER CONTROL TUBE ASSEMBLY (for Stabilizer Control Adapter 2 Type)
Using a union nut wrench, tighten the rear No. 1 stabilizer control tube.
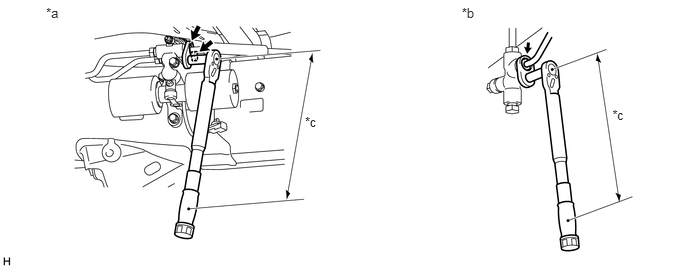
| *a | Stabilizer Control with Accumulator Housing Side | *b | Stabilizer Control Adapter Side |
| *c | Torque Wrench Fulcrum Length | - | - |
- Torque:
- Specified tightening torque : 44 N*m (450 kgf*cm, 33 ft.*lbf)
- HINT:
- ·
Calculate the torque wrench reading when changing the fulcrum length of the torque wrench (See page General>INTRODUCTION>REPAIR INSTRUCTION>PRECAUTION).
·When using a union nut wrench (fulcrum length of 30 mm (1.181 in.)) + torque wrench (fulcrum length of 255 mm (10.039 in.)): 40 N*m (403 kgf*cm, 29 ft.*lbf)
48890A
9.TIGHTEN FRONT NO. 2 STABILIZER CONTROL TUBE ASSEMBLY (for Stabilizer Control Adapter 2 Type)
Using a union nut wrench, tighten the front No. 2 stabilizer control tube.
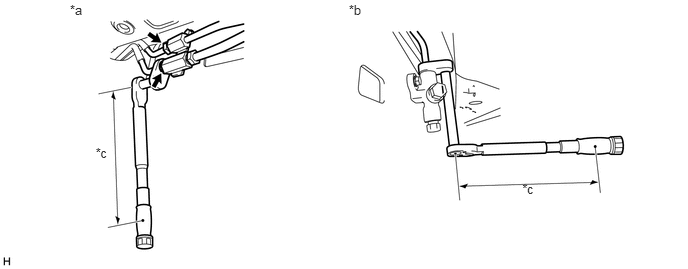
| *a | Front No. 1 Stabilizer Control Tube Side | *b | Stabilizer Control Adapter Side |
| *c | Torque Wrench Fulcrum Length | - | - |
- Torque:
- Specified tightening torque : 44 N*m (450 kgf*cm, 33 ft.*lbf)
- HINT:
- ·
Calculate the torque wrench reading when changing the fulcrum length of the torque wrench (See page General>INTRODUCTION>REPAIR INSTRUCTION>PRECAUTION).
·When using a union nut wrench (fulcrum length of 30 mm (1.181 in.)) + torque wrench (fulcrum length of 255 mm (10.039 in.)): 40 N*m (403 kgf*cm, 29 ft.*lbf)
48890A
10.TIGHTEN FRONT NO. 2 STABILIZER CONTROL TUBE ASSEMBLY (for Stabilizer Control Adapter 1 Type)
Using a union nut wrench, tighten the front No. 2 stabilizer control tube.
| *a | Torque Wrench Fulcrum Length | - | - |
- Torque:
- Specified tightening torque : 44 N*m (450 kgf*cm, 33 ft.*lbf)
- HINT:
- ·
Calculate the torque wrench reading when changing the fulcrum length of the torque wrench (See pageGeneral>INTRODUCTION>REPAIR INSTRUCTION>PRECAUTION).
·When using a union nut wrench (fulcrum length of 30 mm (1.181 in.)) + torque wrench (fulcrum length of 255 mm (10.039 in.)): 40 N*m (403 kgf*cm, 29 ft.*lbf)
48880A
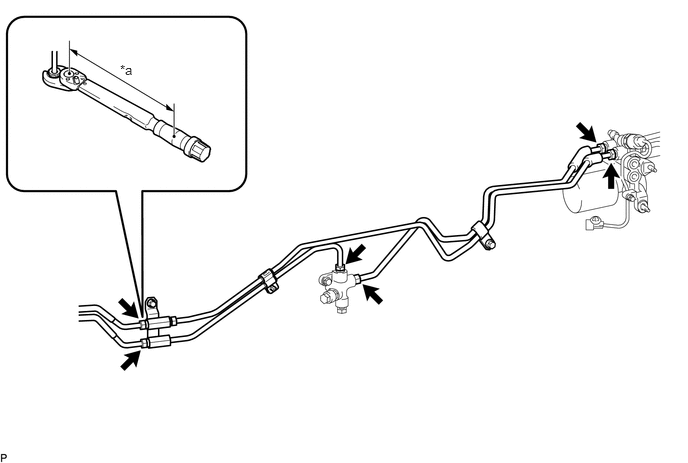
11.TIGHTEN REAR NO. 2 STABILIZER CONTROL TUBE ASSEMBLY (for Stabilizer Control Adapter 2 Type)
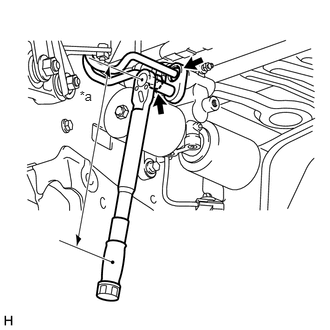
Using a union nut wrench, tighten the rear No. 2 stabilizer control tube.
| *a | Torque Wrench Fulcrum Length |
- Torque:
- Specified tightening torque : 44 N*m (450 kgf*cm, 33 ft.*lbf)
- HINT:
- ·
Calculate the torque wrench reading when changing the fulcrum length of the torque wrench (See page General>INTRODUCTION>REPAIR INSTRUCTION>PRECAUTION).
·When using a union nut wrench (fulcrum length of 30 mm (1.181 in.)) + torque wrench (fulcrum length of 255 mm (10.039 in.)): 40 N*m (403 kgf*cm, 29 ft.*lbf)
17420
12.INSTALL CENTER EXHAUST PIPE ASSEMBLY
for 1GR-FE:
Install the center exhaust pipe (See page Engine / Hybrid System>1GR-FE (INTAKE / EXHAUST)>EXHAUST PIPE>INSTALLATION).
for 1UR-FE:
Install the center exhaust pipe (See page Engine / Hybrid System>1UR-FE (INTAKE / EXHAUST)>EXHAUST PIPE>INSTALLATION).
for 3UR-FE:
Install the center exhaust pipe (See page Engine / Hybrid System>3UR-FE (INTAKE / EXHAUST)>EXHAUST PIPE>INSTALLATION).
for 1VD-FTV:
Install the center exhaust pipe (See page Engine / Hybrid System>1VD-FTV (INTAKE / EXHAUST)>EXHAUST PIPE(w/o DPF)>INSTALLATION).
17430
13.INSTALL TAILPIPE ASSEMBLY
for 1GR-FE:
Install the tailpipe (See page Engine / Hybrid System>1GR-FE (INTAKE / EXHAUST)>EXHAUST PIPE>INSTALLATION).
for 1UR-FE:
Install the tailpipe (See page Engine / Hybrid System>1UR-FE (INTAKE / EXHAUST)>EXHAUST PIPE>INSTALLATION).
for 3UR-FE:
Install the tailpipe (See page Engine / Hybrid System>3UR-FE (INTAKE / EXHAUST)>EXHAUST PIPE>INSTALLATION).
for 1VD-FTV:
Install the tailpipe (See page Engine / Hybrid System>1VD-FTV (INTAKE / EXHAUST)>EXHAUST PIPE(w/o DPF)>INSTALLATION).
14.BLEED AIR FROM SUSPENSION FLUID
Bleed the air from the suspension fluid (See page Suspension>SUSPENSION CONTROL>SUSPENSION CONTROL SYSTEM (w/ KDSS)>BLEEDING).
15.INSPECT FOR SUSPENSION FLUID LEAK
16.INSPECT FOR EXHAUST GAS LEAK
If gas is leaking, tighten the areas necessary to stop the leak. Replace damaged parts as necessary.
17.MEASURE VEHICLE HEIGHT
48860D
18.CLOSE STABILIZER CONTROL WITH ACCUMULATOR HOUSING SHUTTER VALVE
- NOTICE:
- ·
Perform the inspection on a level surface.
·Ensure that the wheels are on the ground and facing straight ahead.
·Perform the inspection with the vehicle load completely on the suspension.
- HINT:
- ·
Perform this step with the fuel tank full.
·If there are any parts installed to the vehicle which place any unbalanced load on the left or right side of the vehicle, remove them.
Using a 5 mm socket hexagon wrench or an 8 mm socket wrench, tighten the lower and upper chamber shutter valves of the stabilizer control with accumulator housing.
- Torque:
- 14 N*m (140 kgf*cm, 10 ft.*lbf)
48826D
19.INSTALL STABILIZER CONTROL VALVE PROTECTOR
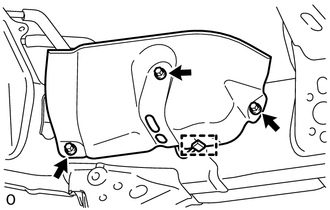
Install the valve protector with the 3 bolts.
- Torque:
- 18 N*m (184 kgf*cm, 13 ft.*lbf)
Attach the clamp, and connect the connector to the valve protector.