FRONT SUSPENSION FRONT SHOCK ABSORBER INSTALLATION
CAUTION / NOTICE / HINT
- HINT:
- ·
Use the same procedures for the RH side and LH side.
·The procedures listed below are for the LH side.
·A bolt without a torque specification is shown in the standard bolt chart (See page General>SPECIFICATIONS>STANDARD BOLT>SPECIFIED TORQUE FOR STANDARD BOLTS).
PROCEDURE

 1.TEMPORARILY INSTALL FRONT SHOCK ABSORBER WITH COIL SPRING
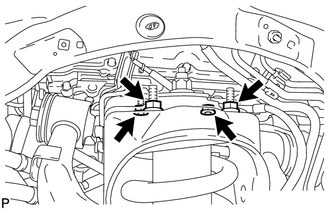
Temporarily install the upper side of the shock absorber to the chassis frame with the 4 nuts.
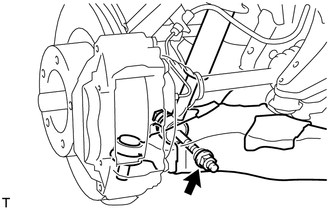
Temporarily install the lower side of the shock absorber to the lower suspension arm with the bolt and nut.
49162B
2.CONNECT NO. 2 SUSPENSION CONTROL PRESSURE HOSE (w/ Active Height Control)
Apply MP grease to the O-ring and back -up ring of the suspension control pressure hose.
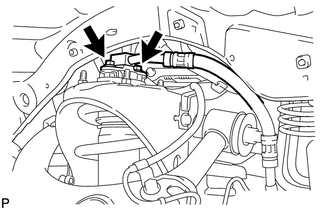
Connect the suspension control pressure hose to the shock absorber with the 2 bolts.
- Torque:
- 18 N*m (184 kgf*cm, 13 ft.*lbf)
- NOTICE:
-
Do not allow any foreign matter such as dirt and dust to enter the suspension control pressure hose from the connecting point.
3.BLEED AIR FROM SUSPENSION FLUID (w/ Active Height Control)
4.CHECK FLUID LEVEL IN RESERVOIR (w/ Active Height Control)
5.INSPECT FOR SUSPENSION FLUID LEAK (w/ Active Height Control)
43212
6.CONNECT STEERING KNUCKLE LH
89516
7.CONNECT SKID CONTROL SENSOR WIRE
53785B
8.INSTALL FRONT FENDER APRON TRIM PACKING D (w/ Active Height Control)
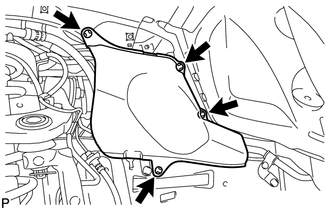
Install the apron trim packing with the 4 clips.
53783
9.INSTALL FRONT FENDER APRON TRIM PACKING B (w/ Active Height Control)
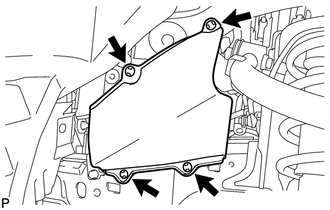
Install the apron trim packing with the 4 clips.
48820B
10.TEMPORARILY INSTALL FRONT STABILIZER LINK ASSEMBLY RH
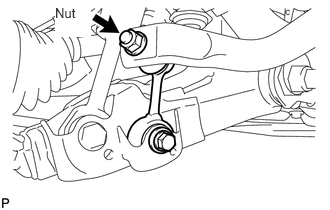
Temporarily install the stabilizer link with the bolt.
Temporarily install the stabilizer link with the nut.
Tighten the nut.
- Torque:
- 128 N*m (1305 kgf*cm, 94 ft.*lbf)
48810
11.TEMPORARILY INSTALL FRONT STABILIZER LINK ASSEMBLY LH (w/ KDSS)
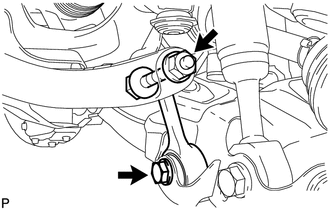
Temporarily install the stabilizer link to the lower arm with the bolt.
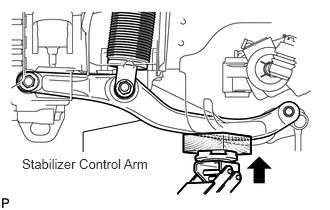
Temporarily install the stabilizer link to the stabilizer control arm with the bolt and nut.
- HINT:
-
If the front stabilizer control cylinder extends and it is difficult to temporarily install the stabilizer link to the stabilizer control arm, raise the stabilizer control arm with a jack and temporarily install the stabilizer link.
48810
12.TEMPORARILY INSTALL FRONT STABILIZER LINK ASSEMBLY LH (w/o KDSS)
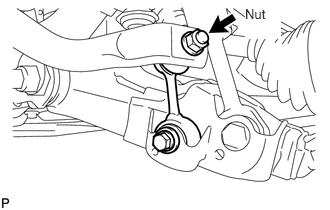
Temporarily install the stabilizer link with the nut and bolt.
Tighten the nut.
T = 128 N*m{ 1305 kgf*cm }
48829A
13.TIGHTEN FRONT NO. 1 STABILIZER BRACKET LH
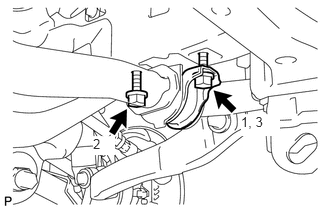
Tighten the 2 bolts of the front stabilizer brackets.
- Torque:
- 87 N*m (887 kgf*cm, 64 ft.*lbf)
- NOTICE:
-
Tighten the bolts in 3 steps, in the order shown in the illustration.
48824A
14.TIGHTEN FRONT NO. 1 STABILIZER BRACKET RH
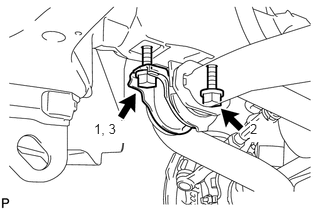
Tighten the 2 bolts of the front stabilizer brackets.
- Torque:
- 87 N*m (887 kgf*cm, 64 ft.*lbf)
- NOTICE:
-
Tighten the bolts in 3 steps, in the order shown in the illustration.
51405A
15.INSTALL NO. 1 ENGINE UNDER COVER SUB-ASSEMBLY
53806
16.INSTALL FRONT FENDER SPLASH SHIELD SUB-ASSEMBLY LH
53805
17.INSTALL FRONT FENDER SPLASH SHIELD SUB-ASSEMBLY RH
18.STABILIZE SUSPENSION
Install the front wheels.
- Torque:
- for aluminum wheel : 131 N*m (1336 kgf*cm, 97 ft.*lbf)
- for steel wheel : 209 N*m (2131 kgf*cm, 154 ft.*lbf)
Lower the vehicle.
Press down on the vehicle several times to stabilize the suspension.
19.TIGHTEN FRONT SHOCK ABSORBER WITH COIL SPRING
Tighten the nut.
- Torque:
- 180 N*m (1835 kgf*cm, 133 ft.*lbf)
- NOTICE:
-
Perform this procedure with all 4 wheels on the ground.
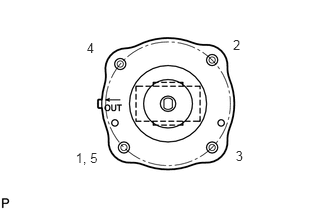
Tighten the 4 upper nuts in diametrically opposite pairs.
- Torque:
- 45 N*m (459 kgf*cm, 33 ft.*lbf)
Check that the first nut that was tightened is at the torque specification.
48810
20.TIGHTEN FRONT STABILIZER LINK ASSEMBLY LH (w/ KDSS)
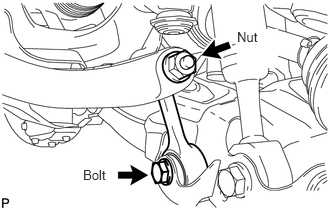
Tighten the bolt.
- Torque:
- 135 N*m (1377 kgf*cm, 100 ft.*lbf)
Tighten the nut.
- Torque:
- 140 N*m (1428 kgf*cm, 103 ft.*lbf)
- NOTICE:
-
Perform this procedure with all 4 wheels on the ground.
48810
21.TIGHTEN FRONT STABILIZER LINK ASSEMBLY LH (w/o KDSS)
Tighten the bolt.
- Torque:
- 135 N*m (1377 kgf*cm, 100 ft.*lbf)
- NOTICE:
-
Perform this procedure with all 4 wheels on the ground.
48820B
22.TIGHTEN FRONT STABILIZER LINK ASSEMBLY RH
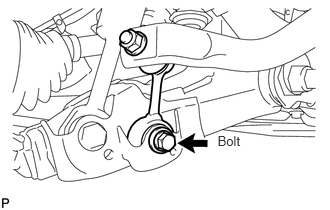
Tighten the bolt.
- Torque:
- 135 N*m (1377 kgf*cm, 100 ft.*lbf)
- NOTICE:
-
Perform this procedure with all 4 wheels on the ground.
23.PERFORM VEHICLE HEIGHT OFFSET CALIBRATION (w/ Active Height Control)
Perform the vehicle height offset calibration (See page Suspension>SUSPENSION CONTROL>ACTIVE HEIGHT CONTROL SUSPENSION>INITIALIZATION).
24.MEASURE VEHICLE HEIGHT (w/ KDSS)
48860D
25.CLOSE STABILIZER CONTROL WITH ACCUMULATOR HOUSING SHUTTER VALVE (w/ KDSS)
48826D
26.INSTALL STABILIZER CONTROL VALVE PROTECTOR (w/ KDSS)