1VD-FTV BATTERY / CHARGING GENERATOR INSTALLATION
PROCEDURE

 27020
1.INSTALL GENERATOR ASSEMBLY
Temporarily install the generator with the 2 stud bolts.
Using an E7 "TORX" socket wrench, tighten the 2 stud bolts.
- Torque:
- 6.0 N*m (61 kgf*cm, 53 in.*lbf)
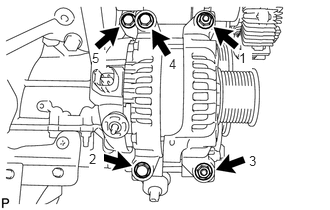
Install the 2 nuts and 3 bolts in the order shown in the illustration.
- Torque:
- 21 N*m (214 kgf*cm, 15 ft.*lbf)
Install the the No. 1 intake air connector pipe to the No. 1 inlet compressor elbow.
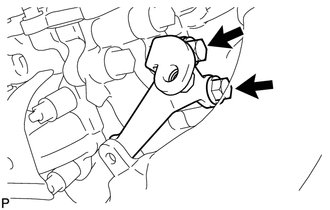
Install the No. 1 intake air connector bracket with the 2 bolts.
- Torque:
- 21 N*m (214 kgf*cm, 15 ft.*lbf)
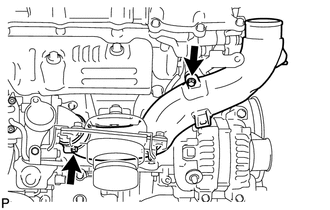
Install the bolt to the No. 1 intake air connector pipe. Then tighten the hose clamp.
- Torque:
- for bolt : 21 N*m (214 kgf*cm, 15 ft.*lbf)
- for hose clamp : 6.0 N*m (61 kgf*cm, 53 in.*lbf)
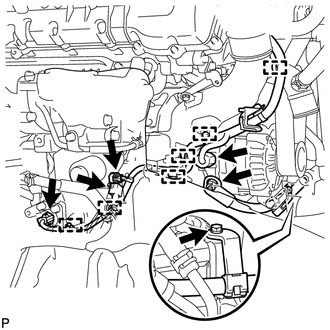
Connect the wire harness bracket to the belt tensioner with the bolt.
- Torque:
- 13 N*m (133 kgf*cm, 10 ft.*lbf)
130 A Type and 150 A Type:
Connect the generator wire with the nut.
- Torque:
- 9.8 N*m (100 kgf*cm, 87 in.*lbf)
180 A Type:
Connect the generator wire with the nut.
- Torque:
- 12 N*m (122 kgf*cm, 9 ft.*lbf)
Install the terminal cap.
Connect the 6 wire harness clamps.
Connect the 4 connectors.
17360A
2.INSTALL NO. 1 AIR TUBE ASSEMBLY
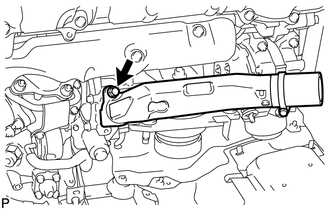
Apply a light coat of washer fluid to a new O-ring and install it to the No. 1 air tube.
Install the No. 1 air tube with the bolt.
- Torque:
- 21 N*m (214 kgf*cm, 15 ft.*lbf)
17885
3.INSTALL NO. 1 AIR CLEANER PIPE SUB-ASSEMBLY
87208
4.INSTALL HEATER WATER PIPE SUB-ASSEMBLY (w/ Viscous Heater)
17363K
5.INSTALL NO. 3 AIR TUBE
17341F
6.INSTALL NO. 1 AIR HOSE
17861
7.INSTALL INTAKE AIR CONNECTOR
17881
8.TEMPORARILY INSTALL NO. 1 AIR CLEANER HOSE
17705
9.INSTALL AIR CLEANER CAP SUB-ASSEMBLY
10.INSTALL NO. 2 ENGINE OIL LEVEL DIPSTICK GUIDE
87209
11.CONNECT WATER HOSE SUB-ASSEMBLY (w/ Viscous Heater)
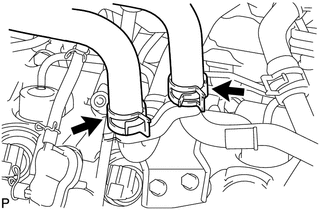
Connect the 2 water hoses.
17972
12.INSTALL NO. 2 COOL AIR INLET (w/o Intercooler)
17971
13.INSTALL NO. 1 COOL AIR INLET (w/o Intercooler)
17940D
14.INSTALL INTERCOOLER ASSEMBLY (w/ Intercooler)
16361A
15.INSTALL V-RIBBED BELT
16.INSTALL NO. 3 IDLER PULLEY (w/ Viscous Heater)
16630H
17.INSTALL NO. 1 IDLER PULLEY (w/ Viscous Heater)
87120H
18.INSTALL V-RIBBED BELT (w/ Viscous Heater)
19.CONNECT CABLE TO NEGATIVE BATTERY TERMINAL
- NOTICE:
-
When disconnecting the cable, some systems need to be initialized after the cable is reconnected (See page General>INTRODUCTION>REPAIR INSTRUCTION>INITIALIZATION).
20.ADD ENGINE COOLANT
21.INSPECT FOR COOLANT LEAK
53738A
22.INSTALL FRONT FENDER APRON SEAL REAR RH
53736G
23.INSTALL FRONT FENDER APRON SEAL FRONT RH
51405A
24.INSTALL NO. 1 ENGINE UNDER COVER SUB-ASSEMBLY
53806
25.INSTALL FRONT FENDER SPLASH SHIELD SUB-ASSEMBLY LH
53805
26.INSTALL FRONT FENDER SPLASH SHIELD SUB-ASSEMBLY RH