SEAT REAR NO. 1 SEAT ASSEMBLY(for 60/40 Split Seat Type 40 Side) INSTALLATION
CAUTION / NOTICE / HINT
- CAUTION:
-
Wear protective gloves. Sharp areas on the parts may injure your hands.
- HINT:
- ·
Use the same procedure for RHD and LHD vehicles.
·The procedure listed below is for LHD vehicles.
PROCEDURE

 72607
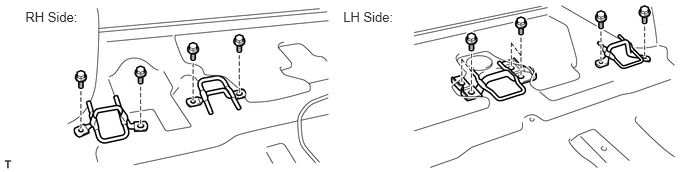
1.INSTALL REAR SEAT CUSHION LOCK STRIKER SUB-ASSEMBLY
Install the 4 strikers with the 10 bolts.
- Torque:
- 37 N*m (377 kgf*cm, 27 ft.*lbf)
87212K
2.INSTALL REAR NO. 6 AIR DUCT (w/ Rear Air Conditioning System)
58510D
3.INSTALL FRONT FLOOR CARPET ASSEMBLY
87174
4.INSTALL REAR AIR DUCT GUIDE (w/ Rear Air Conditioning System)
87217B
5.INSTALL AIR DUCT PLUG (w/ Rear Air Conditioning System)
62520P
6.INSTALL FRONT QUARTER TRIM PANEL ASSEMBLY LH
w/ Sliding Roof:
Install the front quarter trim panel assembly LH (See page Vehicle Interior>INTERIOR PANELS / TRIM>ROOF HEADLINING (w/ Sliding Roof)>INSTALLATION).
w/o Sliding Roof:
Install the front quarter trim panel assembly LH (See page Vehicle Interior>INTERIOR PANELS / TRIM>ROOF HEADLINING (w/o Sliding Roof)>INSTALLATION).
62510P
7.INSTALL FRONT QUARTER TRIM PANEL ASSEMBLY RH
w/ Sliding Roof:
Install the front quarter trim panel assembly RH (See page Vehicle Interior>INTERIOR PANELS / TRIM>ROOF HEADLINING (w/ Sliding Roof)>INSTALLATION).
w/o Sliding Roof:
Install the front quarter trim panel assembly RH (See page Vehicle Interior>INTERIOR PANELS / TRIM>ROOF HEADLINING (w/o Sliding Roof)>INSTALLATION).
71845B
8.INSTALL REAR SEAT COVER CAP (w/ Rear No. 2 Seat, except Face to Face Seat Type)
58574A
9.INSTALL REAR FLOOR MAT REAR SUPPORT PLATE
10.INSTALL REAR NO. 2 SEAT ASSEMBLY
for Face to Face Seat Type:
Install the rear No. 2 seat assembly (See page Vehicle Interior>SEAT>REAR NO. 2 SEAT ASSEMBLY(for Face to Face Seat Type)>INSTALLATION).
except Face to Face Seat Type:
Install the rear No. 2 seat assembly (See page Vehicle Interior>SEAT>REAR NO. 2 SEAT ASSEMBLY(except Face to Face Seat Type)>INSTALLATION).
67918E
11.INSTALL REAR DOOR SCUFF PLATE LH
67917C
12.INSTALL REAR DOOR SCUFF PLATE RH
51775
13.INSTALL REAR STEP COVER
71696
14.INSTALL REAR NO. 2 SEAT PROTECTOR
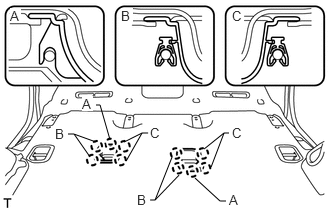
Attach the 10 claws to install the 2 seat protectors.
71695C
15.INSTALL REAR NO. 1 SEAT PROTECTOR
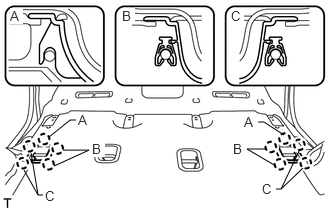
Attach the 10 claws to install the 2 seat protectors.
71400S
16.INSTALL REAR NO. 1 SEAT ASSEMBLY LH
Install the rear No. 1 seat assembly LH (See page Vehicle Interior>SEAT>REAR NO. 1 SEAT ASSEMBLY (for 60/40 Split Seat Type 60 Side)>INSTALLATION).
71300S
17.INSTALL REAR NO. 1 SEAT ASSEMBLY RH
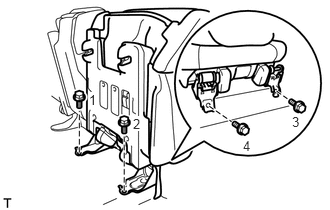
Temporarily install the seat assembly with the 4 bolts.
- NOTICE:
-
Be careful not to damage the vehicle body.
Tighten the bolts in the order shown in the illustration.
- Torque:
- 37 N*m (377 kgf*cm, 27 ft.*lbf)
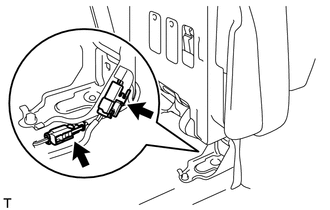
w/ Rear Seat Side Airbag:
Connect the connector.
w/ Seat Heater System:
Connect the connector.
71691J
18.INSTALL REAR NO. 3 SEAT CUSHION HINGE COVER
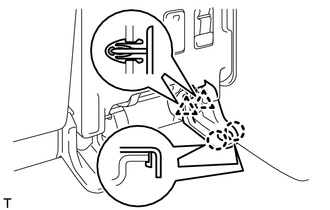
Attach the 2 clips and 2 claws to install the cover.
71691E
19.INSTALL REAR NO. 1 SEAT CUSHION HINGE COVER
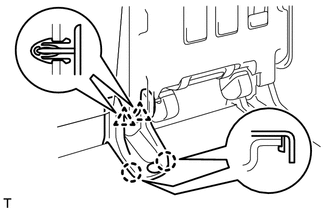
Attach the 2 clips and 2 claws to install the cover.
71692J
20.INSTALL REAR NO. 4 SEAT CUSHION HINGE COVER
Return the seat to the upright position.
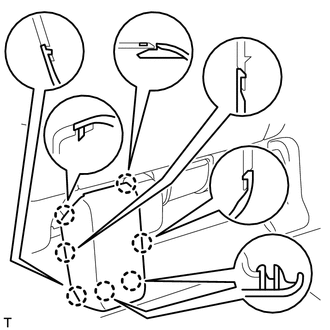
Attach the 7 claws to install the cover.
71692E
21.INSTALL REAR NO. 2 SEAT CUSHION HINGE COVER
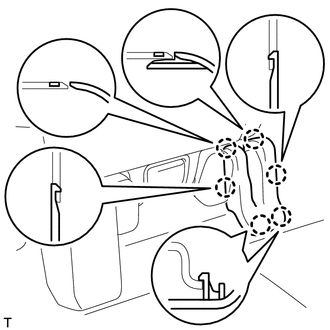
Attach the 6 claws to install the cover.
22.CONNECT CABLE TO NEGATIVE BATTERY TERMINAL
- NOTICE:
-
When disconnecting the cable, some systems need to be initialized after the cable is reconnected (See page General>INTRODUCTION>REPAIR INSTRUCTION>INITIALIZATION).
23.CHECK SRS WARNING LIGHT
Check the SRS warning light (See page Vehicle Interior>SUPPLEMENTAL RESTRAINT SYSTEMS>AIRBAG SYSTEM>DIAGNOSIS SYSTEM).
71300S
24.INSPECT REAR NO. 1 SEAT ASSEMBLY RH
w/ Seat Heater System:
Check the seat heater operation.
Turn the ignition switch to ON.
Turn the seat heater switch on.
Wait 5 minutes or more and confirm that the seat surface becomes warm.