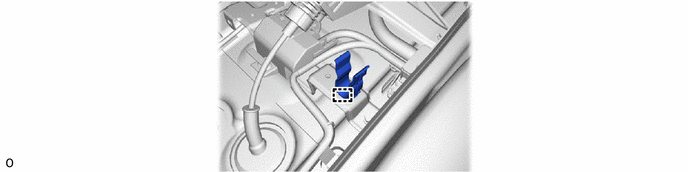
INTERIOR PANELS / TRIM FRONT CONSOLE BOX(w/ Cool Box) REMOVAL
CAUTION / NOTICE / HINT
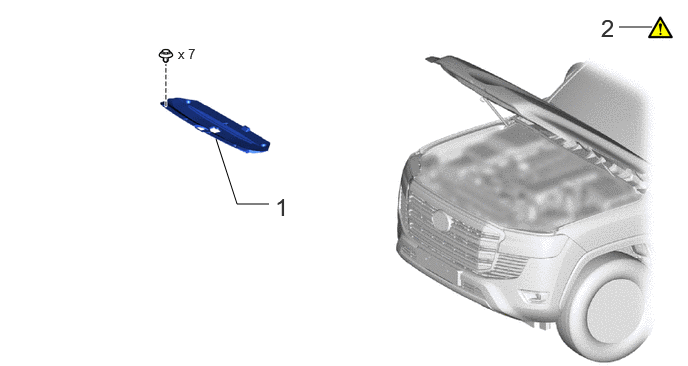
| Procedure | Part Name Code |

|

|

|
|
|---|---|---|---|---|---|
| 1 | UPPER RADIATOR SUPPORT SEAL | 53292A | - | - | - |
| 2 | RECOVER REFRIGERANT FROM REFRIGERATION SYSTEM | - | ( ) |
- | - |
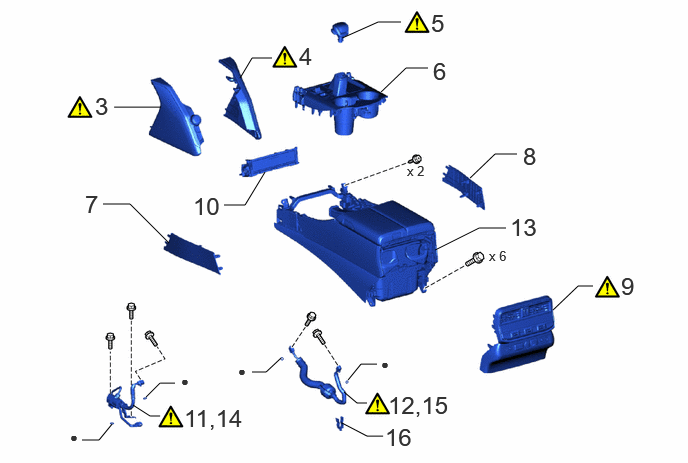
| Procedure | Part Name Code |
|
|
|
|
|---|---|---|---|---|---|
| 3 | INTEGRATION CONTROL AND PANEL SUB-ASSEMBLY | 84012 | () |
- | - |
| 4 | LOWER NO. 2 INSTRUMENT PANEL PAD SUB-ASSEMBLY | 55403H | () |
- | - |
| 5 | SHIFT LEVER KNOB SUB-ASSEMBLY | 33504F | () |
- | - |
| 6 | UPPER CONSOLE PANEL ASSEMBLY | - | - | - | - |
| 7 | INNER NO. 1 INSTRUMENT PANEL BRACKET COVER LH | 55395C | - | - | - |
| 8 | INNER NO. 1 INSTRUMENT PANEL BRACKET COVER RH | 55394D | - | - | - |
| 9 | CONSOLE REAR END PANEL SUB-ASSEMBLY | 58903A | () |
- | - |
| 10 | CENTER INSTRUMENT CLUSTER FINISH PANEL SUB-ASSEMBLY | 55405B | - | - | - |
| 11 | DISCONNECT NO. 8 AIR CONDITIONING TUBE AND ACCESSORY ASSEMBLY | 88G10D | () |
- | - |
| 12 | DISCONNECT NO. 7 AIR CONDITIONING TUBE AND ACCESSORY ASSEMBLY | 88G10C | () |
- | - |
| 13 | COOLING BOX ASSEMBLY | - | - | - | - |
| 14 | REMOVE NO. 8 AIR CONDITIONING TUBE AND ACCESSORY ASSEMBLY | 88G10D | () |
- | - |
| 15 | REMOVE NO. 7 AIR CONDITIONING TUBE AND ACCESSORY ASSEMBLY | 88G10C | () |
- | - |
| 16 | PIPING CLAMP | - | - | - | - |
| ● | Non-reusable part | - | - |
CAUTION / NOTICE / HINT
- HINT:
-
·
Use the same procedure for RHD and LHD vehicles.
·The procedure listed below is for LHD vehicles.
PROCEDURE

 53292A 1.REMOVE UPPER RADIATOR SUPPORT SEAL
for Standard:
Click hereVehicle Exterior>EXTERIOR PANELS / TRIM>FRONT BUMPER (for Standard)>REMOVAL
for Aero Type:
Click hereVehicle Exterior>EXTERIOR PANELS / TRIM>FRONT BUMPER (for Aero Type)>REMOVAL
2.RECOVER REFRIGERANT FROM REFRIGERATION SYSTEM
84012 3.REMOVE INTEGRATION CONTROL AND PANEL SUB-ASSEMBLY
|
|
Click here() |
55403H 4.REMOVE LOWER NO. 2 INSTRUMENT PANEL PAD SUB-ASSEMBLY
|
|
Click here() |
33504F 5.REMOVE SHIFT LEVER KNOB SUB-ASSEMBLY
|
|
for AC60F: Click here( ) for AJA0F: Click here( ) |
6.REMOVE UPPER CONSOLE PANEL ASSEMBLY
55395C 7.REMOVE INNER NO. 1 INSTRUMENT PANEL BRACKET COVER LH
55394D 8.REMOVE INNER NO. 1 INSTRUMENT PANEL BRACKET COVER RH
Use the same procedure described for the LH side.
58903A 9.REMOVE CONSOLE REAR END PANEL SUB-ASSEMBLY
|
|
Click here() |
55405B 10.REMOVE CENTER INSTRUMENT CLUSTER FINISH PANEL SUB-ASSEMBLY
88G10D 11.DISCONNECT NO. 8 AIR CONDITIONING TUBE AND ACCESSORY ASSEMBLY
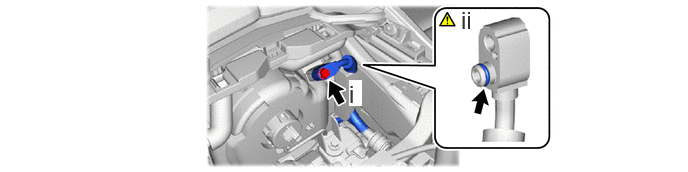
Remove the bolt and No. 8 air conditioning tube and accessory assembly.
Remove the O-ring from the No. 8 air conditioning tube and accessory assembly.
- NOTICE:
-
Seal the openings of the disconnected parts using vinyl tape to prevent the entry of moisture and foreign matter.
88G10C 12.DISCONNECT NO. 7 AIR CONDITIONING TUBE AND ACCESSORY ASSEMBLY
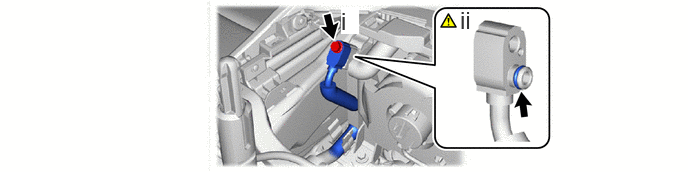
Remove the bolt and No. 7 air conditioning tube and accessory assembly.
Remove the O-ring from the No. 7 air conditioning tube and accessory assembly.
- NOTICE:
-
Seal the openings of the disconnected parts using vinyl tape to prevent the entry of moisture and foreign matter.
13.REMOVE COOLING BOX ASSEMBLY
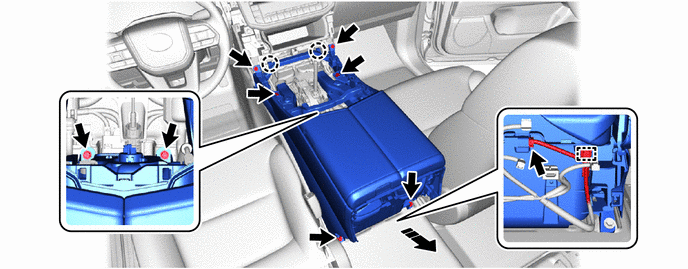

|
Remove in this Direction | - | - |
88G10D 14.REMOVE NO. 8 AIR CONDITIONING TUBE AND ACCESSORY ASSEMBLY
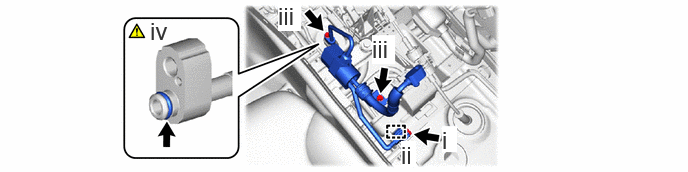
Disconnect the connector.
Detach the clamp.
Remove the 2 bolts and No. 8 air conditioning tube and accessory assembly.
Remove the O-ring from the No. 8 air conditioning tube and accessory assembly.
- NOTICE:
-
Seal the openings of the disconnected parts using vinyl tape to prevent the entry of moisture and foreign matter.
88G10C 15.REMOVE NO. 7 AIR CONDITIONING TUBE AND ACCESSORY ASSEMBLY
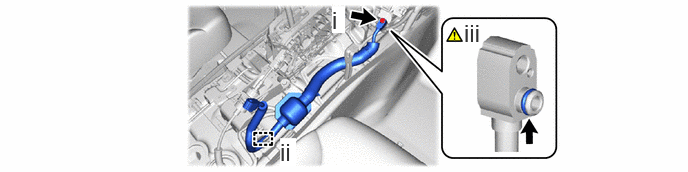
Remove the bolt.
Detach the clamp and remove the No. 7 air conditioning tube and accessory assembly.
Remove the O-ring from the No. 7 air conditioning tube and accessory assembly.
- NOTICE:
-
Seal the openings of the disconnected parts using vinyl tape to prevent the entry of moisture and foreign matter.
16.REMOVE PIPING CLAMP