WINDOW / GLASS WINDSHIELD GLASS INSTALLATION
CAUTION / NOTICE / HINT
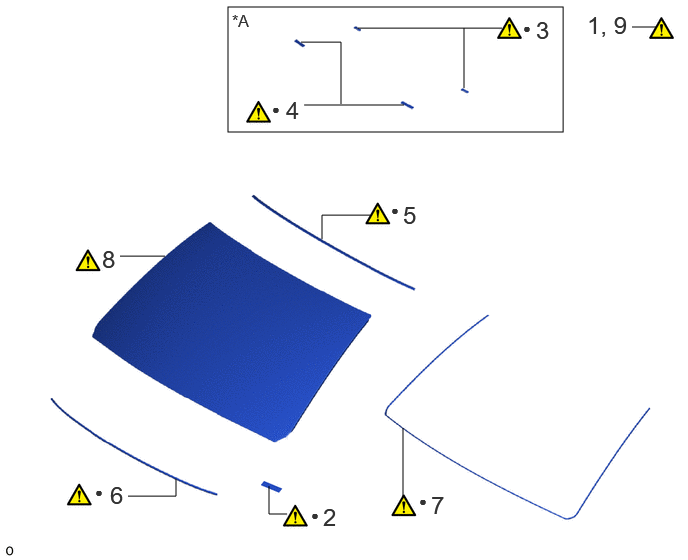
| Procedure | Part Name Code |

|

|

|
|
|---|---|---|---|---|---|
| 1 | CLEAN WINDSHIELD GLASS | 56111 | ( ) |
- | - |
| 2 | WINDSHIELD GLASS SEAL | 56119C | () |
- | - |
| 3 | NO. 1 WINDSHIELD GLASS STOPPER | 56115A | () |
- | - |
| 4 | NO. 2 WINDSHIELD GLASS STOPPER | 56116C | () |
- | - |
| 5 | WINDSHIELD OUTSIDE UPPER MOULDING | 75531D | () |
- | - |
| 6 | NO. 2 INSTRUMENT PANEL CUSHION | 55356D | () |
- | - |
| 7 | WINDOW GLASS ADHESIVE DAM | 56117A | () |
- | - |
| 8 | INSTALL WINDSHIELD GLASS | 56111 | () |
- | - |
| 9 | CHECK FOR LEAK AND REPAIR | - | () |
- | - |
| *A | for 2-piece Type | - | - |
| ● | Non-reusable part | - | - |
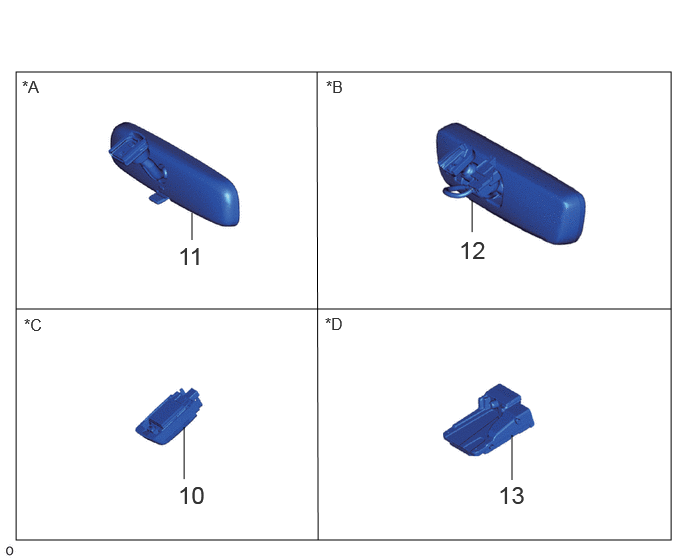
| Procedure | Part Name Code |
|
|
|
|
|---|---|---|---|---|---|
| 10 | RAIN SENSOR | 89941 | - | - | - |
| 11 | INNER REAR VIEW MIRROR ASSEMBLY | 87810 | - | - | - |
| 12 | INNER REAR VIEW MIRROR ASSEMBLY | 87810 | - | - | - |
| 13 | FORWARD RECOGNITION CAMERA | 8646C | - | - | - |
| *A | w/o EC Inner Mirror | *B | w/ EC Inner Mirror |
| *C | w/ Rain Sensor | *D | w/ Front Camera |
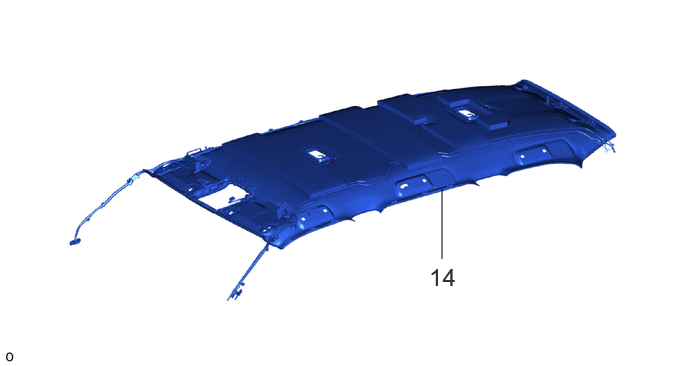
| Procedure | Part Name Code |
|
|
|
|
|---|---|---|---|---|---|
| 14 | ROOF HEADLINING ASSEMBLY | - | - | - | - |
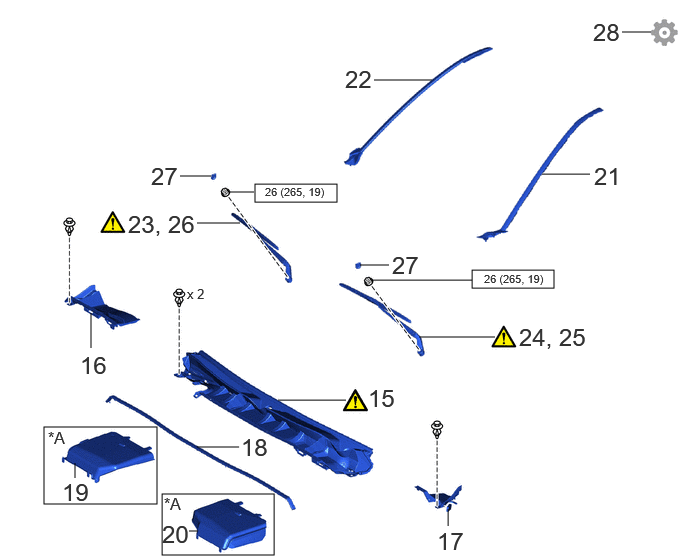
| Procedure | Part Name Code |
|
|
|
|
|---|---|---|---|---|---|
| 15 | COWL TOP VENTILATOR LOUVER SUB-ASSEMBLY | 55708 | () |
- | - |
| 16 | COWL TOP VENTILATOR LOUVER RH | 55781D | - | - | - |
| 17 | COWL TOP VENTILATOR LOUVER LH | 55782D | - | - | - |
| 18 | HOOD TO COWL TOP SEAL | 53383B | - | - | - |
| 19 | ENGINE SIDE COVER RH | 51473C | - | - | - |
| 20 | ENGINE SIDE COVER LH | 51474B | - | - | - |
| 21 | WINDSHIELD OUTSIDE MOULDING LH | 75534 | - | - | - |
| 22 | WINDSHIELD OUTSIDE MOULDING RH | 75533 | - | - | - |
| 23 | INSTALL FRONT WIPER ARM AND BLADE ASSEMBLY RH | - | () |
- | - |
| 24 | INSTALL FRONT WIPER ARM AND BLADE ASSEMBLY LH | - | () |
- | - |
| 25 | INSTALL FRONT WIPER ARM AND BLADE ASSEMBLY LH | - | () |
- | - |
| 26 | INSTALL FRONT WIPER ARM AND BLADE ASSEMBLY RH | - | () |
- | - |
| 27 | FRONT WIPER ARM HEAD CAP | 85292B | - | - | - |
| 28 | ADJUST FORWARD RECOGNITION CAMERA | 8646C | - | - | () |
| *A | except 1GR-FE | - | - |

|
N*m (kgf*cm, ft.*lbf): Specified torque | - | - |
CAUTION / NOTICE / HINT
- NOTICE:
- w/ Front Camera:
-
When replacing the windshield glass of a vehicle equipped with a forward recognition camera, make sure to use a Toyota genuine part. If a non-Toyota genuine part is used, the forward recognition camera may not be able to be installed due to a missing bracket. Also the dynamic radar cruise control system, front camera system, lane tracing assist system, lane departure alert system, road sign assist system, pre-collision system, adaptive high beam system or automatic high beam system may not operate properly due to a difference in the transmissivity or black ceramic border.
PROCEDURE

 56111 1.CLEAN WINDSHIELD GLASS
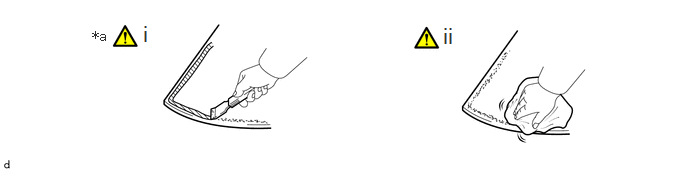
| *a | When reusing the Windshield Glass | - | - |
When reusing the windshield glass:
1. Using a scraper, grind off the adhesive and double-sided tape left on the windshield glass.
- NOTICE:
-
Do not damage the windshield glass.
Using non-residue solvent, clean the outer edge of the windshield glass.
- NOTICE:
-
Be sure to clean the windshield glass even it is new.
56119C 2.INSTALL WINDSHIELD GLASS SEAL
|
|
|
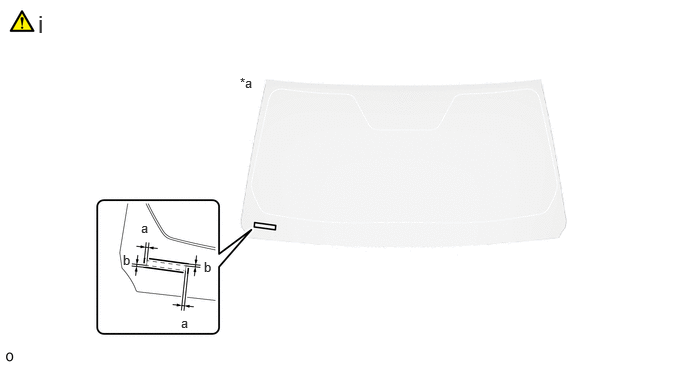
| *a | Backside | - | - |
Install the windshield glass seal at the position on the windshield glass as shown in the illustration.
- Standard Dimension:
-
Area Dimension a 5.0 mm (0.197 in.) b 4.0 mm (0.157 in.)
56115A 3.INSTALL NO. 1 WINDSHIELD GLASS STOPPER (for 2-piece Type)
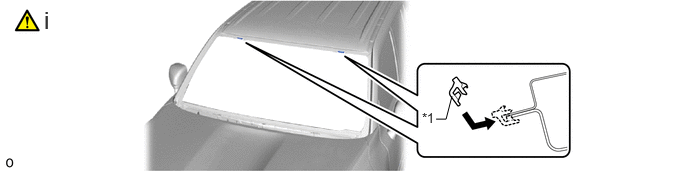
| *1 | No. 1 Windshield Glass Stoppers | - | - |
Install 2 new No. 1 windshield glass stoppers to the vehicle body as shown in the illustration.
- NOTICE:
-
The No. 1 windshield glass stoppers are only supplied as a 2-piece type. Therefore, use 2-piece type No. 1 windshield glass stoppers even for vehicles that are equipped with the 1-piece types.
56116C 4.INSTALL NO. 2 WINDSHIELD GLASS STOPPER (for 2-piece Type)
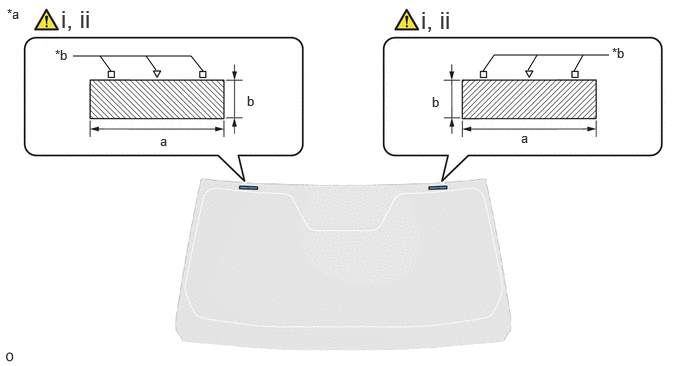
| *a | Backside | *b | Ceramic Notch |

|
Glass Primer | - | - |
Using a brush, apply primer to the installation area of the No. 2 windshield glass stopper.
- NOTICE:
-
Do not apply too much glass primer.
- Standard Dimension:
-
Area Dimension a 84 mm (3.31 in.) b 16.5 mm (0.650 in.)
Remove the peeling paper on new 2 No.2 windshield glass stoppers while making sure not to touch the adhesional surface.
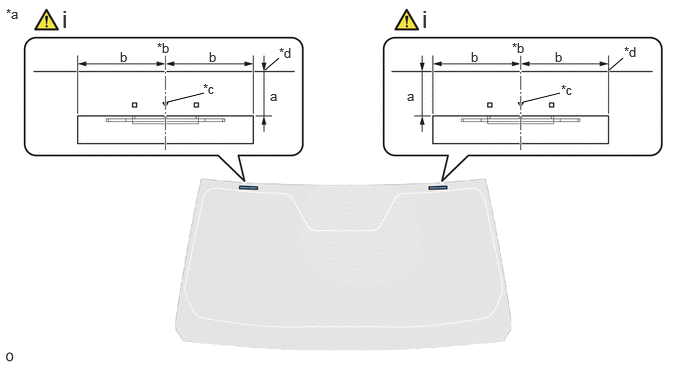
| *a | Backside | *b | Stopper Center line |
| *c | Ceramic Notch | *d | Windshield Glass Edge Side |
Install the 2 No. 2 windshield glass stoppers at the positions on the windshield glass as shown in the illustration.
- NOTICE:
-
·
After the primer dries (in approximately 3 minutes), install the No. 2 windshield glass stopper.
·Make sure to install the No. 2 windshield glass stopper in the correct orientation.
·The No. 2 windshield glass stoppers are only supplied as a 2-piece type. Therefore, use 2-piece type No. 2 windshield glass stoppers even for vehicles that are equipped with the 1-piece type.
- Standard Dimension:
-
Area Dimension a 14.2 mm (0.559 in.) b 40 mm (1.57 in.)
75531D 5.INSTALL WINDSHIELD OUTSIDE UPPER MOULDING
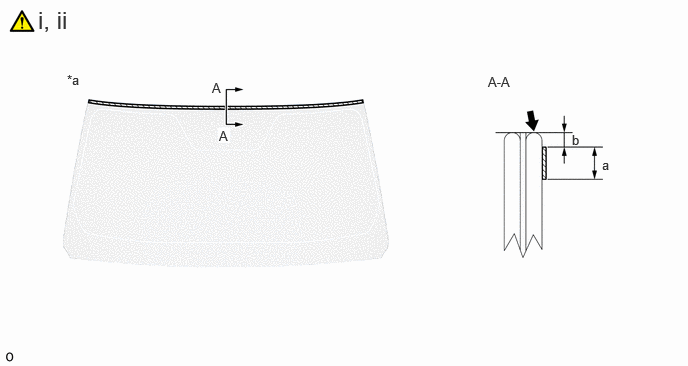
| *a | Backside | - | - |

|
Windshield Glass Edge Side |
|
Glass Primer |
Using a brush, apply primer to the installation area of the windshield outside upper moulding.
- NOTICE:
-
Do not apply too much glass primer.
- Standard Dimension:
-
Area Dimension a 3.75 to 5.25 mm (0.148 to 0.207 in.) b 1.4 to 2.9 mm (0.055 to 0.114 in.)
Remove the peeling paper while making sure not to touch the adhesional surface.
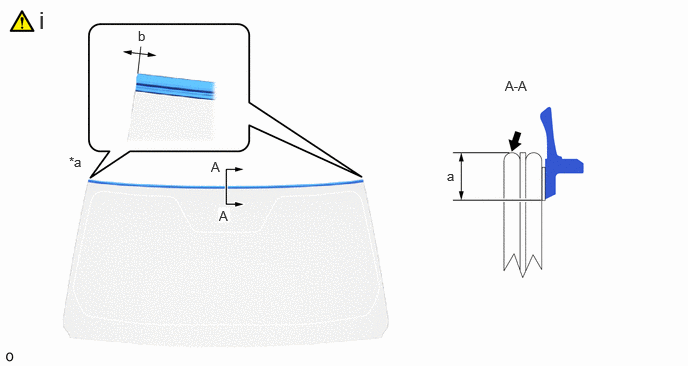
| *a | Backside | - | - |
|
|
Windshield Glass Edge Side | - | - |
Install the windshield outside upper moulding at the position on the windshield glass as shown in the illustration.
- NOTICE:
-
After the glass primer dries (in approximately 3 minutes), install the windshield outside upper moulding.
- HINT:
-
Install within the range of the dimensions for the position b based on the rounded end of the windshield glass.
- Standard Dimension:
-
Area Dimension a 6.65 mm (0.261 in.) b 0 +/- 3.0 mm (0 +/- 0.118 in.)
55356D 6.INSTALL NO. 2 INSTRUMENT PANEL CUSHION
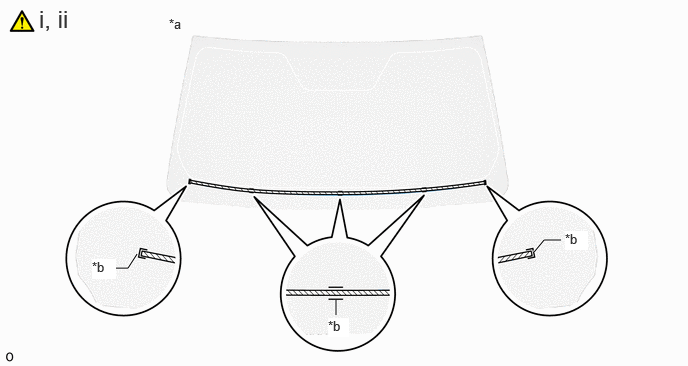
| *a | Backside | *b | Ceramic Notch |
|
|
Glass Primer | - | - |
Using a brush, apply primer to the installation area of the No. 2 instrument panel cushion.
- NOTICE:
-
Do not apply too much glass primer.
Remove the peeling paper while making sure not to touch the adhesional surface.
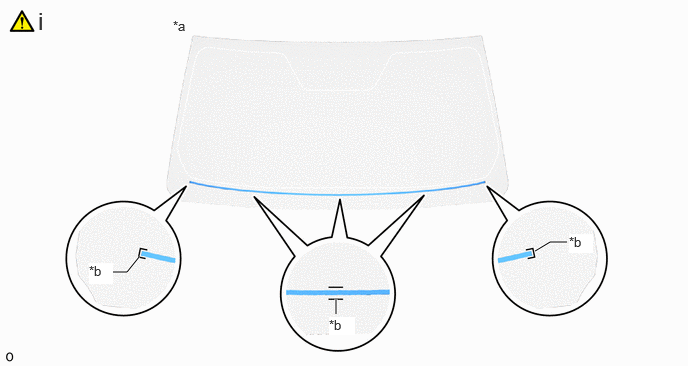
| *a | Backside | *b | Ceramic Notch |
Install the No. 2 instrument panel cushion at the position on the windshield glass as shown in the illustration.
- NOTICE:
-
After the glass primer dries (in approximately 3 minutes), install the No. 2 instrument panel cushion.
56117A 7.INSTALL WINDOW GLASS ADHESIVE DAM

| *a | Cut | - | - |
Cut a new window glass adhesive dam to a length of 2830 to 2850 mm (9.28 to 9.35 ft.).
- Standard Dimension:
-
Area Dimension a 2830 to 2850 mm (9.28 to 9.35 ft.)
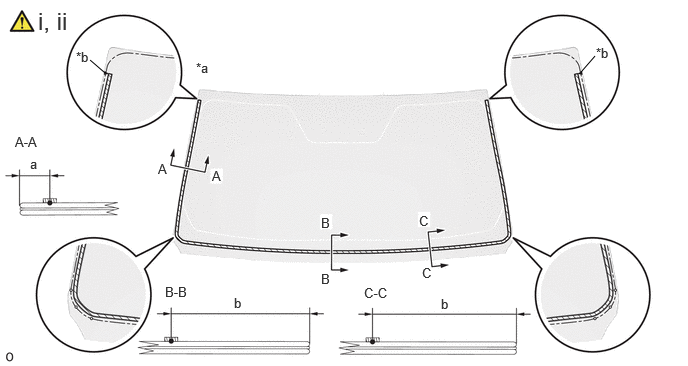
| *a | Backside | *b | Ceramic Notch |
|
|
Glass Primer | - | - |
Using a brush, apply primer to the installation area of the window glass adhesive dam.
- NOTICE:
-
Do not apply too much glass primer.
- Standard Dimension:
-
Area Dimension a 10.5 mm (0.413 in.) b 49.4 mm (1.94 in.)
Remove the peeling paper while making sure not to touch the adhesional surface.
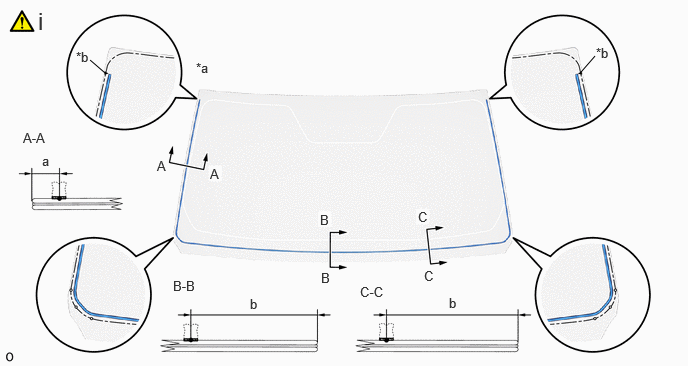
| *a | Backside | *b | Ceramic Notch |
Install the window glass adhesive dam at the position on the windshield glass as shown in the illustration.
- NOTICE:
-
After the glass primer dries (in approximately 3 minutes), install the window glass adhesive dam.
- Standard Dimension:
-
Area Dimension a 10.5 mm (0.413 in.) b 49.4 mm (1.94 in.)
56111 8.INSTALL WINDSHIELD GLASS
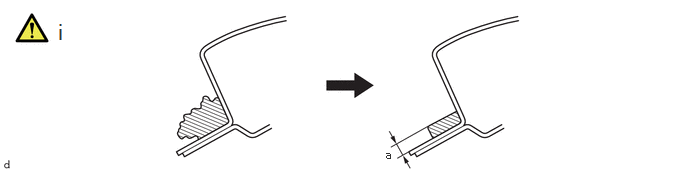
|
|
Adhesive | - | - |
Follow the procedure below to clean the installation surface of the vehicle body.
1. If the adhesive left on the installation surface of the vehicle body is significantly uneven, smooth it out using a utility knife, etc.
- Standard Dimension:
-
Area Dimension a 1.0 to 3.0 mm (0.0394 to 0.118 in.)
- NOTICE:
-
Make sure to leave some adhesive.
2. Using non-residue solvent, clean the installation surface of the vehicle body.
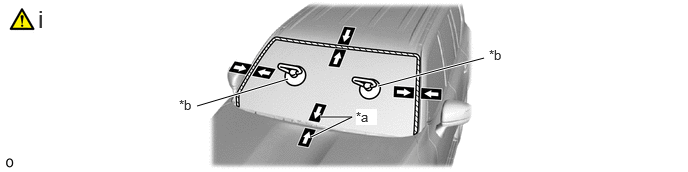
| *a | Matchmarks | *b | Suction Cups |
Follow the procedure below to perform work before installing the windshield glass.
1. Install the suction cups to the windshield glass.
2. Temporarily place the windshield glass on the body and position it so that the gap between the body and the edge of the windshield glass is the same width at the top and sides.
3. Attach adhesive tape on the windshield glass and body panel, and place matchmarks for installation using a pen. (When new the windshield glass)
- NOTICE:
-
·
From inside the cabin, check that the No. 1 windshield glass stopper and the No. 2 windshield glass stopper can be attached.
·When reusing the windshield glass, check and correct the matchmark positions.
·Do not pinch the windshield deicer wire harness between the body and the windshield glass. (w/ windshield deicer)
4. Remove the windshield glass.
5. Apply body primer to the exposed sections of the body surface on the vehicle side (where no adhesive remains).
- NOTICE:
-
·
When applying the primer, take care of the panel joints and spot welds.
·Do not apply to the adhesive.
·Do not apply too much body primer.
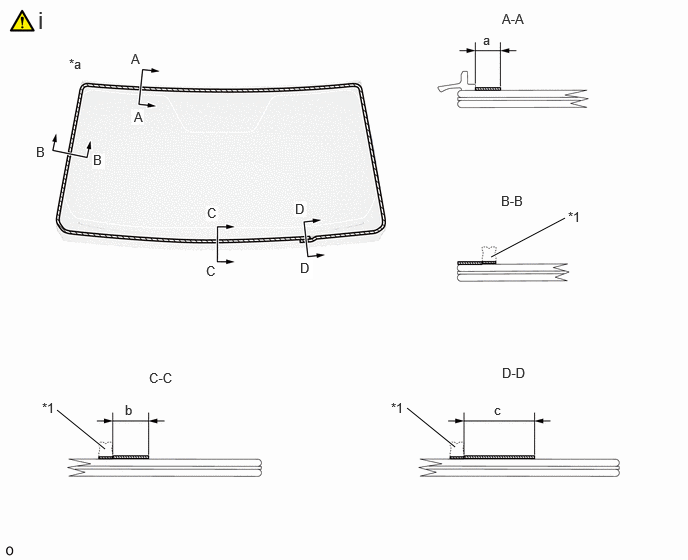
| *1 | Windshield Glass Adhesive Dam | - | - |
| *a | Backside | - | - |
|
|
Glass Primer | - | - |
Using a brush, apply primer to the entire perimeter of the adhesion area of the windshield glass as shown in the illustration.
- NOTICE:
-
Do not apply too much glass primer.
- Standard Dimension:
-
Area Dimension a 8.0 mm (0.315 in.) b 11 mm (0.433 in.) c 19 mm (0.748 in.)
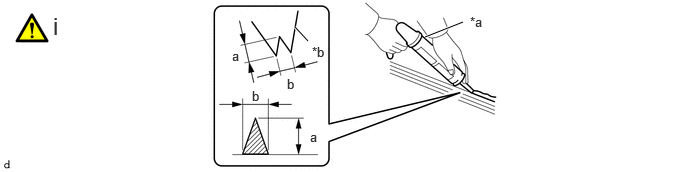
| *a | Sealant Gun | *b | Nozzle |
|
|
Adhesive | - | - |
Cut off the tip of the cartridge nozzle as shown in the illustration, and set the adhesive in the sealant gun.
- Standard Dimension:
-
Area Dimension a 12 to 15 mm (0.472 to 0.590 in.) b 8.0 to 11 mm (0.315 to 0.433 in.)
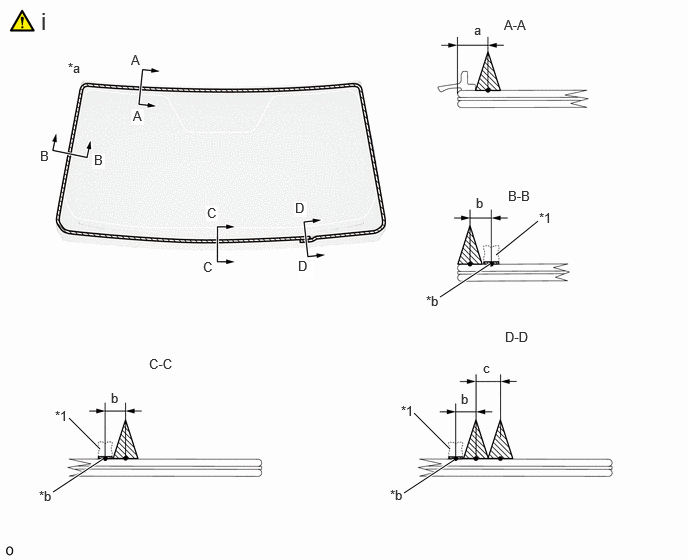
| *1 | Windshield Glass Adhesive Dam | - | - |
| *a | Backside | *b | Dam Center Line |
|
|
Adhesive | ● | Ceramic Notch |
Apply a bead of adhesive along the windshield glass adhesive dam and windshield outside moulding as shown in the illustration.
- NOTICE:
-
After the primer dries (in approximately 3 minutes), apply the adhesive.
- Standard Dimension:
-
Area Dimension a 9.5 mm (0.374 in.) b 6.5 mm (0.256 in.) c 8.0 mm (0.315 in.)
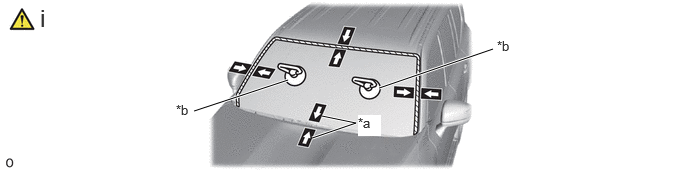
| *a | Matchmarks | *b | Suction Cups |
Follow the procedure below to perform windshield glass installation.
1. Using the suction cups, align the matchmarks and install the windshield glass.
- NOTICE:
-
·
After the body side primer dries (in approximately 3 minutes), install the windshield glass.
·From inside the cabin, check that the No. 1 windshield glass stopper and the No. 2 windshield glass stopper are attached.
·Do not pinch the windshield deicer wire harness between the body and the windshield glass. (w/ windshield deicer)
2. Gently push the front surface of the windshield glass from outside of vehicle to fully contact with the adhesive.
- HINT:
-
Pushing force: 98 N (10 kgf) or higher
3. Remove any excess adhesive or apply as necessary.
- NOTICE:
-
Apply adhesive up to the edge of the windshield glass.
4. Remove any excess adhesive before it hardens.
5. Using protective tape, hold the outside moulding and glass in place until the adhesive hardens.
- NOTICE:
-
Follow the instructions for each adhesive manufacturer or the corresponding owner's manual for the minimum amount of time necessary for drying and prior to driving the vehicle after applying adhesive.
w/ Windshield Deicer:

| *A | w/ Heated Windshield Defroster | - | - |
Face the marking on the wire harness upward and connect the 2 connectors.
- NOTICE:
-
Do not twist the wire harness during installation when connecting the connector.
9.CHECK FOR LEAK AND REPAIR
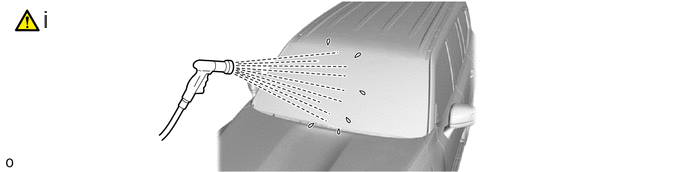
Follow the procedure below to check for water leak and repair.
1. Remove the protective tape.
2. After the adhesive has hardened, apply water from outside the vehicle and check for leaks from in the cabin.
3. If water leaks into the cabin, seal any leaks with adhesive after the water has dried.
89941 10.INSTALL RAIN SENSOR (w/ Rain Sensor)
87810 11.INSTALL INNER REAR VIEW MIRROR ASSEMBLY (w/o EC Mirror)
87810 12.INSTALL INNER REAR VIEW MIRROR ASSEMBLY (w/ EC Mirror)
8646C 13.INSTALL FORWARD RECOGNITION CAMERA (w/ Front Camera)
14.INSTALL ROOF HEADLINING ASSEMBLY
55708 15.INSTALL COWL TOP VENTILATOR LOUVER SUB-ASSEMBLY
|
|
Click here() |
55781D 16.INSTALL COWL TOP VENTILATOR LOUVER RH
55782D 17.INSTALL COWL TOP VENTILATOR LOUVER LH
53383B 18.INSTALL HOOD TO COWL TOP SEAL
51473C 19.INSTALL ENGINE SIDE COVER RH (except 1GR-FE)
51474B 20.INSTALL ENGINE SIDE COVER LH (except 1GR-FE)
75534 21.INSTALL WINDSHIELD OUTSIDE MOULDING LH
75533 22.INSTALL WINDSHIELD OUTSIDE MOULDING RH
23.INSTALL FRONT WIPER ARM AND BLADE ASSEMBLY RH (for LHD)
|
|
Click here() |
24.INSTALL FRONT WIPER ARM AND BLADE ASSEMBLY LH (for RHD)
|
|
Click here() |
25.INSTALL FRONT WIPER ARM AND BLADE ASSEMBLY LH (for LHD)
|
|
Click here() |
26.INSTALL FRONT WIPER ARM AND BLADE ASSEMBLY RH (for RHD)
|
|
Click here() |
85292B 27.INSTALL FRONT WIPER ARM HEAD CAP
8646C 28.ADJUST FORWARD RECOGNITION CAMERA
Target Adjustment (One Time Recognition):
Click hereADAS / AD>ADVANCED DRIVER ASSISTANCE SYSTEM>FRONT CAMERA>TARGET ADJUSTMENT(ONE TIME RECOGNITION)
Target Adjustment (Sequential Recognition):
Click hereADAS / AD>ADVANCED DRIVER ASSISTANCE SYSTEM>FRONT CAMERA>TARGET ADJUSTMENT(SEQUENTIAL RECOGNITION)
Driving Adjustment:
Click hereADAS / AD>ADVANCED DRIVER ASSISTANCE SYSTEM>FRONT CAMERA>DRIVING ADJUSTMENT