FRONT SUSPENSION FRONT SHOCK ABSORBER INSTALLATION
CAUTION / NOTICE / HINT
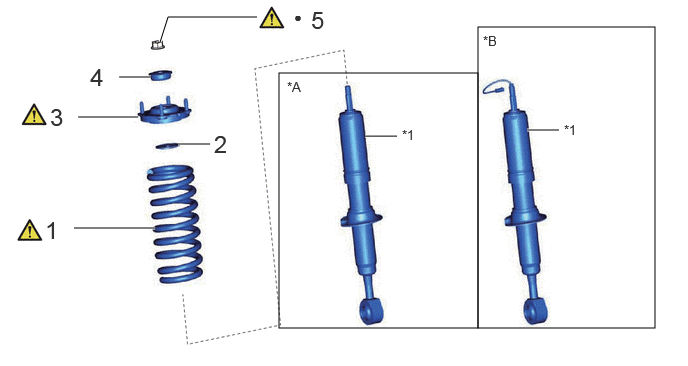
| Procedure | Part Name Code |

|

|

|
|
|---|---|---|---|---|---|
| 1 | FRONT COIL SPRING LH | 48132 | ( ) |
- | - |
| 2 | SHOCK ABSORBER CUSHION RETAINER | 48597 | - | - | - |
| 3 | FRONT SUSPENSION SUPPORT SUB-ASSEMBLY | 48609A | () |
- | - |
| 4 | FRONT UPPER SHOCK ABSORBER BRACKET SUB-ASSEMBLY LH | 48502 | - | - | - |
| 5 | FRONT SUPPORT TO FRONT SHOCK ABSORBER NUT | 48680A | () |
- | - |
| *A | w/o AVS | *B | w/ AVS |
| *1 | FRONT SHOCK ABSORBER ASSEMBLY LH | - | - |
| ● | Non-reusable part | - | - |
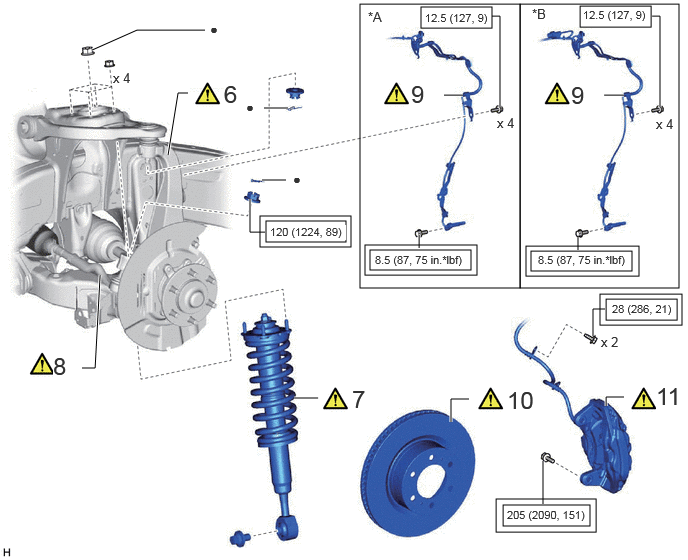
| Procedure | Part Name Code |
|
|
|
|
|---|---|---|---|---|---|
| 6 | TEMPORARILY TIGHTEN STEERING KNUCKLE | - | () |
- | - |
| 7 | TEMPORARILY TIGHTEN FRONT SHOCK ABSORBER WITH COIL SPRING | - | () |
- | - |
| 8 | TIE ROD END SUB-ASSEMBLY LH | 45047 | () |
- | - |
| 9 | FRONT SPEED SENSOR LH | 89543 | () |
- | - |
| 10 | FRONT DISC LH | 43512 | () |
- | - |
| 11 | FRONT DISC BRAKE CALIPER ASSEMBLY LH | - | () |
- | - |
| *A | w/o AVS | *B | w/ AVS |

|
Tightening torque for "Major areas involving basic vehicle performance such as moving/turning/stopping": N*m (kgf*cm, ft.*lbf) |

|
N*m (kgf*cm, ft.*lbf): Specified torque |
| ● | Non-reusable part | - | - |
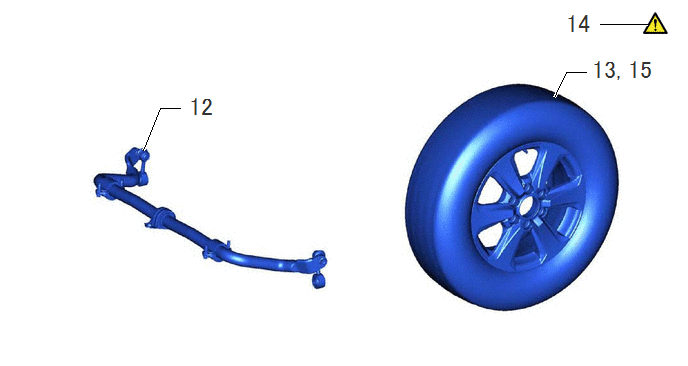
| Procedure | Part Name Code |
|
|
|
|
|---|---|---|---|---|---|
| 12 | FRONT STABILIZER BAR | 48811 | - | - | - |
| 13 | INSTALL FRONT WHEEL | - | - | - | - |
| 14 | STABILIZE SUSPENSION | - | () |
- | - |
| 15 | REMOVE FRONT WHEEL | - | - | - | - |
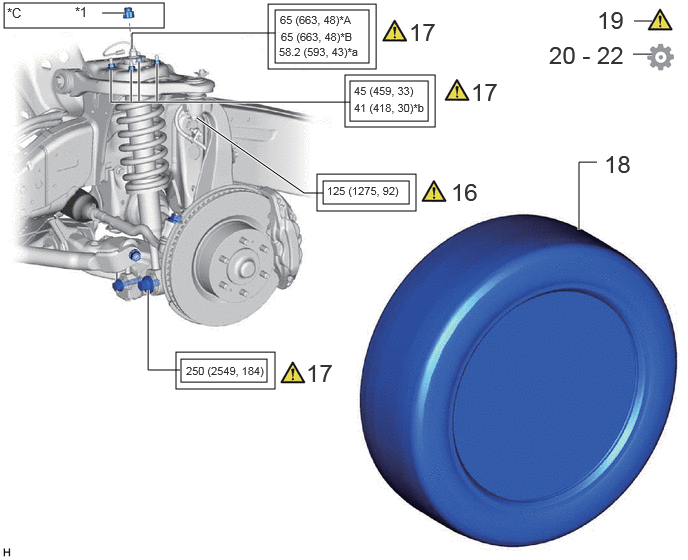
| Procedure | Part Name Code |
|
|
|
|
|---|---|---|---|---|---|
| 16 | FULLY TIGHTEN STEERING KNUCKLE | - | () |
- | - |
| 17 | FULLY TIGHTEN FRONT SHOCK ABSORBER WITH COIL SPRING | - | () |
- | - |
| 18 | INSTALL FRONT WHEEL | - | - | - | - |
| 19 | CONNECT CABLE TO NEGATIVE BATTERY TERMINAL | - | - | - | () |
| 20 | INITIALIZATION AFTER RECONNECTING BATTERY TERMINAL | - | - | - | () |
| 21 | CHECK FOR SPEED SENSOR SIGNAL | - | - | - | () |
| 22 | PERFORM INITIALIZATION | - | - | - | () |
| *A | w/o AVS | *B | w/ AVS |
| *C | w/ CAP | - | - |
| *1 | UPPER SHOCK ABSORBER CAP | - | - |
|
|
Tightening torque for "Major areas involving basic vehicle performance such as moving/turning/stopping": N*m (kgf*cm, ft.*lbf) | - | - |
| *a | w/ AVS (For use with union nut wrench) | *b | For use with union nut wrench |
| ● | Non-reusable part | - | - |
CAUTION / NOTICE / HINT
- HINT:
-
·
Use the same procedure for the RH and LH sides.
·The procedure listed below is for the LH side.
PROCEDURE

 48132 1.INSTALL FRONT COIL SPRING LH
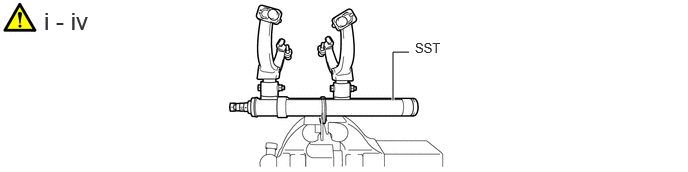
Secure SST in a vise.
- SST
-
09727-30022 (09727-00010, 09727-00022, 09727-00031)
Attach the hooks of each SST arm across the diameter of the coil spring.
- CAUTION:
-
·
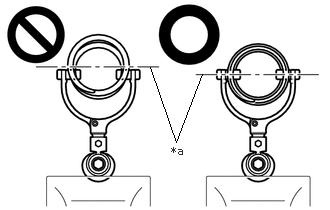 1.563,0.698 1.833,1.479 1.833,1.479 2.104,0.771 false 1.781,1.5 2.094,1.698 0.313,0.198 10 false *a
*a Front Coil Spring Diameter
Do not perform the work without checking to make sure that the claws of the hooks are securely engaged.
·It could cause the hook to slip off and the spring to fly out, which could result in an injury.
·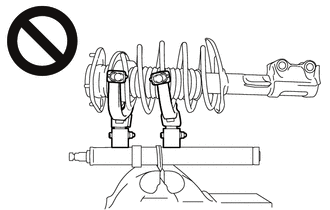
Do not install SST to the front coil spring unless its top and bottom hook distance is set to the widest condition.
·It could cause the hook to slip off and the spring to fly out, which could result in an injury.
·Do not install SST when the distances between the SST arms or the number of coils of the coil spring between the hooks are not the same.
·It could cause the hook to slip off and the spring to fly out, which could result in an injury.
Install the stopper pin to the hook of SST.
- CAUTION:
-
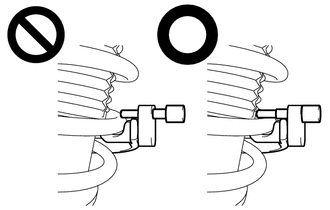
-
·
Check that the stopper pin is securely installed.
·It could cause the hook to slip off and the front coil spring LH to fly out, which could result in an injury.
Using SST, compress the coil spring.
- SST
-
09727-00110
- CAUTION:
-
·
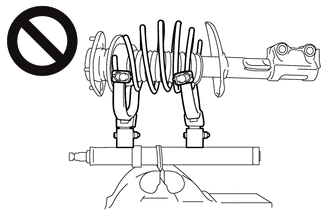
While compressing the spring, if the front coil spring starts to bend into a bow shape, do not continue the work.
·It could cause the hook to slip off and the spring to fly out, which could result in an injury.
·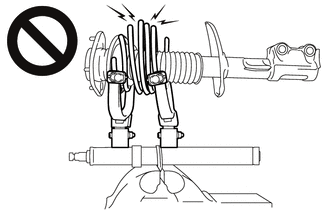
While compressing the spring, if the front coil spring starts to bend into a bow shape, do not continue the work.
·It could cause the hook to slip off and the spring to fly out, which could result in an injury.
·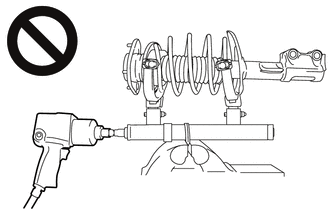
Do not use an impact wrench.
·The threads may be stripped, or the sudden compression may result in slack that causes the hooks to slip off, causing the spring to fly out and possibly resulting in injury.
·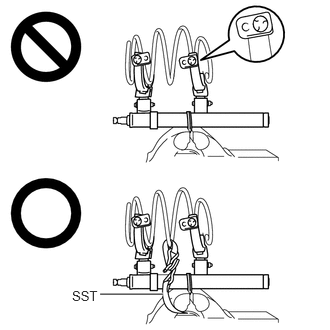 1.042,3.063 1.698,3.063 true 0.75,3 1.063,3.156 0.313,0.156 10 false SST
If a stopper pin touches the coil spring while using SST, remove the stopper pin and continue with the procedure.
If a stopper pin is removed, install SST as shown in the illustration.
·If a hook disengages from the coil spring, the coil spring may fly out, resulting in injury.
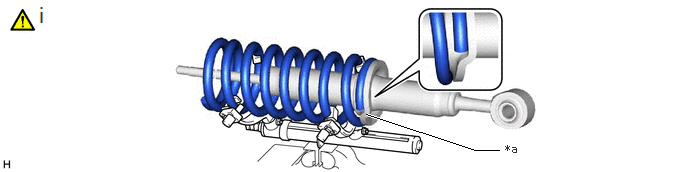
| *a | Depression | - | - |
Install the front coil spring LH to the front shock absorber assembly LH.
- NOTICE:
-
Make sure that the end of the front coil spring LH is positioned in the depression of the front lower spring seat.
48597 2.INSTALL SHOCK ABSORBER CUSHION RETAINER
48609A 3.INSTALL FRONT SUSPENSION SUPPORT SUB-ASSEMBLY
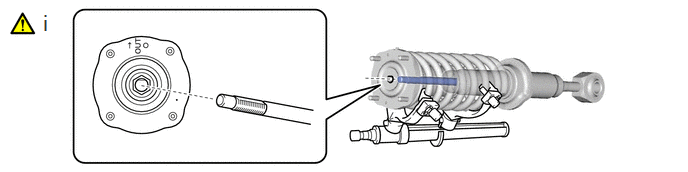
Install the front suspension support sub-assembly to the front shock absorber assembly LH.
- NOTICE:
-
Match the shape of the front shock absorber assembly support ring end to the shape of the front suspension support assembly.
48502 4.INSTALL FRONT UPPER SHOCK ABSORBER BRACKET SUB-ASSEMBLY LH
48680A 5.INSTALL FRONT SUPPORT TO FRONT SHOCK ABSORBER NUT
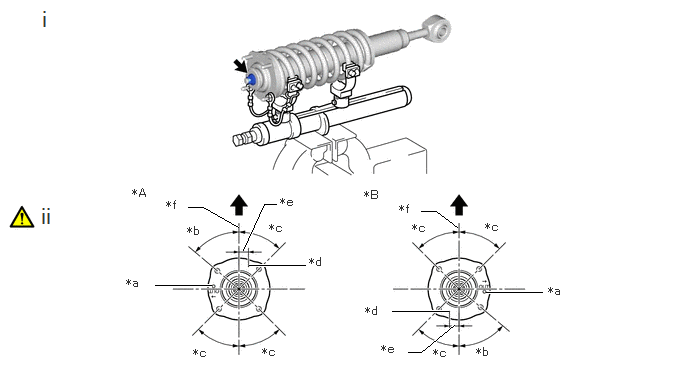
| *A | for LH Side | *B | for RH Side |
| *a | Identification Mark | *b | 50° |
| *c | 45° | *d | Coil Spring Lower End |
| *e | 20 mm (0.787 in.) | *f | Absorber Bush Axis |

|
Front of the Vehicle | - | - |
Temporarily tighten a new lock nut.
Adjust the front suspension sub-support assembly so that the bolts come to the positions as shown in the illustration, and remove SST from the front coil spring LH.
- NOTICE:
-
·
Do not use an impact wrench. It will damage SST.
·Make sure that the width across flat on the front shock absorber piston rod end is located parallel to the front shock absorber bushing.
·Make sure of the direction of the front suspension support assembly when removing SST.
6.TEMPORARILY TIGHTEN STEERING KNUCKLE
|
|
Click here() |
7.TEMPORARILY TIGHTEN FRONT SHOCK ABSORBER WITH COIL SPRING
for Upper side:
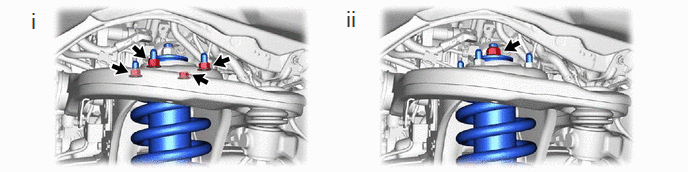
Temporarily tighten the 4 nuts on the upper side of the front shock absorber with coil spring.
Temporarily tighten the a new nut on the upper side of the front shock absorber with coil spring.
for Lower Side:

Temporarily tighten the bolt on the lower side of the front shock absorber with coil spring.
45047 8.CONNECT TIE ROD END SUB-ASSEMBLY LH
|
|
Click here() |
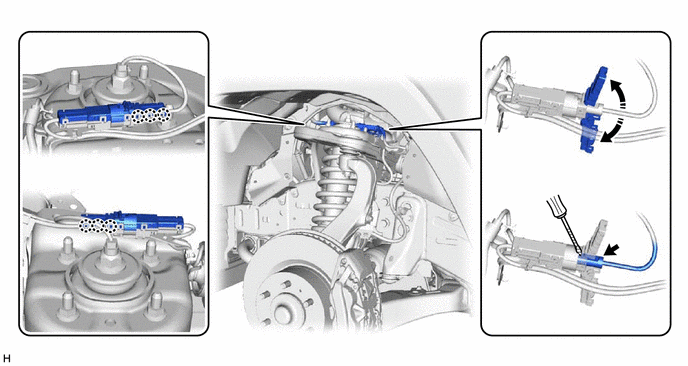
89543 9.CONNECT FRONT SPEED SENSOR LH
|
|
|
w/ AVS:
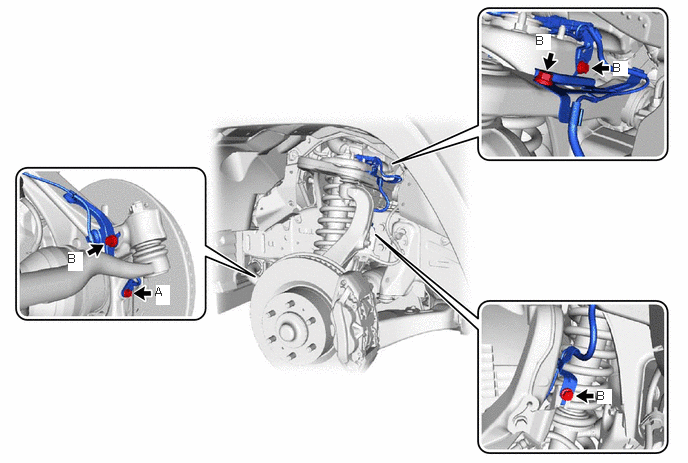
- Torque:
- Bolt A: : 8.5 N*m (87 kgf*cm, 75 in.*lbf)
- Bolt B : 12.5 N*m (127 kgf*cm, 9 ft.*lbf)
43512 10.INSTALL FRONT DISC LH
|
|
Click here() |
11.INSTALL FRONT DISC BRAKE CALIPER ASSEMBLY LH
|
|
Click here() |
48811 12.INSTALL FRONT STABILIZER BAR
w/ Electronic-Kinetic Dynamic Suspension System: Click hereSuspension>FRONT SUSPENSION>FRONT STABILIZER BAR (w/ Electronic-Kinetic Dynamic Suspension System)>INSTALLATION
w/o Electronic-Kinetic Dynamic Suspension System: Click hereSuspension>FRONT SUSPENSION>FRONT STABILIZER BAR (w/o Electronic-Kinetic Dynamic Suspension System)>INSTALLATION
13.INSTALL FRONT WHEEL
14. STABILIZE SUSPENSION
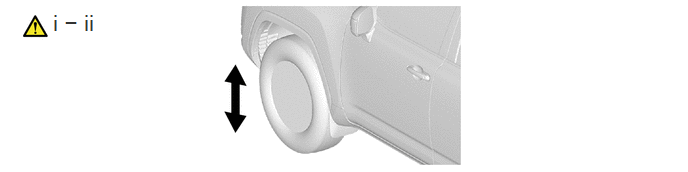
Lower the vehicle.
Bounce the vehicle up and down several times to stabilize the suspension.
15.REMOVE FRONT WHEEL
16.FULLY TIGHTEN STEERING KNUCKLE
|
|
Click here() |
17.FULLY TIGHTEN FRONT SHOCK ABSORBER WITH COIL SPRING
for Upper SIde:
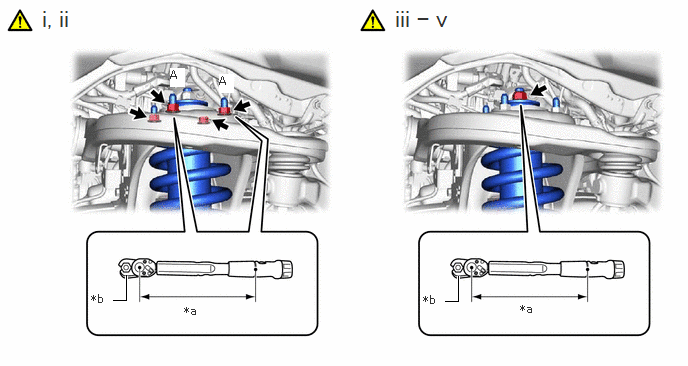
| *a | Torque Wrench Fulcrum Length | *b | Union Nut Wrench |
Using a union nut wrench, fully tighten the 2 nuts (A).
- Torque:
- Specified tightening torque : 45 N*m (459 kgf*cm, 33 ft.*lbf)
- HINT:
-
·
Calculate the torque wrench reading when changing the fulcrum length of the torque wrench.
Click hereGeneral>INTRODUCTION>REPAIR INSTRUCTION>PRECAUTION
·When using a union nut wrench (fulcrum length of 25 mm (0.984 in.)) + torque wrench (fulcrum length of 255 mm (10.039 in.)): 41 N*m (418 kgf*cm, 30 ft.*lbf)
Fully tighten the 2 nuts.
- Torque:
- 45 N*m (459 kgf*cm, 33 ft.*lbf)
w/ AVS:
Using a union nut wrench, fully tighten the nut.
- Torque:
- Specified tightening torque : 65 N*m (663 kgf*cm, 48 ft.*lbf)
- HINT:
-
·
Calculate the torque wrench reading when changing the fulcrum length of the torque wrench.
Click hereGeneral>INTRODUCTION>REPAIR INSTRUCTION>PRECAUTION
·When using a union nut wrench (fulcrum length of 30 mm (1.181 in.)) + torque wrench (fulcrum length of 255 mm (10.039 in.)): 58.2 N*m (593 kgf*cm, 43 ft.*lbf)
w/o AVS:
Fully tighten the nut.
- Torque:
- 65 N*m (663 kgf*cm, 48 ft.*lbf)
w/ Cap:
Install the upper shock absorber cap to the front shock absorber with coil spring.
for Lower Side:
- Torque:
- : 250 N*m (2549 kgf*cm, 184 ft.*lbf)
18.INSTALL FRONT WHEEL
19.CONNECT CABLE TO NEGATIVE BATTERY TERMINAL
|
|
Click here() |
20. INITIALIZATION AFTER RECONNECTING BATTERY TERMINAL
Click hereGeneral>SETUP>WHEN DISCONNECTING OR RECONNECTING BATTERY TERMINAL>WORK PROCEDURE
- HINT:
-
When disconnecting and reconnecting the battery, there is an automatic learning function that completes learning when the respective system is used.
-
Click hereGeneral>SETUP>WHEN DISCONNECTING OR RECONNECTING BATTERY TERMINAL>AUTOMATIC LEARNING CHART
21.CHECK FOR SPEED SENSOR SIGNAL
22.PERFORM INITIALIZATION