1GR-FE ENGINE MECHANICAL ENGINE UNIT REASSEMBLY
CAUTION / NOTICE / HINT
- HINT:
-
·
Thoroughly clean all parts to be assembled.
·Before installing the parts, apply new engine oil to all sliding and rotating surfaces.
·Replace all gaskets, O-rings and oil seals with new ones.
PROCEDURE

 1.INSTALL STUD BOLT
- NOTICE:
-
If a stud bolt is deformed or its threads are damaged, replace it.
Remove any old packing (FIPG material) and be careful not to drop any oil on the contact surfaces of the cylinder block, rear oil seal retainer and oil pan.
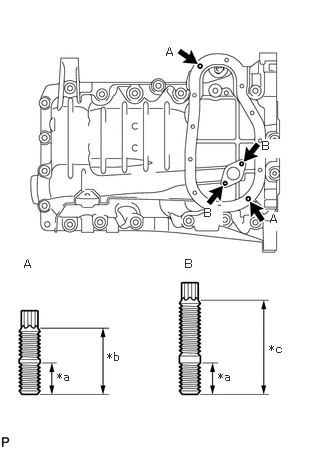
| *a | 9.0 mm (0.354 in.) |
| *b | 19 mm (0.748 in.) |
| *c | 27 mm (1.06 in.) |
Using an E6 "TORX" wrench, install the 4 stud bolts.
- Torque:
- 4.0 N*m (41 kgf*cm, 35 in.*lbf)
11432A 2.INSTALL TAPER SCREW PLUG
Clean the taper screw plug and plug hole.
Apply adhesive to 2 or 3 threads of the taper screw plug end.
- Adhesive:
-
Toyota Genuine Adhesive 1324, Three Bond 1324 or equivalent
Install the taper screw plug.
- Torque:
- 25 N*m (255 kgf*cm, 18 ft.*lbf)
- NOTICE:
-
·
Install the taper screw plug within 3 minutes after applying adhesive.
·Do not expose the taper screw plug to coolant within 1 hour of the installation.
89615 3.INSTALL KNOCK SENSOR
16332 4.INSTALL NO. 1 WATER OUTLET PIPE
11116 5.INSTALL NO. 2 CYLINDER HEAD GASKET
11102 6.INSTALL CYLINDER HEAD LH
11115 7.INSTALL CYLINDER HEAD GASKET
11101 8.INSTALL CYLINDER HEAD SUB-ASSEMBLY
13054 9.INSTALL NO. 4 CAMSHAFT SUB-ASSEMBLY
Apply new engine oil to the thrust portion and journals of the No. 4 camshaft sub-assembly.
Install the No. 4 camshaft sub-assembly to the cylinder head LH.
13053 10.INSTALL NO. 3 CAMSHAFT SUB-ASSEMBLY
Apply new engine oil to the thrust portion and journals of the No. 3 camshaft sub-assembly.
Install the No. 3 camshaft sub-assembly to the cylinder head LH.
11.INSTALL CAMSHAFT BEARING CAP (for Bank 2)
- NOTICE:
-
As the thrust clearance of the camshaft is small, the camshaft must be kept level while it is being installed. If the camshaft is not kept level, the portion of the cylinder head which receives the shaft thrust may crack or be damaged, causing the camshaft to seize or break. To avoid this, make sure the following steps are carried out.
Temporarily install the crankshaft pulley set bolt.
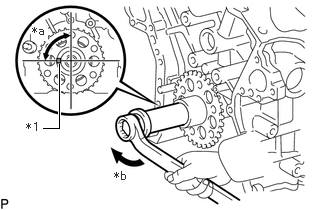
| *1 | Crankshaft Timing Gear Key |
| *a | 90° |
| *b | Turn |
Turn the crankshaft and set the crankshaft timing gear key to the left horizontal position.
- NOTICE:
-
Having the crankshaft at the wrong angle can cause the piston head and valve head to come into contact with each other when the camshaft is installed, causing damage. Always set the crankshaft to the correct angle.
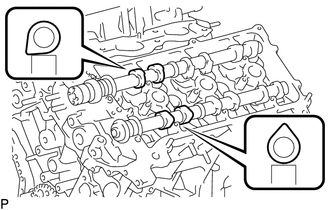
Set the No. 3 camshaft sub-assembly and No. 4 camshaft sub-assembly as shown in the illustration.
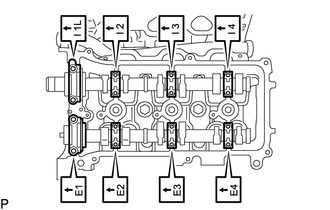
Check the numbers on the camshaft bearing caps and the installation direction before temporarily placing each cap.
Apply a light coat of engine oil to the threads and under the heads of the bolts.
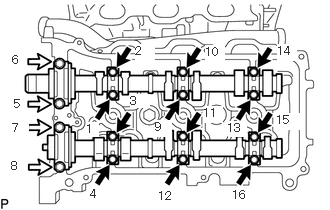

|
Bolt A |

|
Bolt B |
Install and uniformly tighten the 16 bolts in several steps in the order shown in the illustration.
- Torque:
- for bolt A : 9.0 N*m (92 kgf*cm, 80 in.*lbf)
- for bolt B : 24 N*m (245 kgf*cm, 18 ft.*lbf)
- Standard Bolt Length:
-
Item Specified Condition Bolt A 39 mm (1.54 in.) Bolt B 50 mm (1.97 in.)
Remove the crankshaft pulley set bolt.
11821 12.INSTALL NO. 2 CAMSHAFT BEARING
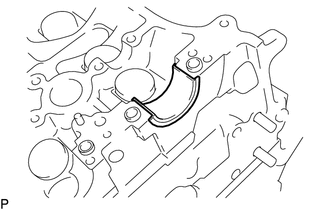
Install the No. 2 camshaft bearing to the cylinder head sub-assembly.
- NOTICE:
-
Clean the backside of the No. 2 camshaft bearing and the contact surface of the cylinder head sub-assembly and prevent oil from adhering to them.
11811 13.INSTALL NO. 1 CAMSHAFT BEARING
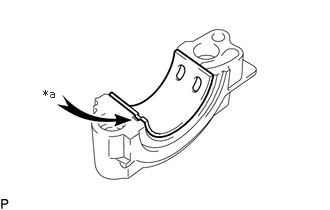
| *a | Claw |
Align the claw of the No. 1 camshaft bearing with the groove of the camshaft bearing cap and push in the No. 1 camshaft bearing.
- NOTICE:
-
·
Install the No. 1 camshaft bearing while aligning it with the oil hole in the camshaft bearing cap.
·Clean the backside of the No. 1 camshaft bearing and the contact surface of the camshaft bearing cap and prevent oil from adhering to them.
13512 14.INSTALL NO. 2 CAMSHAFT
Apply new engine oil to the thrust portion and journals of the No. 2 camshaft.
Install the No. 2 camshaft to the cylinder head sub-assembly.
13511 15.INSTALL CAMSHAFT
Apply new engine oil to the thrust portion and journals of the camshaft.
Install the camshaft to the cylinder head sub-assembly.
16.INSTALL CAMSHAFT BEARING CAP (for Bank 1)
- NOTICE:
-
As the thrust clearance of the camshaft is small, the camshaft must be kept level while it is being installed. If the camshaft is not kept level, the portion of the cylinder head which receives the shaft thrust may crack or be damaged, causing the camshaft to seize or break. To avoid this, make sure the following steps are carried out.
Temporarily install the crankshaft pulley set bolt.
| *1 | Crankshaft Timing Gear Key |
| *a | 90° |
| *b | Turn |
Turn the crankshaft and set the crankshaft timing gear key to the left horizontal position.
- NOTICE:
-
Having the crankshaft at the wrong angle can cause the piston head and valve head to come into contact with each other when the camshaft is installed, causing damage. Always set the crankshaft to the correct angle.
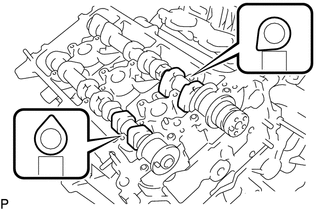
Set the camshaft and No. 2 camshaft as shown in the illustration.
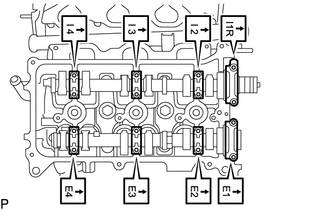
Check the numbers on the camshaft bearing caps and the installation direction before temporarily placing each cap.
Apply a light coat of engine oil to the threads and under the heads of the bolts.
|
|
Bolt A |
|
|
Bolt B |
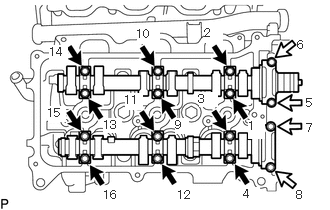
Install and uniformly tighten the 16 bolts in several steps in the order shown in the illustration.
- Torque:
- for bolt A : 9.0 N*m (92 kgf*cm, 80 in.*lbf)
- for bolt B : 24 N*m (245 kgf*cm, 18 ft.*lbf)
- Standard Bolt Length:
-
Item Specified Condition Bolt A 39 mm (1.54 in.) Bolt B 50 mm (1.97 in.)
| *a | Turn |
| *b | 90° |
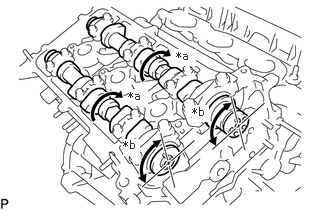
Turn the camshafts clockwise until the camshaft knock pin is at a position 90° from the cylinder head sub-assembly.
Remove the crankshaft pulley set bolt.
13560A 17.INSTALL NO. 3 CHAIN TENSIONER ASSEMBLY
| *a | Push |
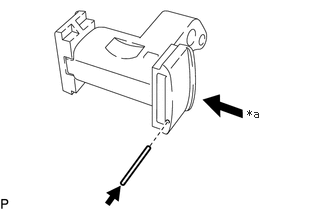
While pushing in the No. 3 chain tensioner assembly, insert a pin with a diameter of 1.0 mm (0.0394 in.) into the hole to fix the No. 3 chain tensioner assembly in place.
Install the No. 3 chain tensioner assembly with the bolt.
- Torque:
- 21 N*m (214 kgf*cm, 15 ft.*lbf)
18.INSTALL CAMSHAFT TIMING GEARS AND NO. 2 CHAIN (for Bank 2)
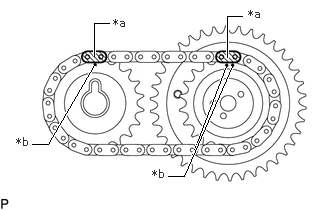
| *a | Mark Link (Yellow) |
| *b | Timing Mark |
Align the mark links (yellow) of the No. 2 chain sub-assembly with the timing marks of the camshaft timing gear assembly and camshaft timing sprocket.
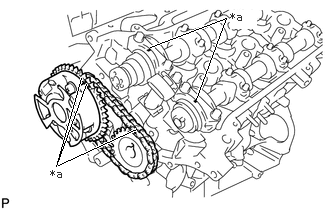
| *a | Timing Mark |
Align the timing marks on the camshaft timing gear assembly and camshaft timing sprocket with the timing marks on the camshaft bearing caps, and install the camshaft timing gear assembly and camshaft timing sprocket together with the No. 2 chain sub-assembly.
Temporarily install the camshaft timing gear assembly and camshaft timing sprocket with the 2 bolts.
- NOTICE:
-
Do not push the camshaft timing gear assembly onto the No. 3 camshaft sub-assembly forcibly when installing it.
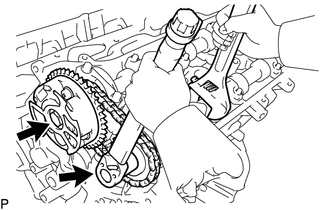
Hold the hexagonal portion of the No. 4 camshaft sub-assembly with a wrench and tighten the 2 bolts.
- Torque:
- 100 N*m (1020 kgf*cm, 74 ft.*lbf)
Remove the pin from the No. 3 chain tensioner assembly.
13550 19.INSTALL NO. 2 CHAIN TENSIONER ASSEMBLY
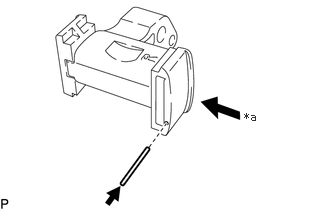
| *a | Push |
While pushing in the No. 2 chain tensioner assembly, insert a pin with a diameter of 1.0 mm (0.0394 in.) into the hole to fix the No. 2 chain tensioner assembly in place.
Install the No. 2 chain tensioner assembly with the bolt.
- Torque:
- 21 N*m (214 kgf*cm, 15 ft.*lbf)
20.INSTALL CAMSHAFT TIMING GEARS AND NO. 2 CHAIN (for Bank 1)
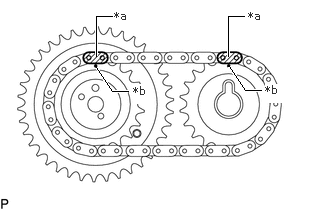
| *a | Mark Link (Yellow) |
| *b | Timing Mark |
Align the mark links (yellow) of the No. 2 chain sub-assembly with the timing marks of the camshaft timing gear assembly and camshaft timing sprocket.
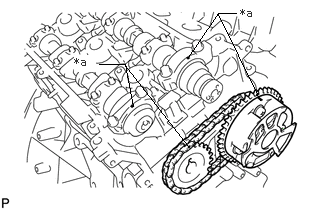
| *a | Timing Mark |
Align the timing marks on the camshaft timing gear assembly and camshaft timing sprocket with the timing marks on the camshaft bearing caps, and install the camshaft timing gear assembly and camshaft timing sprocket together with the No. 2 chain sub-assembly.
Temporarily install the camshaft timing gear assembly and camshaft timing sprocket with the 2 bolts.
- NOTICE:
-
Do not push the camshaft timing gear assembly onto the camshaft forcibly when installing it.
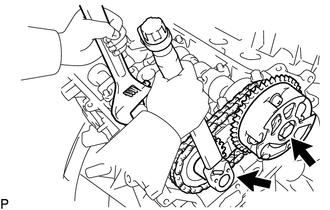
Hold the hexagonal portion of the No. 2 camshaft with a wrench and tighten the 2 bolts.
- Torque:
- 100 N*m (1020 kgf*cm, 74 ft.*lbf)
Remove the pin from the No. 2 chain tensioner assembly.
13561 21.INSTALL NO. 1 CHAIN VIBRATION DAMPER
Install the No. 1 chain vibration damper with the 2 bolts.
- Torque:
- 19 N*m (194 kgf*cm, 14 ft.*lbf)
13521 22.INSTALL CRANKSHAFT TIMING SPROCKET
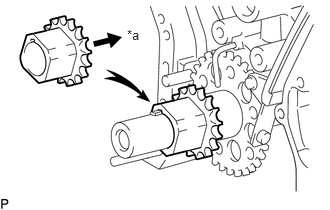
| *a | Inward |
Align the crankshaft timing gear key with the groove of the crankshaft timing sprocket and install the crankshaft timing sprocket as shown in the illustration.
13559 23.INSTALL CHAIN TENSIONER SLIPPER
Install the chain tensioner slipper.
13540 24.INSTALL NO. 1 CHAIN TENSIONER ASSEMBLY
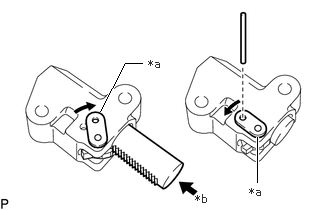
| *a | Stopper Plate |
| *b | Push |
While turning the stopper plate of the No. 1 chain tensioner assembly clockwise, push in the plunger of the No. 1 chain tensioner assembly as shown in the illustration.
While turning the stopper plate of the No. 1 chain tensioner assembly counterclockwise, insert a bar with a diameter of 3.5 mm (0.138 in.) into the holes in the stopper plate and No. 1 chain tensioner assembly to fix the stopper plate in place.
Install the No. 1 chain tensioner assembly with the 2 bolts.
- Torque:
- 10 N*m (102 kgf*cm, 7 ft.*lbf)
25.SET NO. 1 CYLINDER TO TDC/COMPRESSION
Set the No. 1 cylinder to TDC/compression.
Align the timing marks of the camshaft timing gear assemblies and camshaft timing sprockets with the timing marks of the camshaft bearing caps.
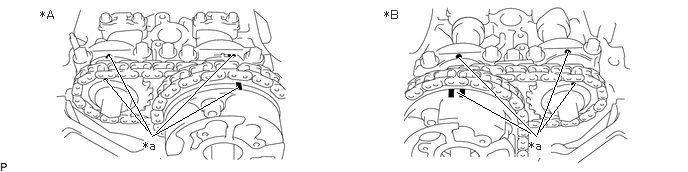
| *A | for Bank 1 | *B | for Bank 2 |
| *a | Timing Mark | - | - |
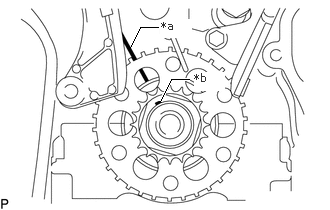
| *a | Timing Line |
| *b | Crankshaft Timing Gear Key |
Temporarily install the crankshaft pulley set bolt and turn the crankshaft to align the crankshaft timing gear key with the timing line of the cylinder block sub-assembly.
13506 26.INSTALL CHAIN SUB-ASSEMBLY
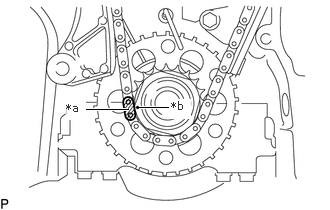
| *a | Mark Link (Yellow) |
| *b | Timing Mark |
Align the mark link (yellow) of the chain sub-assembly with the timing mark of the crankshaft timing sprocket.
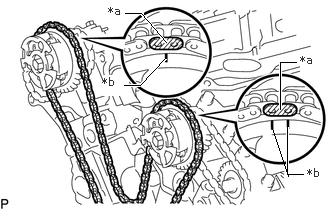
| *a | Mark Link (Orange) |
| *b | Timing Mark |
Align the mark links (orange) of the chain sub-assembly with the timing marks of the camshaft timing gear assemblies and install the chain sub-assembly.
13562 27.INSTALL NO. 2 CHAIN VIBRATION DAMPER
Install the 2 No. 2 chain vibration dampers.
13530 28.INSTALL IDLE SPROCKET ASSEMBLY
Apply a light coat of engine oil to the rotating surface of the No. 1 idle gear shaft.
- HINT:
-
Check for foreign matter on the No. 1 idle gear shaft and No. 2 idle gear shaft.
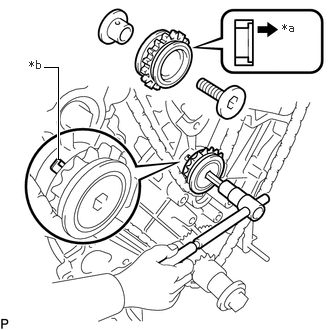
| *a | Forward |
| *b | Knock Pin |
Temporarily install the No. 1 idle gear shaft and idle sprocket assembly together with the No. 2 idle gear shaft while aligning the knock pin of the No. 1 idle gear shaft with the knock pin groove of the cylinder block sub-assembly.
- NOTICE:
-
Make sure the idle sprocket assembly is installed facing the proper direction.
Using a 10 mm hexagon wrench, tighten the No. 2 idle gear shaft.
- Torque:
- 60 N*m (612 kgf*cm, 44 ft.*lbf)
Remove the bar from the No. 1 chain tensioner assembly.
16100 29.INSTALL ENGINE WATER PUMP ASSEMBLY
Install a new gasket and the engine water pump assembly with the 8 bolts.
- Torque:
- 11 N*m (112 kgf*cm, 8 ft.*lbf)
11302 30.INSTALL TIMING CHAIN COVER SUB-ASSEMBLY
Remove any old packing (FIPG material) and be careful not to drop any oil on the contact surfaces of the timing chain cover sub-assembly, cylinder head sub-assembly, cylinder head LH and cylinder block sub-assembly.
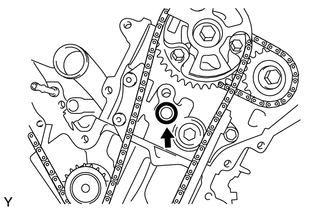
Install a new O-ring to the cylinder head LH as shown in the illustration.
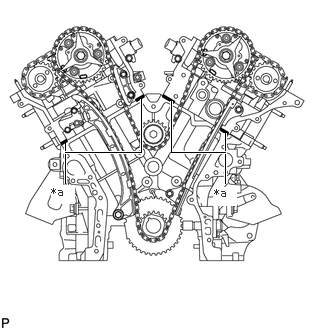
| *a | Seal Packing Application Area |
Apply seal packing as shown in the illustration.
- Seal packing:
-
Toyota Genuine Seal Packing Black, Three Bond 1207B or equivalent
- Standard seal diameter:
-
3.0 to 4.0 mm (0.118 to 0.157 in.)
Apply seal packing as shown in the illustration.
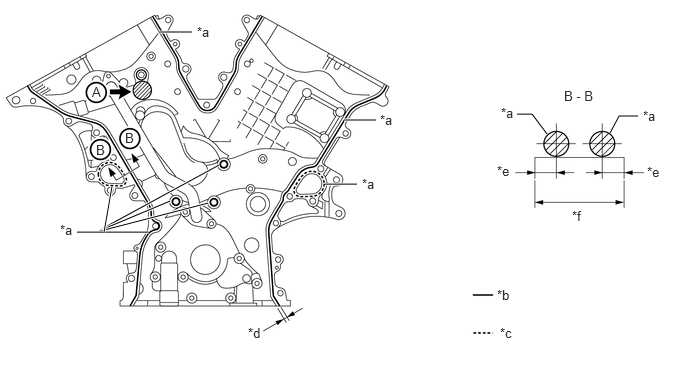
| *a | Seal Packing | *b | Continuous Line Area |
| *c | Dashed Line Area | *d | 3.0 to 4.0 mm (0.118 to 0.157 in.) |
| *e | 3.5 to 4.0 mm (0.138 to 0.157 in.) | *f | 16.7 mm (0.657 in.) |
- Seal packing:
- Continuous line area:
-
Toyota Genuine Seal Packing Black, Three Bond 1207B or equivalent
- Dashed line area:
-
Toyota Genuine Seal Packing 1282B, Three Bond 1282B or equivalent
- Standard seal diameter:
-
3.5 to 4.5 mm (0.138 to 0.177 in.)
- NOTICE:
-
·
Install the timing chain cover sub-assembly within 3 minutes after applying seal packing. After installing it, the bolts and nuts must be tightened within 15 minutes. Otherwise, the seal packing must be removed and reapplied.
·Do not apply seal packing to "A" shown in the illustration.
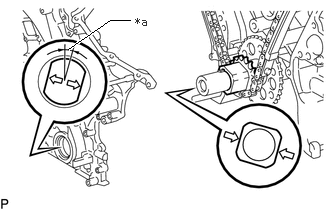
| *a | 15° |
Align the width of the joint portion of the oil pump drive rotor and the crankshaft timing gear, and then install the timing chain or belt cover sub-assembly.
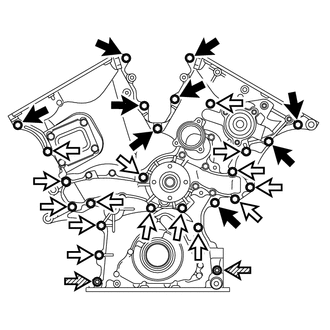
|
|
Bolt A |
|
|
Bolt B |

|
Nut |
Install the timing chain cover sub-assembly with the 24 bolts and 2 nuts. Tighten the bolts and nuts uniformly in several steps.
- Torque:
- for nut : 23 N*m (235 kgf*cm, 17 ft.*lbf)
- for bolt : 21 N*m (214 kgf*cm, 15 ft.*lbf)
- NOTICE:
-
·
Install the timing chain cover sub-assembly 15 minutes or more after installing the engine water pump assembly.
·Make sure that there is no oil on the bolt threads.
- Standard Bolt Length:
-
Item Specified Condition Bolt A 25 mm (0.984 in.) Bolt B 55 mm (2.17 in.)
11301C 31.INSTALL FRONT CRANKSHAFT OIL SEAL
11324 32.INSTALL TIMING CHAIN COVER PLATE
11381A 33.INSTALL ENGINE REAR OIL SEAL
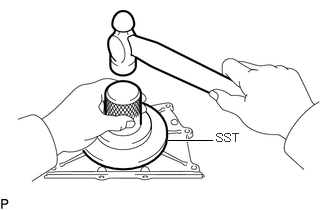
Using SST and a hammer, tap in a new engine rear oil seal until its surface is flush with the engine rear oil seal retainer edge.
- SST
-
09223-78010
Apply MP grease to the lip of the engine rear oil seal.
11381 34.INSTALL ENGINE REAR OIL SEAL RETAINER
Remove any old packing (FIPG material) and be careful not to drop any oil on the contact surfaces of the engine rear oil seal retainer and cylinder block sub-assembly.
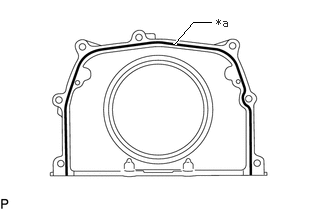
| *a | Seal Packing Application Area |
Apply seal packing as shown in the illustration.
- Seal packing:
-
Toyota Genuine Seal Packing Black, Three Bond 1207B or equivalent
- Standard seal diameter:
-
2.0 to 3.0 mm (0.0787 to 0.118 in.)
- NOTICE:
-
Parts must be assembled within 3 minutes of application. Otherwise the seal packing must be removed and reapplied.
Install the engine rear oil seal retainer with the 5 bolts and 2 nuts.
- Torque:
- for nut : 9.0 N*m (92 kgf*cm, 80 in.*lbf)
- for bolt : 10 N*m (102 kgf*cm, 7 ft.*lbf)
12101 35.INSTALL OIL PAN SUB-ASSEMBLY
Remove any old packing (FIPG material) and be careful not to drop any oil on the contact surfaces of the cylinder block, rear oil seal retainer and oil pan sub-assembly.
Install a new O-ring to the timing chain cover.
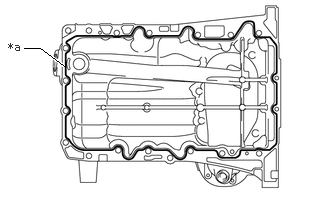
| *a | Seal Packing |
Apply seal packing in a continuous line as shown in the illustration.
- Seal packing:
-
Toyota Genuine Seal Packing Black, Three Bond 1207B or equivalent
- Standard seal diameter:
-
3.0 to 4.0 mm (0.118 to 0.157 in.)
- NOTICE:
-
·
Remove any oil from the contact surface.
·Install the oil pan within 3 minutes after applying seal packing.
·Do not start the engine for at least 2 hours after installing.
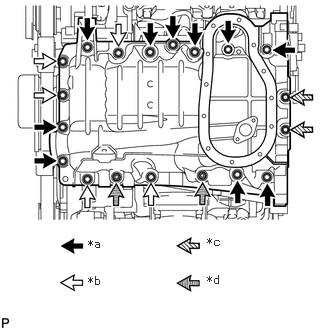
| *a | Bolt A |
| *b | Bolt B |
| *c | Bolt C |
| *d | Nut |
Install the oil pan sub-assembly with the 17 bolts (A, B and C) and 2 nuts. Tighten the bolts and nuts uniformly in several steps.
- Torque:
- for bolt A, B and nut : 21 N*m (214 kgf*cm, 15 ft.*lbf)
- for bolt C : 10 N*m (102 kgf*cm, 7 ft.*lbf)
- Standard Bolt:
-
Item Quantity Length Bolt A 10 45 mm (1.77 in.) Bolt B 5 25 mm (0.984 in.) Bolt C 2 14 mm (0.551 in.)
15104 36.INSTALL OIL STRAINER SUB-ASSEMBLY
Install a new gasket and the oil strainer sub-assembly with the 2 nuts.
- Torque:
- 9.0 N*m (92 kgf*cm, 80 in.*lbf)
12102A 37.INSTALL NO. 2 OIL PAN SUB-ASSEMBLY
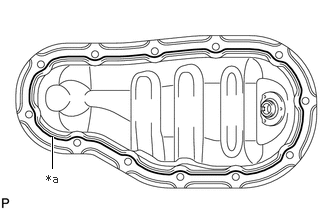
| *a | Seal Packing |
Apply seal packing as shown in the illustration.
- Seal packing:
-
Toyota Genuine Seal Packing Black, Three Bond 1207B or equivalent
- Standard seal diameter:
-
3.0 to 4.0 mm (0.118 to 0.157 in.)
- NOTICE:
-
·
Remove any oil from the contact surface.
·Install the No. 2 oil pan sub-assembly within 3 minutes after applying seal packing.
·Do not start the engine for at least 2 hours after installation.
Install the No. 2 oil pan sub-assembly with the 10 bolts and 2 nuts. Tighten the bolts and nuts uniformly in several steps.
- Torque:
- for bolt : 9.0 N*m (92 kgf*cm, 80 in.*lbf)
- for nut : 10 N*m (102 kgf*cm, 7 ft.*lbf)
12101A 38.INSTALL OIL PAN DRAIN PLUG
Install a new gasket and the oil pan drain plug.
- Torque:
- 40 N*m (408 kgf*cm, 30 ft.*lbf)
13471 39.INSTALL CRANKSHAFT PULLEY
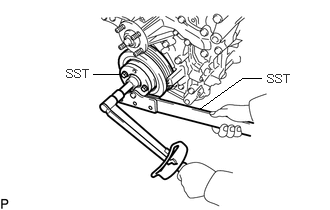
Using SST, install the crankshaft pulley with the crankshaft pulley set bolt.
- SST
-
09213-54015 (91651-60855)
09330-00021
- Torque:
- 250 N*m (2549 kgf*cm, 184 ft.*lbf)
40.SET NO. 1 CYLINDER TO TDC/COMPRESSION
41.INSPECT VALVE CLEARANCE
42.ADJUST VALVE CLEARANCE
11202 43.INSTALL CYLINDER HEAD COVER SUB-ASSEMBLY LH
Remove any old packing (FIPG material) and be careful not to drop any oil on the contact surfaces of the cylinder head LH, timing chain cover sub-assembly and cylinder head cover sub-assembly LH.
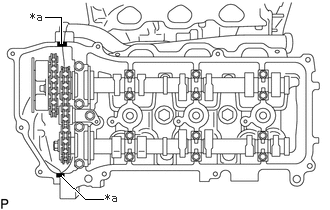
| *a | Seal Packing Application Area |
Apply seal packing as shown in the illustration.
- Seal packing:
-
Toyota Genuine Seal Packing Black, Three Bond 1207B or equivalent
- Standard seal diameter:
-
2.0 to 3.0 mm (0.0787 to 0.118 in.)
- NOTICE:
-
·
Remove any oil from the contact surface.
·Install the cylinder head cover sub-assembly LH within 3 minutes after applying seal packing.
·Do not start the engine for at least 2 hours after the installation.
Install a new gasket to the cylinder head cover sub-assembly LH.
Install the seal washers to the bolts.
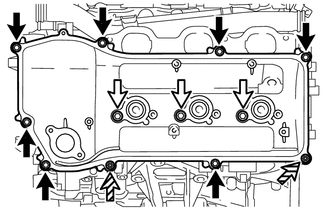
|
|
Bolt A |
|
|
Bolt B |
|
|
Nut |
Temporarily install the cylinder head cover sub-assembly LH with the 10 bolts and 2 nuts. Tighten the bolts and nuts uniformly in several steps.
- Torque:
- for bolt A : 10 N*m (102 kgf*cm, 7 ft.*lbf)
- for bolt B and nut : 9.0 N*m (92 kgf*cm, 80 in.*lbf)
- Standard Bolt Length:
-
Item Specified Condition Bolt A 25 mm (0.984 in.) Bolt B 60 mm (2.36 in.)
12204 44.INSTALL PCV VALVE SUB-ASSEMBLY
11201 45.INSTALL CYLINDER HEAD COVER SUB-ASSEMBLY
Remove any old packing (FIPG material) and be careful not to drop any oil on the contact surfaces of the cylinder head sub-assembly, timing chain cover sub-assembly and cylinder head cover sub-assembly.
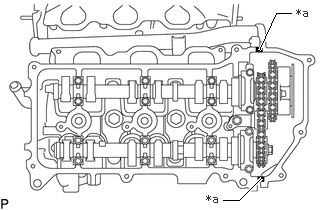
| *a | Seal Packing Application Area |
Apply seal packing as shown in the illustration.
- Seal packing:
-
Toyota Genuine Seal Packing Black, Three Bond 1207B or equivalent
- Standard seal diameter:
-
2.0 to 3.0 mm (0.0787 to 0.118 in.)
- NOTICE:
-
·
Remove any oil from the contact surface.
·Install the head cover within 3 minutes after applying seal packing.
·Do not start the engine for at least 2 hours after the installation.
Install a new gasket to the cylinder head cover sub-assembly.
Install the seal washers to the bolts.
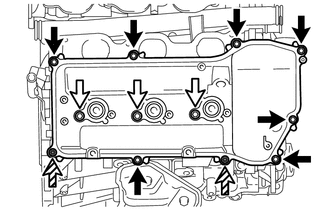
|
|
Bolt A |
|
|
Bolt B |
|
|
Nut |
Temporarily install the cylinder head cover sub-assembly with the 10 bolts and 2 nuts. Tighten the bolts and nuts uniformly in several steps.
- Torque:
- for bolt A : 10 N*m (102 kgf*cm, 7 ft.*lbf)
- for bolt B and nut : 9.0 N*m (92 kgf*cm, 80 in.*lbf)
- Standard Bolt Length:
-
Item Specified Condition Bolt A 25 mm (0.984 in.) Bolt B 60 mm (2.36 in.)
19100P 46.INSTALL SPARK PLUG
12185 47.INSTALL OIL FILLER CAP HOUSING
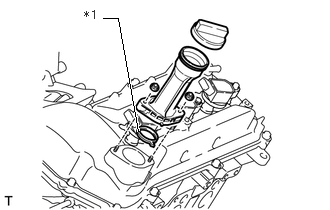
| *1 | New Gasket |
Install a new gasket and the oil filler cap housing with the 2 nuts.
- Torque:
- 9.0 N*m (92 kgf*cm, 80 in.*lbf)
12108 48.INSTALL OIL FILLER CAP SUB-ASSEMBLY
Install the oil filler cap sub-assembly.
16356 49.INSTALL REAR WATER BY-PASS JOINT
16323 50.INSTALL WATER INLET HOUSING
Install a new O-ring and a new gasket.
- HINT:
-
Apply soapy water to a new O-ring.
Install the water inlet housing with the 5 bolts.
- Torque:
- 9.0 N*m (92 kgf*cm, 80 in.*lbf)
- NOTICE:
-
Make sure that the O-rings do not become trapped.
16267 51.INSTALL NO. 3 WATER BY-PASS HOSE
Install the No. 3 water by-pass hose, and slide the 2 hose clamps to secure the hoses.
16264 52.INSTALL NO. 2 WATER BY-PASS HOSE
Install the No. 2 water by-pass hose, and slide the 2 hose clamps to secure the hoses.
16261 53.INSTALL NO. 1 WATER BY-PASS HOSE
Install the No. 1 water by-pass hose, and slide the 2 hose clamps to secure the hoses.
15609 54.INSTALL OIL FILTER BRACKET SUB-ASSEMBLY
Install a new O-ring to the timing chain cover sub-assembly.
Install the oil filter bracket sub-assembly with the 3 bolts and 2 nuts.
- Torque:
- 19 N*m (194 kgf*cm, 14 ft.*lbf)
15710 55.INSTALL OIL COOLER ASSEMBLY
15777 56.INSTALL OIL COOLER HOSE
15778 57.INSTALL NO. 2 OIL COOLER HOSE
15601 58.INSTALL OIL FILTER SUB-ASSEMBLY
15678A 59.INSTALL OIL CONTROL VALVE FILTER
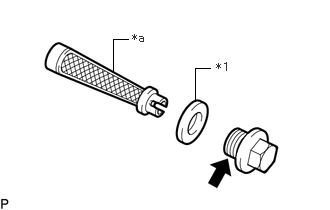
| *1 | New Gasket |
| *a | Mesh Part |
|
|
Adhesive |
Make sure that the mesh is free from damage and foreign matter.
Install 2 new gaskets to 2 new oil control valve filters.
Install the 2 oil control filters into the 2 new unions.
Apply adhesive to 2 or 3 threads of the unions.
- Adhesive:
-
Toyota Genuine Adhesive 1344, Three Bond 1344 or equivalent
Install the 2 unions to the cylinder head sub-assembly and cylinder head LH.
- Torque:
- 62 N*m (632 kgf*cm, 46 ft.*lbf)
15330B 60.INSTALL CAMSHAFT TIMING OIL CONTROL VALVE ASSEMBLY (for Bank 2)
15330B 61.INSTALL CAMSHAFT TIMING OIL CONTROL VALVE ASSEMBLY (for Bank 1)
62.INSTALL CRANKSHAFT POSITION SENSOR
11301M 63.INSTALL VVT SENSOR (for Bank 2)
11301M 64.INSTALL VVT SENSOR (for Bank 1)
11415 65.INSTALL CYLINDER BLOCK WATER DRAIN COCK SUB-ASSEMBLY
Remove any oil from the threads of the cylinder block water drain cock sub-assembly.
Apply adhesive to 2 or 3 threads at the end of the cylinder block water drain cock sub-assembly.
- Adhesive:
-
Toyota Genuine Adhesive 1324, Three Bond 1324 or equivalent
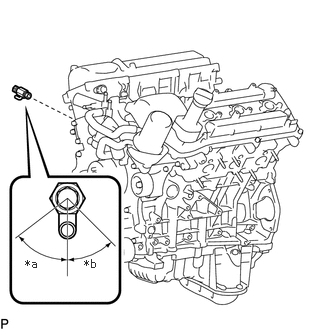
| *a | 75° |
| *b | 45° |
Install the cylinder block water drain cock sub-assembly.
- Torque:
- 25 N*m (255 kgf*cm, 18 ft.*lbf)
- NOTICE:
-
·
Install the cylinder block water drain cock sub-assembly within 3 minutes after applying adhesive.
·Do not expose the cylinder block water drain cock sub-assembly to engine coolant within 1 hour after installing.
Rotate the cylinder block water drain cock sub-assembly clockwise as shown in the illustration.
- NOTICE:
-
·
Do not rotate the cylinder block water drain cock sub-assembly by more than 1 revolution (360°) after tightening the cylinder block water drain cock sub-assembly to the specified torque.
·Do not loosen the cylinder block water drain cock sub-assembly after setting it correctly.
89422C 66.INSTALL ENGINE COOLANT TEMPERATURE SENSOR
83520 67.INSTALL OIL PRESSURE SENDER GAUGE ASSEMBLY (w/ Oil Pressure Gauge)
83530 68.INSTALL ENGINE OIL PRESSURE SWITCH ASSEMBLY (w/o Oil Pressure Gauge)