1VD-FTV ENGINE CONTROL ECD SYSTEM VC Output Circuit
DESCRIPTION
The ECM constantly generates 5 V of power from the battery voltages supplied to the +B (BATT) terminal to operate the microprocessor. The ECM also provides this power to the sensors through the VC output circuit.
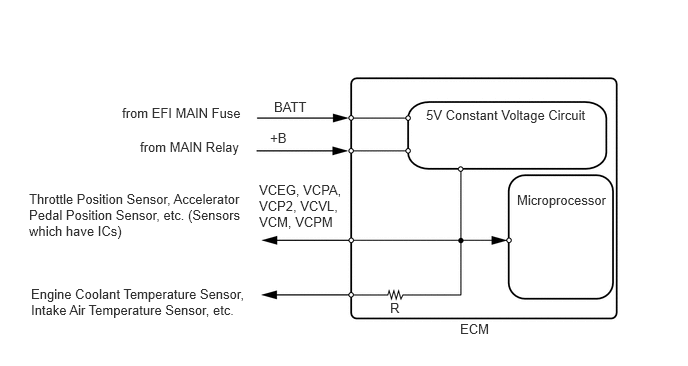
When the VC circuit is short-circuited, the microprocessor in the ECM and sensors that are supplied with power through the VC circuit are inactivated because the power is not supplied from the VC circuit. Under this condition, the system does not start up and the MIL does not illuminate even if the system malfunctions.
- HINT:
-
Under normal conditions, the MIL is illuminated for several seconds when the ignition switch is first turned to ON. The MIL goes off when the engine is started.
WIRING DIAGRAM
ECM Power Source Circuit Diagram
Click hereEngine / Hybrid System>1VD-FTV (ENGINE CONTROL)>ECD SYSTEM>ECM Power Source Circuit
Mass Air Flow Meter Circuit
Click hereEngine / Hybrid System>1VD-FTV (ENGINE CONTROL)>ECD SYSTEM>P0100
VC power source circuit
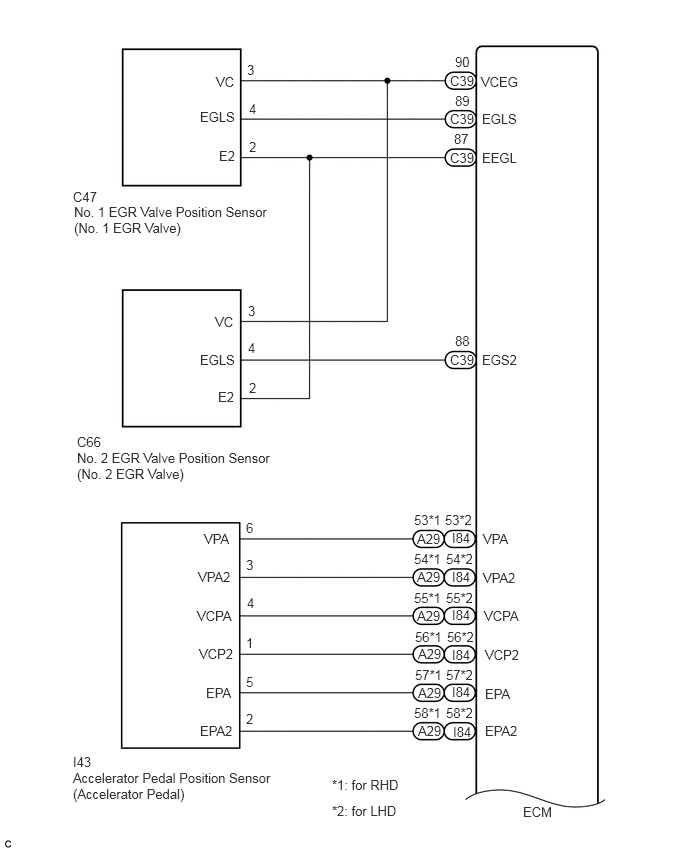
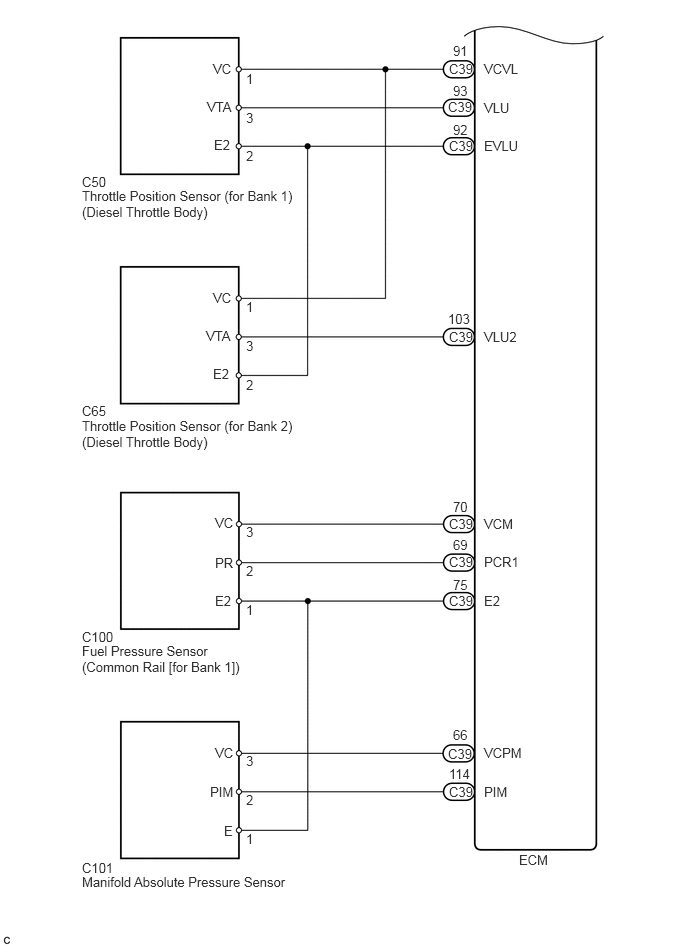
CAUTION / NOTICE / HINT
- NOTICE:
-
·
Check the fuses for circuits related to this system before performing the following inspection procedure.
·After replacing the ECM, the new ECM needs registration (See page Engine / Hybrid System>1VD-FTV (ENGINE CONTROL)>ECD SYSTEM>REGISTRATION) and initialization (See page Engine / Hybrid System>1VD-FTV (ENGINE CONTROL)>ECD SYSTEM>INITIALIZATION).
PROCEDURE
- Result:
-
Result Proceed to for LHD A for RHD B
A
B
Connect the GTS to the DLC3.
Turn the ignition switch to ON.
Turn the GTS on.
Check the communication between the GTS and ECM.
- HINT:
-
It can be checked using the "Engine" item of the Data List.
- Result:
-
Result Proceed to Communication is not possible A Communication is possible B
A
B
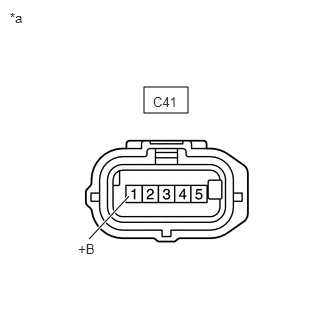
| *a | Front view of wire harness connector (to Mass Air Flow Meter) |
Turn the ignition switch to ON.
Measure the voltage according to the value(s) in the table below.
- Standard Voltage:
-
Tester Connection Condition Specified Condition C41-1 (+B) - Body ground Ignition switch ON 11 to 14 V
- HINT:
-
·
Check the fuse with it installed to the relay block.
·If the result is not as specified, since current is not flowing to the +B terminals of the ECM, the system may not be started.
- Result:
-
Proceed to OK NG
OK
NG
Disconnect the throttle position sensor (for Bank 1) connector.
Turn the ignition switch to ON.
Turn the GTS on.
Check the communication between the GTS and ECM.
- HINT:
-
It can be checked using the "Engine" item of the Data List.
- Result:
-
Result Proceed to Communication is possible A Communication is not possible B
B
A
Disconnect the throttle position sensor (for Bank 2) connector.
Turn the ignition switch to ON.
Turn the GTS on.
Check the communication between the GTS and ECM.
- HINT:
-
It can be checked using the "Engine" item of the Data List.
- Result:
-
Result Proceed to Communication is possible A Communication is not possible B
B
A
Disconnect the No. 1 EGR valve connector.
Turn the ignition switch ON.
Turn the GTS on.
Check the communication between the GTS and ECM.
- HINT:
-
It can be checked using the "Engine" item of the Data List.
- Result:
-
Result Proceed to Communication is possible A Communication is not possible B
B
A
Disconnect the No. 2 EGR valve connector.
Turn the ignition switch ON.
Turn the GTS on.
Check the communication between the GTS and ECM.
- HINT:
-
It can be checked using the "Engine" item of the Data List.
- Result:
-
Result Proceed to Communication is possible A Communication is not possible B
B
A
Disconnect the accelerator pedal position sensor connector.
Turn the ignition switch to ON.
Turn the GTS on.
Check the communication between the GTS and ECM.
- HINT:
-
It can be checked using the "Engine" item of the Data List.
- Result:
-
Result Proceed to Communication is possible A Communication is not possible B
B
A
Disconnect the manifold absolute pressure sensor connector.
Turn the ignition switch to ON.
Turn the GTS on.
Check the communication between the GTS and ECM.
- HINT:
-
It can be checked using the "Engine" item of the Data List.
- Result:
-
Result Proceed to Communication is possible A Communication is not possible B
B
A
Disconnect the fuel pressure sensor connector.
Turn the ignition switch to ON.
Turn the GTS on.
Check the communication between the GTS and ECM.
- HINT:
-
It can be checked using the "Engine" item of the Data List.
- Result:
-
Result Proceed to Communication is possible A Communication is not possible B
B
A
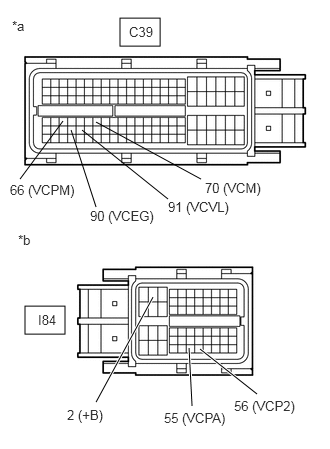
| *a | Front view of wire harness connector (to ECM) |
| *b | Front view of wire harness connector (to ECM) |
Disconnect the throttle position sensor (for Bank 1) connector.
Disconnect the throttle position sensor (for Bank 2) connector.
Disconnect the No. 1 EGR valve connector.
Disconnect the No. 2 EGR valve connector.
Disconnect the accelerator pedal position sensor connector.
Disconnect the manifold absolute pressure sensor connector.
Disconnect the fuel pressure sensor connector.
Disconnect the ECM connectors.
Measure the resistance according to the value(s) in the table below.
- Standard resistance:
-
Tester Connection Condition Specified Condition C39-90 (VCEG) - Body ground Always 10 kΩ or higher C39-91 (VCVL) - Body ground Always 10 kΩ or higher C39-70 (VCM) - Body ground Always 10 kΩ or higher C39-66 (VCPM) - Body ground Always 10 kΩ or higher I84-55 (VCPA) - Body ground Always 10 kΩ or higher I84-56 (VCP2) - Body ground Always 10 kΩ or higher MAIN relay terminal 3 - I84-2 (+B) Always Below 1 Ω I84-2 (+B) - Body ground Always 10 kΩ or higher
- Result:
-
Proceed to OK NG
OK
NG
Check that the Malfunction Indicator Lamp (MIL) lights up when turning the ignition switch ON.
- Result:
-
Result Proceed to MIL illuminates A MIL does not illuminate B
B
A
Connect the GTS to the DLC3.
Turn the ignition switch ON and GTS on.
Check the communication between the GTS and ECM.
- Result:
-
Result Proceed to Communication is possible A Communication is not possible B
B
A
Disconnect the throttle position sensor (for Bank 1) connector.
Turn the ignition switch ON.
Check the MIL.
- Result:
-
Result Proceed to MIL illuminates A MIL does not illuminate B
B
A
Disconnect the throttle position sensor (for Bank 2) connector.
Turn the ignition switch ON.
Check the MIL.
- Result:
-
Result Proceed to MIL illuminates A MIL does not illuminate B
B
A
Disconnect the No. 1 EGR valve connector.
Turn the ignition switch ON.
Check the MIL.
- Result:
-
Result Proceed to MIL illuminates A MIL does not illuminate B
B
A
Disconnect the No. 2 EGR valve connector.
Turn the ignition switch ON.
Check the MIL.
- Result:
-
Result Proceed to MIL illuminates A MIL does not illuminate B
B
A
Disconnect the accelerator pedal position sensor connector.
Turn the ignition switch ON.
Check the MIL.
- Result:
-
Result Proceed to MIL illuminates A MIL does not illuminate B
B
A
Disconnect the manifold absolute pressure sensor connector.
Turn the ignition switch ON.
Check the MIL.
- Result:
-
Result Proceed to MIL illuminates A MIL does not illuminate B
B
A
Disconnect the fuel pressure sensor connector.
Turn the ignition switch ON.
Check the MIL.
- Result:
-
Result Proceed to MIL illuminates A MIL does not illuminate B
B
A
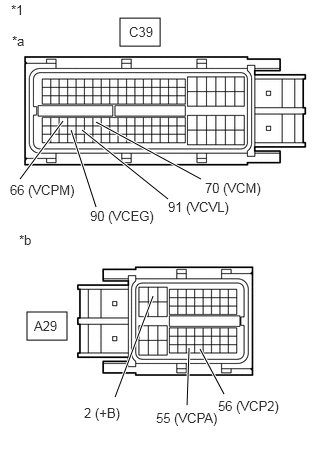
| *1 | for RHD |
| *a | Front view of wire harness connector (to ECM) |
| *b | Front view of wire harness connector (to ECM) |
Disconnect the throttle position sensor (for Bank 1) connector.
Disconnect the throttle position sensor (for Bank 2) connector.
Disconnect the No. 1 EGR valve connector.
Disconnect the No. 2 EGR valve connector.
Disconnect the accelerator pedal position sensor connector.
Disconnect the manifold absolute pressure sensor connector.
Disconnect the fuel pressure sensor connector.
Disconnect the ECM connectors.
Measure the resistance according to the value(s) in the table below.
- Standard resistance:
-
Tester Connection Condition Specified Condition C39-90 (VCEG) - Body ground Always 10 kΩ or higher C39-91 (VCVL) - Body ground Always 10 kΩ or higher C39-70 (VCM) - Body ground Always 10 kΩ or higher C39-66 (VCPM) - Body ground Always 10 kΩ or higher A29-55 (VCPA) - Body ground Always 10 kΩ or higher A29-56 (VCP2) - Body ground Always 10 kΩ or higher MAIN relay terminal 3 - A29-2 (+B) Always Below 1 Ω A29-2 (+B) - Body ground Always 10 kΩ or higher
- Result:
-
Proceed to OK NG
OK
NG