BF1B TRANSFER / 4WD / AWD TRANSFER SHIFT LEVER ASSEMBLY INSTALLATION
PROCEDURE

 36321 1.INSTALL FRONT TRANSFER DRIVE SHIFT LEVER (for Direct Shift Type)
Install a new bush to the front transfer drive shift lever.
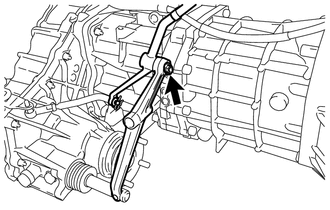
Install the front transfer drive shift lever and 2 washers and then install a new clip.
Install the transfer shift lever shaft and wave washer.
Install the 2 washers and nut.
- Torque:
- 44.1 N*m (450 kgf*cm, 33 ft.*lbf)
36323 2.INSTALL TRANSFER SHIFT LEVER GUIDE (for Direct Shift Type)
Install the front drive shift link lever bush.
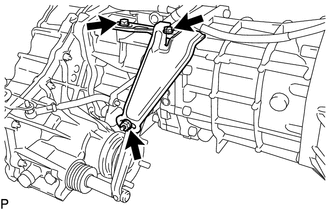
Install the transfer shift lever guide with the 2 bolts.
- Torque:
- 39.2 N*m (400 kgf*cm, 29 ft.*lbf)
Install the nut, washer and wave washer.
- Torque:
- 24.5 N*m (250 kgf*cm, 18 ft.*lbf)
Install the manual transmission assembly.
Click hereDrivetrain>R151F (MANUAL TRANSMISSION / TRANSAXLE)>MANUAL TRANSMISSION ASSEMBLY>INSTALLATION
36322 3.INSTALL TRANSFER HIGH AND LOW SHIFT LEVER (for Vacuum Shift Type)
Install the 2 transfer shift lever bush, high and low shift rod grommet and high and low shift rod spacer to the transfer high and low shift lever.
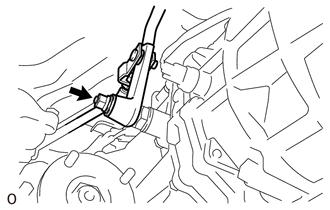
Install the high and low shift rod pin and transfer high and low shift lever and then Install a new clip.
Install the nut, wave washer and washer.
- Torque:
- 24.5 N*m (250 kgf*cm, 18 ft.*lbf)
37140 4.INSTALL FRONT PROPELLER SHAFT ASSEMBLY
58286 5.INSTALL NO. 1 SHIFT AND SELECT LEVER BOOT
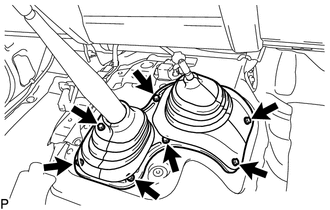
Install the No. 1 shift and select lever boot with the 6 bolts.
- Torque:
- 5.0 N*m (51 kgf*cm, 44 in.*lbf)
Return the floor carpet to its original position.
- HINT:
-
Install the front seat assembly if it was removed.
-
·
for Separate Seat Type: Click hereVehicle Interior>SEAT>FRONT SEAT ASSEMBLY (for Separate Seat Type without Inner Belt Attached)>INSTALLATION
·for Bench Seat Type: Click hereVehicle Interior>SEAT>FRONT SEAT ASSEMBLY(for Bench Seat Type)>INSTALLATION
36303 6.INSTALL SHIFT LEVER KNOB SUB-ASSEMBLY
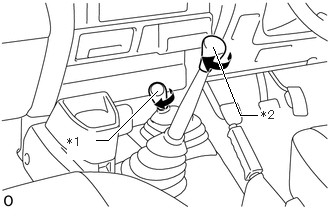
| *1 | Shift Lever Knob Sub-assembly (for Transfer Side) |
| *2 | Shift Lever Knob Sub-assembly (for Transmission Side) |
Twist the 2 shift lever knob sub-assembly in the direction indicated by the arrow and remove it.
89441A 7.INSTALL DECELERATION SENSOR (w/ ABS)
89170 8.INSTALL AIRBAG SENSOR ASSEMBLY WITH AIRBAG SENSOR BRACKET (w/ Airbag System)
89179A 9.INSTALL AIRBAG SENSOR COVER
58811B 10.INSTALL CONSOLE BOX
58191 11.INSTALL FRONT FLOOR FOOTREST
for LHD: (Click hereVehicle Interior>INTERIOR PANELS / TRIM>FRONT FLOOR FOOTREST(for LHD)>INSTALLATION)
for RHD: (Click hereVehicle Interior>INTERIOR PANELS / TRIM>FRONT FLOOR FOOTREST(for RHD)>INSTALLATION)
62112A 12.INSTALL COWL SIDE TRIM SUB-ASSEMBLY LH
62111A 13.INSTALL COWL SIDE TRIM SUB-ASSEMBLY RH
- HINT:
-
Use the same procedure described for the LH side.
67914 14.INSTALL FRONT DOOR SCUFF PLATE LH
for 4 Door: (Click hereVehicle Interior>INTERIOR PANELS / TRIM>ROOF HEADLINING (for Double Cab)>INSTALLATION)
for 2 Door: (Click hereVehicle Interior>INTERIOR PANELS / TRIM>ROOF HEADLINING (for Single Cab)>INSTALLATION)
67913 15.INSTALL FRONT DOOR SCUFF PLATE RH
- HINT:
-
Use the same procedure described for the LH side.
16. CONNECT CABLE TO NEGATIVE BATTERY TERMINAL
17.PERFORM DIAGNOSTIC SYSTEM CHECK
18.CHECK SRS WARNING LIGHT
19. INITIALIZATION AFTER RECONNECTING BATTERY TERMINAL
- HINT:
-
When disconnecting and reconnecting the battery, there is an automatic learning function that completes learning when the respective system is used.
-
Click hereGeneral>SETUP>WHEN DISCONNECTING OR RECONNECTING BATTERY TERMINAL>AUTOMATIC LEARNING CHART