1VD-FTV ENGINE CONTROL ECD SYSTEM(w/ DPF) P20CD Open in Exhaust Aftertreatment Fuel Injector "A" Control Circuit
DESCRIPTION
Refer to DTC P200C
Click hereEngine / Hybrid System>1VD-FTV (ENGINE CONTROL)>ECD SYSTEM (w/ DPF)>P200C
- HINT:
-
·
For more information on the exhaust fuel addition injector assembly and DPF catalyst, refer to the following procedures.
Click hereEngine / Hybrid System>1VD-FTV (ENGINE CONTROL)>ECD SYSTEM (w/ DPF)>SYSTEM DESCRIPTION
·If DTC P20CD is present, refer to the DTC table for Diesel Particulate Filter System.
Click hereEngine / Hybrid System>1VD-FTV (ENGINE CONTROL)>ECD SYSTEM (w/ DPF)>SYSTEM DESCRIPTION
| DTC No. | Detection Item | DTC Detection Condition | Trouble Area | MIL | Memory |
|---|---|---|---|---|---|
| P20CD | Open in Exhaust Aftertreatment Fuel Injector "A" Control Circuit | With the exhaust fuel addition injector assembly off, the FIVO output is high for 3 seconds (1 trip detection logic). |
·
Open or short in exhaust fuel addition injector assembly circuit
·
Exhaust fuel addition injector assembly
·
ECM |
Comes on | DTC stored |
- HINT:
-
DTC P200C, P200E, P20CF and/or P2428 will be present if there is an open malfunction in the exhaust fuel addition injector assembly circuit.
MONITOR DESCRIPTION
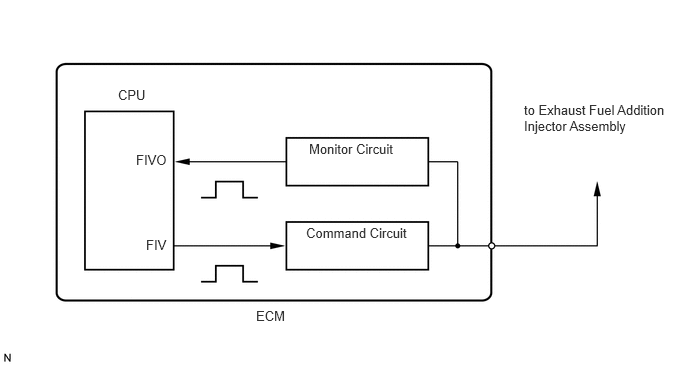
In order to detect abnormality in the fuel addition injector assembly, an internal CPU of the ECM monitors injection command (FIV) signals and injection confirmation (FIVO) signals. The FIV signal is sent from the CPU to the exhaust fuel addition injector assembly via a drive circuit inside the ECM. The FIVO signal, which is originally output current from the internal drive circuit of the ECM, is transmitted to the CPU via a monitor circuit. By receiving the FIVO signal, the ECM judges that the current has been applied to the exhaust fuel addition injector assembly.
This DTC will be set if the ECM judges that the number of signals of the FIV and FIVO are inconsistent.
CONFIRMATION DRIVING PATTERN
| DTC No. | DTC Detection Drive Pattern |
|---|---|
| P20CD | Ignition switch ON for 3 seconds |
WIRING DIAGRAM
CAUTION / NOTICE / HINT
- NOTICE:
-
·
Inspect the fuses of circuits related to this system before performing the following procedure.
·After replacing the ECM, the new ECM needs registration (Click hereEngine / Hybrid System>1VD-FTV (ENGINE CONTROL)>ECD SYSTEM (w/ DPF)>REGISTRATION) and initialization (Click hereEngine / Hybrid System>1VD-FTV (ENGINE CONTROL)>ECD SYSTEM (w/ DPF)>INITIALIZATION).
- HINT:
-
Read freeze frame data using the GTS. Freeze frame data records the engine condition when malfunctions are detected. When troubleshooting, freeze frame data can help determine if the vehicle was moving or stationary, if the engine was warmed up or not, and other data from the time the malfunction occurred.
PROCEDURE
Inspect the exhaust fuel addition injector assembly.
- Result:
-
Proceed to OK NG
OK
NG
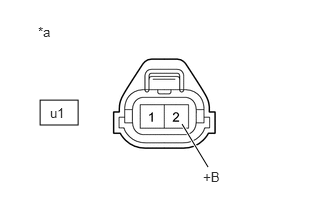
| *a | Front view of wire harness connector (to Exhaust Fuel Addition Injector Assembly) |
Disconnect the exhaust fuel addition injector assembly connector.
Measure the voltage according to the value(s) in the table below.
- Standard Voltage:
-
Tester Connection Switch Condition Specified Condition u1 (+B)-2 - Body ground Ignition switch ON 11 to 14 V
- Result:
-
Proceed to OK NG
OK
NG
Disconnect the exhaust fuel addition injector assembly connector.
Disconnect the ECM connector.
Measure the resistance according to the value(s) in the table below.
- Standard Resistance:
-
Tester Connection Condition Specified Condition u1-1 (FIV) - C39-83 (FIV) Always Below 1 Ω u1-1 (FIV) or C39-83 (FIV) - Body ground and other terminals Always 10 kΩ or higher
- Result:
-
Proceed to OK NG
OK
NG
Replace the ECM.
Click hereEngine / Hybrid System>1VD-FTV (ENGINE CONTROL)>ECM>REMOVAL
- Result:
-
Proceed to NEXT
NEXT
Disconnect the exhaust fuel addition injector assembly connector.
Remove the MAIN2 relay from the engine room relay block assembly.
Measure the resistance according to the value(s) in the table below.
- Standard Resistance:
-
Tester Connection Condition Specified Condition u1-2 (+B) - MAIN2 relay terminal 3 Always Below 1 Ω u1-2 (+B) or MAIN2 relay terminal 3 - Body ground and other terminals Always 10 kΩ or higher
- Result:
-
Proceed to OK NG
OK
NG
Inspect the MAIN2 relay.
Click hereEngine / Hybrid System>1VD-FTV (ENGINE CONTROL)>RELAY>ON-VEHICLE INSPECTION
- Result:
-
Proceed to OK NG
OK
NG
Remove the MAIN2 relay from the engine room relay block assembly.
Disconnect the ECM connector.
Measure the resistance according to the value(s) in the table below.
- Standard Resistance:
-
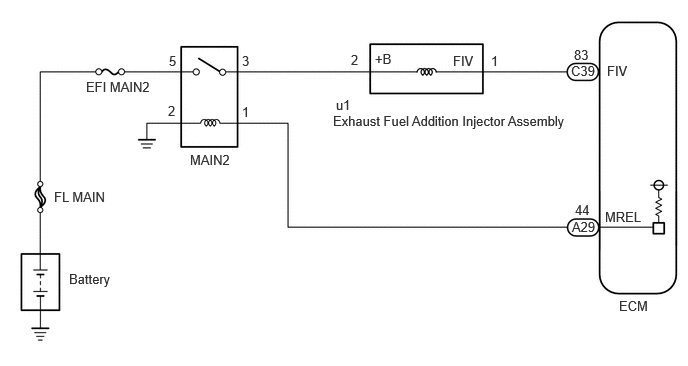
for RHD Tester Connection Condition Specified Condition MAIN2 relay terminal - A29-44 (MREL) Always Below 1 Ω MAIN2 relay terminal or A29-44 (MREL) - Body ground and other terminals Always 10 kΩ or higher
- Standard Resistance:
-
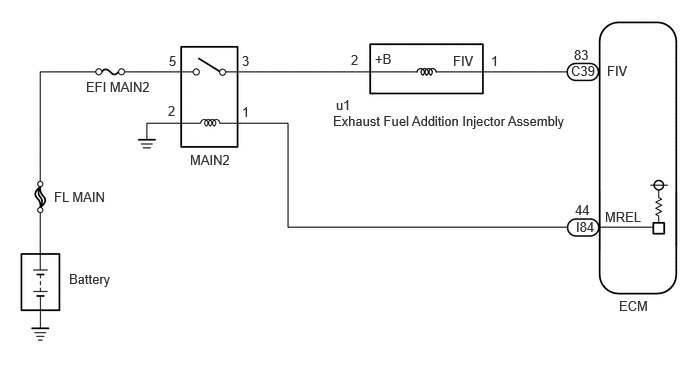
for LHD Tester Connection Condition Specified Condition MAIN2 relay terminal - I84-44 (MREL) Always Below 1 Ω MAIN2 relay terminal or I84-44 (MREL) - Body ground and other terminals Always 10 kΩ or higher
- Result:
-
Proceed to OK NG
OK
NG
Remove the MAIN2 relay from the engine room relay block assembly.
Measure the resistance according to the value(s) in the table below.
- Standard Resistance:
-
Tester Connection Condition Specified Condition MAIN2 relay terminal 2 - Body ground Always Below 1 Ω
- Result:
-
Proceed to OK NG
OK
NG
- HINT:
-
If the voltage at the exhaust fuel addition injector assembly connector is not 11 to 14 V, repair or replace the harness and connector between the exhaust fuel addition injector assembly and MAIN 2 relay (including the EFI MAIN2 fuse.
Repair or replace the harness or connector.
- Result:
-
Proceed to NEXT
NEXT
Replace the MAIN2 relay.
- Result:
-
Proceed to NEXT
NEXT
Replace the exhaust fuel addition injector assembly.
Click hereEngine / Hybrid System>1VD-FTV (EMISSION CONTROL)>EXHAUST FUEL ADDITION INJECTOR (for DPF)>REMOVAL
- Result:
-
Proceed to NEXT
NEXT
Connect the GTS to the DLC3.
Turn the ignition switch to ON and turn the GTS on.
Clear the DTCs.
- Powertrain > Engine and ECT > Clear DTCs
- 50002 234
Warm up the engine (engine coolant temperature is 75°C (167°F) or higher).
Perform PM forced regeneration.
- HINT:
-
When the exhaust fuel addition injector assembly is replaced, air may enter the fuel lines, leading to engine starting trouble. Therefore, perform forced regeneration and bleed the air from the fuel lines.
- Result:
-
Proceed to NEXT
NEXT
Connect the GTS to the DLC3.
Turn the ignition switch to ON.
Turn the GTS on.
Clear the DTCs.
- Powertrain > Engine and ECT > Clear DTCs
- 50002 234
Turn the ignition switch off for 30 seconds or more.
Turn the ignition switch to ON for 3 seconds.
Turn the GTS on.
Enter the following menus: Powertrain / Engine and ECT / Trouble Codes.
Confirm that the DTC is not output.
- Powertrain > Engine and ECT > Trouble Codes
- 50001 234
- Result:
-
Proceed to NEXT
NEXT