Q710 HYBRID TRANSMISSION / TRANSAXLE ELECTRONIC SHIFT LEVER SYSTEM P1C8949 Park Pawl Motor Control System (Initially Drive) Internal Electronic Failure
DESCRIPTION
The shift control actuator assembly consists of a parking lock motor and rotation angle sensor.
The shift control ECU receives shift lever position signals from the shift lever position sensor (shift lock control unit assembly) and P position switch signal from the P position switch (parking switch) to operate the parking lock motor through current control to engage and release the parking lock. The shift control ECU detects the motor rotation angle through signals from the rotation angle sensor and controls the timing of application of current to the coils of the parking lock motor.
When a malfunction occurs in the actuator main power source (BMA1) system, switching the shift state to park (P) is possible by switching to the power supply from the sub power source (BMA2) system.
When the shift control ECU detects a malfunction in the actuator system, the DTC is stored in the EV control ECU.
| DTC No. | Detection Item | DTC Detection Condition | Trouble Area | Warning Indicate | DTC Output from | Priority |
|---|---|---|---|---|---|---|
| P1C8949 | Park Pawl Motor Control System (Initially Drive) Internal Electronic Failure | When the ignition switch is ON, the power supply voltage is low, an open or short occurs in the P CON MTR relay, shift control actuator assembly (parking lock motor and rotation angle sensor) or wire harness, and an internal malfunction occurs in the shift control actuator assembly (parking lock motor and rotation angle sensor) continuously for 1 second or more
(1 trip detection logic) |
·
Shift control ECU ·
Auxiliary battery ·
Shift control supply ·
Shift control actuator assembly ·
P CON MTR relay ·
Wire harness or connector |
·
Master Warning -
Comes on ·
Multi-information Display Error Message -
Displayed |
EV | A |
| Vehicle Condition | |||||
|---|---|---|---|---|---|
| Pattern 1 | Pattern 2 | Pattern 3 | Pattern 4 | ||
| Diagnosis Condition | Ignition switch ON | ○ | ○ | ○ | ○ |
| Malfunction Status | Power supply voltage is low | ○ | - | - | - |
| P CON MTR relay open | - | ○ | - | - | |
| P CON MTR relay short | - | - | ○ | - | |
| Shift control actuator assembly (parking lock motor and rotation angle sensor) open | - | - | - | ○ | |
| Detection Time | 1 second or more | 1 second or more | 1 second or more | 1 second or more | |
| Number of Trips | 1 trip | 1 trip | 1 trip | 1 trip | |
| Vehicle Condition | |||||
|---|---|---|---|---|---|
| Pattern 5 | Pattern 6 | Pattern 7 | Pattern 8 | ||
| Diagnosis Condition | Ignition switch ON | ○ | ○ | ○ | ○ |
| Malfunction Status | Shift control actuator assembly (parking lock motor and rotation angle sensor) short | ○ | - | - | - |
| Wire harness open | - | ○ | - | - | |
| Wire harness short | - | - | ○ | - | |
| Internal malfunction occurs in the shift control actuator assembly (parking lock motor and rotation angle sensor) | - | - | - | ○ | |
| Detection Time | 1 second or more | 1 second or more | 1 second or more | 1 second or more | |
| Number of Trips | 1 trip | 1 trip | 1 trip | 1 trip | |
- HINT:
-
DTC will be output when conditions for either of the patterns in the table above are met.
CONFIRMATION DRIVING PATTERN
- HINT:
-
After repairs have been completed, clear the DTCs and then check that the vehicle has returned to normal by performing the All Readiness check procedure.
-
Click hereDrivetrain>Q710 (HYBRID TRANSMISSION / TRANSAXLE)>ELECTRONIC SHIFT LEVER SYSTEM>UTILITY
Turn the ignition switch to ON.
Depress the brake pedal and move the shift lever to select neutral (N).
Push the P position switch (parking switch) to select park (P).
WIRING DIAGRAM
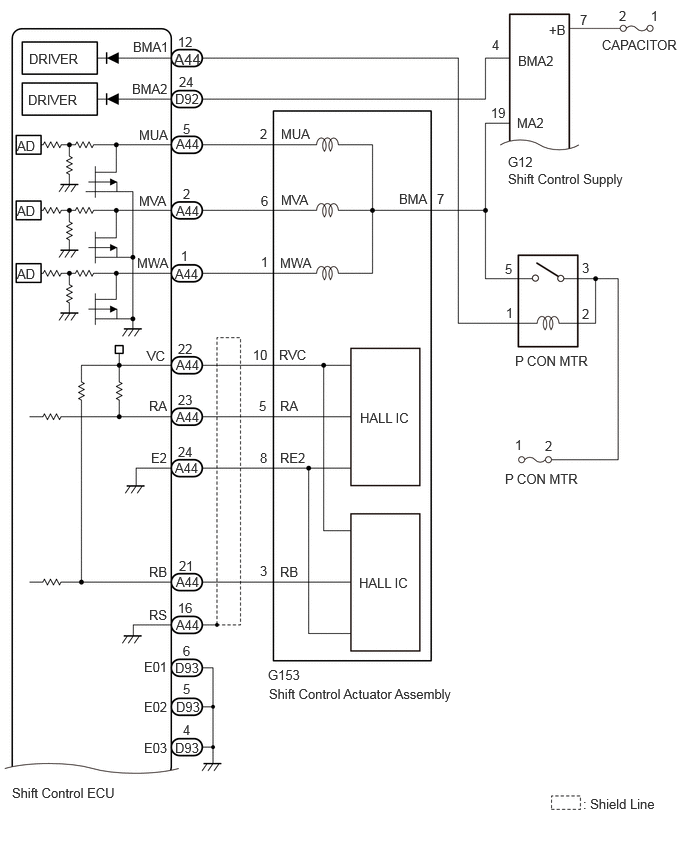
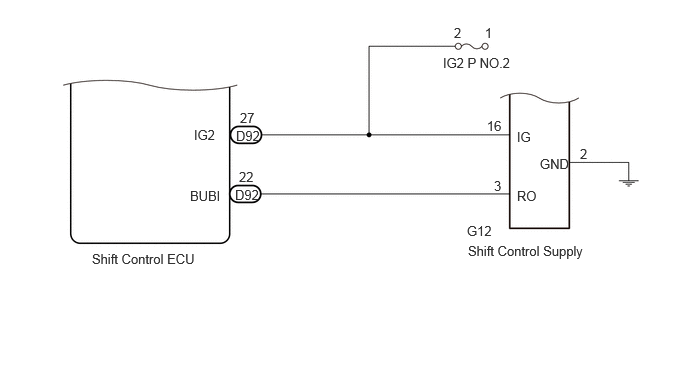
CAUTION / NOTICE / HINT
- NOTICE:
- ·
After turning the ignition switch off, waiting time may be required before disconnecting the cable from the negative (-) auxiliary battery terminal. Therefore, make sure to read the disconnecting the cable from the negative (-) auxiliary battery terminal notices before proceeding with work.
Click hereGeneral>INTRODUCTION>REPAIR INSTRUCTION>PRECAUTION
·The vehicle is equipped with a shift control supply. Therefore, ensure there is no power being supplied to the vehicle when disconnecting or reconnecting the connector of the shift control ECU and when removing or installing the shift control ECU.
Click hereDrivetrain>Q710 (HYBRID TRANSMISSION / TRANSAXLE)>ELECTRONIC SHIFT LEVER SYSTEM>PRECAUTION
·Inspect the fuses for circuits related to this system before performing the following inspection procedure.
PROCEDURE
Pre-procedure1
Turn the ignition switch to ON.
Procedure1
Check if DTCs are output.
- Powertrain > EV > Trouble Codes
- 50001 397
- Result:
Result Proceed to No DTCs in the table below are output A P1C8949 and any DTCs in the table below are output B
| Priority | Relevant DTC | |
|---|---|---|
| 1 | P085D94 | Gear Shift Control Module "A" Unexpected Operation |
| P1761A2 | Gear Shift Control Module "A" System Voltage Low | |
| P1765A2 | Sub Battery Module System Voltage Low | |
| P176D12 | IG2 Signal (Gear Shift Control Module "A") Circuit Short to Auxiliary Battery | |
| P176949 | Gear Shift Control Module "A" Internal Electronic Failure | |
| 2 | P272C73 | Park Pawl Motor Relay System Actuator Stuck Closed |
| P1C8F14 | Park Pawl Motor Phase U Circuit Short to Ground or Open | |
| P1C9414 | Park Pawl Motor Phase V Circuit Short to Ground or Open | |
| P1C9914 | Park Pawl Motor Phase W Circuit Short to Ground or Open | |
- HINT:
-
The chart above is listed in inspection order of priority.
Post-procedure1
Turn the ignition switch off.
A
B
Pre-procedure1
Turn the ignition switch to ON.
- HINT:
-
It may not be possible to turn the ignition switch to ON (READY).
Procedure1
Read the freeze frame data of DTC P1C8949.
- Powertrain > EV > Trouble Codes
- 50001 397
- Powertrain > EV > DTC(P1C8949) > Freeze Frame Data
-
Tester Display BATT Voltage for Gear Shift Control Module - 50040 397 567 P1C8949
- Result:
Result Proceed to The value of BATT Voltage for Gear Shift Control Module is 9 V or more A The value of BATT Voltage for Gear Shift Control Module is less than 9 V B
Post-procedure1
Turn the ignition switch off.
A
B
Pre-procedure1
Turn the ignition switch to ON.
Procedure1
Check for DTCs and freeze frame data and then write them down.
- Powertrain > EV > Trouble Codes
- 50001 397
- HINT:
-
When DTCs are cleared, the freeze frame data is also cleared. The freeze frame data stored when the DTCs are detected is required for troubleshooting. Therefore, check and record the stored DTC information before clearing them.
- Result:
Proceed to NEXT
Post-procedure1
Turn the ignition switch off.
NEXT
Pre-procedure1
Turn the ignition switch to ON.
Procedure1
Clear the DTCs.
- Powertrain > EV > Clear DTCs
- 50002 397
- Result:
Proceed to NEXT
Post-procedure1
Turn the ignition switch off.
Leave the vehicle as is for 60 seconds or more.
- NOTICE:
- ·
Do not connect the GTS.
·Do not depress the brake pedal.
·Do not open/close any of the doors.
NEXT
Charge the auxiliary battery.
- Result:
Proceed to NEXT
NEXT
Pre-procedure1
Turn the ignition switch to ON.
Depress the brake pedal and move the shift lever to select neutral (N).
Check that the shift state is neutral (N), and then push the P position switch (parking switch) to select park (P).
Turn the ignition switch to ON (READY).
Depress the brake pedal and move the shift lever as follows to select each shift state: N → D.
Drive the vehicle at 40 km/h (25 mph) or more for 10 seconds or more.
Stop the vehicle and push the P position switch (parking switch) to select park (P).
Turn the ignition switch off.
Turn the ignition switch to ON and wait for 10 seconds or more.
- HINT:
-
It may not be possible to turn the ignition switch to ON (READY).
Depress the brake pedal and move the shift lever to select neutral (N).
Push the P position switch (parking switch) to select park (P).
Procedure1
Check if DTCs are output.
- Powertrain > EV > Trouble Codes
- 50001 397
- Result:
Result Proceed to Only P1C8949 is output A DTCs are not output B P1C8949 and other DTCs are output C
Post-procedure1
Turn the ignition switch off.
A
B
C
Pre-procedure1
Turn the ignition switch to ON.
Procedure1
Read the freeze frame data of DTC P1C8949.
- Powertrain > EV > Trouble Codes
- 50001 397
- Powertrain > EV > DTC(P1C8949) > Freeze Frame Data
-
Tester Display Parking Lock Motor Main Relay Status Parking Lock Motor Backup Relay Status - 50040 397 489,488 P1C8949
- Result:
Result Proceed to The value of Parking Lock Motor Main Relay Status is ON A The value of Parking Lock Motor Backup Relay Status is ON B
Post-procedure1
Turn the ignition switch off.
A
B
Pre-procedure1
Turn the ignition switch to ON.
Procedure1
Read the freeze frame data of DTC P1C8949.
- Powertrain > EV > Trouble Codes
- 50001 397
- Powertrain > EV > DTC(P1C8949) > Freeze Frame Data
-
Tester Display W Phase Parking Lock Motor Terminal Voltage V Phase Parking Lock Motor Terminal Voltage U Phase Parking Lock Motor Terminal Voltage - 50040 397 224,223,222 P1C8949
- Result:
Tester Display Specified Condition W Phase Parking Lock Motor Terminal Voltage 1 to 2 V V Phase Parking Lock Motor Terminal Voltage 1 to 2 V U Phase Parking Lock Motor Terminal Voltage 1 to 2 V
- Result:
Proceed to OK NG
Post-procedure1
Turn the ignition switch off.
OK
NG
Pre-procedure1
Disconnect the A44 shift control ECU connector.
Disconnect the G153 rotation angle sensor (shift control actuator assembly) connector.
Procedure1
Measure the resistance according to the value(s) in the table below.
- Standard Resistance:
Tester Connection Condition Specified Condition Click Location & Routing(A44,G153)Location & Routingewd_type=routing;type=c,c;code=A44,G153
Click Connector(A44)Instrument Panel>Front Compartment Main Wire>Shift Control ECUewd_type=component;type=c;code=A44;pinno=22,23,21,24
Click Connector(G153)Body>Floor Wire / No. 3 Floor Wire>Shift Control Actuator Assemblyewd_type=component;type=c;code=G153;pinno=10,5,3,8
A44-22 (VC) - G153-10 (RVC) Always Below 1 Ω A44-23 (RA) - G153-5 (RA) Always Below 1 Ω A44-21 (RB) - G153-3 (RB) Always Below 1 Ω A44-24 (E2) - G153-8 (RE2) Always Below 1 Ω A44-22 (VC) or G153-10 (RVC) - Body ground and other terminals Always 10 kΩ or higher A44-23 (RA) or G153-5 (RA) - Body ground and other terminals Always 10 kΩ or higher A44-21 (RB) or G153-3 (RB) - Body ground and other terminals Always 10 kΩ or higher A44-24 (E2) or G153-8 (RE2) - Body ground and other terminals Always 10 kΩ or higher
- Result:
Proceed to OK NG
Post-procedure1
Reconnect the G153 rotation angle sensor (shift control actuator assembly) connector.
Reconnect the A44 shift control ECU connector.
OK
NG
Pre-procedure1
Disconnect the D93 shift control ECU connector.
Procedure1
Measure the resistance according to the value(s) in the table below.
- Standard Resistance (Check for Open):
Tester Connection Condition Specified Condition Click Location & Routing(D93)Location & Routingewd_type=routing;type=c;code=D93
Click Connector(D93)Instrument Panel>Instrument Panel Wire>Shift Control ECUewd_type=component;type=c;code=D93;pinno=6,5,4
D93-6 (E01) - Body ground Always Below 1 Ω D93-5 (E02) - Body ground Always Below 1 Ω D93-4 (E03) - Body ground Always Below 1 Ω
- Result:
Proceed to OK NG
Post-procedure1
Reconnect the D93 shift control ECU connector.
OK
NG
Pre-procedure1
Disconnect the A44 shift control ECU connector.
Procedure1
Measure the resistance according to the value(s) in the table below.
- Standard Resistance:
Tester Connection Switch Condition Specified Condition Click Location & Routing(A44)Location & Routingewd_type=routing;type=c;code=A44
Click Connector(A44)Instrument Panel>Front Compartment Main Wire>Shift Control ECUewd_type=component;type=c;code=A44;pinno=22,23,21,24
A44-22 (VC) - A44-23 (RA) Ignition switch off 10 kΩ or higher A44-22 (VC) - A44-21 (RB) Ignition switch off 10 kΩ or higher A44-22 (VC) - A44-24 (E2) Ignition switch off 590 to 670 Ω A44-23 (RA) - A44-21 (RB) Ignition switch off 10 kΩ or higher A44-23 (RA) - A44-24 (E2) Ignition switch off 10 kΩ or higher A44-21 (RB) - A44-24 (E2) Ignition switch off 10 kΩ or higher
- Result:
Proceed to OK NG
Post-procedure1
Reconnect the A44 shift control ECU connector.
OK
NG
Pre-procedure1
Check that the parking brake is applied.
Pull the shift control actuator assembly from the FCV with motor transaxle assembly.
Reconnect the G153 shift control actuator assembly connector.
Release the brake pedal and turn the ignition switch to ACC.
- NOTICE:
-
The shift control actuator assembly may operate if the ignition switch is turned to ON or ON (READY). Do not turn the ignition switch to ON or ON (READY) during this inspection to prevent the shift control actuator assembly from operating while in contact with the splines.
Procedure1
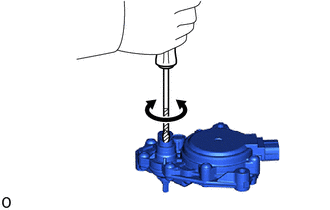
Using a screwdriver with its tip wrapped with protective tape or a piece of cloth, rotate the shaft.
- NOTICE:
- ·
During this inspection, make sure to use a screwdriver with its tip wrapped with protective tape or a piece of cloth to prevent the splines of the actuator from being damaged.
·Rotate the shaft with torque of 2 N*m (20.3 kgf*cm, 17.7 in.*lbf) or less. Do not apply load while the contacting the stopper inside the actuator.
·The shift control actuator assembly cannot be disassembled.
Confirm that the shaft of the shift control actuator assembly rotates smoothly.
- OK:
The shaft of the shift control actuator assembly rotates smoothly.
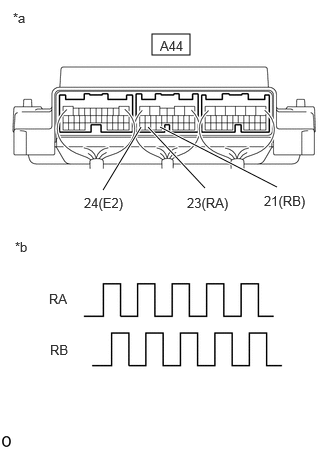
| *a | Component with harness connected
(Shift Control ECU) |
| *b | Output Waveform while Splines of Shift Control Actuator Assembly being Rotated (Example) |
Measure the voltage according to the value(s) in the table below.
- NOTICE:
-
When measuring the voltage, turn the shift control actuator assembly slowly.
- Standard Voltage:
Tester Connection Condition Specified Condition Click Location & Routing(A44)Location & Routingewd_type=routing;type=c;code=A44
Click Connector(A44)Instrument Panel>Front Compartment Main Wire>Shift Control ECUewd_type=component;type=c;code=A44;pinno=23,24,21
A44-23 (RA) - A44-24 (E2) Ignition switch ACC, shaft of shift control actuator assembly being rotated 0 to 1.5 V ←→ 4 to 5.5 V A44-21 (RB) - A44-24 (E2) Ignition switch ACC, shaft of shift control actuator assembly being rotated 0 to 1.5 V ←→ 4 to 5.5 V
- Result:
Proceed to OK NG
Post-procedure1
Turn the ignition switch off.
OK
NG
Pre-procedure1
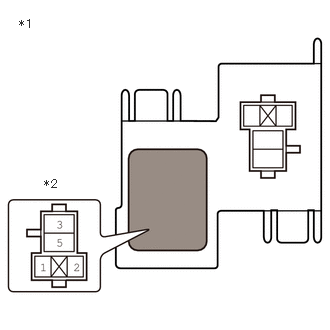
| *1 | Luggage Room Relay Block |
| *2 | P CON MTR Relay |
Remove the P CON MTR relay from the luggage room relay block.
Procedure1
Measure the voltage according to the value(s) in the table below.
- Standard Voltage:
Tester Connection Switch Condition Specified Condition P CON MTR relay terminal 3 or 2 - Body ground Ignition switch off 8 to 15.4 V
- Result:
Proceed to OK NG
Post-procedure1
Install the P CON MTR relay.
OK
NG
Pre-procedure1
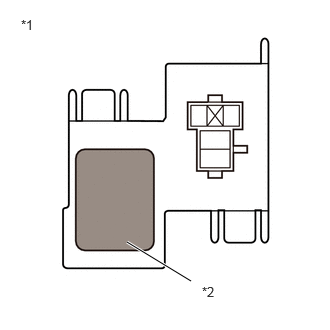
| *1 | Luggage Room Relay Block |
| *2 | P CON MTR Relay |
Remove the P CON MTR relay from the luggage room relay block.
Procedure1
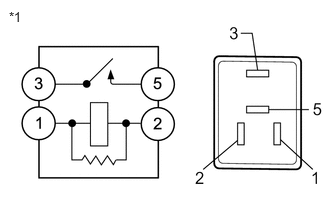
| *1 | P CON MTR Relay |
Measure the resistance according to the value(s) in the table below.
- Standard Resistance:
Tester Connection Condition Specified Condition 3 - 5 Auxiliary battery voltage not applied between terminals 1 and 2 10 kΩ or higher 3 - 5 Auxiliary battery voltage applied between terminals 1 and 2 Below 1 Ω
- Result:
Proceed to OK NG
Post-procedure1
Install the P CON MTR relay.
OK
NG
Pre-procedure1
Disconnect the G153 parking lock motor (shift control actuator assembly) connector.
Remove the P CON MTR relay from the luggage room relay block.
Disconnect the A44 shift control ECU connector.
Procedure1
Measure the resistance according to the value(s) in the table below.
- Standard Resistance:
Tester Connection Condition Specified Condition Click Location & Routing(G153,A44)Location & Routingewd_type=routing;type=c,c;code=G153,A44
Click Connector(G153)Body>Floor Wire / No. 3 Floor Wire>Shift Control Actuator Assemblyewd_type=component;type=c;code=G153;pinno=7
Click Connector(A44)Instrument Panel>Front Compartment Main Wire>Shift Control ECUewd_type=component;type=c;code=A44;pinno=12
P CON MTR relay terminal 5 - G153-7 (BMA) Always Below 1 Ω P CON MTR relay terminal 1 - A44-12 (BMA1) Always Below 1 Ω P CON MTR relay terminal 5 or G153-7 (BMA) - Body ground and other terminals Always 10 kΩ or higher P CON MTR relay terminal 1 or A44-12 (BMA1) - Body ground and other terminals Always 10 kΩ or higher
- Result:
Proceed to OK NG
Post-procedure1
Install the P CON MTR relay.
Reconnect the A44 shift control ECU connector.
Reconnect the G153 parking lock motor (shift control actuator assembly) connector.
OK
NG
Pre-procedure1
Disconnect the A44 shift control ECU connector.
Disconnect the G153 parking lock motor (shift control actuator assembly) connector.
Procedure1
Measure the resistance according to the value(s) in the table below.
- Standard Resistance:
Tester Connection Condition Specified Condition Click Location & Routing(A44,G153)Location & Routingewd_type=routing;type=c,c;code=A44,G153
Click Connector(A44)Instrument Panel>Front Compartment Main Wire>Shift Control ECUewd_type=component;type=c;code=A44;pinno=5,2,1
Click Connector(G153)Body>Floor Wire / No. 3 Floor Wire>Shift Control Actuator Assemblyewd_type=component;type=c;code=G153;pinno=2,6,1
A44-5 (MUA) -G153-2 (MUA) Always Below 1 Ω A44-2 (MVA) - G153-6 (MVA) Always Below 1 Ω A44-1 (MWA) - G153-1 (MWA) Always Below 1 Ω A44-5 (MUA) or G153-2 (MUA) - Body ground and other terminals Always 10 kΩ or higher A44-2 (MVA) or G153-6 (MVA) - Body ground and other terminals Always 10 kΩ or higher A44-1 (MWA) or G153-1 (MWA) -Body ground and other terminals Always 10 kΩ or higher
- Result:
Proceed to OK NG
Post-procedure1
Reconnect the G153 parking lock motor (shift control actuator assembly) connector.
Reconnect the A44 shift control ECU connector.
OK
NG
Pre-procedure1
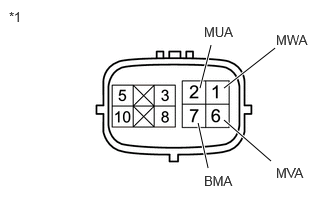
| *1 | Parking Lock Motor (Shift Control Actuator Assembly) |
Disconnect the parking lock motor (shift control actuator assembly) connector.
Procedure1
Measure the resistance according to the value(s) in the table below.
- Standard Resistance:
Tester Connection Condition Specified Condition 2 (MUA) - 7 (BMA) Always 0.5 to 2 Ω 6 (MVA) - 7 (BMA) Always 0.5 to 2 Ω 1 (MWA) - 7 (BMA) Always 0.5 to 2 Ω 2 (MUA) - 6 (MVA) Always 1 to 4 Ω 6 (MVA) - 1 (MWA) Always 1 to 4 Ω 1 (MWA) - 2 (MUA) Always 1 to 4 Ω 2 (MUA) - Body ground Always 10 kΩ or higher 6 (MVA) - Body ground Always 10 kΩ or higher 1 (MWA) - Body ground Always 10 kΩ or higher
- Result:
Proceed to OK NG
Post-procedure1
Reconnect the parking lock motor (shift control actuator assembly) connector.
OK
NG
Pre-procedure1
Disconnect the cable from the negative (-) auxiliary battery terminal.
Disconnect the cable from the positive (+) auxiliary battery terminal.
Remove the P CON MTR relay from the luggage room relay block.
Procedure1
Measure the resistance according to the value(s) in the table below.
- Standard Resistance:
Tester Connection Condition Specified Condition Auxiliary battery positive (+) cable - P CON MTR relay terminal 3 or 2 Always Below 1 Ω Auxiliary battery positive (+) cable or P CON MTR relay terminal 3 or 2 - Body ground and other terminals Always 10 kΩ or higher
- Result:
Proceed to OK NG
Post-procedure1
Install the P CON MTR relay.
Reconnect the cable to the positive (+) auxiliary battery terminal.
Reconnect the cable to the negative (-) auxiliary battery terminal.
OK
NG
Charge the auxiliary battery.
- Result:
Proceed to NEXT
NEXT
Pre-procedure1
Turn the ignition switch to ON.
Procedure1
Check for DTCs and freeze frame data and then write them down.
- Powertrain > EV > Trouble Codes
- 50001 397
- Result:
Proceed to NEXT
Post-procedure1
Turn the ignition switch off.
NEXT
Pre-procedure1
Turn the ignition switch to ON.
Procedure1
Clear the DTCs.
- Powertrain > EV > Clear DTCs
- 50002 397
- Result:
Proceed to NEXT
Post-procedure1
Turn the ignition switch off.
Leave the vehicle as is for 60 seconds or more.
- NOTICE:
- ·
Do not connect the GTS.
·Do not depress the brake pedal.
·Do not open/close any of the doors.
NEXT
Pre-procedure1
Turn the ignition switch to ON.
Depress the brake pedal and move the shift lever to select neutral (N).
Check that the shift state is neutral (N), and then push the P position switch (parking switch) to select park (P).
Turn the ignition switch to ON (READY).
Depress the brake pedal and move the shift lever as follows to select each shift state: N → D.
Drive the vehicle at 40 km/h (25 mph) or more for 10 seconds or more.
Stop the vehicle and push the P position switch (parking switch) to select park (P).
Turn the ignition switch off.
Turn the ignition switch to ON and wait for 10 seconds or more.
- HINT:
-
It may not be possible to turn the ignition switch to ON (READY).
Depress the brake pedal and move the shift lever to select neutral (N).
Push the P position switch (parking switch) to select park (P).
Procedure1
Check if DTCs are output.
- Powertrain > EV > Trouble Codes
- 50001 397
- Result:
Result Proceed to DTCs are not output A Only P1C8949 is output B P1C8949 and other DTCs are output C
Post-procedure1
Turn the ignition switch off.
A
B
C
Pre-procedure1
Turn the ignition switch to ON.
Procedure1
Read the freeze frame data of DTC P1C8949.
- Powertrain > EV > Trouble Codes
- 50001 397
- Powertrain > EV > DTC(P1C8949) > Freeze Frame Data
-
Tester Display W Phase Parking Lock Motor Terminal Voltage V Phase Parking Lock Motor Terminal Voltage U Phase Parking Lock Motor Terminal Voltage - 50040 397 224,223,222 P1C8949
- Result:
Tester Display Specified Condition W Phase Parking Lock Motor Terminal Voltage 1 to 2 V V Phase Parking Lock Motor Terminal Voltage 1 to 2 V U Phase Parking Lock Motor Terminal Voltage 1 to 2 V
- Result:
Proceed to OK NG
Post-procedure1
Turn the ignition switch off.
OK
NG
Pre-procedure1
| *1 | Luggage Room Relay Block |
| *2 | P CON MTR Relay |
Remove the P CON MTR relay from the luggage room relay block.
Procedure1
Measure the voltage according to the value(s) in the table below.
- Standard Voltage:
Tester Connection Switch Condition Specified Condition P CON MTR relay terminal 3 or 2 - Body ground Ignition switch off 8 to 15.4 V
- Result:
Proceed to OK NG
Post-procedure1
Install the P CON MTR relay.
OK
NG
Pre-procedure1
| *1 | Luggage Room Relay Block |
| *2 | P CON MTR Relay |
Remove the P CON MTR relay from the luggage room relay block.
Procedure1
| *1 | P CON MTR Relay |
Measure the resistance according to the value(s) in the table below.
- Standard Resistance:
Tester Connection Condition Specified Condition 3 - 5 Auxiliary battery voltage not applied between terminals 1 and 2 10 kΩ or higher 3 - 5 Auxiliary battery voltage applied between terminals 1 and 2 Below 1 Ω
- Result:
Proceed to OK NG
Post-procedure1
Install the P CON MTR relay.
OK
NG
Pre-procedure1
Disconnect the G153 parking lock motor (shift control actuator assembly) connector.
Remove the P CON MTR relay from the luggage room relay block.
Disconnect the A44 shift control ECU connector.
Procedure1
Measure the resistance according to the value(s) in the table below.
- Standard Resistance:
Tester Connection Condition Specified Condition Click Location & Routing(G153,A44)Location & Routingewd_type=routing;type=c,c;code=G153,A44
Click Connector(G153)Body>Floor Wire / No. 3 Floor Wire>Shift Control Actuator Assemblyewd_type=component;type=c;code=G153;pinno=7
Click Connector(A44)Instrument Panel>Front Compartment Main Wire>Shift Control ECUewd_type=component;type=c;code=A44;pinno=12
P CON MTR relay terminal 5 - G153-7 (BMA) Always Below 1 Ω P CON MTR relay terminal 1 - A44-12 (BMA1) Always Below 1 Ω P CON MTR relay terminal 5 or G153-7 (BMA) - Body ground and other terminals Always 10 kΩ or higher P CON MTR relay terminal 1 or A44-12 (BMA1) - Body ground and other terminals Always 10 kΩ or higher
- Result:
Proceed to OK NG
Post-procedure1
Reconnect the A44 shift control ECU connector.
Install the P CON MTR relay.
Reconnect the G153 parking lock motor (shift control actuator assembly) connector.
OK
NG
Pre-procedure1
Disconnect the A44 shift control ECU connector.
Disconnect the G153 parking lock motor (shift control actuator assembly) connector.
Procedure1
Measure the resistance according to the value(s) in the table below.
- Standard Resistance:
Tester Connection Condition Specified Condition Click Location & Routing(A44,G153)Location & Routingewd_type=routing;type=c,c;code=A44,G153
Click Connector(A44)Instrument Panel>Front Compartment Main Wire>Shift Control ECUewd_type=component;type=c;code=A44;pinno=5,2,1
Click Connector(G153)Body>Floor Wire / No. 3 Floor Wire>Shift Control Actuator Assemblyewd_type=component;type=c;code=G153;pinno=2,6,1
A44-5 (MUA) - G153-2 (MUA) Always Below 1 Ω A44-2 (MVA) - G153-6 (MVA) Always Below 1 Ω A44-1 (MWA) - G153-1 (MWA) Always Below 1 Ω A44-5 (MUA) or G153-2 (MUA) - Body ground and other terminals Always 10 kΩ or higher A44-2 (MVA) or G153-6 (MVA) - Body ground and other terminals Always 10 kΩ or higher A44-1 (MWA) or G153-1 (MWA) -Body ground and other terminals Always 10 kΩ or higher
- Result:
Proceed to OK NG
Post-procedure1
Reconnect the G153 parking lock motor (shift control actuator assembly) connector.
Reconnect the A44 shift control ECU connector.
OK
NG
Pre-procedure1
Disconnect the D92 shift control ECU connector.
Disconnect the G12 shift control supply connector.
Procedure1
Measure the resistance according to the value(s) in the table below.
- Standard Resistance (Check for Open):
Tester Connection Condition Specified Condition Click Location & Routing(G12,D92)Location & Routingewd_type=routing;type=c,c;code=G12,D92
Click Connector(G12)Instrument Panel>Floor Wire>Shift Control Supplyewd_type=component;type=c;code=G12;pinno=16,3,7,2
Click Connector(D92)Instrument Panel>Instrument Panel Wire>Shift Control ECUewd_type=component;type=c;code=D92;pinno=27,22
G12-16 (IG) - D92-27 (IG2) Always Below 1 Ω G12-3 (RO) - D92-22 (BUBI) Always Below 1 Ω CAPACITOR fuse terminal 2 - G12-7 (+B) Always Below 1 Ω G12-2 (GND) - Body ground Always Below 1 Ω
- Result:
Proceed to OK NG
Post-procedure1
Reconnect the G12 shift control supply connector.
Reconnect the D92 shift control ECU connector.
OK
NG
Pre-procedure1
| *1 | Parking Lock Motor (Shift Control Actuator Assembly) |
Disconnect the parking lock motor (shift control actuator assembly) connector.
Procedure1
Measure the resistance according to the value(s) in the table below.
- Standard Resistance:
Tester Connection Condition Specified Condition 2 (MUA) - 7 (BMA) Always 0.5 to 2 Ω 6 (MVA) - 7 (BMA) Always 0.5 to 2 Ω 1 (MWA) - 7 (BMA) Always 0.5 to 2 Ω 2 (MUA) - 6 (MVA) Always 1 to 4 Ω 6 (MVA) - 1 (MWA) Always 1 to 4 Ω 1 (MWA) - 2 (MUA) Always 1 to 4 Ω 2 (MUA) -Body ground Always 10 kΩ or higher 6 (MVA) -Body ground Always 10 kΩ or higher 1 (MWA) -Body ground Always 10 kΩ or higher
- Result:
Proceed to OK NG
Post-procedure1
Reconnect the parking lock motor (shift control actuator assembly) connector.
OK
NG
Charge the auxiliary battery.
- Result:
Proceed to NEXT
NEXT
Pre-procedure1
Turn the ignition switch to ON.
Procedure1
Check for DTCs and freeze frame data and then write them down.
- Powertrain > EV > Trouble Codes
- 50001 397
- Result:
Proceed to NEXT
Post-procedure1
Turn the ignition switch off.
NEXT
Pre-procedure1
Turn the ignition switch to ON.
Procedure1
Clear the DTCs.
- Powertrain > EV > Clear DTCs
- 50002 397
- Result:
Proceed to NEXT
Post-procedure1
Turn the ignition switch off.
Leave the vehicle as is for 60 seconds or more.
- NOTICE:
- ·
Do not connect the GTS.
·Do not depress the brake pedal.
·Do not open/close any of the doors.
NEXT
Pre-procedure1
Turn the ignition switch to ON.
Depress the brake pedal and move the shift lever to select neutral (N).
Check that the shift state is neutral (N), and then push the P position switch (parking switch) to select park (P).
Turn the ignition switch to ON (READY).
Depress the brake pedal and move the shift lever as follows to select each shift state: N → D.
Drive the vehicle at 40 km/h (25 mph) or more for 10 seconds or more.
Stop the vehicle and push the P position switch (parking switch) to select park (P).
Turn the ignition switch off.
Turn the ignition switch to ON and wait for 10 seconds or more.
- HINT:
-
It may not be possible to turn the ignition switch to ON (READY).
Depress the brake pedal and move the shift lever to select neutral (N).
Push the P position switch (parking switch) to select park (P).
Procedure1
Check if DTCs are output.
- Powertrain > EV > Trouble Codes
- 50001 397
- Result:
Result Proceed to DTCs are not output A Only P1C8949 is output B P1C8949 and other DTCs are output C
Post-procedure1
Turn the ignition switch off.
A
B
C
- Result:
Proceed to NEXT
NEXT
Pre-procedure1
Disconnect the cable from the negative (-) auxiliary battery terminal.
Disconnect the cable from the positive (+) auxiliary battery terminal.
Remove the P CON MTR relay from the luggage room relay block.
Procedure1
Measure the resistance according to the value(s) in the table below.
- Standard Resistance:
Tester Connection Condition Specified Condition Auxiliary battery positive (+) cable - P CON MTR relay terminal 3 or 2 Always Below 1 Ω Auxiliary battery positive (+) cable or P CON MTR relay terminal 3 or 2 - Body ground and other terminals Always 10 kΩ or higher
- Result:
Proceed to OK NG
Post-procedure1
Install the P CON MTR relay.
Reconnect the cable to the positive (+) auxiliary battery terminal.
Reconnect the cable to the negative (-) auxiliary battery terminal.
OK
NG
Charge the auxiliary battery.
- Result:
Proceed to NEXT
NEXT
Pre-procedure1
Turn the ignition switch to ON.
Procedure1
Check for DTCs and freeze frame data and then write them down.
- Powertrain > EV > Trouble Codes
- 50001 397
- Result:
Proceed to NEXT
Post-procedure1
Turn the ignition switch off.
NEXT
Pre-procedure1
Turn the ignition switch to ON.
Procedure1
Clear the DTCs.
- Powertrain > EV > Clear DTCs
- 50002 397
- Result:
Proceed to NEXT
Post-procedure1
Turn the ignition switch off.
Leave the vehicle as is for 60 seconds or more.
- NOTICE:
- ·
Do not connect the GTS.
·Do not depress the brake pedal.
·Do not open/close any of the doors.
NEXT
Pre-procedure1
Turn the ignition switch to ON.
Depress the brake pedal and move the shift lever to select neutral (N).
Check that the shift state is neutral (N), and then push the P position switch (parking switch) to select park (P).
Turn the ignition switch to ON (READY).
Depress the brake pedal and move the shift lever as follows to select each shift state: N → D.
Drive the vehicle at 40 km/h (25 mph) or more for 10 seconds or more.
Stop the vehicle and push the P position switch (parking switch) to select park (P).
Turn the ignition switch off.
Turn the ignition switch to ON and wait for 10 seconds or more.
- HINT:
-
It may not be possible to turn the ignition switch to ON (READY).
Depress the brake pedal and move the shift lever to select neutral (N).
Push the P position switch (parking switch) to select park (P).
Procedure1
Check if DTCs are output.
- Powertrain > EV > Trouble Codes
- 50001 397
- Result:
Result Proceed to DTCs are not output A Only P1C8949 is output B P1C8949 and other DTCs are output C
Post-procedure1
Turn the ignition switch off.
A
B
C
Pre-procedure1
Disconnect the cable from the negative (-) auxiliary battery terminal.
Disconnect the cable from the positive (+) auxiliary battery terminal.
Disconnect the G12 shift control supply connector.
Procedure1
Measure the resistance according to the value(s) in the table below.
- Standard Resistance:
Tester Connection Condition Specified Condition Click Location & Routing(G12)Location & Routingewd_type=routing;type=c;code=G12
Click Connector(G12)Instrument Panel>Floor Wire>Shift Control Supplyewd_type=component;type=c;code=G12;pinno=7
Auxiliary battery positive (+) cable - G12-7 (+B) Always Below 1 Ω Auxiliary battery positive (+) cable or G12-7 (+B) - Body ground and other terminals Always 10 kΩ or higher
- Result:
Proceed to OK NG
Post-procedure1
Reconnect the G12 shift control supply connector.
Reconnect the cable to the positive (+) auxiliary battery terminal.
Reconnect the cable to the negative (-) auxiliary battery terminal.
OK
for LHD: Click hereDrivetrain>Q710 (HYBRID TRANSMISSION / TRANSAXLE)>SHIFT CONTROL POWER SUPPLY (for LHD)>REMOVAL
for RHD: Click hereDrivetrain>Q710 (HYBRID TRANSMISSION / TRANSAXLE)>SHIFT CONTROL POWER SUPPLY (for RHD)>REMOVAL
NG
- Result:
Proceed to NEXT
NEXT
- Result:
Proceed to NEXT
NEXT
Pre-procedure1
Turn the ignition switch to ON.
Procedure1
Check for DTCs and freeze frame data and then write them down.
- Powertrain > EV > Trouble Codes
- 50001 397
- Result:
Proceed to NEXT
Post-procedure1
Turn the ignition switch off.
NEXT
Pre-procedure1
Turn the ignition switch to ON.
Procedure1
Clear the DTCs.
- Powertrain > EV > Clear DTCs
- 50002 397
- Result:
Proceed to NEXT
Post-procedure1
Turn the ignition switch off.
Leave the vehicle as is for 60 seconds or more.
- NOTICE:
- ·
Do not connect the GTS.
·Do not depress the brake pedal.
·Do not open/close any of the doors.
NEXT
Pre-procedure1
Turn the ignition switch to ON.
Depress the brake pedal and move the shift lever to select neutral (N).
Check that the shift state is neutral (N), and then push the P position switch (parking switch) to select park (P).
Turn the ignition switch to ON (READY).
Depress the brake pedal and move the shift lever as follows to select each shift state: N → D.
Drive the vehicle at 40 km/h (25 mph) or more for 10 seconds or more.
Stop the vehicle and push the P position switch (parking switch) to select park (P).
Turn the ignition switch off.
Turn the ignition switch to ON and wait for 10 seconds or more.
- HINT:
-
It may not be possible to turn the ignition switch to ON (READY).
Depress the brake pedal and move the shift lever to select neutral (N).
Push the P position switch (parking switch) to select park (P).
Procedure1
Check if DTCs are output.
- Powertrain > EV > Trouble Codes
- 50001 397
- Result:
Result Proceed to DTCs are not output A Only P1C8949 is output B P1C8949 and other DTCs are output C
Post-procedure1
Turn the ignition switch off.
A
B
C
- Result:
Proceed to NEXT
NEXT