BRAKE CONTROL / DYNAMIC CONTROL SYSTEMS ELECTRONICALLY CONTROLLED BRAKE SYSTEM P057112 Brake Switch "A" Circuit Short to Battery
DESCRIPTION
The No. 2 skid control ECU (brake actuator assembly) receives stop light switch assembly signals and uses them to determine whether or not the brakes are applied.
DTCs may be stored if either of the following occurs:
Stop light switch assembly stuck on malfunction.
The accelerator and brake pedals are depressed simultaneously.*
- HINT:
-
*: The No. 2 skid control ECU (brake actuator assembly) may store this DTC upon judging that a stuck on malfunction has occurred when the accelerator pedal and brake pedal are depressed simultaneously. However, this does not indicate a malfunction.
| DTC No. | Detection Item | DTC Detection Condition | Trouble Area | DTC Output from | Priority | Note |
|---|---|---|---|---|---|---|
| P057112 | Brake Switch "A" Circuit Short to Battery | When the stop light switch assembly is continuously stuck on, the vehicle decelerates from 30 km/h (19 mph) or more to 3 km/h (2 mph) or less 10 times or more. | ·
Stop light switch assembly ·
Stop light switch assembly installation ·
Wire harness and connector ·
No. 2 skid control ECU (brake actuator assembly) ·
No. 2 semiconductor power integration ECU ·
STP circuit |
Brake/EPB | A | Output ECU: No. 2 skid control ECU (brake actuator assembly) |
WIRING DIAGRAM
Refer to DTC C13807E.
Click hereBrake>BRAKE CONTROL / DYNAMIC CONTROL SYSTEMS>ELECTRONICALLY CONTROLLED BRAKE SYSTEM>C13807E
CAUTION / NOTICE / HINT
- NOTICE:
- ·
Inspect the fuses for circuits related to this system before performing the following procedure.
·After replacing the No. 2 skid control ECU (brake actuator assembly), perform "Calibration".
Click hereBrake>BRAKE CONTROL / DYNAMIC CONTROL SYSTEMS>ELECTRONICALLY CONTROLLED BRAKE SYSTEM>UTILITY
PROCEDURE
- HINT:
-
for LHD: Click hereBrake>BRAKE SYSTEM (OTHER)>BRAKE PEDAL (for LHD)>ADJUSTMENT
-
for RHD: Click hereBrake>BRAKE SYSTEM (OTHER)>BRAKE PEDAL (for RHD)>ADJUSTMENT
- Result:
Proceed to OK NG
OK
NG
for LHD: Click hereBrake>BRAKE SYSTEM (OTHER)>BRAKE PEDAL (for LHD)>ADJUSTMENT
for RHD: Click hereBrake>BRAKE SYSTEM (OTHER)>BRAKE PEDAL (for RHD)>ADJUSTMENT
Procedure1
Make sure that there is no looseness at the locking part and the connecting part of the connector.
- OK:
The connector is securely connected.
Pre-procedure1
Disconnect the A6 No. 2 skid control ECU (brake actuator assembly) connector.
Procedure2
Check both the connector case and the terminals for deformation and corrosion.
- OK:
No deformation or corrosion.
Procedure3
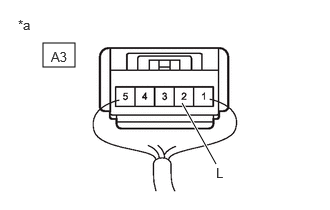
| *a | Component with harness connected
(Stop Light Switch Assembly) |
Measure the voltage according to the value(s) in the table below.
- Standard Voltage:
Tester Connection Condition Specified Condition Click Location & Routing(A3)Location & Routingewd_type=routing;type=c;code=A3
Click Connector(A3)Instrument Panel>Front Compartment Main Wire>Stop Light Switch Assemblyewd_type=component;type=c;code=A3;pinno=2
A3-2 (L) - Body ground Brake pedal released Below 1.5 V
- Result:
Proceed to OK NG
Post-procedure1
None
OK
for LHD: Click hereBrake>BRAKE CONTROL / DYNAMIC CONTROL SYSTEMS>BRAKE ACTUATOR (for LHD)>REMOVAL
for RHD: Click hereBrake>BRAKE CONTROL / DYNAMIC CONTROL SYSTEMS>BRAKE ACTUATOR (for RHD)>REMOVAL
NG
Procedure1
Make sure that there is no looseness at the locking part and the connecting part of the connector.
- OK:
The connector is securely connected.
Pre-procedure1
Disconnect the G102 No. 2 semiconductor power integration ECU connector.
Procedure2
Check both the connector case and the terminals for deformation and corrosion.
- OK:
No deformation or corrosion.
Procedure3
| *a | Component with harness connected
(Stop Light Switch Assembly) |
Measure the voltage according to the value(s) in the table below.
- Standard Voltage:
Tester Connection Condition Specified Condition Click Location & Routing(A3)Location & Routingewd_type=routing;type=c;code=A3
Click Connector(A3)Instrument Panel>Front Compartment Main Wire>Stop Light Switch Assemblyewd_type=component;type=c;code=A3;pinno=2
A3-2 (L) - Body ground Brake pedal released Below 1.5 V
- Result:
Proceed to OK NG
Post-procedure1
None
OK
NG
Procedure1
Make sure that there is no looseness at the locking part and the connecting part of the connector.
- OK:
The connector is securely connected.
Pre-procedure1
Disconnect the A3 stop light switch assembly connector.
Procedure2
Check both the connector case and the terminals for deformation and corrosion.
- OK:
No deformation or corrosion.
Procedure3
Measure the voltage according to the value(s) in the table below.
- Standard Voltage:
Tester Connection Condition Specified Condition Click Location & Routing(A3)Location & Routingewd_type=routing;type=c;code=A3
Click Connector(A3)Instrument Panel>Front Compartment Main Wire>Stop Light Switch Assemblyewd_type=component;type=c;code=A3;pinno=2
A3-2 (L) - Body ground Always Below 1.5 V
- Result:
Proceed to OK NG
Post-procedure1
None
OK
NG
Check that there is no short to +B in the STP circuit (wire harnesses, connectors and ECUs).
- OK:
No short to +B.
- Result:
Proceed to OK NG
OK
Click hereGeneral>INTRODUCTION>HOW TO TROUBLESHOOT ECU CONTROLLED SYSTEMS>HOW TO PROCEED WITH TROUBLESHOOTING
NG