 |
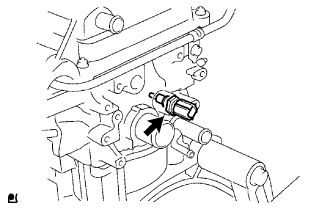
Install a new gasket, then install the engine coolant temperature sensor.
- Torque:
- 20 N*m{ 204 kgf*cm , 15 in.*lbf }
ENGINE ASSEMBLY > INSTALLATION |
| 1. INSTALL ENGINE COOLANT TEMPERATURE SENSOR |
|
Install a new gasket, then install the engine coolant temperature sensor.
| 2. INSTALL NOISE FILTER |
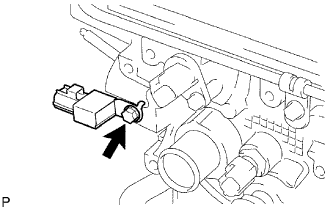 |
Install the noise filter with the bolt.
| 3. INSTALL EXHAUST MANIFOLD |
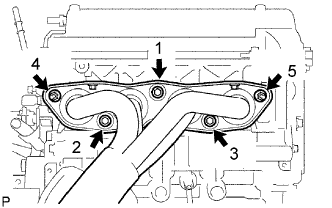 |
Install a new gasket, then install the exhaust manifold.
Tighten the 3 bolts and 2 nuts in the sequence shown in the illustration.
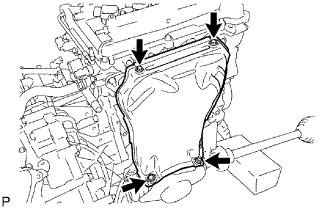 |
Install the exhaust manifold insulator with the 4 bolts.
| 4. INSTALL IGNITION COIL |
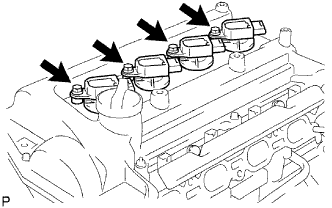 |
Install the ignition coil with the bolt.
| 5. INSTALL IDLER PULLEY |
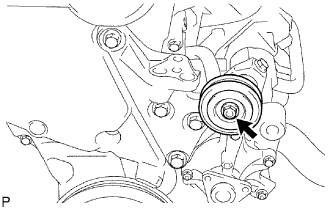 |
Temporarily install the idler pulley assembly to the engine mounting bracket RH with the nut.
| 6. INSTALL DRIVE BELT |
Temporarily install the belt on each pulley.
| 7. INSTALL ENGINE OIL PRESSURE SWITCH |
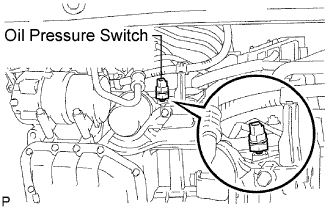 |
Remove the engine oil pressure switch assembly.
Disconnect the oil pressure switch connector.
Using a 24 mm deep socket wrench, remove the oil pressure switch.
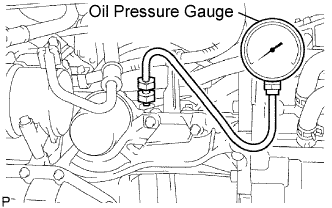 |
Install an oil pressure gauge.
Install the adaptor, then install an oil pressure gauge.
Set the vehicle to inspection mode (Click here).
Warm up the engine.
Check the oil pressure. If the oil pressure is not specified, check the oil pump (Click here).
| Condition | Specified Condition |
| Idle | 59 kPa (0.6 kgf/cm2, 4.2 psi) or more |
| 2,500 rpm | 150 to 550 kPa (1.5 to 5.6 kgf/cm2, 22 to 80 psi) |
Remove the oil pressure gauge.
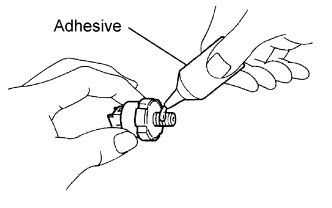 |
Install the engine oil pressure switch.
Apply adhesive to the threads.
Using a 24 mm deep socket wrench, install the oil pressure switch.
Connect the oil pressure switch connector.
| 8. INSTALL KNOCK SENSOR |
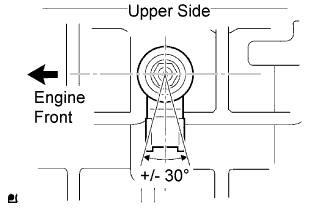 |
Install the knock sensor with the nut.
Connect the knock sensor connector.
| 9. INSTALL NO. 1 WATER BY-PASS PIPE |
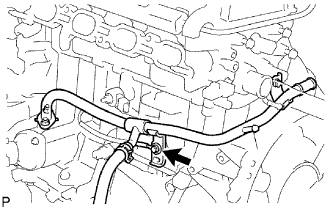 |
Install a new gasket, then install the water by-pass pipe with the bolt and 2 nuts.
| 10. INSTALL INTAKE MANIFOLD |
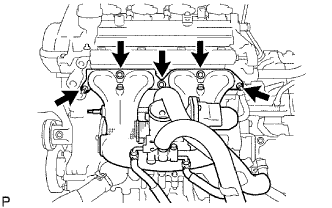 |
Install a new gasket, then install the intake manifold with the 3 bolts and 2 nuts.
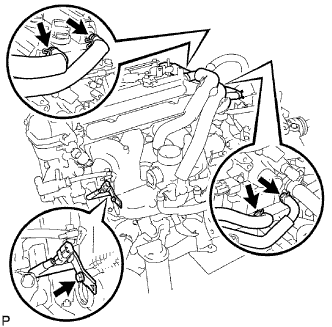 |
Connect the water by-pass hose.
Connect the ventilation hose.
Install the knock control sensor with bracket with the bolt.
| 11. INSTALL OIL DIPSTICK GUIDE |
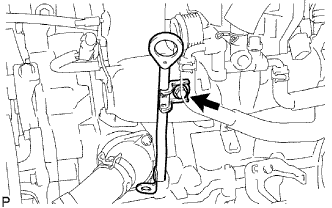 |
Apply engine oil to a new O-ring, then install it to the dipstick guide.
Install the dipstick guide with the bolt.
Install the dipstick.
| 12. INSTALL FLYWHEEL |
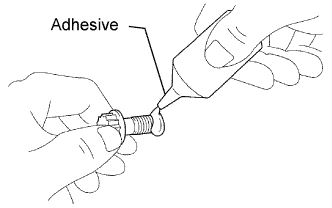 |
Apply adhesive to 2 or 3 threads of the bolt end.
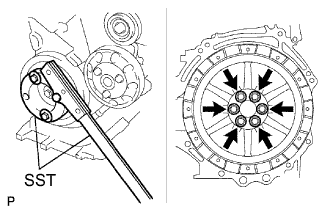 |
Using SST, hold the crankshaft.
Install the flywheel with 6 new bolts.
After tightening the new bolts to the specified torque, tighten each bolt by an additional 90°.
| 13. INSTALL TRANSMISSION INPUT DAMPER |
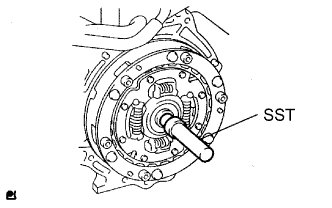 |
Using SST, align the hole of the input damper. Then temporarily tighten the input damper cover with the 6 bolts.
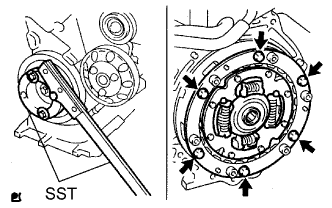 |
Using SST, hold the crankshaft.
Tighten the 6 bolts.
| 14. INSTALL HYBRID VEHICLE TRANSAXLE ASSEMBLY |
Install the hybrid vehicle transaxle assembly to the engine assembly with the 6 bolts (Click here).
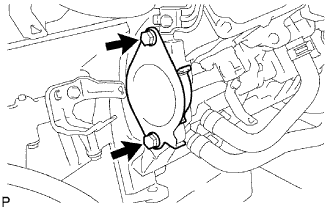 |
Install the flywheel housing side cover and starter hole insulator with the 2 bolts.
Install the engine wire harness to the engine assembly with transaxle.
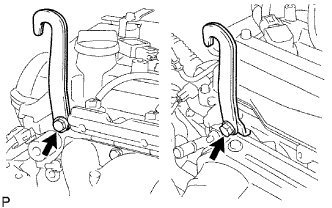 |
Remove the bolts and engine hangers.
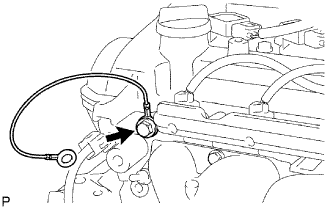 |
Install the ground cable with the bolt.
| 15. INSTALL AIR CLEANER ASSEMBLY |
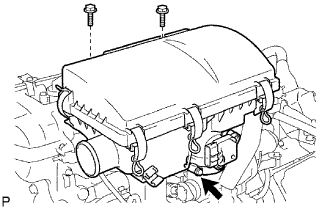 |
Install the air cleaner with the 2 bolts and tighten the clamp.
| 16. INSTALL ENGINE AND TRANSAXLE |
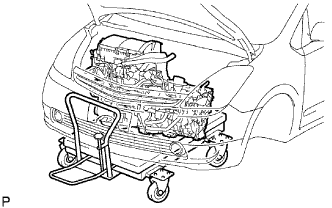 |
Set the engine lifter as illustrated.
Operate the engine lifter, then install the engine assembly with transaxle to the vehicle.
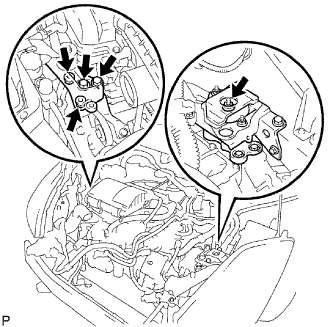 |
Connect the engine mounting bracket RH and engine mounting insulator RH with the 2 bolts and 2 nuts.
Connect the engine mounting insulator bracket LH and engine mounting insulator LH with the nut.
| 17. INSTALL FRONT SUSPENSION CROSSMEMBER |
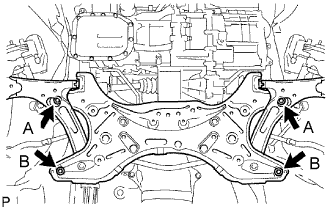 |
Install the front suspension crossmember with power steering gear assembly with the 4 bolts.
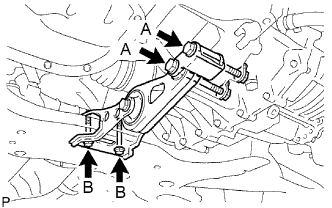 |
Install the engine moving control rod with bracket with the 4 bolts and 2 nuts.
| 18. INSTALL FRONT DRIVE SHAFT LH |
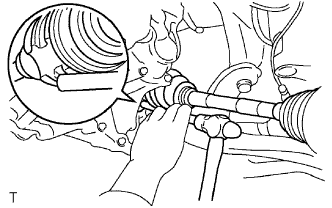 |
Apply ATF to the spline of the inboard joint.
Align the spline of the front drive shaft and insert the front drive shaft using a brass bar and hammer.
Install the front fender apron seal.
| 19. INSTALL FRONT DRIVE SHAFT RH |
| 20. INSTALL FRONT AXLE HUB LH |
Push the front axle outward from the vehicle to align the spline of the front drive shaft with the front axle and insert.
| 21. INSTALL FRONT AXLE HUB RH |
| 22. INSTALL NO. 1 FRONT SUSPENSION ARM LOWER LH |
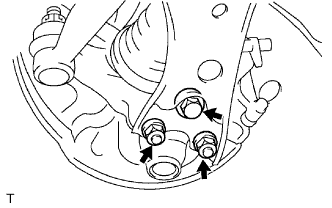 |
Install the front suspension lower No. 1 arm to the front lower ball joint with the bolt and 2 nuts.
| 23. INSTALL NO. 1 FRONT SUSPENSION ARM LOWER RH |
| 24. CONNECT TIE ROD END LH |
Connect the tie rod end to the steering knuckle and install it with the castle nut.
Install a new clip.
| 25. CONNECT TIE ROD END RH |
| 26. CONNECT FRONT STABILIZER LINK LH |
Install the No. 1 stabilizer bracket the front suspension crossmember with the 2 bolts.
| 27. INSTALL FRONT AXLE HUB NUT LH |
Clean the threaded parts on the drive shaft and axle hub nut using a non-residue solvent.
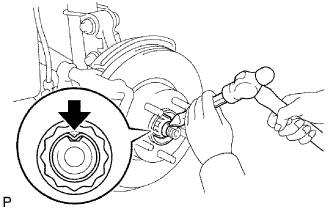 |
Using a 30 mm socket wrench, install a new hub nut.
Using a chisel and hammer, stake the hub nut.
| 28. INSTALL FRONT AXLE HUB NUT RH |
| 29. CONNECT STEERING SLIDING YOKE |
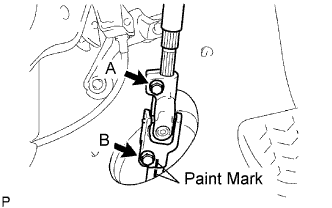 |
Align the paint marks, then connect the steering sliding yoke with the bolt.
Install the column hole cover silencer sheet with the 2 clips.
Remove the seat belt from the steering wheel.
| 30. CONNECT COOLER COMPRESSOR WITH MOTOR ASSEMBLY |
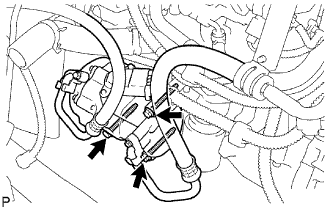 |
Install the cooler compressor with the 3 bolts.
| 31. CONNECT ENGINE WIRE |
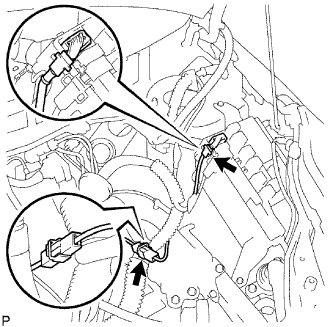 |
Connect the ground cable.
Connect the harness and clamp to the engine room main relay block.
Push in the engine wire harness, and then connect the wire harness to the ECM.
| 32. CONNECT NO. 3 HEAT STORAGE WATER BY-PASS HOSE |
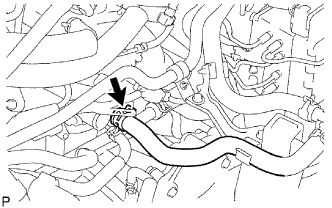 |
Connect the No. 3 heat storage water by-pass hose.
| 33. CONNECT HEATER WATER HOSE |
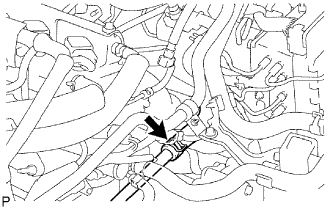 |
| 34. CONNECT FUEL TUBE |
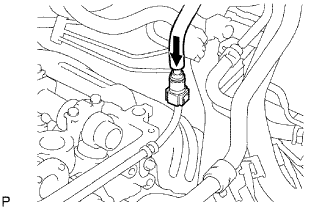 |
Push the fuel tube into the fuel delivery pipe until it makes a "click" sound.
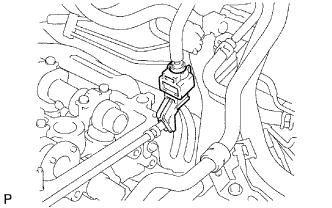 |
Install the fuel pipe clamp.
| 35. INSTALL PURGE VSV |
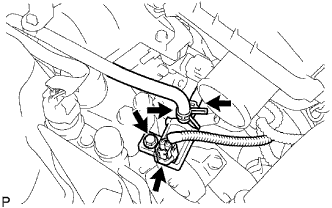 |
Install the purge VSV with the bolt.
Connect the hose and connector.
| 36. CONNECT NO. 1 AIR CLEANER INLET |
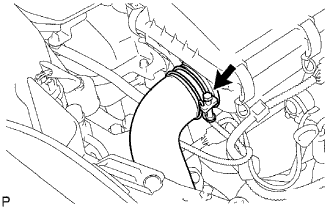 |
Connect the No. 1 air cleaner inlet to the air cleaner case, and then tighten the clamp.
| 37. CONNECT ENGINE WIRE |
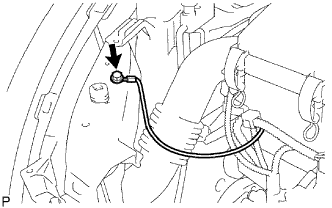 |
Connect the ground cable with the bolt.
| 38. CONNECT NO. 1 HEAT STORAGE WATER BY-PASS HOSE |
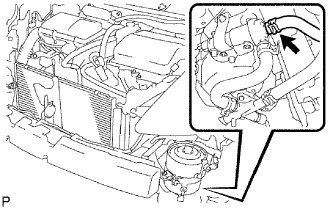 |
Connect the hose as shown in the illustration.
| 39. CONNECT NO. 3 INVERTER COOLING HOSE |
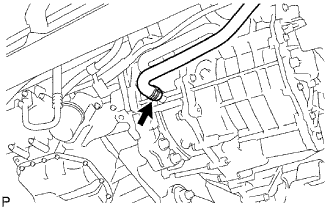 |
| 40. INSTALL NO. 2 RADIATOR ASSEMBLY |
Install the radiator to the vehicle .
| 41. INSTALL INVERTER WITH CONVERTER ASSEMBLY |
Install the inverter with converter to the vehicle .
| 42. INSTALL FRONT COWL TOP PANEL OUTER |
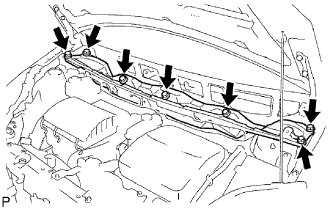 |
Install the panel with the 7 bolts.
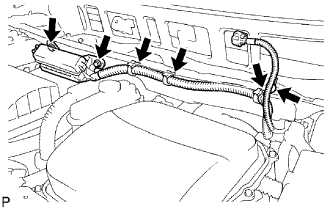 |
Connect the 4 wire harness clamps.
Install the No. 2 engine room relay block with the 2 bolts.
| 43. INSTALL WINDSHIELD WIPER LINK AND WIPER MOTOR ASSEMBLY |
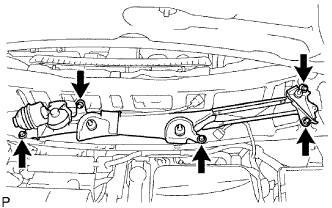 |
Install the windshield wiper motor & link with the 5 bolts.
Connect the connector.
| 44. INSTALL COWL TOP VENTILATOR LOUVER RH |
| 45. INSTALL COWL TOP VENTILATOR LOUVER LH |
| 46. INSTALL HOOD TO COWL TOP SEAL |
| 47. INSTALL FRONT WIPER ARM LH |
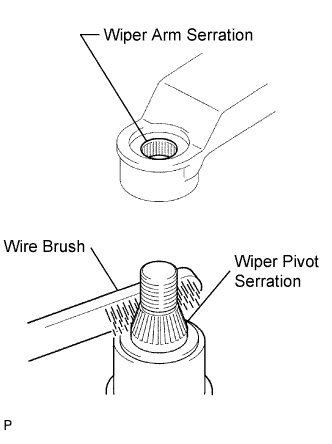 |
Clean the wiper arm serration with a round file or equivalent (when reinstalling).
Clean the wiper pivot serration with a wire brush.
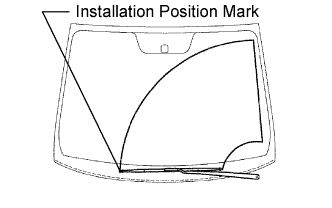 |
Install the front wiper arm LH with the nut so that the front wiper blade comes to the position shown in the illustration.
| 48. INSTALL FRONT WIPER ARM RH |
 |
Clean the wiper arm serration with a round file or equivalent (when reinstalling).
Clean the wiper pivot serration with a wire brush.
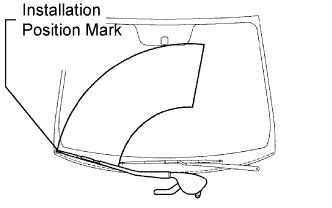
Install the front wiper arm RH with the 2 nuts so that the front wiper blade comes to the position shown in the illustration.
Operate the front wipers while spraying water or washer fluid on the windshield glass. Ensure that the wipers function properly and there is no interference with the body.
| 49. INSTALL WIPER ARM HEAD CAP |
| 50. ADD TRANSAXLE OIL |
| 51. INSTALL SERVICE PLUG GRIP |
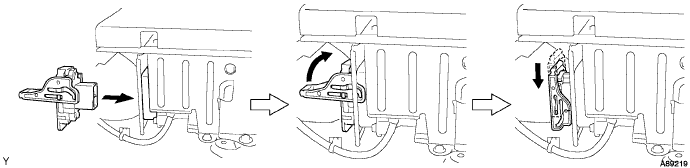
Joint the service plug grip with the HV battery.
While pushing the service plug grip to the right, rotate the lever to the right.
Slide the lever down to lock the service plug grip in place.
| 52. CONNECT CABLE TO NEGATIVE BATTERY TERMINAL |
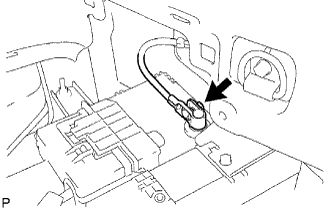 |
Connect the battery negative cable, and then tighten the nut.
| 53. INSTALL NO. 3 REAR FLOOR BOARD |
 |
Install the floor board, and then attach the 4 claws.
| 54. INSTALL REAR DECK FLOOR BOX |
 |
Install the rear deck floor box to the vehicle.
| 55. INSTALL NO. 2 REAR FLOOR BOARD |
 |
Install the floor board, and then lock the 2 cover knobs.
| 56. ADD ENGINE COOLANT |
Tighten the drain cock plug of the coolant heat storage tank, then disconnect the vinyl hose.
Tighten the drain cock plug of the engine, then disconnect the vinyl hose.
Tighten the drain cock plug of the radiator, then disconnect the vinyl hose.
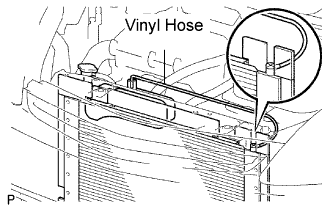 |
Connect a vinyl hose to the bleeder plug of the radiator assembly and the radiator reservoir.
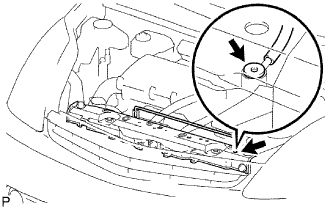 |
Using a 6 mm socket hexagon wrench, loosen the radiator bleeder plug from the radiator support service hole.
Fill the radiator with coolant up to the fill port.
Using a 6 mm socket hexagon wrench, tighten the radiator bleeder plug.
Install the radiator cop.
Fill the radiator reservoir tank with coolant to the full level.
Connect the coolant heat storage water pump connector.
Connect the Techstream to the DLC3.
Turn the power switch ON (IG).
Select the item:
Powertrain / Engine and ECT / Data List/Activate the Water Pump
|
Using a 6 mm socket hexagon wrench, loosen the radiator bleeder plug from the radiator support service hole.
Remove the radiator cap, then fill the radiator with coolant up to the fill port.
Using a 6 mm socket hexagon wrench, tighten the radiator bleeder plug.
Install the radiator cap.
Slowly pour coolant into the radiator reservoir until it reaches the full line.
Disconnect the vinyl hose between the bleeder plug of the radiator assembly and the radiator reservoir tank.
Set the vehicle to inspection mode (Click here).
Warm up the engine until the thermostat is open.
Stop the engine, then wait until the coolant becomes cold. Remove the radiator cap and check the coolant level.
When the coolant level stops going down, add coolant to the radiator reservoir tank up to the full level.
| 57. CHECK FOR TRANSAXLE FLUID LEVEL |
Inspect the transaxle oil (Click here).
| 58. INSPECT FOR ENGINE COOLANT LEAK |
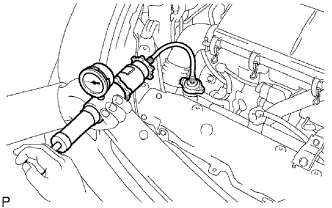 |
Fill the radiator with coolant and attach a radiator cap tester.
Warm up the engine.
Using the radiator cap tester, increase the pressure inside the radiator to 177 kPa (1.8 kgf/cm2, 25.6 psi), and check that the pressure does not drop.
If the pressure drops, check the hoses, radiator and water pump for leaks. If no external leaks are found, check the cylinder block and head.
| 59. INSPECT FOR FUEL LEAK |
|
Fill the radiator with coolant and attach a radiator cap tester.
Warm up the engine.
Using the radiator cap tester, increase the pressure inside the radiator to 177 kPa (1.8 kgf/cm2, 25.6 psi), and check that the pressure does not drop.
If the pressure drops, check the hoses, radiator and water pump for leaks. If no external leaks are found, check the cylinder block and head.
| 60. INSPECT FOR OIL LEAK |
| 61. INSTALL FRONT WHEELS |
| 62. ADJUST FRONT WHEEL ALIGNMENT |
Adjust the front wheel alignment (Click here).
| 63. INSTALL NO. 3 ENGINE UNDER COVER |
| 64. INSTALL NO. 4 CENTER ENGINE UNDER COVER |
| 65. PERFORM INITIALIZATION |
Perform initialization (Click here).