1NZ-FXE LUBRICATION OIL PUMP INSTALLATION
PROCEDURE

 15100C
1.INSTALL OIL PUMP SEAL
Apply a light coat of MP grease to the timing chain cover oil pump seal lip.
- NOTICE:
-
Keep the seal lip free of foreign matter.
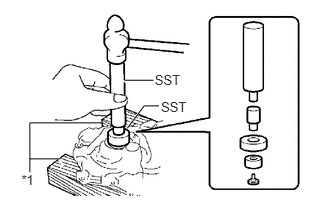
Using SST and a wooden block, tap in a new oil pump seal until its surface is flush with the timing chain cover edge.
| *1 | Wooden Block |
- SST
- 09550-60010 (09951-00250, 09951-00380, 09952-06010)
09950-70010
- Tap in depth:
0 to 1.0 mm from the edge of the timing chain cover.
- NOTICE:
-
Do not tap the oil pump seal at an angle.
15100
2.INSTALL TIMING CHAIN COVER
Install 2 new O-rings to the cylinder block and oil pan.
Apply seal packing to the timing chain cover and engine assembly as shown in the illustration below.
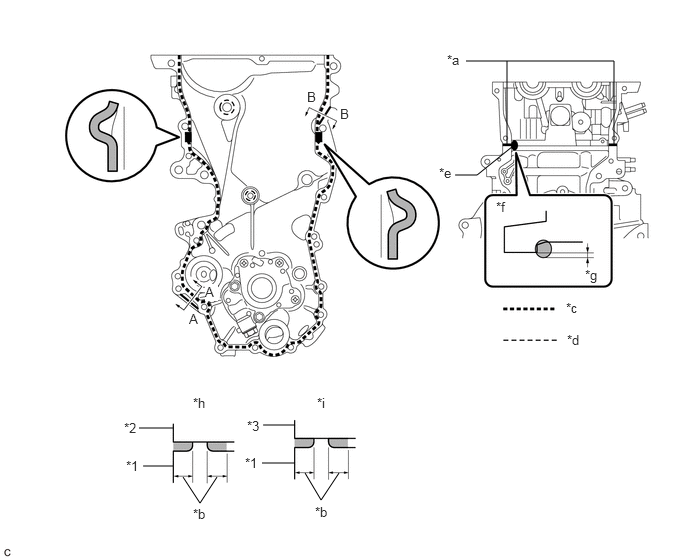
| *1 | Timing Chain Cover | *2 | Cylinder Block |
| *3 | Cylinder Head Sub-assembly | - | - |
| *a | Apply Seal Packing to The Inner Corners | *b | 2.5 mm (0.0984 in.) or Higher |
| *c | Seal Packing Application Width 3.5 to 4.5 mm (0.138 to 0.177 in.) | *d | Seal Packing Application Width 1.5 to 2.0 mm (0.0591 to 0.0787 in.) |
| *e | Seal Packing Application Width 10 mm (0.394 in.) or more | *f | Upper View |
| *g | Apply enough seal packing so that it will protrude beyond the timing chain cover installation surface | *h | A - A (After Installation) |
| *i | B - B (After Installation) | - | - |
- Seal packing:
Toyota Genuine Seal Packing Black, Three Bond 1207B or equivalent
- NOTICE:
- ·
When the contact surfaces are wet, clean the surfaces with non-residue solvent before applying seal packing.
·Install the timing chain cover within 3 minutes and tighten the bolts within 10 minutes of applying seal packing.
·Do not apply engine oil for at least 2 hours after installation.
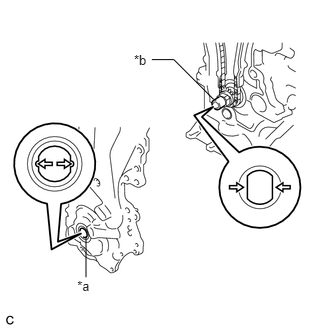
Align the oil pump drive rotor spline and the crankshaft as shown in the illustration.
| *a | Drive Rotor Spline |
| *b | Crankshaft |
Temporarily install the timing chain cover and 2 wire harness clamp brackets with the 18 bolts and nut.
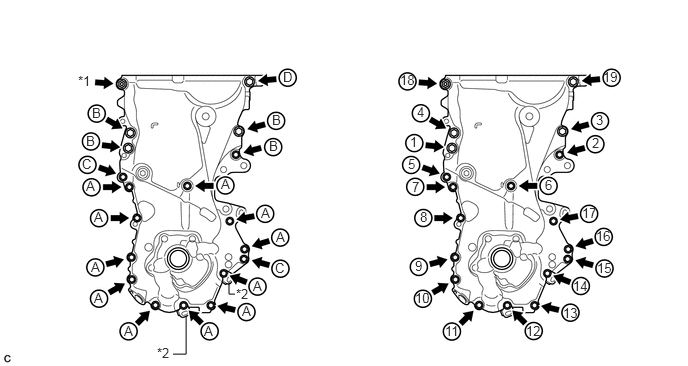
| *1 | Nut | *2 | Wire Harness Clamp Bracket |
| Item | Length | Thread Diameter |
|---|---|---|
| Bolt A | 20 mm (0.787 in.) | 6 mm (0.236 in.) |
| Bolt B | 30 mm (1.18 in.) | 8 mm (0.315 in.) |
| Bolt C | 35 mm (1.38 in.) | 6 mm (0.236 in.) |
| Bolt D | 20 mm (0.787 in.) | 8 mm (0.315 in.) |
- NOTICE:
- ·
Be careful not to disturb the seal packing.
·After installing the timing chain cover, install the engine mounting bracket RH within 10 minutes.
Tighten the 18 bolts and nut in the sequence shown in the illustration.
- Torque:
- Bolt A and Bolt C : 12 N*m (122 kgf*cm, 9 ft.*lbf)
- Bolt B : 32 N*m (326 kgf*cm, 24 ft.*lbf)
- Bolt D and Nut : 24 N*m (245 kgf*cm, 18 ft.*lbf)
3.INSTALL SCREW PLUG
Apply a few drops of adhesive to 2 or 3 threads of the screw plug.
- Adhesive:
Toyota Genuine Adhesive 1324, Three Bond 1324 or equivalent
Using an 8 mm hexagon socket wrench, install the screw plug.
- Torque:
- 15 N*m (153 kgf*cm, 11 ft.*lbf)
12315A
4.INSTALL ENGINE MOUNTING BRACKET RH
Temporarily install the engine mounting bracket RH with the 4 bolts.
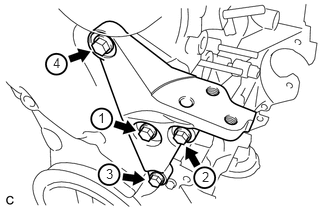
Tighten the 4 bolts in the sequence shown in the illustration.
- Torque:
- 55 N*m (561 kgf*cm, 41 ft.*lbf)
11452
5.INSTALL ENGINE OIL LEVEL DIPSTICK GUIDE
Apply a light coat of engine oil to a new O-ring and install the O-ring to the engine oil level dipstick guide.
Install the engine oil level dipstick guide with the bolt.
- Torque:
- 10 N*m (102 kgf*cm, 7 ft.*lbf)
15301
6.INSTALL ENGINE OIL LEVEL DIPSTICK
13407
7.INSTALL CRANKSHAFT DAMPER SUB-ASSEMBLY
15100Q
8.INSTALL CRANKSHAFT POSITION SENSOR
11201
9.INSTALL CYLINDER HEAD COVER SUB-ASSEMBLY
82121
10.CONNECT ENGINE WIRE (for LHD)
82121
11.CONNECT ENGINE WIRE (for RHD)
19500D
12.INSTALL IGNITION COIL ASSEMBLY
25680
13.INSTALL EGR VALVE WITH COOLER ASSEMBLY
25612
14.INSTALL NO. 2 EGR PIPE
15.REMOVE ENGINE STAND