POWER ASSIST SYSTEMS POWER STEERING SYSTEM CALIBRATION
TORQUE SENSOR ZERO POINT CALIBRATION (USING THE INTELLIGENT TESTER)
- NOTICE:
-
Perform torque sensor zero point calibration if any of the following conditions occur:
- ·
The power steering ECU assembly has been replaced.
·The electric power steering column sub-assembly has been replaced.
·There is a difference in steering effort between turning left and right.
Inspection before calibration
Turn the power switch off (lock).
Connect the intelligent tester to the DLC3.
Turn the power switch on (IG).
Turn the intelligent tester on.
Calibrate the power steering ECU assembly. Enter the following menus: Chassis / EMPS / Data List.
Check the values by referring to the table below.
| Tester Display | Measurement Item/Range | Normal Condition | Diagnostic Note |
|---|---|---|---|
| IG Power Supply | ECU power source voltage/
Min.: 0.0000V Max.: 20.1531 V |
9 to 16 V | Power switch on (IG) |
- Standard Voltage:
9 to 16 V
- NOTICE:
-
If the IG power supply voltage is 9 V or less, calibration cannot be performed. In this case, charge or replace the auxiliary battery, and then perform calibration.
Torque sensor zero point calibration
- NOTICE:
-
If DTC C1516/16 (Torque Sensor Zero Point Adjustment Incomplete) is stored, the torque sensor zero point cannot be calibrated. Clear the DTCs before starting calibration.
Set the steering wheel to the center point and align the front wheels straight ahead.
Turn the power switch off (lock).
Connect the intelligent tester to the DLC3.
Turn the power switch on (IG).
Turn the intelligent tester on.
Enter the following menus: Chassis / EMPS / Utility / Torque Sensor Adjustment.
- NOTICE:
- ·
Do not turn the steering wheel sharply.
·Do not touch the steering wheel during torque sensor zero point calibration (for 3 seconds).
Check for DTCs (See page Steering>POWER ASSIST SYSTEMS>POWER STEERING SYSTEM>DTC CHECK / CLEAR).
- NOTICE:
-
If DTC C1515/15, C1516/16, C1534/34 or C1581/81 is output, perform troubleshooting for the corresponding DTC.
- Result:
Result See Procedure DTC C1515/15 is output. (  )
DTC C1516/16 is output. ( )
DTC C1534/34 is output. ( )
DTC C1581/81 is output. ( )
TORQUE SENSOR ZERO POINT CALIBRATION (USING SST CHECK WIRE)
- NOTICE:
-
Calibrate the torque sensor zero point if any of the following has occurred:
- ·
The power steering ECU assembly has been replaced.
·The electric power steering column sub-assembly has been replaced.
·Steering effort differs between left and right.
Check for DTCs.
Check for DTCs (See page Steering>POWER ASSIST SYSTEMS>POWER STEERING SYSTEM>DTC CHECK / CLEAR).
- NOTICE:
- ·
If DTC C1516/16 (Torque Sensor Zero Point Adjustment Incomplete) is stored, the torque sensor zero point cannot be calibrated. Clear the DTC before starting calibration.
·If DTCs other than C1516/16 is output, refer to the "Diagnostic Trouble Code Chart" (See page Steering>POWER ASSIST SYSTEMS>POWER STEERING SYSTEM>DIAGNOSTIC TROUBLE CODE CHART).
Perform pre-calibration check.
Turn the power switch off (lock).
Disconnect the G6 power steering ECU assembly connector.
Turn the power switch on (IG).
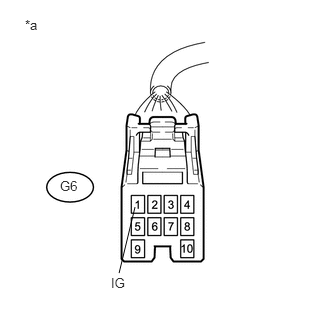
Measure the voltage according to the value(s) in the table below.
- Standard Voltage:
Tester Connection Condition Specified Condition G6-1 (IG) - Body ground Power switch on (IG) 9 to 16 V
- NOTICE:
-
If the IG power supply voltage is 9 V or less, calibration cannot be performed. In this case, charge or replace the auxiliary battery, and then perform calibration.
Turn the power switch off (lock).
Connect the G6 power steering ECU assembly connector.
| *a | Front view of wire harness connector
(to Power Steering ECU Assembly) |
Clear sensor calibration value.
Set the steering wheel to the center point and align the front tires straight ahead.
Turn the power switch off (lock).
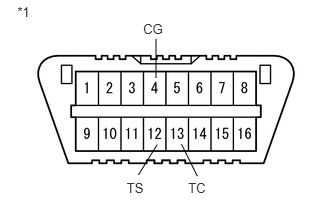
Using SST, connect terminals 12 (TS) and 4 (CG) of the DLC3.
- SST
- 09843-18040
- NOTICE:
-
Connect the terminals to the correct positions to avoid a malfunction.
| *1 | DLC3 |
Turn the power switch on (IG) and then connect and disconnect terminals 13 (TC) and 4 (CG) at least 20 times in 20 seconds.
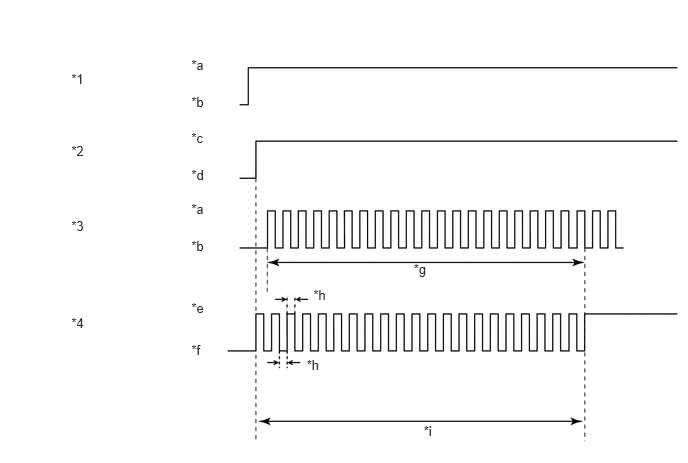
| *1 | DLC3 (TS and CG) | *2 | Power Switch |
| *3 | DLC3 (TC and CG) | *4 | EPS Warning Light |
| *a | Short | *b | Open |
| *c | on (IG) | *d | off (lock) |
| *e | ON | *f | OFF |
| *g | 20 Times Or More | *h | 0.125 Seconds |
| *i | 20 Seconds |

Check that the EPS warning light blinks and then remains illuminated.
- HINT:
-
The EPS warning light illumination indicates that DTCs C1515/15 has been stored.
Turn the power switch off (lock).
- NOTICE:
-
After erasing the sensor calibration value zero point calibration cannot be performed if the power switch is on (IG).
| *1 | EPS Warning Light |
Perform torque sensor zero point calibration.
- NOTICE:
-
As torque sensor zero point calibration cannot be performed if DTC C1515/15 has not been stored, be sure to perform sensor calibration value erasure before performing torque sensor zero point calibration.
Set the steering wheel to the center point and align the front tires straight ahead.
Turn the power switch off (lock).
Using SST, connect terminals 12 (TS) and 4 (CG) of the DLC3.
- SST
- 09843-18040
| *1 | DLC3 |
Turn the power switch on (IG) and then connect terminals 13 (TC) and 4 (CG).
- NOTICE:
-
Do not touch the steering wheel during calibration (for 3 seconds).
- HINT:
-
The EPS warning light remains illuminated even after calibration has completed.
With terminals 12 (TS) and 4 (CG), and 13 (TC) and 4 (CG) connected, and the power switch on (IG), continue to perform rotation angle sensor initialization.
ASSIST MAP WRITING (USING THE INTELLIGENT TESTER)
- NOTICE:
-
Perform assist map writing if any of the following conditions occur:
- ·
The power steering ECU assembly has been replaced.
Turn the power switch off (lock).
Connect the intelligent tester to the DLC3.
Turn the power switch on (IG).
Turn the intelligent tester on.
Enter the following menus: Chassis / EMPS / Utility / Signal Check.
- HINT:
- ·
Follow the instructions on the intelligent tester to perform Signal Check.
·With DTC C1581/81 output, performing Signal Check will cause the power steering ECU assembly to enter Test Mode and the assist map will be written automatically.
Wait for at least 5 seconds.
Check for DTCs (See page Steering>POWER ASSIST SYSTEMS>POWER STEERING SYSTEM>DTC CHECK / CLEAR).
- HINT:
-
After writing the assist map, if DTC C1581/81 is output, perform the troubleshooting procedure for DTC C1581/81 (See page Steering>POWER ASSIST SYSTEMS>POWER STEERING SYSTEM>C1581/81).
ASSIST MAP WRITING (USING SST CHECK WIRE)
- NOTICE:
-
Perform assist map writing if any of the following conditions occur:
- ·
The power steering ECU assembly has been replaced.
- HINT:
-
If DTC C1581/81 is output after torque sensor zero point calibration, perform assist map writing.
Turn the power switch off (lock).
| *1 | DLC3 |
Using SST, connect terminals 12 (TS) and 4 (CG) of the DLC3.
- SST
- 09843-18040
- NOTICE:
-
Connect the terminals correctly to avoid a malfunction.
Turn the power switch on (IG).
Wait for 5 seconds or more.
Check for DTCs (See page Steering>POWER ASSIST SYSTEMS>POWER STEERING SYSTEM>DTC CHECK / CLEAR).
- HINT:
-
After writing the assist map, if DTC C1581/81 is output, perform the troubleshooting procedure for DTC C1581/81 (See page Steering>POWER ASSIST SYSTEMS>POWER STEERING SYSTEM>C1581/81).