FRONT SUSPENSION FRONT LOWER SUSPENSION ARM INSTALLATION
CAUTION / NOTICE / HINT
- HINT:
- ·
Use the same procedure for the RH and LH sides.
·The procedure listed below is for the LH side.
PROCEDURE

 48069
1.TEMPORARILY INSTALL FRONT LOWER NO. 1 SUSPENSION ARM SUB-ASSEMBLY LH
Temporarily install the front lower No. 1 suspension arm sub-assembly LH to the front suspension crossmember sub-assembly with the 2 bolts and nut.
- NOTICE:
-
Because the nut has its own stopper, do not turn the nut. Tighten the bolt with the nut fixed in place.
51201
2.INSTALL FRONT SUSPENSION CROSSMEMBER SUB-ASSEMBLY
Support the front suspension crossmember sub-assembly with an engine lifter using 4 attachments or equivalent tools.
- NOTICE:
- ·
Make sure to secure the front suspension crossmember sub-assembly to prevent it from dropping.
·Use the attachments to keep the front suspension crossmember sub-assembly level.
·The front suspension crossmember sub-assembly is a heavy component. Make sure that it is supported securely.
Tighten the 2 bolts on the left and right sides while alternately inserting SST into the left and right side reference holes in the front suspension crossmember sub-assembly.
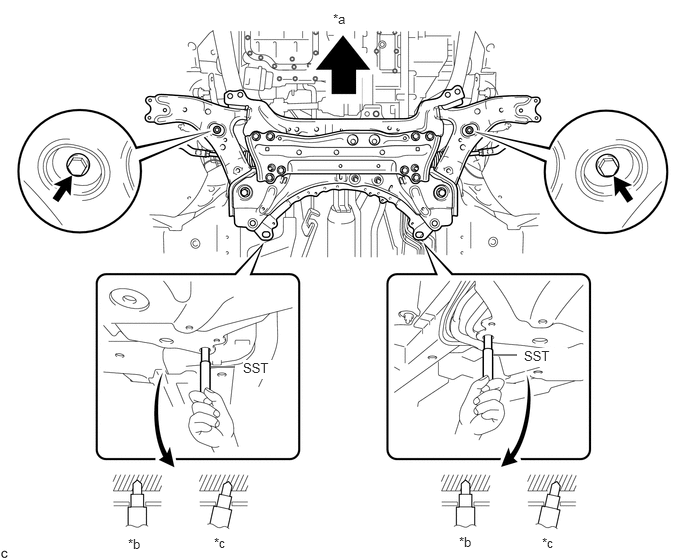
| *a | Front of the Vehicle | *b | OK |
| *c | NG | - | - |
- SST
- 09670-00020
- Torque:
- 137 N*m (1397 kgf*cm, 101 ft.*lbf)
Lower the engine lifter.
Install the rear engine mounting insulator with bolts A and B, and nuts C and D by tightening them in several steps.
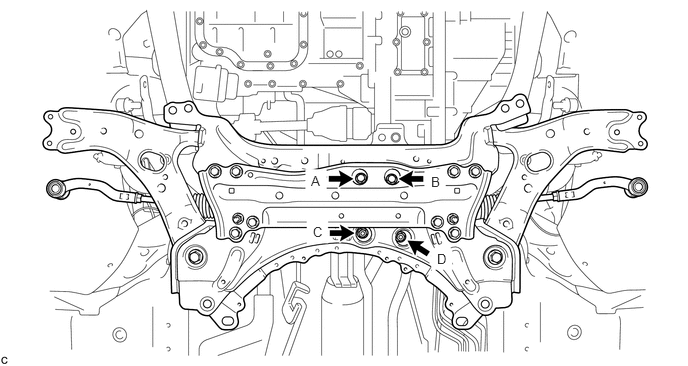
- Torque:
- Bolt A, B, Nut C, D : 95 N*m (969 kgf*cm, 70 ft.*lbf)
- NOTICE:
-
Temporarily tighten bolt A, and then fully tighten the 2 bolts and 2 nuts in the order of B, D, C, and A.
52258B
3.INSTALL FRONT SUSPENSION MEMBER REAR BRACE LH
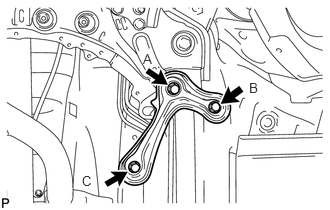
Install the front suspension member rear brace LH with the 3 bolts.
- Torque:
- Bolt A : 137 N*m (1397 kgf*cm, 101 ft.*lbf)
- Bolt B, C : 93 N*m (948 kgf*cm, 69 ft.*lbf)
- NOTICE:
-
Temporarily tighten bolts A and B, and then fully tighten the 3 bolts in the order of C, B, and A.
52257A
4.INSTALL FRONT SUSPENSION MEMBER REAR BRACE RH
- HINT:
-
Use the same procedure described for the LH side.
51425B
5.INSTALL ENGINE FRONT MOUNTING BRACKET REINFORCEMENT LOWER (for 2WW and 3ZR 2WD)
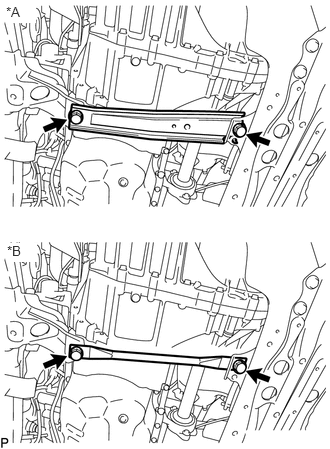
| *A | for 3ZR-FE (2WD) |
| *B | for 2WW Engine |
Install the engine front mounting bracket reinforcement lower with the 2 bolts.
- Torque:
- 99 N*m (1010 kgf*cm, 73 ft.*lbf)
51218A
6.INSTALL FRONT SUSPENSION MEMBER REINFORCEMENT LH
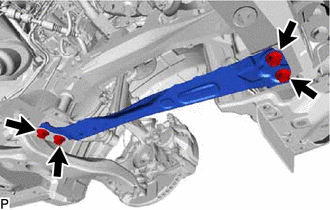
Install the front suspension member reinforcement LH with the 4 bolts.
- Torque:
- 99 N*m (1010 kgf*cm, 73 ft.*lbf)
51217A
7.INSTALL FRONT SUSPENSION MEMBER REINFORCEMENT RH
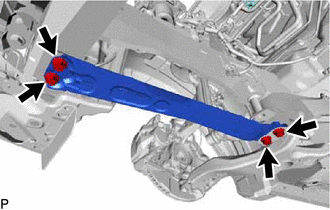
Install the front suspension member reinforcement RH with the 4 bolts.
- Torque:
- 99 N*m (1010 kgf*cm, 73 ft.*lbf)
48069
8.CONNECT FRONT LOWER NO. 1 SUSPENSION ARM SUB-ASSEMBLY LH
Connect the front lower No. 1 suspension arm sub-assembly to the lower arm ball joint with the bolt and 2 nuts.
- Torque:
- 92 N*m (938 kgf*cm, 68 ft.*lbf)
48068
9.CONNECT FRONT LOWER NO. 1 SUSPENSION ARM SUB-ASSEMBLY RH
- HINT:
-
Use the same procedure described for the LH side.
45047
10.CONNECT TIE ROD END SUB-ASSEMBLY LH
45046
11.CONNECT TIE ROD END SUB-ASSEMBLY RH
- HINT:
-
Use the same procedure described for the LH side.
48810
12.CONNECT FRONT STABILIZER LINK ASSEMBLY LH
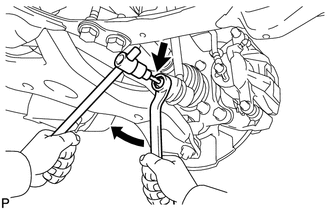
Connect the front stabilizer link assembly LH to the front stabilizer bar with the nut.
- Torque:
- 74 N*m (755 kgf*cm, 55 ft.*lbf)
- HINT:
-
If the ball joint turns together with the nut, use a 6 mm hexagon wrench to hold the stud bolt.
48820B
13.CONNECT FRONT STABILIZER LINK ASSEMBLY RH
- HINT:
-
Use the same procedure described for the LH side.
45025D
14.INSTALL NO. 1 STEERING COLUMN HOLE COVER SUB-ASSEMBLY
45260
15.CONNECT NO. 2 STEERING INTERMEDIATE SHAFT ASSEMBLY
45259A
16.INSTALL COLUMN HOLE COVER SILENCER SHEET
51444A
17.INSTALL REAR ENGINE UNDER COVER LH
for AD Series Engine: Click hereEngine / Hybrid System>2AD-FHV ENGINE MECHANICAL>ENGINE ASSEMBLY>INSTALLATION
for 2AR-FE and 3ZR-FE: Click hereEngine / Hybrid System>2AR-FE ENGINE MECHANICAL>ENGINE ASSEMBLY>INSTALLATION
for 3ZR-FAE Engine: Click hereEngine / Hybrid System>3ZR-FAE ENGINE MECHANICAL>ENGINE ASSEMBLY>INSTALLATION
for 2WW Engine: Click hereEngine / Hybrid System>2WW ENGINE MECHANICAL>ENGINE ASSEMBLY>INSTALLATION
51443C
18.INSTALL REAR ENGINE UNDER COVER RH
for AD Series Engine: Click hereEngine / Hybrid System>2AD-FHV ENGINE MECHANICAL>DRIVE BELT>INSTALLATION
for 2AR-FE and 3ZR-FE: Click hereEngine / Hybrid System>2AR-FE ENGINE MECHANICAL>ENGINE ASSEMBLY>INSTALLATION
for 3ZR-FAE Engine: Click hereEngine / Hybrid System>3ZR-FAE ENGINE MECHANICAL>ENGINE ASSEMBLY>INSTALLATION
for 2WW Engine: Click hereEngine / Hybrid System>2AD-FHV ENGINE MECHANICAL>DRIVE BELT>INSTALLATION
19.INSTALL FRONT WHEELS
- Torque:
- 103 N*m (1050 kgf*cm, 76 ft.*lbf)
20. STABILIZE SUSPENSION
Lower the vehicle.
Bounce the vehicle up and down at the corners several times to stabilizer the suspension.
48069
21.TIGHTEN FRONT LOWER NO. 1 SUSPENSION ARM SUB-ASSEMBLY LH
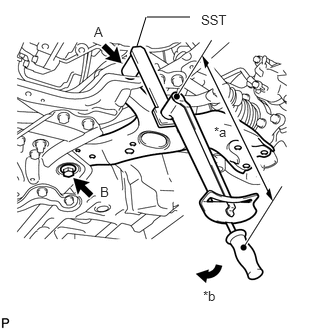
| *a | Fulcrum Length |
| *b | Turn |
Using SST, tighten bolt A.
- SST
- 09961-01270
- Torque:
- without SST : 233 N*m (2376 kgf*cm, 172 ft.*lbf)
- with SST : 172 N*m (1754 kgf*cm, 127 ft.*lbf)
- NOTICE:
- ·
Because the nut has its own stopper, do not turn the nut. Tighten the bolt with the nut fixed in place.
·Use a torque wrench with a fulcrum length of 425 mm (1.39 ft.).
·The torque value for use with SST is effective when SST is parallel to the torque wrench.
·The final torque must be applied under standard vehicle height conditions.
Tighten bolt B.
- Torque:
- 214 N*m (2182 kgf*cm, 158 ft.*lbf)
51442
22.INSTALL NO. 2 ENGINE UNDER COVER
50819
23.INSTALL FRONT FLOOR COVER
51441
24.INSTALL NO. 1 ENGINE UNDER COVER
for AD Series Engine: Click hereEngine / Hybrid System>2AD-FHV ENGINE MECHANICAL>ENGINE ASSEMBLY>INSTALLATION
for 2AR-FE and 3ZR-FE: Click hereEngine / Hybrid System>2AR-FE ENGINE MECHANICAL>ENGINE ASSEMBLY>INSTALLATION
for 3ZR-FAE Engine: Click hereEngine / Hybrid System>3ZR-FAE ENGINE MECHANICAL>ENGINE ASSEMBLY>INSTALLATION
for 2WW Engine: Click hereEngine / Hybrid System>2WW COOLING>RADIATOR>INSTALLATION
25.INSPECT AND ADJUST FRONT WHEEL ALIGNMENT