3ZR-FAE LUBRICATION OIL PUMP INSTALLATION
PROCEDURE

 15100
1.INSTALL OIL PUMP ASSEMBLY
Install the oil pump assembly with the 3 bolts.
- Torque:
- 21 N*m (214 kgf*cm, 15 ft.*lbf)
12102A
2.INSTALL NO. 2 OIL PAN SUB-ASSEMBLY
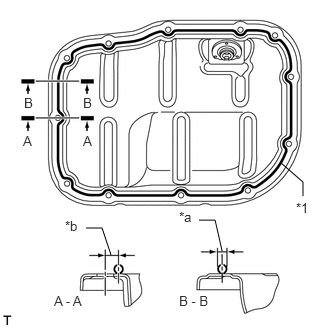
| *1 | Seal Packing |
| *a | 3.0 to 4.5 mm (0.118 to 0.177 in.) |
| *b | 6.0 mm (0.236 in.) |
Remove any old packing material and be careful not to drop any oil on the contact surfaces of the stiffening crankcase and No. 2 oil pan sub-assembly.
Apply seal packing in a continuous line as shown in the illustration.
- Application Specification:
Area Seal Packing Diameter Distance from Center of Bolt Hole to Center of Seal Packing A - A 3.0 to 4.5 mm (0.118 to 0.177 in.) 6.0 mm (0.236 in.) B - B -
- Seal packing:
Toyota Genuine Seal Packing Black, Three Bond 1207B or equivalent
- NOTICE:
- ·
Remove any oil from the contact surfaces.
·Install the No. 2 oil pan sub-assembly within 3 minutes and tighten the bolts within 10 minutes after applying seal packing.
·Do not add engine oil for at least 2 hours after installing the No. 2 oil pan sub-assembly.
Install the No. 2 oil pan sub-assembly with the 10 bolts and 2 nuts.
- Torque:
- 10 N*m (102 kgf*cm, 7 ft.*lbf)
13507
3.INSTALL NO. 2 CHAIN SUB-ASSEMBLY
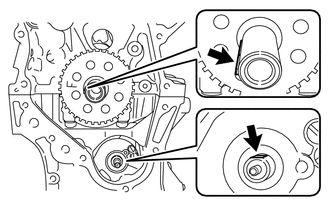
Temporarily install the crankshaft pulley bolt.
Set the crankshaft key as shown in the illustration.
Turn the drive shaft so that the cutout faces upward.
Remove the crankshaft pulley bolt.
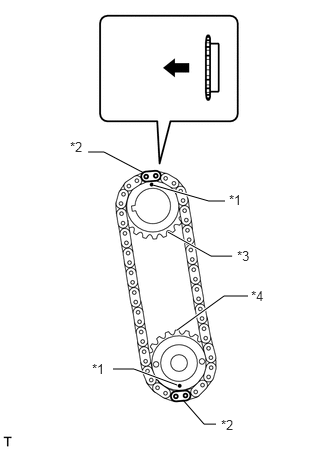
| *1 | Timing Mark |
| *2 | Mark Plate (Yellow) |
| *3 | Oil Pump Drive Gear |
| *4 | Oil Pump Drive Shaft Gear |

|
Front |
Align the yellow mark plates with the timing mark of each gear as shown in the illustration.
Install the gears onto the crankshaft and oil pump shaft with the chain on the gears.
Temporarily install the oil pump drive shaft gear with the nut.
Install the chain damper spring to the chain tensioner plate, and then install the chain tensioner plate with the bolt.
- Torque:
- 10 N*m (102 kgf*cm, 7 ft.*lbf)
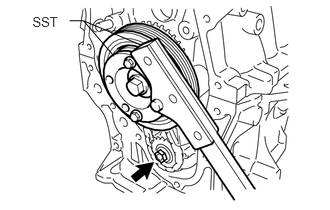
Temporarily install the crankshaft pulley with the pulley bolt.
Using SST, hold the crankshaft. Then tighten the drive shaft gear nut.
- SST
- 09213-54015 09330-00021
- Torque:
- 28 N*m (286 kgf*cm, 21 ft.*lbf)
- HINT:
-
Part number of installation bolt for SST (crankshaft pulley holding tool): 91551-00850 (quantity: 2)
Remove SST, the crankshaft pulley bolt and the crankshaft pulley.
13521
4.INSTALL CRANKSHAFT TIMING SPROCKET
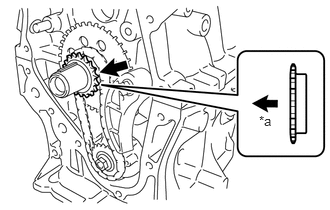
| *a | Front |
Install the crankshaft timing sprocket as shown in the illustration.
13561
5.INSTALL NO. 1 CHAIN VIBRATION DAMPER
6.SET NO. 1 CYLINDER TO TDC/COMPRESSION
13506
7.INSTALL CHAIN SUB-ASSEMBLY
13559
8.INSTALL CHAIN TENSIONER SLIPPER
9.CHECK NO. 1 CYLINDER TO TDC/COMPRESSION
11302
10.INSTALL TIMING CHAIN COVER SUB-ASSEMBLY
Install a new gasket to the timing chain cover sub-assembly.
- NOTICE:
-
Remove any oil from the contact surface.
Install the engine water pump assembly with the 3 bolts.
- Torque:
- 21 N*m (214 kgf*cm, 15 ft.*lbf)
Remove any remaining seal packing material.
Clean the contact surfaces of the timing chain cover sub-assembly, camshaft housing sub-assembly, cylinder head sub-assembly, cylinder block sub-assembly and stiffening crankcase assembly, and confirm that no oil, moisture, or other foreign matter is on the surfaces.
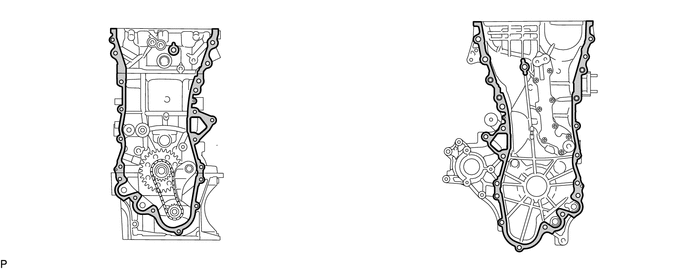

|
Clean and Degrease | - | - |
Install 3 new O-rings.
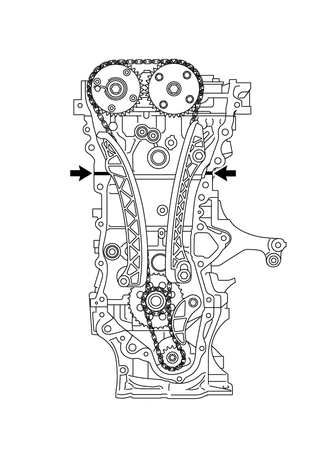
Apply seal packing as shown in the illustration.
- Seal packing:
Toyota Genuine Seal Packing Black, Three Bond 1207B or equivalent
- Standard seal diameter:
5.0 mm (0.197 in.)
- NOTICE:
-
Install the timing chain cover sub-assembly within 3 minutes and tighten the bolts within 10 minutes of applying seal packing.
Apply seal packing in a continuous line to the timing chain cover sub-assembly as shown in the following illustration.
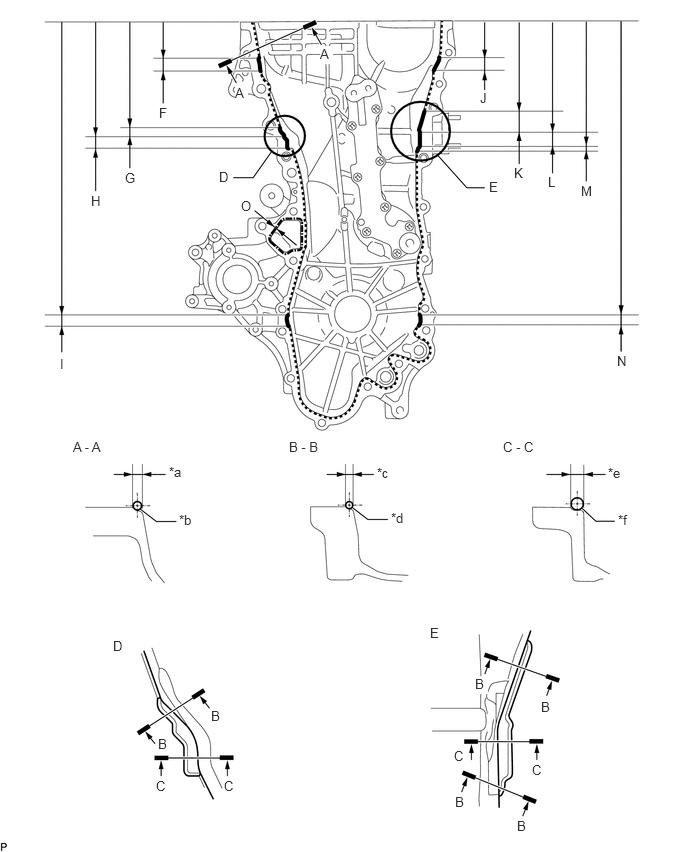
| *a | 2.5 mm (0.0984 in.) | *b | 2.5 to 3.5 mm (0.0984 to 0.138 in.) |
| *c | 5.0 mm (0.197 in.) | *d | 4.5 to 5.5 mm (0.177 to 0.217 in.) |
| *e | 7.5 mm (0.295 in.) | *f | 7.0 to 8.0 mm (0.276 to 0.315 in.) |
- Seal Packing:
Item Seal Packing Dashed line Toyota Genuine Seal Packing Black, Three Bond 1207B or equivalent Continuous line Alternate long and short dashed line Toyota Genuine Seal Packing 1282B, Three Bond 1282B or equivalent
- Application Specification:
Area Seal Packing Diameter Distance from Edge of Cover to: Seal Packing Application Length Distance from Top of Cover to Top of Seal Packing Dashed line 2.5 to 3.5 mm (0.0984 to 0.138 in.) Center of seal packing
2.5 mm (0.0984 in.)- - Continuous line 4.5 to 5.5 mm (0.177 to 0.217 in.) or 7.0 to 8.0 mm (0.276 to 0.315 in.) - - - Alternate long and short dashed line 4.0 mm (0.157 in.) Center of seal packing
3.0 mm (0.118 in.)- - A - A 2.5 to 3.5 mm (0.0984 to 0.138 in.) Center of seal packing
2.5 mm (0.0984 in.)- - B - B 4.5 to 5.5 mm (0.177 to 0.217 in.) Opposite edge of seal packing
5.0 mm (0.197 in.)- - C - C 7.0 to 8.0 mm (0.276 to 0.315 in.) Opposite edge of seal packing
7.5 mm (0.295 in.)- - F 4.5 to 5.5 mm (0.177 to 0.217 in.) - 15.8 mm (0.622 in.) 50.1 mm (1.97 in.) G 4.5 to 5.5 mm (0.177 to 0.217 in.) - 10.3 mm (0.406 in.) 155.1 mm (6.11 in.) H 7.0 to 8.0 mm (0.276 to 0.315 in.) - 19.5 mm (0.768 in.) 165.4 mm (6.51 in.) I 4.5 to 5.5 mm (0.177 to 0.217 in.) - 14.6 mm (0.575 in.) 397.8 mm (1.31 ft.) J 4.5 to 5.5 mm (0.177 to 0.217 in.) - 18.6 mm (0.732 in.) 51.4 mm (2.02 in.) K 4.5 to 5.5 mm (0.177 to 0.217 in.) - 25.3 mm (0.996 in.) 133.9 mm (5.27 in.) L 7.0 to 8.0 mm (0.276 to 0.315 in.) - 25.8 mm (1.02 in.) 159.2 mm (6.28 in.) M 4.5 to 5.5 mm (0.177 to 0.217 in.) - 5.0 mm (0.197 in.) 185.0 mm (7.28 in.) N 4.5 to 5.5 mm (0.177 to 0.217 in.) - 14.6 mm (0.575 in.) 397.8 mm (1.31 ft.) O 4.0 mm (0.157 in.) Center of seal packing
3.0 mm (0.118 in.)- -
- NOTICE:
-
Install the timing chain cover sub-assembly within 3 minutes and tighten the bolts within 10 minutes of applying seal packing.
Clean the bolts and their installation holes.
Apply adhesive to 5 and a half threads or more of the end of bolt C.
- Adhesive:
Toyota Genuine Adhesive 1324, Three Bond 1324 or equivalent
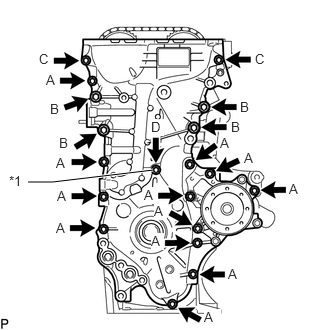
| *1 | Seal Washer |
Temporarily install the timing chain cover sub-assembly with the 19 bolts and a new seal washer.
- Bolt Length:
Item Length Thread Diameter Bolt A, C 35 mm (1.38 in.) 8 mm (0.315 in.) Bolt B 55 mm (2.17 in.) 10 mm (0.394 in.) Bolt D 40 mm (1.57 in.) 6 mm (0.236 in.)
- NOTICE:
-
Make sure that there is no oil on the threads of the bolts.
Temporarily install the engine mounting bracket RH to the timing chain cover sub-assembly with the 3 bolts.
- Bolt Length:
Length Thread Diameter 80 mm (3.15 in.) 10 mm (0.394 in.)
- NOTICE:
-
Make sure that there is no oil on the threads of the bolts.
Install 2 new O-rings to the timing chain cover sub-assembly.
Temporarily install the oil filter bracket to the timing chain cover sub-assembly with the 4 bolts.
- Bolt Length:
Length Thread Diameter 35 mm (1.38 in.) 8 mm (0.315 in.)
- NOTICE:
-
Make sure that there is no oil on the threads of the bolts.
Tighten the 26 bolts in the order shown in the illustration.
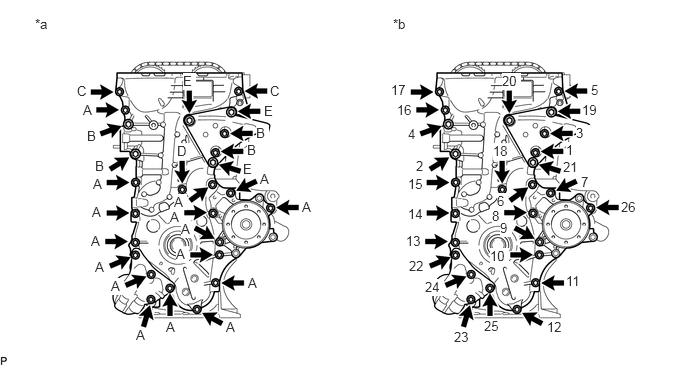
| *a | Torque | *b | Bolt Tightening Order |
- Torque:
- for bolt A, C : 25.5 N*m (260 kgf*cm, 19 ft.*lbf)
- for bolt B, E : 51 N*m (520 kgf*cm, 38 ft.*lbf)
- for bolt D : 10 N*m (102 kgf*cm, 7 ft.*lbf)
- NOTICE:
- ·
Tighten the bolts within 10 minutes of applying seal packing.
·Do not add engine oil for at least 2 hours after installation.
·Do not start the engine for at least 2 hours after installation.
11302A
11.INSTALL TIMING CHAIN COVER OIL SEAL
15620
12.INSTALL OIL FILTER
13.INSTALL ENGINE MOUNTING BRACKET STUD BOLT
13471
14.INSTALL CRANKSHAFT PULLEY
13540
15.INSTALL NO. 1 CHAIN TENSIONER ASSEMBLY
11213
16.INSTALL CYLINDER HEAD COVER GASKET
11201
17.INSTALL CYLINDER HEAD COVER SUB-ASSEMBLY
16620
18.INSTALL V-RIBBED BELT TENSIONER ASSEMBLY
12551A
19.INSTALL NO. 1 VACUUM PUMP BRACKET
19500
20.INSTALL IGNITION COIL ASSEMBLY
16331A
21.INSTALL THERMOSTAT
16321
22.INSTALL WATER INLET
16262
23.CONNECT WATER INLET HOSE
24.INSTALL WATER BY-PASS HOSE
16267
25.CONNECT NO. 3 WATER BY-PASS HOSE
12261
26.INSTALL PCV HOSE
29300
27.INSTALL VACUUM PUMP ASSEMBLY
17141
28.INSTALL EXHAUST MANIFOLD
17118
29.INSTALL MANIFOLD STAY
17167
30.INSTALL NO. 1 EXHAUST MANIFOLD HEAT INSULATOR
11452
31.INSTALL ENGINE OIL LEVEL DIPSTICK GUIDE
23250
32.INSTALL FUEL INJECTOR ASSEMBLY
23807V
33.INSTALL NO. 1 DELIVERY PIPE SPACER
23807
34.INSTALL FUEL DELIVERY PIPE SUB-ASSEMBLY
23901
35.INSTALL FUEL TUBE SUB-ASSEMBLY
36.INSTALL WIRE HARNESS CLAMP BRACKET
17111
37.INSTALL INTAKE MANIFOLD
17361M
38.INSTALL AIR TUBE
22210
39.INSTALL THROTTLE BODY ASSEMBLY
40.REMOVE ENGINE STAND
41.INSTALL ENGINE ASSEMBLY WITH TRANSAXLE