INTERIOR PANELS / TRIM UPPER INSTRUMENT PANEL INSTALLATION
CAUTION / NOTICE / HINT
- HINT:
- ·
Use the same procedure for RHD and LHD vehicles.
·The procedure listed below is for LHD vehicles.
·A bolt without a torque specification is shown in the standard bolt chart.
Click hereGeneral>SPECIFICATIONS>STANDARD BOLT>SPECIFIED TORQUE FOR STANDARD BOLTS
PROCEDURE

 1.INSTALL UPPER INSTRUMENT PANEL
Attach the 8 clips to install the upper instrument panel.
for Single Type Airbag:
Install the 2 bolts <C> or <D>.
Install the 2 bolts <B>.
- Torque:
- 20 N*m (204 kgf*cm, 15 ft.*lbf)
Connect each connector.
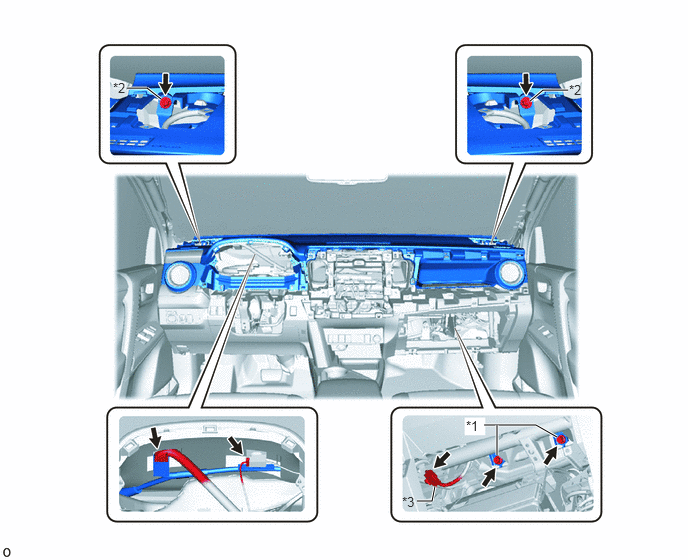
| *1 | Bolt <B> | *2 | Bolt <C> or <D> |
| *3 | Airbag Connector | - | - |
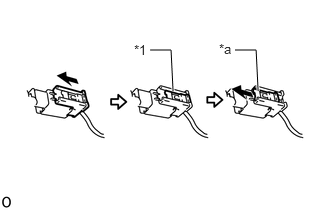
| *1 | Lock Slider |
| *a | Lock Position |
Connect the airbag connector.
- NOTICE:
-
When handling the airbag connector, take care not to damage the airbag wire harness.
Check that the lock slider is in the lock position.
for Dual Type Airbag:
Install the 2 bolts <C> or <D>.
Install the 2 bolts <B>.
- Torque:
- 20 N*m (204 kgf*cm, 15 ft.*lbf)
Connect each connector.
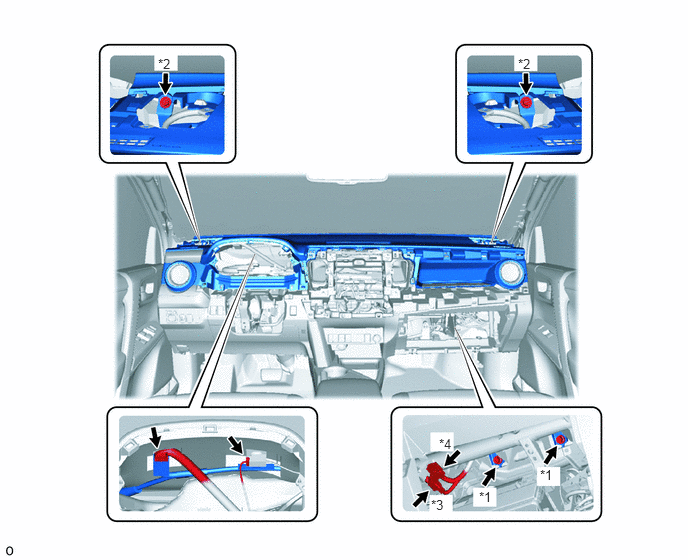
| *1 | Bolt <B> | *2 | Bolt <C> or <D> |
| *3 | Airbag Connector A | *4 | Airbag Connector B |
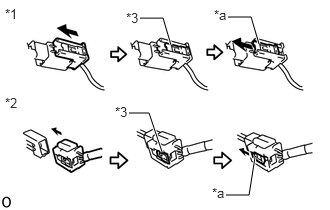
| *1 | Airbag Connector A |
| *2 | Airbag Connector B |
| *3 | Lock Slider |
| *a | Lock Position |
Connect the 2 airbag connectors A and B.
- NOTICE:
-
When handling the airbag connector, take care not to damage the airbag wire harness.
Check that the lock slider is in the lock position.
62212
2.INSTALL FRONT PILLAR GARNISH LH (w/o Curtain Shield Airbag)
62211
3.INSTALL FRONT PILLAR GARNISH RH (w/o Curtain Shield Airbag)
62212
4.INSTALL FRONT PILLAR GARNISH LH (w/ Curtain Shield Airbag)
62211
5.INSTALL FRONT PILLAR GARNISH RH (w/ Curtain Shield Airbag)
86160P
6.INSTALL FRONT NO. 2 SPEAKER ASSEMBLY
55535B
7.INSTALL NO. 2 SPEAKER HOLE COVER (w/o Speaker)
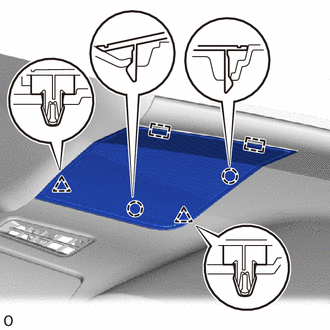
Attach the 2 guides, 2 clips and 2 claws to install the No. 2 speaker hole cover.
55525
8.INSTALL NO. 1 SPEAKER HOLE COVER (w/o Speaker)
- HINT:
-
Use the same procedure described for the No. 2 speaker hole cover.
55535B
9.INSTALL NO. 2 SPEAKER HOLE COVER (w/ Speaker)
55525
10.INSTALL NO. 1 SPEAKER HOLE COVER (w/ Speaker)
- HINT:
-
Use the same procedure described for the No. 2 speaker hole cover.
55550
11.INSTALL GLOVE COMPARTMENT DOOR ASSEMBLY
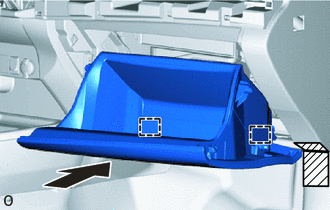

|
Protective Tape |
Apply protective tape as shown in the illustration.
Attach the 2 hinges to install the glove compartment door assembly.
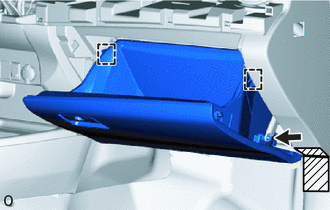
|
|
Protective Tape |
While pushing in the sides of the glove compartment door assembly, attach the 2 stoppers.
Connect the glove compartment door stopper sub-assembly.
55421B
12.INSTALL UPPER INSTRUMENT CLUSTER FINISH PANEL
Attach the 4 clips to install the upper instrument cluster finish panel.
55012A
13.INSTALL NO. 2 INSTRUMENT PANEL GARNISH SUB-ASSEMBLY
for LHD with Entry and Start System:
Connect the connector.
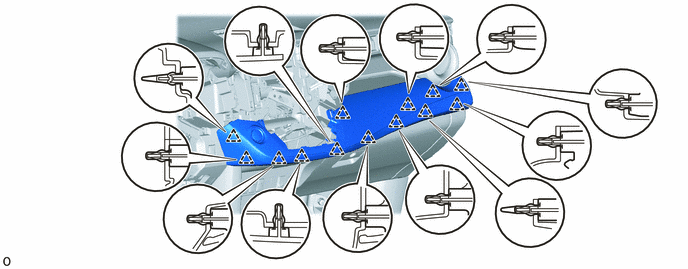
Attach the 13 clips to install the No. 2 instrument panel garnish sub-assembly.
55900
14.INSTALL AIR CONDITIONING CONTROL ASSEMBLY (for Automatic Air Conditioning System)
55406B
15.INSTALL LOWER CENTER INSTRUMENT CLUSTER FINISH PANEL SUB-ASSEMBLY (except Automatic Air Conditioning System)
Connect each connector.
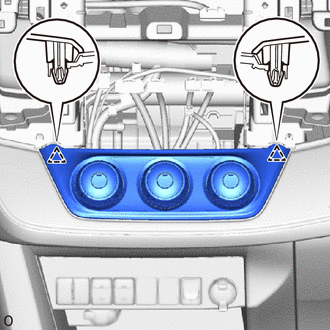
Attach the 2 clips to install the lower center instrument cluster finish panel sub-assembly.
16.INSTALL HEADLIGHT DIMMER SWITCH
83100
17.INSTALL COMBINATION METER ASSEMBLY
55411G
18.INSTALL NO. 1 INSTRUMENT CLUSTER FINISH PANEL
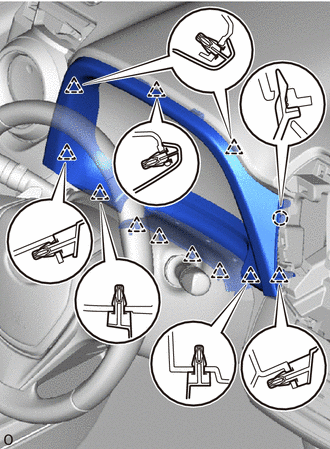
Attach the 11 clips and claw to install the No. 1 instrument cluster finish panel.
55521C
19.INSTALL STEREO OPENING COVER (w/o Audio)
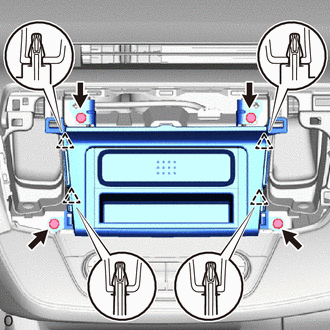
Attach the 4 clips to install the stereo opening cover.
Install the 4 bolts.
86120
20.INSTALL RADIO RECEIVER ASSEMBLY (w/ Audio, for Radio Receiver Type)
86140A
21.INSTALL RADIO AND DISPLAY RECEIVER ASSEMBLY (w/ Audio, for Radio and Display Type)
22.INSTALL NAVIGATION RECEIVER (w/ Navigation System)
83950M
23.INSTALL TELLTALE LIGHT ASSEMBLY
55670
24.INSTALL NO. 3 INSTRUMENT PANEL REGISTER ASSEMBLY
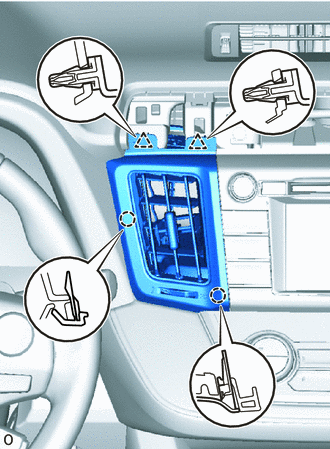
Attach the 2 clips and 2 claws to install the No. 3 instrument panel register assembly.
55680A
25.INSTALL NO. 4 INSTRUMENT PANEL REGISTER ASSEMBLY
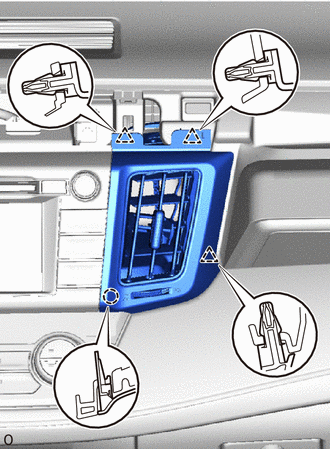
Attach the 3 clips and claw to install the No. 4 instrument panel register assembly.
55412C
26.INSTALL CENTER NO. 1 INSTRUMENT CLUSTER FINISH PANEL
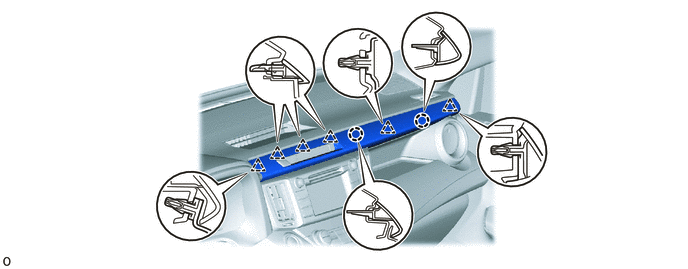
Attach the 6 clips and 2 claws to install the center No. 1 instrument cluster finish panel.
27.CONNECT CABLE TO NEGATIVE BATTERY TERMINAL
- NOTICE:
-
When disconnecting the cable, some systems need to be initialized after the cable is reconnected.
-
Click hereGeneral>INTRODUCTION>REPAIR INSTRUCTION>INITIALIZATION
28.CHECK SRS WARNING LIGHT