WINDOW / GLASS POWER WINDOW REGULATOR MOTOR(for Rear Door) REMOVAL
CAUTION / NOTICE / HINT
The necessary procedures (adjustment, calibration, initialization, or registration) that must be performed after parts are removed and installed, or replaced during power window regulator motor removal/installation are shown below.
| Replaced Part or Performed Procedure | Necessary Procedure | Effect/Inoperative Function when Necessary Procedure not Performed | Link |
|---|---|---|---|
|
*: When performing learning using the GTS. Click here( |
|||
| Removal and installation of auxiliary battery terminal | Perform steering sensor zero point calibration | Lane control system | ( ) |
| Parking support brake system (for HV model)* | |||
| Pre-collision system | |||
| Memorize steering angle neutral point | Parking assist monitor system | ()
|
|
| Panoramic view monitor system (for HV model) | ()
|
||
| Reset back door close position | Power back door system (for HV model) | ()
|
|
| Power back door initialization | Power door lock control system | ()
|
|
·
Power window regulator motor assembly LH ·
Power window regulator motor assembly RH ·
Rear door window regulator sub-assembly LH ·
Rear door window regulator sub-assembly RH ·
Rear door glass sub-assembly LH ·
Rear door glass sub-assembly RH ·
Rear door glass run LH ·
Rear door glass run RH |
Initialize power window control system | ·
Auto up and down function ·
Jam protection function ·
Catch protection function ·
Remote control function ·
Wireless transmitter-linked function ·
Key-linked function ·
Key-off operation function ·
Window open warning function |
()
|
- NOTICE:
-
After the ignition switch is turned off, the navigation system requires approximately a minute to record various types of memory and settings. As a result, after turning the ignition switch off, wait a minute or more before disconnecting the cable from the negative (-) auxiliary battery terminal.
| Replaced Part or Performed Procedure | Necessary Procedure | Effect/Inoperative Function when Necessary Procedure not Performed | Link |
|---|---|---|---|
|
*: When performing learning using the GTS. Click here( |
|||
| Removal and installation of auxiliary battery terminal | Drive the vehicle until stop and start control is permitted (approximately 5 to 60 minutes) | Stop and start system | for A25A-FKS:()
for M20A-FKS:( )
|
| Perform steering sensor zero point calibration | Lane control system | ()
|
|
| Parking support brake system (for Gasoline model)* | |||
| Pre-collision system | |||
| Memorize steering angle neutral point | Parking assist monitor system | ()
|
|
| Panoramic view monitor system (for Gasoline model) | ()
|
||
| Reset back door close position | Power back door system (for Gasoline model) | ()
|
|
| Power back door initialization | Power door lock control system | ()
|
|
·
Power window regulator motor assembly LH ·
Power window regulator motor assembly RH ·
Rear door window regulator sub-assembly LH ·
Rear door window regulator sub-assembly RH ·
Rear door glass sub-assembly LH ·
Rear door glass sub-assembly RH ·
Rear door glass run LH ·
Rear door glass run RH |
Initialize power window control system | ·
Auto up and down function ·
Jam protection function ·
Catch protection function ·
Remote control function ·
Wireless transmitter-linked function ·
Key-linked function ·
Key-off operation function ·
Window open warning function |
()
|
- NOTICE:
-
After the ignition switch is turned off, the navigation system requires approximately a minute to record various types of memory and settings. As a result, after turning the ignition switch off, wait a minute or more before disconnecting the cable from the negative (-) auxiliary battery terminal.
- HINT:
- ·
Use the same procedure for the RH and LH sides.
·Use the same procedure described for the LH side.
·When performing disassembly for the rear door, disconnect the negative (-) auxiliary battery terminal after fully opening the rear door glass.
PROCEDURE

 1. PRECAUTION
- NOTICE:
-
After turning the ignition switch off, waiting time may be required before disconnecting the cable from the negative (-) auxiliary battery terminal. Therefore, make sure to read the disconnecting the cable from the negative (-) auxiliary battery terminal notices before proceeding with work.
-
Click hereGeneral>INTRODUCTION>REPAIR INSTRUCTION>PRECAUTION
58410B
2.REMOVE DECK BOARD ASSEMBLY (for HV Model)
58416K
3.REMOVE NO. 2 REAR FLOOR BOARD (for HV Model)
65351A
4.REMOVE BATTERY HOLE COVER (for HV Model)
5.DISCONNECT CABLE FROM NEGATIVE AUXILIARY BATTERY TERMINAL
for A25A-FXS:
Click hereGeneral>MAINTENANCE>A25A-FXS AUXILIARY BATTERY>REMOVAL
for A25A-FKS:
for M20A-FKS:
Click hereGeneral>MAINTENANCE>M20A-FKS BATTERY>REMOVAL
- CAUTION:
-
- ·
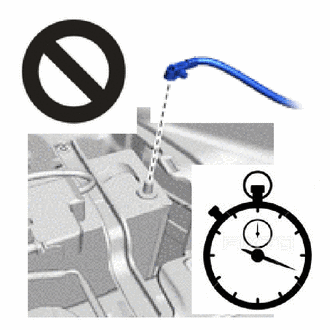
Wait at least 90 seconds after disconnecting the cable from the negative (-) auxiliary battery terminal to disable the SRS system.
·If the airbag deploys for any reason, it may cause a serious accident.
- NOTICE:
-
When disconnecting the cable, some systems need to be initialized after the cable is reconnected.
-
Click hereGeneral>INTRODUCTION>REPAIR INSTRUCTION>INITIALIZATION
69278C
6.REMOVE REAR DOOR INSIDE HANDLE BEZEL LH
74646A
7.REMOVE DOOR ASSIST GRIP COVER LH
8.REMOVE REAR POWER WINDOW REGULATOR SWITCH ASSEMBLY WITH REAR DOOR ARMREST BASE PANEL
67604
9.REMOVE REAR DOOR TRIM BOARD SUB-ASSEMBLY LH
68174A
10.REMOVE REAR DOOR INNER GLASS WEATHERSTRIP LH
68199
11.REMOVE REAR DOOR REAR BELT SEAL LH
67842E
12.REMOVE REAR DOOR SERVICE HOLE COVER LH
67674A
13.REMOVE REAR DOOR FRAME GARNISH LH
68152C
14.REMOVE REAR DOOR GLASS RUN LH
67408E
15.REMOVE REAR DOOR WINDOW DIVISION BAR SUB-ASSEMBLY LH
68104
16.REMOVE REAR DOOR GLASS SUB-ASSEMBLY LH
69804
17.REMOVE REAR DOOR WINDOW REGULATOR SUB-ASSEMBLY LH
85720D
18.REMOVE POWER WINDOW REGULATOR MOTOR ASSEMBLY LH
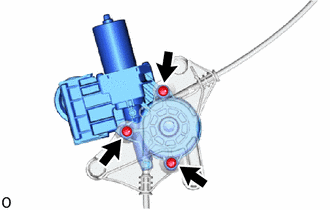
Using a T25 "TORX" socket wrench, remove the 3 "TORX" screws and power window regulator motor assembly LH from the rear door window regulator sub-assembly LH.