AXLE AND DIFFERENTIAL REAR AXLE CARRIER(for 2WD) INSTALLATION
CAUTION / NOTICE / HINT
- HINT:
- ·
Use the same procedure for the RH and LH sides.
·The following procedure is for the LH side.
PROCEDURE

 1.TEMPORARILY INSTALL REAR AXLE CARRIER SUB-ASSEMBLY
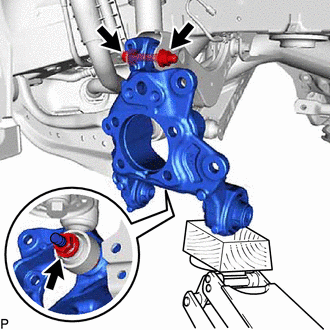
Temporarily install the rear axle carrier sub-assembly to the rear upper control arm assembly with the bolt and nut.
- NOTICE:
- ·
Insert the bolt with the threaded end facing the rear of the vehicle.
·Because the nut has its own stopper, do not turn the nut. Tighten the bolt with the nut secured.
Temporarily install the rear shock absorber assembly to the rear axle carrier sub-assembly with the nut.
- NOTICE:
-
Hold the rear axle carrier pin while rotating the nut.
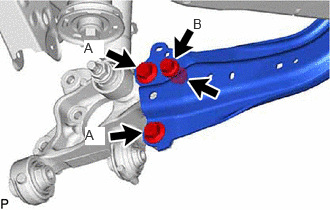
Install the rear trailing arm assembly to the rear axle carrier sub-assembly with the 3 bolts and nut.
- Torque:
- Bolt A : 135 N*m (1377 kgf*cm, 100 ft.*lbf)
- Bolt B : 75 N*m (765 kgf*cm, 55 ft.*lbf)
47352B
2.INSTALL NO. 2 FLEXIBLE HOSE BRACKET
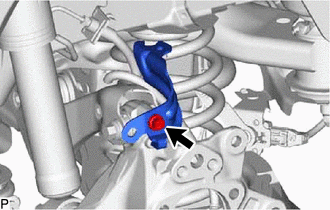
Install the No. 2 flexible hose bracket to the rear axle carrier sub-assembly with the bolt.
- Torque:
- 29 N*m (296 kgf*cm, 21 ft.*lbf)
48720A
3.TEMPORARILY INSTALL REAR NO. 1 SUSPENSION ARM ASSEMBLY LH
Temporarily install the rear No. 1 suspension arm assembly to the rear axle carrier sub-assembly with the bolt and nut.
- NOTICE:
- ·
Because the nut has its own stopper, do not turn the nut. Tighten the bolt with the nut secured.
·Insert the bolt with the threaded end facing the rear of the vehicle.
48258C
4.INSTALL REAR LOWER COIL SPRING INSULATOR LH
48231B
5.INSTALL REAR COIL SPRING LH
6.INSTALL STABILIZE SUSPENSION
48790
7.INSTALL REAR UPPER CONTROL ARM ASSEMBLY LH
Install the rear upper control arm assembly to the rear axle carrier sub-assembly with the bolt.
- Torque:
- 73 N*m (744 kgf*cm, 54 ft.*lbf)
- NOTICE:
-
Because the nut has its own stopper, do not turn the nut. Tighten the bolt with the nut secured.
48720A
8.INSTALL REAR NO. 1 SUSPENSION ARM ASSEMBLY LH
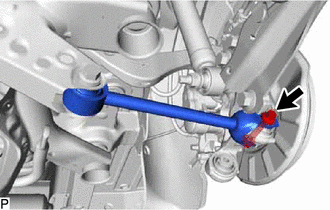
Install the rear No. 1 suspension arm assembly with the bolt.
- Torque:
- 73 N*m (744 kgf*cm, 54 ft.*lbf)
- NOTICE:
-
Because the nut has its own stopper, do not turn the nut. Tighten the bolt with the nut secured.
48740F
9.INSTALL REAR NO. 2 SUSPENSION ARM ASSEMBLY LH
48540
10.INSTALL REAR SHOCK ABSORBER ASSEMBLY LH
48840A
11.INSTALL REAR STABILIZER LINK ASSEMBLY LH
42450B
12.INSTALL REAR AXLE HUB AND BEARING ASSEMBLY LH
42431
13.INSTALL REAR DISC
14.INSTALL REAR DISC BRAKE CALIPER ASSEMBLY LH
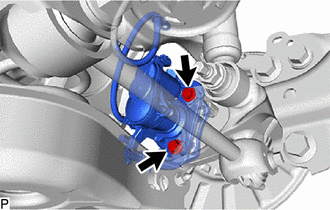
Install the rear disc brake caliper assembly LH to the rear axle carrier sub-assembly with the 2 bolts.
- Torque:
- 107 N*m (1091 kgf*cm, 79 ft.*lbf)
47319F
15.CONNECT REAR FLEXIBLE HOSE LH
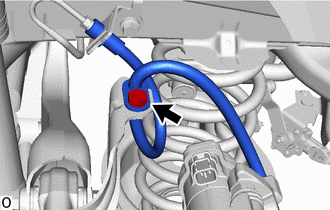
Connect the rear flexible hose LH to the rear flexible hose bracket with the bolt.
- Torque:
- 29 N*m (296 kgf*cm, 21 ft.*lbf)
89408C
16.INSTALL REAR HEIGHT CONTROL SENSOR SUB-ASSEMBLY LH (for LH Side)
890C0A
17.CONNECT NO. 2 PARKING BRAKE WIRE ASSEMBLY
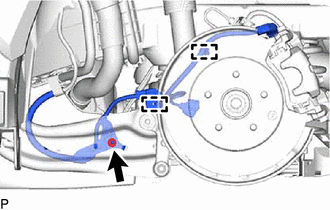
Install the No. 2 parking brake wire assembly to the rear trailing arm assembly with the nut.
- Torque:
- 15.5 N*m (158 kgf*cm, 11 ft.*lbf)
Engage the 2 clamps.
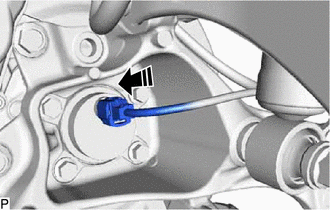
Connect the No. 2 parking brake wire assembly connector to the rear axle hub and bearing assembly.
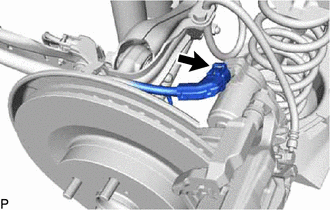
Connect the No. 2 parking brake wire assembly connector to the parking brake actuator assembly.
48738C
18.INSTALL LOWER NO. 2 CONTROL ARM COVER (w/ Cover)
19.INSTALL REAR WHEEL
20.CONNECT CABLE TO NEGATIVE AUXILIARY BATTERY TERMINAL (w/o Vacuum Brake Booster)
Connect the reservoir level switch connector.
Connect the cable to the negative (-) auxiliary battery terminal.
for A25A-FXS: Click hereGeneral>MAINTENANCE>A25A-FXS AUXILIARY BATTERY>INSTALLATION
for A25B-FXS: Click hereGeneral>MAINTENANCE>A25B-FXS AUXILIARY BATTERY>INSTALLATION
Perform the following procedure if air bleeding is not necessary:
Turn the power switch on (READY).
Depress the brake pedal and release it.
48740F
21.INSTALL REAR NO. 2 SUSPENSION ARM ASSEMBLY
Install the rear No. 2 suspension arm assembly (rear suspension member sub-assembly side) with the nut.
Click hereSuspension>REAR SUSPENSION>REAR LOWER ARM>INSTALLATION
22.INSPECT AND ADJUST REAR WHEEL ALIGNMENT
23.CHECK FOR SPEED SENSOR SIGNAL
w/ Vacuum Brake Booster: Click hereBrake>BRAKE CONTROL / DYNAMIC CONTROL SYSTEMS>ELECTRONICALLY CONTROLLED BRAKE SYSTEM (w/ Vacuum Brake Booster)>TEST MODE PROCEDURE
w/o Vacuum Brake Booster: Click hereBrake>BRAKE CONTROL / DYNAMIC CONTROL SYSTEMS>ELECTRONICALLY CONTROLLED BRAKE SYSTEM (w/o Vacuum Brake Booster)>TEST MODE PROCEDURE
24.PERFORM INITIALIZATION
| Parking Support Brake System (for HV model) | ( ) |
| Parking Assist Monitor System | ()
|
| Panoramic View Monitor System (for HV model) | ()
|
| Lighting System (EXT) | ()
|
| Parking Support Brake System (for Gasoline model) | ()
|
| Parking Assist Monitor System | ()
|
| Panoramic View Monitor System (for Gasoline model) | ()
|
| Lighting System (EXT) | ()
|