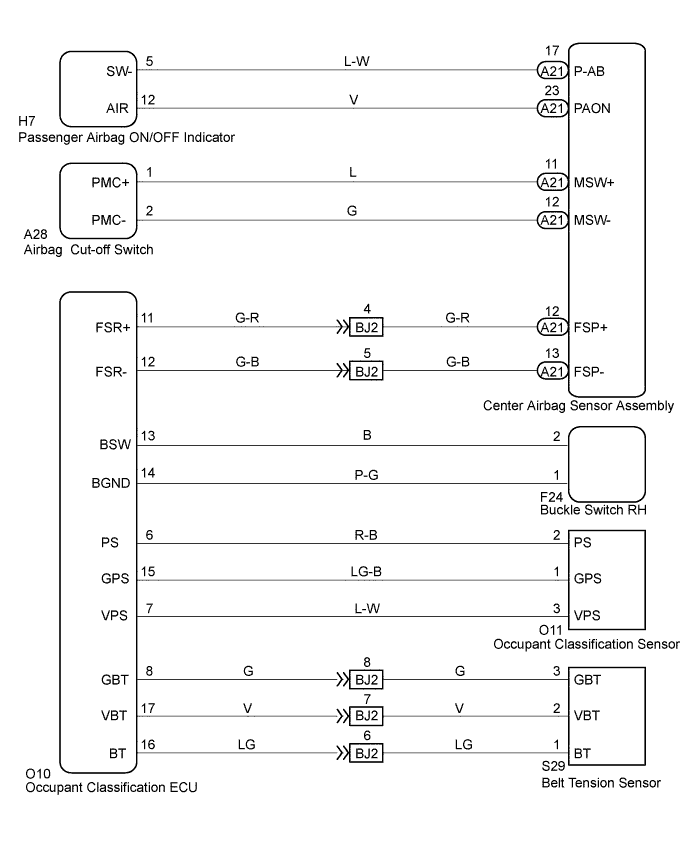
OCCUPANT CLASSIFICATION SYSTEM (for Bench Seat Type) > Trouble in Passenger Airbag ON / OFF Indicator |
| Front passenger seat condition | ON Indicator | OFF Indicator |
| Adult is seated | ON | OFF |
| Child is seated | OFF | ON |
| Vacant | OFF | OFF |
| Occupant classification system failure | OFF | ON |
| 1.CHECK PASSENGER AIRBAG ON/OFF INDICATOR (PERFORM SENSITIVITY CHECK) |
Perform the sensitivity check (Click here).
|
| ||||
| NG | |
 |
| 2.PERFORM ZERO POINT CALIBRATION |
Connect the intelligent tester to the DLC3.
Turn the ignition switch to the ON position.
Using the intelligent tester, perform the zero point calibration (Click here).
| NEXT | |
|
| 3.CHECK PASSENGER AIRBAG ON/OFF INDICATOR (PERFORM SENSITIVITY CHECK) |
Perform the sensitivity check (Click here).
|
| ||||
| NG | |
|
| 4.READ VALUE OF DATA LIST (PASSENGER SIDE BUCKLE SWITCH) |
Turn the ignition switch to the ON position.
Using the intelligent tester, read the the DATA LIST.
Read the the display when the passenger side buckle switch is operated.
| Item | Measurement Item / Range (Display) | Normal Condition | Diagnostic Note |
| P BUCKLE SW | Buckle switch (Passenger side)/ UNSET: The seat belt is not fastened SET: The seat belt is fastened NG: Data is not determined | UNSET/SET | - |
|
| ||||
| OK | |
|
| 5.READ VALUE OF DATA LIST (SEAT BELT TENSION SENSOR) |
Fasten the passenger side seat belt.
Turn the ignition switch to the ON position.
Using the intelligent tester, read the value of the DATA LIST.
| Item | Measurement Item / Range (Display) | Normal Condition | Diagnostic Note |
| FILTERED TENSION | Filtered belt tension output/ Min.: 0 N Max.: 255 N | 39 to 64 (no load) | - |
|
| ||||
| OK | |
|
| 6.CHECK PASSENGER AIRBAG ON/OFF INDICATOR (PERFORM SENSITIVITY CHECK) |
Perform the sensitivity check (Click here).
|
| ||||
| NG | |
|
| 7.CHECK CONNECTORS |
Turn the ignition switch to the LOCK position.
Disconnect the negative (-) terminal cable from the battery, and wait for at least 90 seconds.
Check that the following connectors are connected properly.
Disconnect the following connectors.
Check that the terminals of the connectors are not damaged.
|
| ||||
| OK | |
|
| 8.INSPECT AIRBAG CUT-OFF SWITCH |
Disconnect the A20 airbag cut-off switch connector.
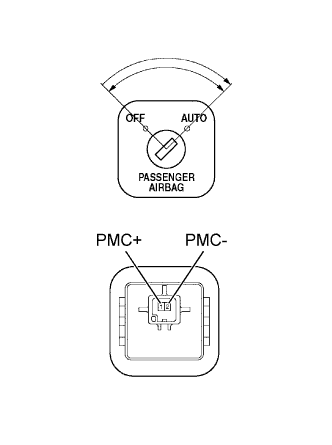 |
Measure the resistance.
| Switch Condition | Tester Condition | Specified Condition |
| OFF | 1(PMC+) - 2(PMC-) | 80 to 120 Ω |
| AUTO | 1(PMC+) - 2(PMC-) | 320 to 480 Ω |
|
| ||||
| OK | |
|
| 9.CHECK INSTRUMENT PANEL WIRE (FOR OPEN) |
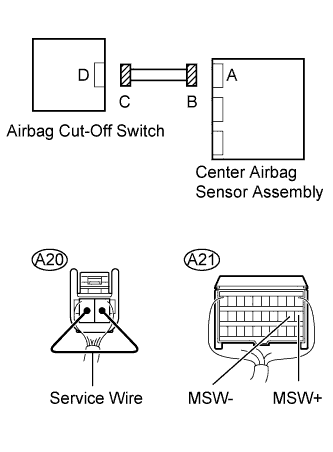 |
Using a service wire, connect A20-1 (PMC+) and A20-2 (PMC-) of connector C.
Measure the resistance.
| Tester Connection | Condition | Specified Condition |
| A21-11 (MSW+) - A21-12 (MSW-) | Always | Below 1Ω |
|
| ||||
| OK | |
|
| 10.CHECK INSTRUMENT PANEL WIRE (FOR SHORT) |
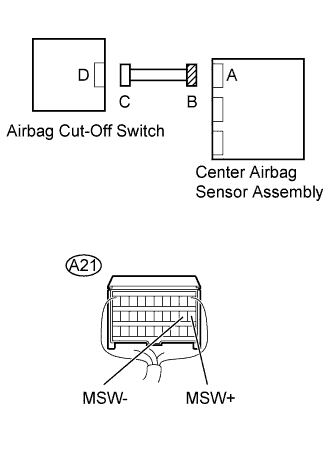 |
Disconnect the service wire from connector C.
Measure the resistance.
| Tester Connection | Condition | Specified Condition |
| A21-11 (MSW+) - A21-12 (MSW-) | Always | 1 MΩor Higher |
|
| ||||
| OK | |
|
| 11.CHECK INSTRUMENT PANEL WIRE (TO B+) |
|
Connect the negative (-) terminal cable to the battery, and wait for at least 2 seconds.
Turn the ignition switch to the ON position.
Measure the voltage.
| Tester Connection | Condition | Specified Condition |
| A21-11 (MSW+) - Body ground | Ignition switch ON | Below 1 V |
| A21-12 (MSW-) - Body ground | Ignition switch ON | Below 1 V |
|
| ||||
| OK | |
|
| 12.CHECK INSTRUMENT PANEL WIRE (TO GROUND) |
|
Turn the ignition switch to the LOCK position.
Disconnect the negative (-) terminal cable from the battery, and wait for at least 90 seconds.
Measure the resistance.
| Tester Connection | Condition | Specified Condition |
| A21-11 (MSW+) - Body ground | Always | 1 MΩor Higher |
| A21-12 (MSW-) - Body ground | Always | 1 MΩor Higher |
|
| ||||
| OK | |
|
| 13.READ VALUE OF DATA LIST (PASSENGER CLASS) |
Connect the intelligent tester to the DLC3.
Turn the ignition switch to the LOCK position.
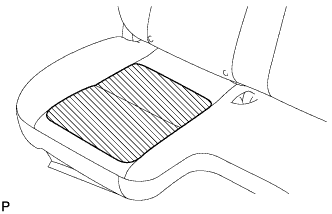 |
Place a weight of 20 kg (44.0 lb) on the front passenger seat.
Turn the ignition switch to the ON position.
Using the intelligent tester, read the value of the DATA LIST (Click here).
| Item | Measurement Item / Range (Display) | Normal Condition | Diagnostic Note |
| PASSENGER CLASS | Passenger classification/ NG: Data is not determined AM50: Adult is seated and seat is rear position AF05: Adult is seated and seat is front position CHILD: Child is seated OFF: Vacant | AF05/AM50/CHILD/OFF | - |
Turn the ignition switch to the LOCK position.
|
Add 30 kg (66.1 lb) weight on the front passenger seat.
Turn the ignition switch to the ON position.
Using the intelligent tester, read the value of the DATA LIST (Click here).
| Item | Measurement Item / Range (Display) | Normal Condition | Diagnostic Note |
| PASSENGER CLASS | Passenger classification/ NG: Data is not determined AM50: Adult is seated and seat is rear position AF05: Adult is seated and seat is front position CHILD: Child is seated OFF: Vacant | AF05/AM50/CHILD/OFF | - |
|
| ||||
| OK | |
|
| 14.REPLACE CENTER AIRBAG SENSOR ASSEMBLY |
Turn the ignition switch to the LOCK position.
Disconnect the negative (-) terminal cable from the battery, and wait for at least 90 seconds.
Replace the center airbag sensor assembly (Click here).
| NEXT | |
|
| 15.CHECK PASSENGER AIRBAG ON/OFF INDICATOR (PERFORM SENSITIVITY CHECK) |
Perform the sensitivity check (Click here).
|
| ||||
| NG | |
|
| 16.REPLACE OCCUPANT CLASSIFICATION ECU |
Connect the intelligent tester to the DLC3.
Turn the ignition switch to the ON position.
Store the occupant classification ECU data into the intelligent tester (Click here).
Turn the ignition switch to the LOCK position.
Disconnect the negative (-) terminal cable from the battery, and wait for at least 90 seconds.
Replace the occupant classification ECU (Click here).
Connect the negative (-) terminal cable to the battery.
Turn the ignition switch to the ON position.
Load the data from the previous ECU stored in the tester, into the newly installed ECU (Click here).
| NEXT | ||
 | ||
| ||
| 17.REPLACE OCCUPANT CLASSIFICATION ECU |
Connect the intelligent tester to the DLC3.
Turn the ignition switch to the ON position.
Store the occupant classification ECU data into the intelligent tester (Click here).
Turn the ignition switch to the LOCK position.
Disconnect the negative (-) terminal cable from the battery, and wait for at least 90 seconds.
Replace the occupant classification ECU (Click here).
Connect the negative (-) terminal cable to the battery.
Turn the ignition switch to the ON position.
Load the data from the previous ECU stored in the tester, into the newly installed ECU (Click here).
| NEXT | |
|
| 18.CHECK PASSENGER AIRBAG ON/OFF INDICATOR (PERFORM SENSITIVITY CHECK) |
Perform the sensitivity check (Click here).
|
| ||||
| NG | |
|
| 19.REPLACE FRONT SEAT CUSHION ASSEMBLY (WITH OCCUPANT CLASSIFICATION ECU AND SENSOR) |
Turn the ignition switch to the LOCK position.
Disconnect the negative (-) terminal cable from the battery, and wait for at least 90 seconds.
Replace the front seat cushion assembly (with occupant classification ECU and occupant classification sensor) (Click here).
Connect the negative (-) terminal cable to the battery.
Turn the ignition switch to the ON position.
Clear the DTCs stored in the memory (Click here).
Turn the ignition switch to the LOCK position.
Turn the ignition switch to the ON position.
Check the DTCs (Click here).
| NEXT | |
|
| 20.PERFORM ZERO POINT CALIBRATION |
Connect the intelligent tester to the DLC3.
Turn the ignition switch to the ON position.
Using the intelligent tester, perform the zero point calibration (Click here).
| NEXT | ||
| ||
| ||

