EC6D MANUAL TRANSMISSION / TRANSAXLE TRANSMISSION CONTROL CABLE ADJUSTMENT
CAUTION / NOTICE / HINT
The necessary procedures (adjustment, calibration, initialization or registration) that must be performed after parts are removed and installed, or replaced during transmission control cable assembly adjustment are shown below.
| Replaced Part or Performed Procedure | Necessary Procedure | Effect/Inoperative Function when Necessary Procedure not Performed | Link |
|---|---|---|---|
| Air intake system parts | Inspection after repair | ·
Poor idle, etc. ·
Engine start function, etc. |
( ) |
- HINT:
-
When the cable is disconnected / reconnected to the auxiliary battery terminal, systems temporarily stop operating. However, each system has a function that completes learning the first time the system is used.
- ·
Learning completes when vehicle is driven
Effect/Inoperative Function When Necessary Procedures are not Performed Necessary Procedures Link Lane tracing assist system Drive the vehicle straight ahead at 35 km/h (22 mph) or more for 5 second or more. ( )
Pre-collision system Stop and start system Drive the vehicle until stop and start control is permitted (approximately 5 to 60 minutes) ( )
·Learning completes when vehicle is operated normally
Effect/Inoperative Function When Necessary Procedures are not Performed Necessary Procedures Link Power door lock control system
·Back door opener
Perform door unlock operation with door control switch or electrical key transmitter sub-assembly switch. ( )
Power back door system Fully close the back door by hand.
- HINT:
-
Initialization is not necessary if the above procedures are performed while the back door is closed.
( )
Air conditioning system After the ignition switch is turned to ON, the servo motor standard position is recognized. -
PROCEDURE

 1.SECURE VEHICLE
Fully apply the parking brake and chock a wheel.
- CAUTION:
- ·
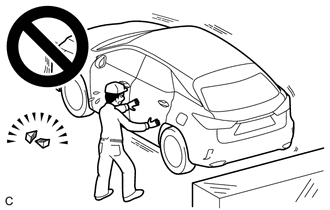
Make sure to apply the parking brake and chock a wheel before performing this procedure.
·If the vehicle is not secure and the shift lever is moved to neutral, the vehicle may suddenly move, possibly resulting in an accident or serious injury.
2. PRECAUTION
- NOTICE:
-
After turning the ignition switch off, waiting time may be required before disconnecting the cable from the negative (-) auxiliary battery terminal.
-
Click hereGeneral>SETUP>WHEN DISCONNECTING OR RECONNECTING BATTERY TERMINAL>BEFORE DISCONNECTING BATTERY
28800
3.REMOVE AUXILIARY BATTERY
4.REMOVE AIR CLEANER ASSEMBLY WITH AIR CLEANER HOSE
w/ Stop and Start System:
Click hereEngine / Hybrid System>M15A-FKS (STARTING)>STARTER (w/ Stop And Start System)>REMOVAL
w/o Stop and Start System:
Click hereEngine / Hybrid System>M15A-FKS (STARTING)>STARTER (w/o Stop And Start System)>REMOVAL
89661
5.REMOVE ECM
74404A
6.REMOVE BATTERY CLAMP SUB-ASSEMBLY
58910C
7.REMOVE REAR CONSOLE BOX ASSEMBLY
33820B
8.ADJUST TRANSMISSION CONTROL CABLE ASSEMBLY
- HINT:
- ·
After the floor shift shift lever assembly or the transmission control cable assembly is replaced, be sure to adjust the transmission control cable assembly.
·If the shift lever does not move (or the shift lever is difficult to move) to the 1st or 2nd position, or if it is possible to move the shift lever to the reverse position without pulling up the slider shaft, the length of the transmission control cable assembly must be adjusted.
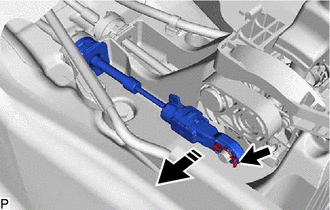

|
Remove in this Direction |
Remove the clip and disconnect the transmission control select cable from the floor shift shift lever assembly.
Release the lock of the transmission control select cable length adjustment structure.
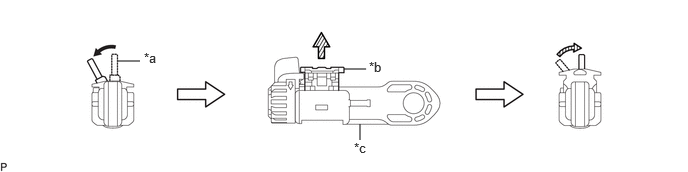
| *a | Stopper | *b | Lock Piece |
| *c | Adjuster Case | - | - |

|
Twist | 
|
Pull |

|
Return | - | - |
Twist the stopper.
Pull the lock piece outward from the adjuster case to release the lock.
Return the stopper.
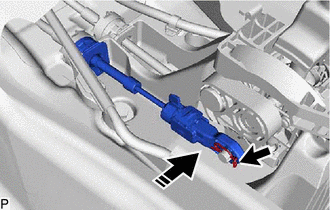
|
|
Install in this Direction |
Connect the transmission control select cable to the floor shift shift lever assembly and install the clip.
- NOTICE:
- ·
Make sure that the lock piece of the transmission control select cable length adjustment structure is facing upward when the transmission control select cable is connected.
·Make sure that the transmission control select cable is securely installed.
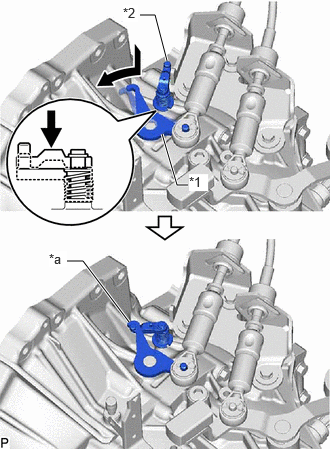
| *1 | Outer Select Lever |
| *2 | Reverse Restrict Pin Assembly |
| *a | Secured |
Hook the outer select lever of the manual transaxle assembly to the reverse restrict pin assembly to secure it.
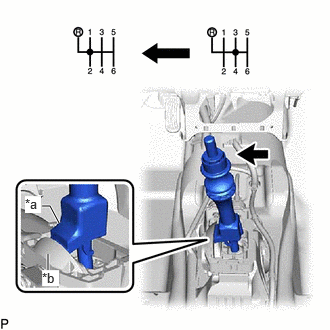
| *a | Slider Shaft |
| *b | Cam Wall |
Push the slider shaft against the cam wall.
- NOTICE:
- ·
Do not pull up the slider shaft.
·When adjusting the transmission control select cable, make sure that the shift lever is not in 1st or 2nd.
Lock the transmission control select cable length adjustment structure.
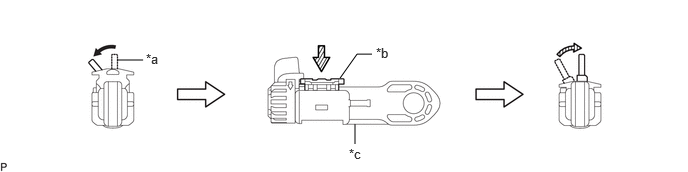
| *a | Stopper | *b | Lock Piece |
| *c | Adjuster Case | - | - |
|
|
Twist |
|
Push |
|
|
Return | - | - |
Twist the stopper.
Push the lock piece into the adjuster case with slider shaft held against the cam wall.
- NOTICE:
- ·
Securely press in the lock piece until the lock engages.
·When adjusting the transmission control select cable, make sure that the shift lever is not in 1st or 2nd.
Return the stopper to prevent the lock from being released.
- NOTICE:
- ·
Push the lock piece as far as it will go.
·Confirm whether the transmission control select cable length adjustment structure is locked securely.
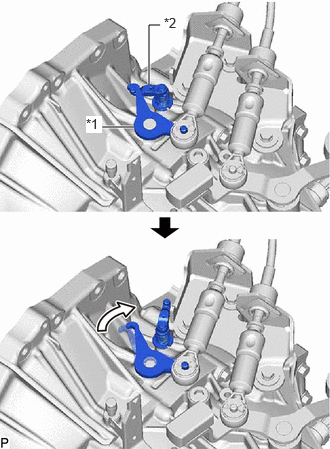
| *1 | Outer Select Lever |
| *2 | Reverse Restrict Pin Assembly |

|
Released |
Move the shift lever to the reverse position, so that the outer select lever can be released.
58910C
9.INSTALL REAR CONSOLE BOX ASSEMBLY
74404A
10.INSTALL BATTERY CLAMP SUB-ASSEMBLY
89661
11.INSTALL ECM
12.INSTALL AIR CLEANER ASSEMBLY WITH AIR CLEANER HOSE
w/ Stop and Start System:
Click hereEngine / Hybrid System>M15A-FKS (STARTING)>STARTER (w/ Stop And Start System)>INSTALLATION
w/o Stop and Start System:
Click hereEngine / Hybrid System>M15A-FKS (STARTING)>STARTER (w/o Stop And Start System)>INSTALLATION
28800
13.INSTALL AUXILIARY BATTERY
14. INITIALIZATION AFTER RECONNECTING BATTERY TERMINAL
- HINT:
-
When disconnecting and reconnecting the battery, there is an automatic learning function that completes learning when the respective system is used.
-
Click hereGeneral>SETUP>WHEN DISCONNECTING OR RECONNECTING BATTERY TERMINAL>AUTOMATIC LEARNING CHART