THEFT DETERRENT / KEYLESS ENTRY ENTRY AND START SYSTEM(for Start Function, Gasoline Model) Engine does not Start
DESCRIPTION
When the electrical key transmitter sub-assembly is in the cabin and the engine switch is pressed, the certification ECU (smart key ECU assembly) receives a signal and changes the power source mode. Additionally, when the clutch pedal is depressed, the engine can be started by pressing the engine switch.
When the electrical key transmitter sub-assembly is in the cabin and the engine switch is pressed, the certification ECU (smart key ECU assembly) receives a signal and changes the power source mode. Additionally, when the shift lever is in P and the brake pedal is depressed, the engine can be started by pressing the engine switch.
| Problem Symptom | Data List and Active Test |
|---|---|
| Engine does not start | Power Source Control
·
Stop Light Switch*1 ·
Shift P Signal*1 ·
Neutral SW/ Clutch SW ·
Starter Relay Driving Request (Starting Control) ·
Shift P/N (Starting Control) Entry&Start
·
Immobiliser ·
Start Request ·
L Code Check ·
S Code Check*2 |
WIRING DIAGRAM
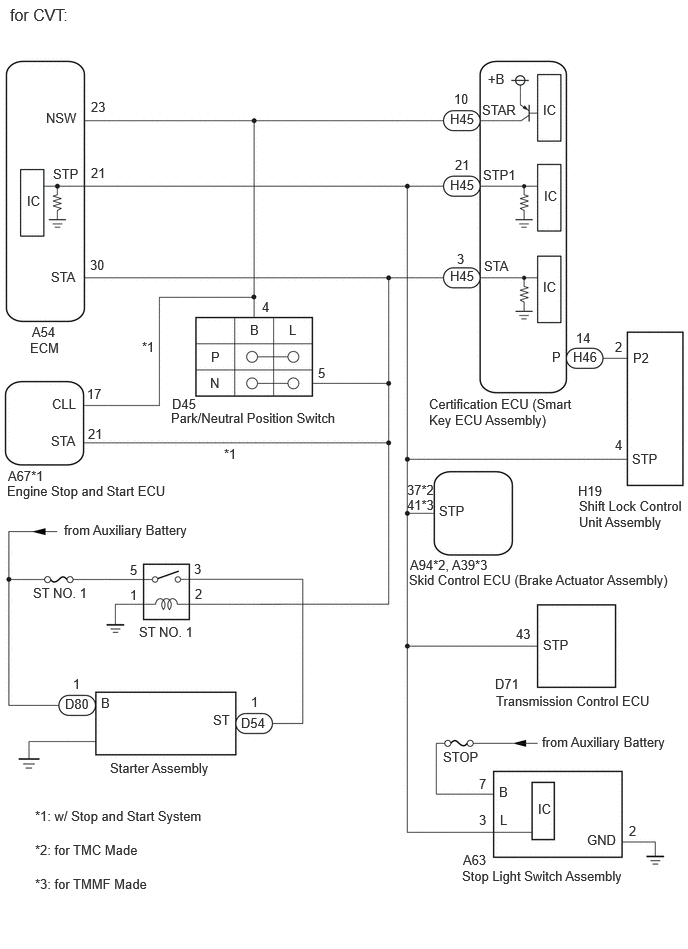
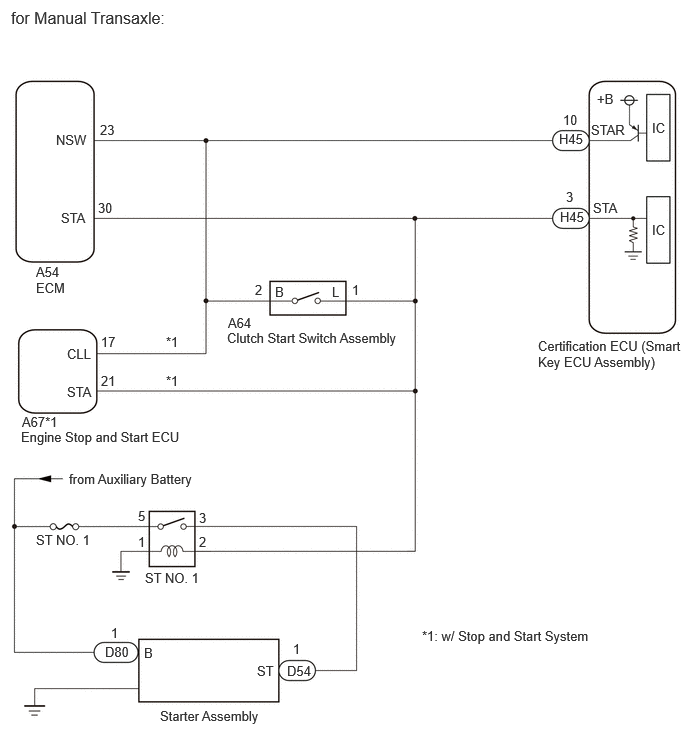
CAUTION / NOTICE / HINT
- NOTICE:
- ·
When using the GTS with the ignition switch off, connect the GTS to the DLC3 and turn a courtesy light switch on and off at intervals of 1.5 seconds or less until communication between the GTS and the vehicle begins. Then select Model Code "KEY REGIST" under manual mode and enter the following menus: Body Electrical / Entry&Start(CAN). While using the GTS, periodically turn a courtesy light switch on and off at intervals of 1.5 seconds or less to maintain communication between the GTS and the vehicle.
·If the entry and start system (for Start Function) has been disabled, enable the system before performing troubleshooting.
·Inspect the fuses for circuits related to this system before performing the following procedure.
·Before replacing the certification ECU (smart key ECU assembly) or an electrical key transmitter sub-assembly, refer to Service Bulletin.
·After completing repairs, confirm that the problem does not recur.
·After performing repairs, confirm that no DTCs are output by performing "DTC Output Confirmation Operation."
PROCEDURE
Using an electrical key transmitter sub-assembly which is registered to the vehicle, turn the ignition switch to ON.
Check that the engine can be started 5 seconds after the ignition switch turned to ON.
- OK:
Engine starts normally.
- Result:
Proceed to OK NG
OK
NG
Get into the vehicle while carrying an electrical key transmitter sub-assembly.
Move the shift lever to P.
Press the engine switch with the brake pedal released and check that the security indicator light changes from blinking to off at the same time that the power source mode changes to ACC.
- OK:
The security indicator light changes from blinking to off at the same time that the power source mode changes to ACC.
- HINT:
-
The immobiliser function can be determined to be operating correctly if the security indicator light changes from blinking to off at the same time that the power source mode changes to ACC.
- Result:
Proceed to OK NG
OK
NG
Using the GTS, check if LIN communication DTC B278588 and B278987 are output.
- Body Electrical > Entry&Start > Trouble Codes
- 50001 440
- OK:
DTC B278588 and B278987 are not output.
- Result:
Proceed to OK NG
OK
NG
Get into the vehicle while carrying an electrical key transmitter sub-assembly.
Move the shift lever to P.
Check that the key indicator display is displayed on the multi-information display in the combination meter assembly, and then press the engine switch and check that the engine cranks.
- Result:
Result Proceed to Engine cranks and initial combustion occurs A Engine cranks but initial combustion does not occur B Engine does not crank C
A
B
Click hereEngine / Hybrid System>M15A-FKS (ENGINE CONTROL)>SFI SYSTEM>HOW TO PROCEED WITH TROUBLESHOOTING
C
Choose the model to be inspected.
- Result:
Result Proceed to for CVT A for Manual Transaxle B
A
B
Get into the vehicle while carrying an electrical key transmitter sub-assembly.
Move the shift lever to P.
With the brake pedal released, check that pressing the engine switch causes the power source mode to change.
- Result:
Result Proceed to Power source mode changes : Off → ACC → ON → off A Power source mode does not change to ACC or ON B Power source mode changes to ON but not to ACC C Power source mode changes to ACC but not to ON D
A
B
C
D
Read the Data List according to the display on the GTS.
- Body Electrical > Power Source Control > Data List
-
Tester Display Measurement Item Range Normal Condition Diagnostic Note Stop Light Switch State of brake pedal OFF or ON OFF: Brake pedal released
ON: Brake pedal depressed·Use this item to determine if the stop light switch assembly is malfunctioning.
·The engine cannot be started when this item is OFF.
·If the stop light switch assembly is malfunctioning, the engine can be started by pressing and holding the engine switch for a certain period of time.
- Body Electrical > Power Source Control > Data List
-
Tester Display Stop Light Switch - 50003 454 206
- OK:
The GTS display changes correctly in response to the brake pedal operation.
- Result:
Proceed to OK NG
OK
NG
Move the shift lever to P.
Read the Data List according to the display on the GTS.
- Body Electrical > Power Source Control > Data List
-
Tester Display Measurement Item Range Normal Condition Diagnostic Note Shift P Signal Shift position P OFF or ON OFF: Shift lever not in P
ON: Shift lever in P·Use this item to determine if the shift position switch is malfunctioning.
·The engine cannot be started when this item is OFF.
- Body Electrical > Power Source Control > Data List
-
Tester Display Shift P Signal - 50003 454 205
- OK:
ON is displayed on the GTS.
- Result:
Proceed to OK NG
OK
NG
Read the Data List according to the display on the GTS.
- Body Electrical > Power Source Control > Data List
-
Tester Display Measurement Item Range Normal Condition Diagnostic Note Neutral Switch / Clutch Switch Shift position (P and N) OFF or ON OFF: Shift lever in any position other than P or N
ON: Shift lever in P or N·Use this item to determine if the park/neutral position switch is malfunctioning.
·When the engine cannot be started due to a park/neutral position switch malfunction, OFF is displayed.
- Body Electrical > Power Source Control > Data List
-
Tester Display Neutral Switch / Clutch Switch - 50003 454 207
- Body Electrical > Power Source Control > Data List
-
Tester Display Measurement Item Range Normal Condition Diagnostic Note Shift P/N (Starting Control) Park/Neutral position switch status OFF or ON OFF: Shift lever not in P or N
ON: Shift lever in P or NWhen OFF is displayed, the engine will not crank.
- Body Electrical > Power Source Control > Data List
-
Tester Display Shift P/N (Starting Control) - 50003 454 703
- OK:
The GTS display changes correctly in response to the shift lever or brake pedal operation.
- Result:
Proceed to OK NG
OK
NG
Read the Data List according to the display on the GTS.
- Body Electrical > Power Source Control > Data List
-
Tester Display Measurement Item Range Normal Condition Diagnostic Note Power Supply Condition Power supply state OFF, ACC ON, IGR ON, IGP ON or Starter ON OFF: Ignition switch off
ACC ON: Ignition switch ACC
IGR ON: Ignition switch ON
IGP ON: Ignition switch ON
Starter ON: Sending engine start request signal-
- Body Electrical > Power Source Control > Data List
-
Tester Display Power Supply Condition - 50003 454 405
- NOTICE:
-
Check that the key indicator display is displayed on the multi-information display in the combination meter assembly, and then press the engine switch.
- OK:
The GTS display changes correctly in response to the engine switch operation.
- Result:
Proceed to OK NG
OK
NG
Get into the vehicle while carrying an electrical key transmitter sub-assembly.
Move the shift lever to P.
According to the display on the GTS, read the Data List while pressing the engine switch with the brake pedal depressed.
- Body Electrical > Power Source Control > Data List
-
Tester Display Measurement Item Range Normal Condition Diagnostic Note Starter Relay Driving Request (Starting Control) Engine start request signal status OFF or ON OFF: The engine switch is not pressed
ON: With the shift lever in P and the brake pedal depressed, the engine switch is pressed and held·When the engine cannot be started due to a start request signal malfunction, OFF is displayed.
·When the engine switch is pressed, the duration of time that ON is displayed will be extremely short. As such, the engine switch needs to be pressed and held for a certain period of time.
- Body Electrical > Power Source Control > Data List
-
Tester Display Starter Relay Driving Request (Starting Control) - 50003 454 701
- OK:
The GTS display changes.
- Result:
Proceed to OK NG
OK
NG
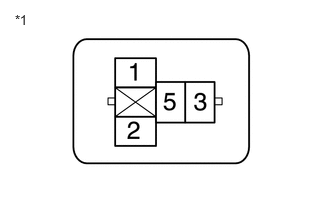
| *1 | No. 1 Engine Room Relay Block Assembly
(ST NO. 1 Relay Holder) |
Measure the voltage according to the value(s) in the table below.
- Standard Voltage:
Tester Connection Condition Specified Condition No. 1 engine room relay block assembly ST NO. 1 relay terminal 2 - Body ground Engine switch pressed and held with brake pedal depressed (starter on) → Approximately 1 second after engine switch released (starter off) 6 V or higher* → 1.0 V or less
- HINT:
-
*: While the engine is cranking, the auxiliary battery voltage may drop to approximately 6 V.
- Result:
Proceed to OK NG
OK
NG
| *1 | No. 1 Engine Room Relay Block Assembly
(ST NO. 1 Relay Holder) |
Measure the resistance according to the value(s) in the table below.
- Standard Resistance:
Tester Connection Condition Specified Condition No. 1 engine room relay block assembly ST NO. 1 relay terminal 1 - Body ground Always Below 1 Ω
Measure the voltage according to the value(s) in the table below.
- Standard Voltage:
Tester Connection Condition Specified Condition No. 1 engine room relay block assembly ST NO. 1 relay terminal 5 - Body ground Always 11 to 14 V
- Result:
Proceed to OK NG
OK
NG
OK
NG
Disconnect the D54 starter assembly connector.
Measure the resistance according to the value(s) in the table below.
- Standard Resistance:
Tester Connection Condition Specified Condition Click Location & Routing(D54)Location & Routingewd_type=routing;type=c;code=D54
Click Connector(D54)Engine Compartment>Engine Wire>Starter Assemblyewd_type=component;type=c;code=D54;pinno=1
No. 1 engine room relay block assembly ST NO. 1 relay terminal 3 - D54-1 Always Below 1 Ω No. 1 engine room relay block assembly ST NO. 1 relay terminal 3 or D54-1 - Other terminals and body ground Always 10 kΩ or higher
- Result:
Proceed to OK NG
OK
NG
Disconnect the D80 starter assembly connector.
Measure the voltage according to the value(s) in the table below.
- Standard Voltage:
Tester Connection Condition Specified Condition Click Location & Routing(D80)Location & Routingewd_type=routing;type=c;code=D80
Click Connector(D80)Engine Compartment>Engine Wire>Starter Assemblyewd_type=component;type=c;code=D80;pinno=1
D80-1 (B) - Body ground Always 11 to 14 V
- Result:
Proceed to OK NG
OK
for w/ Stop And Start System: Click hereEngine / Hybrid System>M15A-FKS (STARTING)>STARTER (w/ Stop And Start System)>REMOVAL
for w/o Stop And Start System: Click hereEngine / Hybrid System>M15A-FKS (STARTING)>STARTER (w/o Stop And Start System)>REMOVAL
NG
Disconnect the D45 park/neutral position switch connector.
Disconnect the A67 engine stop and start ECU connector.*1
*1: w/ Stop and Start System
Measure the resistance according to the value(s) in the table below.
- Standard Resistance:
Tester Connection Condition Specified Condition Click Location & Routing(D45)Location & Routingewd_type=routing;type=c;code=D45
Click Connector(D45)Engine Compartment>Engine Wire>Park/Neutral Position Switch Assemblyewd_type=component;type=c;code=D45;pinno=5
D45-5 (L) - 2 (ST NO. 1 relay) Always Below 1 Ω D45-5 (L) or 2 (ST NO. 1 relay) - Other terminals and body ground Always 10 kΩ or higher
- Result:
Proceed to OK NG
OK
NG
Check that the steering unlocks when the ignition switch is turned to ACC.
- OK:
The steering unlocks.
- Result:
Proceed to OK NG
OK
NG
Disconnect the A54 ECM connector.
Read the Data List according to the display on the GTS.
- Body Electrical > Power Source Control > Data List
-
Tester Display Measurement Item Range Normal Condition Diagnostic Note Neutral Switch / Clutch Switch Shift position (P and N) OFF or ON OFF: Shift lever in any position other than P or N
ON: Shift lever in P or N·Use this item to determine if the park/neutral position switch is malfunctioning.
·When the engine cannot be started due to a park/neutral position switch malfunction, OFF is displayed.
- Body Electrical > Power Source Control > Data List
-
Tester Display Neutral Switch / Clutch Switch - 50003 454 207
- OK:
The GTS display changes correctly in response to the shift lever or brake pedal operation.
- Result:
Proceed to OK NG
OK
NG
Choose the model to be inspected.
- Result:
Result Proceed to w/ Stop And Start System A w/o Stop And Start System B
A
B
Disconnect the A67 engine stop and start ECU connector.
Read the Data List according to the display on the GTS.
- Body Electrical > Power Source Control > Data List
-
Tester Display Measurement Item Range Normal Condition Diagnostic Note Neutral Switch / Clutch Switch Shift position (P and N) OFF or ON OFF: Shift lever in any position other than P or N
ON: Shift lever in P or N·Use this item to determine if the park/neutral position switch is malfunctioning.
·When the engine cannot be started due to a park/neutral position switch malfunction, OFF is displayed.
- Body Electrical > Power Source Control > Data List
-
Tester Display Neutral Switch / Clutch Switch - 50003 454 207
- OK:
The GTS display changes correctly in response to the shift lever operation.
- Result:
Proceed to OK NG
OK
NG
Click hereDrivetrain>K320 (MULTIDRIVE / CVT)>PARK / NEUTRAL POSITION SWITCH>INSPECTION
- Result:
Proceed to OK NG
OK
NG
Disconnect the H45 certification ECU (smart key ECU assembly) connector.
Disconnect the D45 park/neutral position switch connector.
Remove the ST NO. 1 relay.
Measure the resistance according to the value(s) in the table below.
- Standard Resistance:
Tester Connection Condition Specified Condition Click Location & Routing(H45,D45,A67,A54)Location & Routingewd_type=routing;type=c,c,c,c;code=H45,D45,A67,A54
Click Connector(H45)Instrument Panel>Instrument Panel Wire / Speaker Wire>Certification ECUewd_type=component;type=c;code=H45;pinno=3,10
Click Connector(D45)Engine Compartment>Engine Wire>Park/Neutral Position Switch Assemblyewd_type=component;type=c;code=D45;pinno=5,4
Click Connector(A67)Instrument Panel>Engine Room Main Wire>Engine Stop and Start ECUewd_type=component;type=c;code=A67;pinno=21,17
Click Connector(A54)Engine Compartment>Engine Room Main Wire>ECMewd_type=component;type=c;code=A54;pinno=23
H45-3 (STA) - D45-5 (L) Always Below 1 Ω H45-3 (STA) - A67-21 (STA)*1 Always Below 1 Ω H45-10 (STAR) - A54-23 (NSW) Always Below 1 Ω H45-10 (STAR) - D45-4 (B) Always Below 1 Ω H45-10 (STAR) - A67-17 (CLL)*1 Always Below 1 Ω H45-3 (STA) or D45-5 (L) - Other terminals and body ground Always 10 kΩ or higher H45-10 (STAR) or A54-23 (NSW) - Other terminals and body ground Always 10 kΩ or higher H45-10 (STAR) or D45-4 (B) - Other terminals and body ground Always 10 kΩ or higher
*1: w/ Stop And Start System
- Result:
Proceed to OK NG
OK
NG
Connect the H45 certification ECU (smart key ECU assembly) connector.
Measure the voltage according to the value(s) in the table below.
- Standard Voltage:
Tester Connection Condition Specified Condition Click Location & Routing(H45)Location & Routingewd_type=routing;type=c;code=H45
Click Connector(H45)Instrument Panel>Instrument Panel Wire / Speaker Wire>Certification ECUewd_type=component;type=c;code=H45;pinno=10
H45-10 (STAR) - Body ground Engine switch pressed and held with brake pedal depressed (starter on) → Approximately 1 second after engine switch released (starter off) 6 V or higher* → 1.0 V or less
- HINT:
-
*: While the engine is cranking, the auxiliary battery voltage may drop to approximately 6 V.
- Result:
Proceed to OK NG
OK
NG
OK
NG
Measure the voltage according to the value(s) in the table below.
- Standard Voltage:
Tester Connection Condition Specified Condition Click Location & Routing(H46)Location & Routingewd_type=routing;type=c;code=H46
Click Connector(H46)Instrument Panel>Instrument Panel Wire / Speaker Wire>Certification ECUewd_type=component;type=c;code=H46;pinno=14
H46-14 (P) - Body ground Shift position P → Shift position not P 9V or higher → 2.76 V or less
- Result:
Proceed to OK NG
OK
NG
Disconnect the H46 certification ECU (smart key ECU assembly) connector.
Disconnect the H20 shift lock control unit assembly connector.
Measure the resistance according to the value(s) in the table below.
- Standard Resistance:
Tester Connection Condition Specified Condition Click Location & Routing(H46,H20)Location & Routingewd_type=routing;type=c,c;code=H46,H20
Click Connector(H46)Instrument Panel>Instrument Panel Wire / Speaker Wire>Certification ECUewd_type=component;type=c;code=H46;pinno=14
Click Connector(H20)Instrument Panel>Instrument Panel Wire / Speaker Wire>Shift Lock Control Unit Assemblyewd_type=component;type=c;code=H20;pinno=3
H46-14 (P) - H20-3 (P2) Always Below 1 Ω H46-14 (P) or H20-3 (P2) - Other terminals and body ground Always 10 kΩ or higher
- Result:
Proceed to OK NG
OK
NG
Reconnect the H46 certification ECU (smart key ECU assembly) connector.
- Standard Voltage:
Tester Connection Condition Specified Condition Click Location & Routing(H46)Location & Routingewd_type=routing;type=c;code=H46
Click Connector(H46)Instrument Panel>Instrument Panel Wire / Speaker Wire>Certification ECUewd_type=component;type=c;code=H46;pinno=14
H46-14 (P) - Body ground Shift position P 9 V or higher
- Result:
Result Proceed to OK (for TMC Made) A OK (for TMMF Made) B NG C
A
B
C
Disconnect the A63 stop light switch assembly connector.
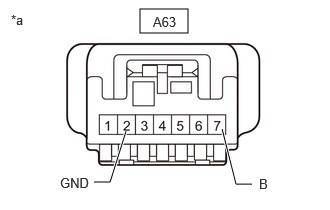
| *a | Front view of wire harness connector
(to Stop Light Switch Assembly) |
Measure the voltage according to the value(s) in the table below.
- Standard Voltage:
Tester Connection Condition Specified Condition Click Location & Routing(A63)Location & Routingewd_type=routing;type=c;code=A63
Click Connector(A63)Instrument Panel>Engine Room Main Wire>Stop Light Switch Assemblyewd_type=component;type=c;code=A63;pinno=7
A63-7 (B) - Body ground Always 11 to 14 V
Measure the resistance according to the value(s) in the table below.
- Standard Resistance:
Tester Connection Condition Specified Condition Click Location & Routing(A63)Location & Routingewd_type=routing;type=c;code=A63
Click Connector(A63)Instrument Panel>Engine Room Main Wire>Stop Light Switch Assemblyewd_type=component;type=c;code=A63;pinno=2
A63-2 (GND) - Body ground Always Below 1 Ω
- Result:
Proceed to OK NG
OK
NG
Click hereVehicle Exterior>LIGHTING (EXT)>STOP LIGHT SWITCH>ON-VEHICLE INSPECTION
- Result:
Proceed to OK NG
OK
NG
Disconnect the H45 certification ECU (smart key ECU assembly) connector.
Disconnect the A63 stop light switch assembly connector.
Disconnect the A54 ECM connector.
Disconnect the A94*1 or A39*2 skid control ECU (brake actuator assembly) connector.
Disconnect the D71 transmission control ECU connector.
Measure the resistance according to the value(s) in the table below.
- Standard Resistance:
Tester Connection Condition Specified Condition Click Location & Routing(H45,A63)Location & Routingewd_type=routing;type=c,c;code=H45,A63
Click Connector(H45)Instrument Panel>Instrument Panel Wire / Speaker Wire>Certification ECUewd_type=component;type=c;code=H45;pinno=21
Click Connector(A63)Instrument Panel>Engine Room Main Wire>Stop Light Switch Assemblyewd_type=component;type=c;code=A63;pinno=3
H45-21 (STP1) - A63-3 (L) Always Below 1 Ω H45-21 (STP1) or A63-3 (L) - Other terminals and body ground Always 10 kΩ or higher
*1: for TMC Made
*2: for TMMF Made
- Result:
Proceed to OK NG
OK
NG
Get into the vehicle while carrying an electrical key transmitter sub-assembly.
With the clutch pedal released, check that pressing the engine switch causes the power source mode to change.
- Result:
Result Proceed to Power source mode changes : Off → ACC → ON → off A Power source mode does not change to ACC or ON B Power source mode changes to ON but not to ACC C Power source mode changes to ACC but not to ON D
A
B
C
D
Read the Data List according to the display on the GTS.
- Body Electrical > Power Source Control > Data List
-
Tester Display Measurement Item Range Normal Condition Diagnostic Note Neutral Switch / Clutch Switch State of clutch pedal OFF or ON OFF: Clutch pedal released
ON: Clutch pedal depressed·Use this item to help determine if the clutch position switch is malfunctioning.
·The engine cannot be started when this item is "OFF".
- Body Electrical > Power Source Control > Data List
-
Tester Display Neutral Switch / Clutch Switch - 50003 454 207
- OK:
The GTS display changes correctly in response to the clutch pedal operation.
- Result:
Proceed to OK NG
OK
NG
Read the Data List according to the display on the GTS.
- Body Electrical > Power Source Control > Data List
-
Tester Display Measurement Item Range Normal Condition Diagnostic Note Power Supply Condition Power supply state OFF, ACC ON, IGR ON, IGP ON or Starter ON OFF: Ignition switch off
ACC ON: Ignition switch ACC
IGR ON: Ignition switch ON
IGP ON: Ignition switch ON
Starter ON: Sending engine start request signal-
- Body Electrical > Power Source Control > Data List
-
Tester Display Power Supply Condition - 50003 454 405
- NOTICE:
-
Check that the key indicator display is displayed on the multi-information display in the combination meter assembly, and then press the engine switch.
- OK:
The GTS display changes correctly in response to the engine switch operation.
- Result:
Proceed to OK NG
OK
NG
| *1 | No. 1 Engine Room Relay Block Assembly
(ST NO. 1 Relay Holder) |
Measure the voltage according to the value(s) in the table below.
- Standard Voltage:
Tester Connection Condition Specified Condition No. 1 engine room relay block assembly ST NO. 1 relay terminal 2 - Body ground Engine switch pressed and held with clutch pedal depressed (starter on) → Approximately 1 second after engine switch released (starter off) 6 V or higher* → 1.0 V or less
- HINT:
-
*: While the engine is cranking, the auxiliary battery voltage may drop to approximately 6 V.
- Result:
Proceed to OK NG
OK
NG
| *1 | No. 1 Engine Room Relay Block Assembly
(ST NO. 1 Relay Holder) |
Measure the resistance according to the value(s) in the table below.
- Standard Resistance:
Tester Connection Condition Specified Condition No. 1 engine room relay block assembly ST NO. 1 relay terminal 1 - Body ground Always Below 1 Ω
Measure the voltage according to the value(s) in the table below.
- Standard Voltage:
Tester Connection Condition Specified Condition No. 1 engine room relay block assembly ST NO. 1 relay terminal 5 - Body ground Always 11 to 14 V
- Result:
Proceed to OK NG
OK
NG
OK
NG
Disconnect the D54 starter assembly connector.
Measure the resistance according to the value(s) in the table below.
- Standard Resistance:
Tester Connection Condition Specified Condition Click Location & Routing(D54)Location & Routingewd_type=routing;type=c;code=D54
Click Connector(D54)Engine Compartment>Engine Wire>Starter Assemblyewd_type=component;type=c;code=D54;pinno=1
No. 1 engine room relay block assembly ST NO. 1 relay terminal 3 - D54-1 Always Below 1 Ω No. 1 engine room relay block assembly ST NO. 1 relay terminal 3 or D54-1 - Other terminals and body ground Always 10 kΩ or higher
- Result:
Proceed to OK NG
OK
NG
Disconnect the D80 starter assembly connector.
Measure the voltage according to the value(s) in the table below.
- Standard Voltage:
Tester Connection Condition Specified Condition Click Location & Routing(D80)Location & Routingewd_type=routing;type=c;code=D80
Click Connector(D80)Engine Compartment>Engine Wire>Starter Assemblyewd_type=component;type=c;code=D80;pinno=1
D80-1 (B) - Body ground Always 11 to 14 V
- Result:
Result Proceed to OK (w/ Stop And Start System) A OK (w/o Stop And Start System) B NG C
A
B
C
Disconnect the A64 clutch start switch assembly connector.
Disconnect the A67 engine stop and start ECU connector.*1
*1: w/ Stop and Start System
Measure the resistance according to the value(s) in the table below.
- Standard Resistance:
Tester Connection Condition Specified Condition Click Location & Routing(A64)Location & Routingewd_type=routing;type=c;code=A64
Click Connector(A64)Instrument Panel>Engine Room Main Wire>Clutch Start Switch Assemblyewd_type=component;type=c;code=A64;pinno=1
A64-1 (L) - 2 (ST NO. 1 relay) Always Below 1 Ω A64-1 (L) or 2 (ST NO. 1 relay) - Other terminals and body ground Always 10 kΩ or higher
- Result:
Proceed to OK NG
OK
NG
Check that the steering unlocks when the ignition switch is turned to ACC.
- OK:
The steering unlocks.
- Result:
Proceed to OK NG
OK
NG
Get into the vehicle while carrying an electrical key transmitter sub-assembly.
Press the engine switch with the clutch pedal released and check that the security indicator light changes from blinking to off at the same time that the power source mode changes to ACC.
- OK:
The security indicator light changes from blinking to off at the same time that the power source mode changes to ACC.
- HINT:
-
The immobiliser function can be determined to be operating correctly if the security indicator light changes from blinking to off at the same time that the power source mode changes to ACC.
- Result:
Proceed to OK NG
OK
NG
Disconnect the A54 ECM connector.
Read the Data List according to the display on the GTS.
- Body Electrical > Power Source Control > Data List
-
Tester Display Measurement Item Range Normal Condition Diagnostic Note Neutral Switch / Clutch Switch State of clutch pedal OFF or ON OFF: Clutch pedal released
ON: Clutch pedal depressed·Use this item to help determine if the clutch position switch is malfunctioning.
·The engine cannot be started when this item is "OFF".
- Body Electrical > Power Source Control > Data List
-
Tester Display Neutral Switch / Clutch Switch - 50003 454 207
- OK:
The GTS display changes correctly in response to the clutch pedal operation.
- Result:
Proceed to OK NG
OK
NG
Choose the model to be inspected.
- Result:
Result Proceed to w/ Stop And Start System A w/o Stop And Start System B
A
B
Disconnect the A67 engine stop and start ECU connector.
Read the Data List according to the display on the GTS.
- Body Electrical > Power Source Control > Data List
-
Tester Display Measurement Item Range Normal Condition Diagnostic Note Neutral Switch / Clutch Switch State of clutch pedal OFF or ON OFF: Clutch pedal released
ON: Clutch pedal depressed·Use this item to help determine if the clutch position switch is malfunctioning.
·The engine cannot be started when this item is "OFF".
- Body Electrical > Power Source Control > Data List
-
Tester Display Neutral Switch / Clutch Switch - 50003 454 207
- OK:
The GTS display changes correctly in response to the clutch pedal operation.
- Result:
Proceed to OK NG
OK
NG
OK
NG
Disconnect the H45 certification ECU (smart key ECU assembly) connector.
Disconnect the A64 clutch start switch assembly connector.
Remove the ST NO. 1 relay.
Measure the resistance according to the value(s) in the table below.
- Standard Resistance:
Tester Connection Condition Specified Condition Click Location & Routing(H45,A64,A67,A54)Location & Routingewd_type=routing;type=c,c,c,c;code=H45,A64,A67,A54
Click Connector(H45)Instrument Panel>Instrument Panel Wire / Speaker Wire>Certification ECUewd_type=component;type=c;code=H45;pinno=3,10
Click Connector(A64)Instrument Panel>Engine Room Main Wire>Clutch Start Switch Assemblyewd_type=component;type=c;code=A64;pinno=1,2
Click Connector(A67)Instrument Panel>Engine Room Main Wire>Engine Stop and Start ECUewd_type=component;type=c;code=A67;pinno=21,17
Click Connector(A54)Engine Compartment>Engine Room Main Wire>ECMewd_type=component;type=c;code=A54;pinno=23
H45-3 (STA) - A64-1 (L) Always Below 1 Ω H45-3 (STA) - A67-21 (STA)*1 Always Below 1 Ω H45-10 (STAR) - A54-23 (NSW) Always Below 1 Ω H45-10 (STAR) - A64-2 (B) Always Below 1 Ω H45-10 (STAR) - A67-17 (CLL)*1 Always Below 1 Ω H45-3 (STA) or A64-1 (L) - Other terminals and body ground Always 10 kΩ or higher H45-10 (STAR) or A54-23 (NSW) - Other terminals and body ground Always 10 kΩ or higher H45-10 (STAR) or A64-2 (B) - Other terminals and body ground Always 10 kΩ or higher
*1: w/ Stop And Start System
- Result:
Proceed to OK NG
OK
NG
Connect the H45 certification ECU (smart key ECU assembly) connector.
Measure the voltage according to the value(s) in the table below.
- Standard Voltage:
Tester Connection Condition Specified Condition Click Location & Routing(H45)Location & Routingewd_type=routing;type=c;code=H45
Click Connector(H45)Instrument Panel>Instrument Panel Wire / Speaker Wire>Certification ECUewd_type=component;type=c;code=H45;pinno=10
H45-10 (STAR) - Body ground Engine switch pressed and held with clutch pedal depressed (starter on) → Approximately 1 second after engine switch released (starter off) 6 V or higher* → 1.0 V or less
- HINT:
-
*: While the engine is cranking, the auxiliary battery voltage may drop to approximately 6 V.
- Result:
Proceed to OK NG
OK
NG
OK
NG