REAR SUSPENSION REAR AXLE BEAM INSTALLATION
PROCEDURE

 48725G
1.INSTALL REAR AXLE CARRIER BUSH LH
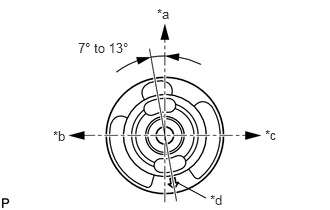
Align the matchmarks on a new rear axle carrier bush LH and the rear axle beam assembly and provisionally install the rear axle carrier bush LH onto the rear axle beam assembly, as shown in the illustration.
| *a | Upper Side |
| *b | Front Side |
| *c | Rear Side |
| *d | Bush Mark |
- NOTICE:
-
Install the new bush in the same orientation as the old one was prior to removal, because they are directional.
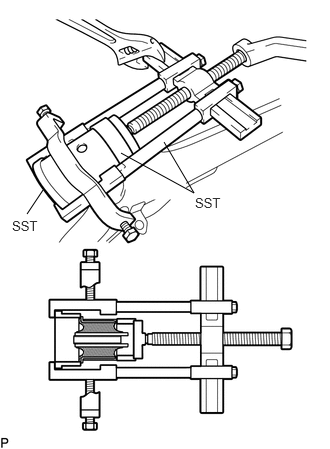
Using SST, install the rear axle carrier bush LH onto the rear axle beam assembly.
- SST
- 09950-40011 (09951-04020, 09952-04010, 09953-04030, 09954-04030, 09955-04051, 09957-04010, 09958-04011)
09950-60020 (09951-00810)
09387-02010
09223-15020
- NOTICE:
-
Do not damage the rubber portion when installing the rear axle carrier bush LH.
48725F
2.INSTALL REAR AXLE CARRIER BUSH RH
- HINT:
-
Use the same procedure for the RH side as for the LH side.
42110F
3.TEMPORARILY TIGHTEN REAR AXLE BEAM ASSEMBLY
Support the rear axle beam assembly with an engine lift.
Install the rear axle beam assembly onto the vehicle and provisionally tighten the 2 bolts.
48231B
4.INSTALL REAR COIL SPRING LH
48231A
5.INSTALL REAR COIL SPRING RH
- HINT:
-
Use the same procedure for the RH side as for the LH side.
48540
6.TEMPORARILY TIGHTEN REAR SHOCK ABSORBER ASSEMBLY LH
48530
7.TEMPORARILY TIGHTEN REAR SHOCK ABSORBER ASSEMBLY RH
- HINT:
-
Use the same procedure for the RH side as for the LH side.
42450B
8.INSTALL REAR AXLE HUB AND BEARING ASSEMBLY
9.INSPECT REAR AXLE HUB BEARING BACKLASH
10.INSPECT REAR AXLE HUB RUNOUT
42403
11.INSTALL REAR BRAKE DRUM SUB-ASSEMBLY
46430
12.INSTALL NO. 3 PARKING BRAKE CABLE ASSEMBLY
Install the No. 3 parking brake cable assembly with the bolt and a new clamp.
- Torque:
- 6.0 N*m (61 kgf*cm, 53 in.*lbf)
46420
13.INSTALL NO. 2 PARKING BRAKE CABLE ASSEMBLY
- HINT:
-
Use the same procedure for the RH side as for the LH side.
47324
14.INSTALL NO. 4 REAR BRAKE TUBE
Install the No. 4 rear brake tube onto the rear axle beam assembly with the nut.
- Torque:
- 5.0 N*m (51 kgf*cm, 48 in.*lbf)
Connect the rear flexible hose LH to the rear axle beam assembly with a new clip.
Using a union nut wrench (10 mm), install the No. 4 rear brake tube to the rear flexible hose LH while holding the rear flexible hose LH with a wrench.
- Torque:
- 15 N*m (155 kgf*cm, 11 ft.*lbf)
- NOTICE:
-
Use the formula to calculate special torque values for situations where a union nut wrench is combined with a torque wrench (See page General>INTRODUCTION>REPAIR INSTRUCTION>PRECAUTION).
47323
15.INSTALL NO. 3 REAR BRAKE TUBE
- HINT:
-
Use the same procedure for the RH side as for the LH side.
89516D
16.INSTALL SKID CONTROL SENSOR WIRE LH (w/ ABS)
89516C
17.INSTALL SKID CONTROL SENSOR WIRE RH (w/ ABS)
- HINT:
-
Use the same procedure for the RH side as for the LH side.
18.INSTALL REAR WHEEL
- Torque:
- 103 N*m (1050 kgf*cm, 76 ft.*lbf)
19. STABILIZE SUSPENSION
Lower the vehicle from the jack.
Bounce the vehicle up and down several times to stabilize the suspension.
42110F
20.FULLY TIGHTEN REAR AXLE BEAM ASSEMBLY
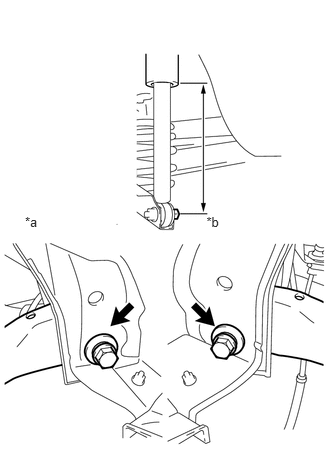
Suspend the jack on the rear axle spring seat and adjust the length of the rear shock absorber assembly to the reference value.
| *a | RH Side |
| *b | LH Side |
- Length of shock absorber:
220 mm (8.66 in.)
Fully tighten the 2 bolts.
- Torque:
- 90 N*m (918 kgf*cm, 66 ft.*lbf)
48540
21.FULLY TIGHTEN REAR SHOCK ABSORBER ASSEMBLY LH
48530
22.FULLY TIGHTEN REAR SHOCK ABSORBER ASSEMBLY RH
- HINT:
-
Use the same procedure for the RH side as for the LH side.
23.BLEED BRAKE LINE
24.BLEED CLUTCH LINE (for Manual Transaxle)
(See page Drivetrain>CLUTCH>CLUTCH SYSTEM>BLEEDING)
25.INSPECT REAR WHEEL ALIGNMENT
26. CHECK SPEED SENSOR SIGNAL (w/ ABS)
27. CHECK SPEED SENSOR SIGNAL (w/ VSC)