1NR-FE LUBRICATION OIL PUMP INSTALLATION
PROCEDURE

 11302A
1.INSTALL TIMING CHAIN COVER OIL SEAL
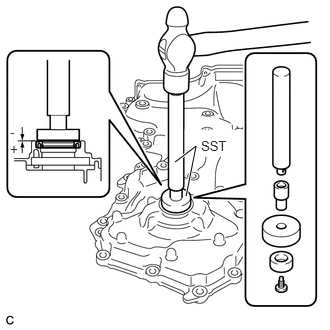
Using SST and a hammer, tap in a new timing chain cover oil seal until its surface is flush with the timing chain cover assembly edge.
- SST
- 09950-60010 (09951-00330, 09951-00480, 09952-06010)
09950-70010 (09951-07100)
- NOTICE:
-
Do not tap the timing chain cover oil seal at an angle.
- Timing chain cover oil seal tap in depth:
-0.5 to 1.0 mm (-0.0197 to 0.0393 in.)
Apply a light coat of MP grease to the timing chain cover oil seal lip.
- NOTICE:
-
Keep the timing chain cover oil seal lip free of foreign matter.
2.INSTALL PLUG
Clean and degrease the threads of the plug and threaded hole of the timing chain cover assembly.
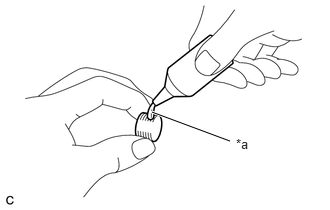
| *a | Adhesive |
Apply adhesive to the plug more than 3.0 mm (0.118 in.) from the plug tip.
- Adhesive:
Toyota Genuine Adhesive 1324, Three Bond 1324 or equivalent
- NOTICE:
-
To prevent contamination by foreign matter, install immediately after applying adhesive.
Using an 8 mm socket hexagon wrench, install the plug to the timing chain cover assembly.
- Torque:
- 15 N*m (153 kgf*cm, 11 ft.*lbf)
- NOTICE:
-
Do not start the engine for at least 1 hour after installation.
11310
3.INSTALL TIMING CHAIN COVER ASSEMBLY
Remove any remaining seal packing material.
Clean the contact surfaces of the timing chain cover assembly, camshaft housing sub-assembly, cylinder head sub-assembly, cylinder block sub-assembly and oil pan sub-assembly, and confirm that no oil, moisture or other foreign matter is on the surfaces.
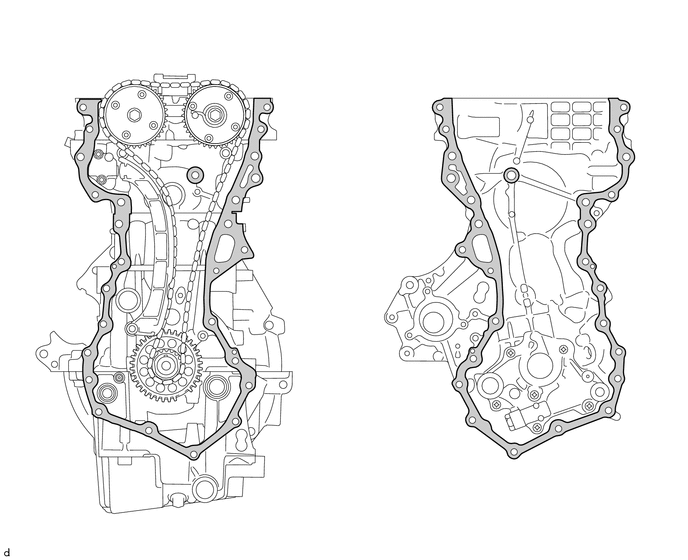

|
Surface to be Cleaned | - | - |
Install 3 new oil pump O-rings to the oil pan sub-assembly.
Apply seal packing to the timing chain cover assembly as shown in the illustration.
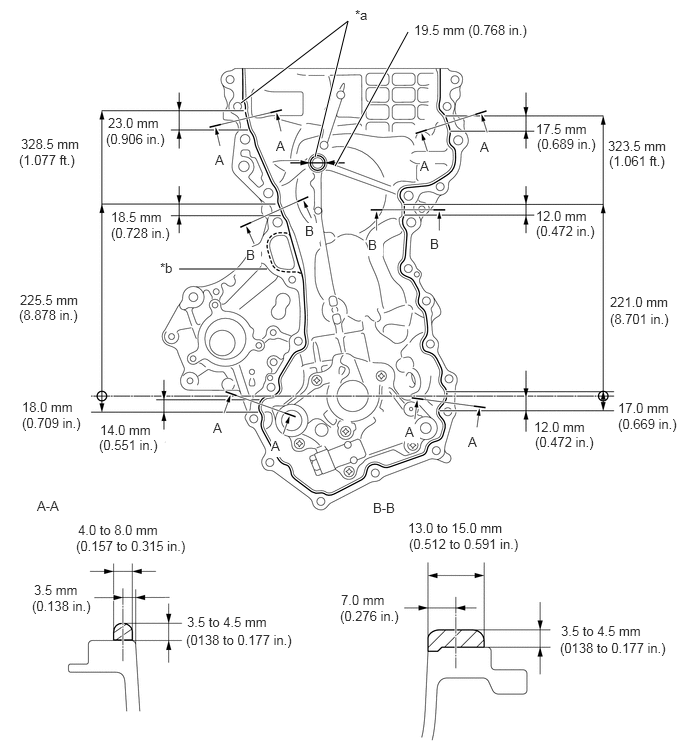
| *a | Toyota Genuine Seal Packing Black, Three Bond 1207B or equivalent | *b | Toyota Genuine Seal Packing 1282B, Three Bond 1282B or equivalent |
- NOTICE:
- ·
If there is oil on the contact surfaces, wipe them with an oil-free cloth before applying seal packing.
·Install the timing chain cover assembly within 3 minutes and tighten the bolts within 10 minutes of applying seal packing.
·Do not start the engine for at least 2 hours after installation.
- HINT:
-
Areas A-A and B-B are the joints between the cylinder block sub-assembly and oil pan sub-assembly, the cylinder block sub-assembly and cylinder head sub-assembly, and the cylinder head sub-assembly and camshaft housing sub-assembly.
- Application Specification:
Area Seal Packing Diameter Seal packing Continuous Line Area
Except A-A and B-B3.5 to 4.5 mm (0.138 to 0.177 in.) Toyota Genuine Seal Packing Black, Three Bond 1207B or equivalent Dashed Line Area 3.5 to 4.5 mm (0.138 to 0.177 in.) Toyota Genuine Seal Packing 1282B, Three Bond 1282B or equivalent
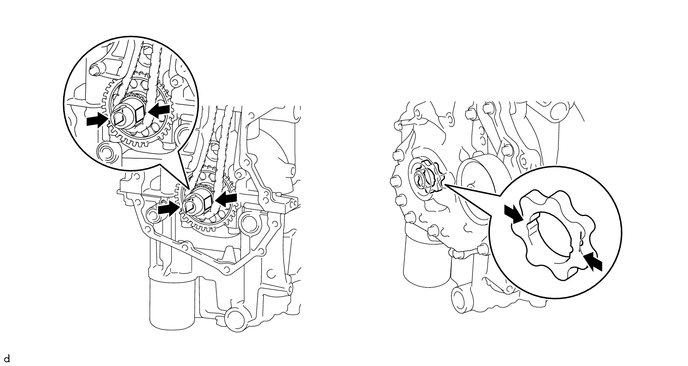
Align the oil pump drive rotor spline and crankshaft as shown in the illustration and install the timing chain cover assembly to the crankshaft.
Clean and degrease the threads of the bolts and threaded holes of the camshaft housing sub-assembly, cylinder head sub-assembly, cylinder block sub-assembly and oil pan sub-assembly.
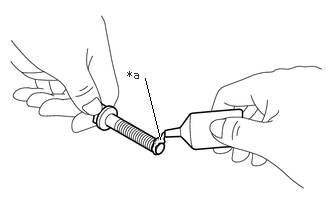
| *a | Adhesive |
Apply adhesive to the bolt (D) more than 7.0 mm (0.276 in.) from the bolt tip.
- Adhesive:
Toyota Genuine Adhesive 1324, Three Bond 1324 or equivalent
- NOTICE:
-
To prevent contamination by foreign matter, install immediately after applying adhesive.
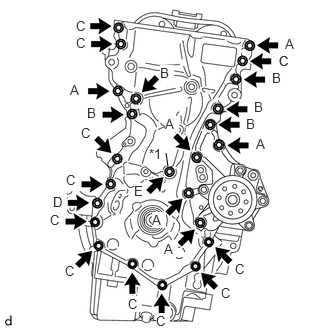
| *1 | Seal Washer |
Temporarily install the 24 bolts and a new seal washer.
- Bolt Length:
Item Length Bolt A 40 mm (1.575 in.) Bolt B 50 mm (1.969 in.) Bolt C, D 25 mm (0.984 in.) Bolt E 35 mm (1.378 in.)
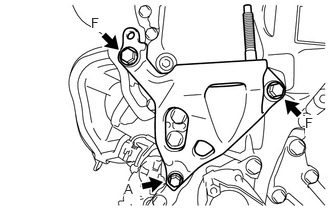
Temporarily install the engine mounting bracket RH to the timing chain cover assembly with the 3 bolts.
- Bolt Length:
Item Length Bolt A 40 mm (1.57 in.) Bolt F 80 mm (3.15 in.)
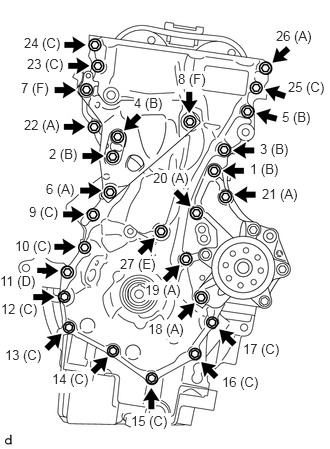
Fully tighten the 27 bolts in the sequence shown in the illustration.
- Torque:
- Bolt A, C and D : 24 N*m (245 kgf*cm, 18 ft.*lbf)
- Bolt B : 60.5 N*m (617 kgf*cm, 45 ft.*lbf)
- Bolt E : 10 N*m (102 kgf*cm, 7 ft.*lbf)
- Bolt F : 71 N*m (724 kgf*cm, 52 ft.*lbf)
13471
4.INSTALL CRANKSHAFT PULLEY
11301K
5.INSTALL CRANKSHAFT POSITION SENSOR
16326
6.INSTALL NO. 2 WATER INLET HOUSING GASKET
16321
7.INSTALL WATER INLET WITH THERMOSTAT SUB-ASSEMBLY
11201
8.INSTALL CYLINDER HEAD COVER SUB-ASSEMBLY
16620
9.INSTALL V-RIBBED BELT TENSIONER ASSEMBLY
16268
10.CONNECT NO. 1 WATER BY-PASS PIPE
17168
11.INSTALL NO. 2 EXHAUST MANIFOLD HEAT INSULATOR
12262
12.INSTALL NO. 2 VENTILATION HOSE
12261
13.INSTALL VENTILATION HOSE
19500D
14.INSTALL NO. 1 IGNITION COIL
15.INSTALL ENGINE HANGER
for Manual Transaxle: Click hereEngine / Hybrid System>1NR-FE ENGINE MECHANICAL>ENGINE ASSEMBLY(for Manual Transaxle)>REMOVAL
for CVT: Click hereEngine / Hybrid System>1NR-FE ENGINE MECHANICAL>ENGINE ASSEMBLY(for CVT)>REMOVAL
16.REMOVE ENGINE STAND
for Manual Transaxle: Click hereEngine / Hybrid System>1NR-FE ENGINE MECHANICAL>ENGINE ASSEMBLY(for Manual Transaxle)>INSTALLATION
for CVT: Click hereEngine / Hybrid System>1NR-FE ENGINE MECHANICAL>ENGINE ASSEMBLY(for CVT)>INSTALLATION