1NR-FE ENGINE MECHANICAL ENGINE ASSEMBLY(for Manual Transaxle) REMOVAL
CAUTION / NOTICE / HINT
- CAUTION:
-
The engine assembly with transaxle is very heavy. Be sure to follow the procedure described in the repair manual, or the engine lifter may suddenly drop.
PROCEDURE

 1. PRECAUTION
- NOTICE:
-
After turning the ignition switch off, waiting time may be required before disconnecting the cable fromthe battery terminal. Therefore, make sure to read the disconnecting the cable from the batteryterminal notice before proceeding with work.
-
Click hereGeneral>INTRODUCTION>REPAIR INSTRUCTION>PRECAUTION
2.DISCHARGE FUEL SYSTEM PRESSURE
3.DISCONNECT CABLE FROM NEGATIVE BATTERY TERMINAL
- NOTICE:
-
When disconnecting the cable, some systems need to be initialized after the cable is reconnected.
-
Click hereGeneral>INTRODUCTION>REPAIR INSTRUCTION>INITIALIZATION
4.REMOVE FRONT WHEELS
51442C
5.REMOVE ENGINE UNDER COVER LH (w/o Metal Type Under Cover)
Remove the 3 bolts, 5 screws and engine under cover LH from the vehicle.
51441C
6.REMOVE ENGINE UNDER COVER RH (w/o Metal Type Under Cover)
Remove the 2 bolts, 2 screws and engine under cover RH from the vehicle.
51451A
7.REMOVE CENTER ENGINE UNDER COVER (w/ Metal Type Under Cover)
Remove the 4 screws, 5 clips and center engine under cover from the vehicle.
51405A
8.REMOVE NO. 1 ENGINE UNDER COVER SUB-ASSEMBLY (w/ Metal Type Under Cover)
Remove the 11 bolts and No. 1 engine under cover sub-assembly from the vehicle.
9.DRAIN ENGINE OIL
10.DRAIN ENGINE COOLANT
11.DRAIN MANUAL TRANSAXLE OIL
12611
12.REMOVE NO. 1 ENGINE COVER
23826
13.DISCONNECT NO. 1 FUEL VAPOR FEED HOSE
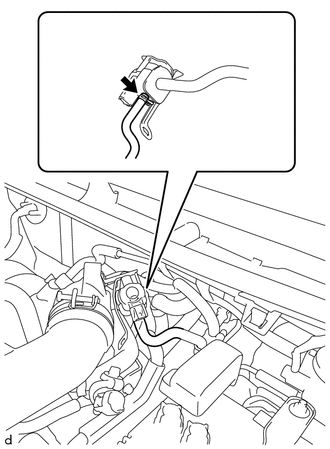
Slide the hose clip and disconnect the No. 1 fuel vapor feed hose from the purge VSV (purge valve).
23827A
14.DISCONNECT NO. 2 FUEL VAPOR FEED HOSE
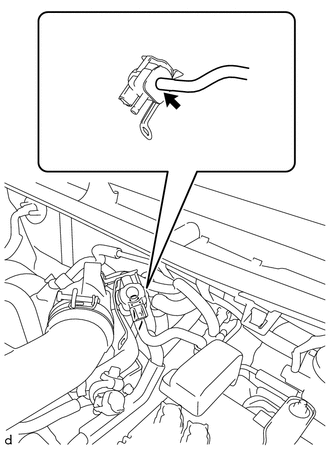
Disconnect the No. 2 fuel vapor feed hose from the purge VSV (purge valve).
12262
15.DISCONNECT NO. 2 VENTILATION HOSE
17880
16.REMOVE AIR CLEANER HOSE ASSEMBLY
17.REMOVE AIR CLEANER CAP SUB-ASSEMBLY
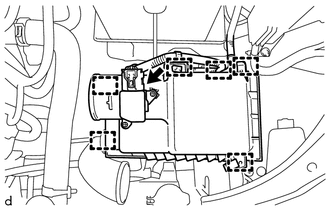
Disconnect the mass air flow meter connector.
Disengage the 2 clamps to separate the engine wire from the air cleaner cap sub-assembly.
Disengage the 2 clamps of the air cleaner cap sub-assembly.
Disengage the 2 guides to remove the air cleaner cap sub-assembly from the air cleaner case sub-assembly.
17801
18.REMOVE AIR CLEANER FILTER ELEMENT SUB-ASSEMBLY
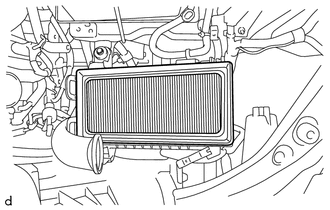
Remove the air cleaner filter element sub-assembly from the air cleaner case sub-assembly.
17701
19.REMOVE AIR CLEANER CASE SUB-ASSEMBLY
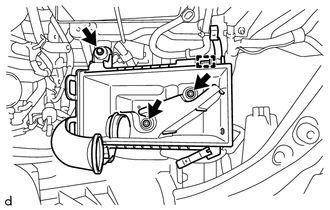
Disengage the clamp to separate the engine wire from the air cleaner case sub-assembly.
Remove the 3 bolts and air cleaner case sub-assembly from the air cleaner bracket.
28800
20.REMOVE BATTERY
Remove the terminal cover from the positive (+) battery terminal.
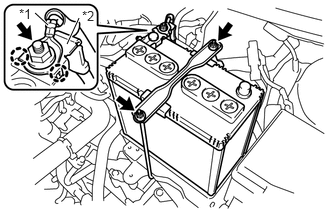
| *1 | Engine Room Main Wire |
| *2 | Engine Wire |
Remove the nut to disconnect the engine room main wire with engine wire from the positive (+) battery terminal.
Disengage the 2 claws to disconnect the engine room main wire from the engine wire.
Remove the 2 nuts, battery clamp bolt and battery clamp sub-assembly from the battery carrier assembly.
Remove the battery from the battery tray.
74431
21.REMOVE BATTERY TRAY
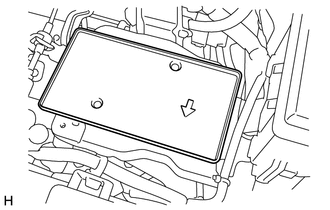
Remove the battery tray from the battery carrier assembly.
74410
22.REMOVE BATTERY CARRIER ASSEMBLY
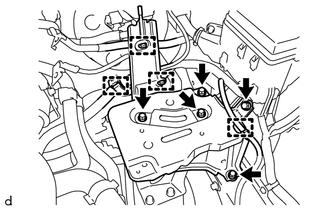
Disengage the 4 clamps to disconnect the wire harness from the battery carrier assembly.
Remove the 5 bolts and battery carrier assembly from the engine mounting insulator LH and vehicle.
16361A
23.REMOVE FAN AND GENERATOR V BELT
15301
24.REMOVE OIL LEVEL DIPSTICK SUB-ASSEMBLY
11452
25.REMOVE OIL LEVEL DIPSTICK GUIDE
17167
26.REMOVE NO. 1 EXHAUST MANIFOLD HEAT INSULATOR
82121
27.DISCONNECT ENGINE WIRE
28.REMOVE WIRE HARNESS CLAMP BRACKET
27060
29.REMOVE GENERATOR WITH REGULATOR ASSEMBLY
44774
30.DISCONNECT UNION TO CONNECTOR TUBE HOSE
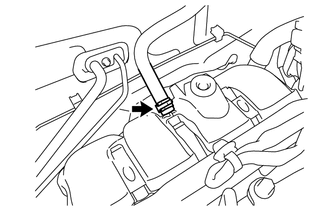
Slide the hose clip and disconnect the union to connector tube hose from the intake manifold.
16571C
31.DISCONNECT NO. 1 RADIATOR HOSE
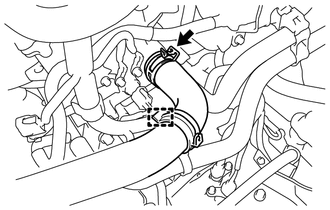
Disengage the clamp to disconnect the No. 1 radiator hose from the hose clamp.
Slide the hose clip and disconnect the No. 1 radiator hose from the cylinder head sub-assembly.
16572D
32.DISCONNECT NO. 2 RADIATOR HOSE
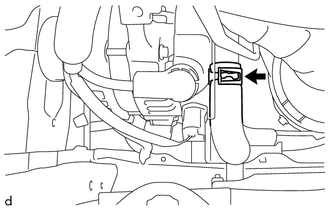
Slide the hose clip and disconnect the No. 2 radiator hose from the water inlet.
87246
33.DISCONNECT OUTLET HEATER WATER HOSE
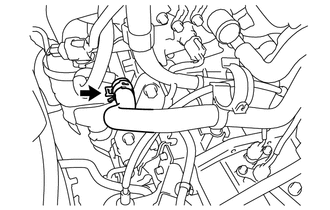
Slide the hose clip and disconnect the outlet heater water hose from the No. 1 water by-pass pipe.
87245
34.DISCONNECT INLET HEATER WATER HOSE
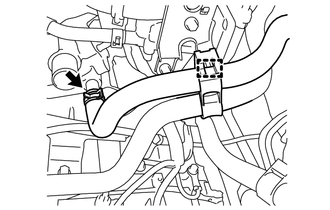
Disengage the clamp to disconnect the hose clamp from the wire harness clamp bracket.
Slide the hose clip and disconnect the inlet heater water hose from the cylinder head sub-assembly.
23841B
35.REMOVE EFI FUEL PIPE CLAMP
23901
36.DISCONNECT FUEL TUBE SUB-ASSEMBLY
88320
37.SEPARATE COOLER COMPRESSOR ASSEMBLY (w/ Cooler System)
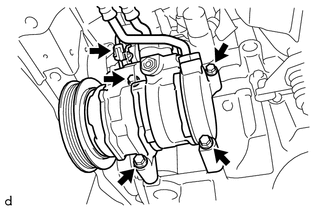
Disconnect the cooler compressor assembly connector.
Remove the 4 bolts and separate the cooler compressor assembly from the cylinder block sub-assembly and oil pan sub-assembly.
- NOTICE:
-
Separate the cooler compressor assembly together with the discharge hose and suction hose, then suspend them from the vehicle with a piece of rope.
31470
38.SEPARATE CLUTCH RELEASE CYLINDER ASSEMBLY
55550
39.REMOVE GLOVE COMPARTMENT DOOR ASSEMBLY
82121
40.DISCONNECT ENGINE WIRE (for LHD)
Remove the relay block cover from the engine room relay block.
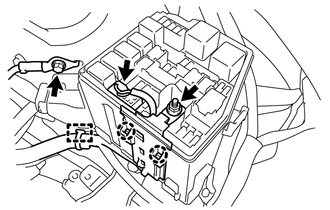
Remove the bolt to disconnect the engine wire from the vehicle.
Disengage the clamp to disconnect the engine wire from the vehicle.
Disconnect the connector from the engine room relay block.
Remove the nut from the engine room relay block.
Disengage the 2 claws to disconnect the engine wire from the engine room relay block.
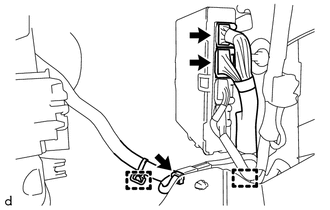
Disconnect the 3 connectors.
Disengage the 2 clamps to disconnect the engine wire from the wire harness clamp bracket and vehicle.
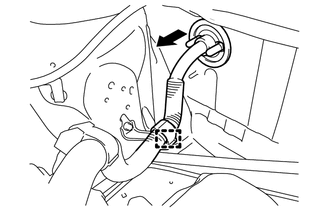
Disengage the clamp to disconnect the engine wire from the wire harness clamp bracket.
Disengage the grommet and pass the engine wire through the hole to the inside of the engine room.
82121
41.DISCONNECT ENGINE WIRE (for RHD)
Remove the relay block cover from the engine room relay block.
Remove the bolt to disconnect the engine wire from the vehicle.
Disengage the clamp to disconnect the engine wire from the vehicle.
Disconnect the connector from the engine room relay block.
Remove the nut from the engine room relay block.
Disengage the 2 claws to disconnect the engine wire from the engine room relay block.
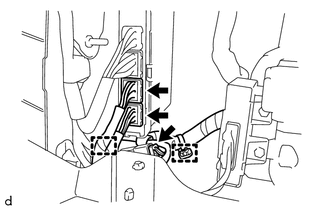
Disconnect the 3 connectors.
Disengage the 2 clamps to disconnect the engine wire from the wire harness clamp bracket and vehicle.
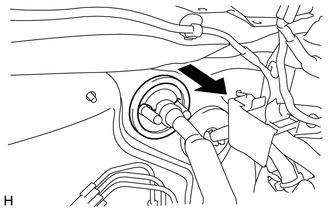
Disengage the grommet and pass the engine wire through the hole to the inside of the engine room.
57533B
42.REMOVE FRONT FLOOR CENTER BRACE
17410
43.REMOVE FRONT EXHAUST PIPE ASSEMBLY (for Sedan)
17410
44.REMOVE FRONT EXHAUST PIPE ASSEMBLY (for Hatchback)
33820B
45.DISCONNECT TRANSMISSION CONTROL CABLE ASSEMBLY
46.REMOVE FRONT DRIVE SHAFT ASSEMBLY
45259A
47.REMOVE COLUMN HOLE COVER SILENCER SHEET
45209
48.DISCONNECT STEERING SLIDING YOKE SUB-ASSEMBLY
45025D
49.SEPARATE NO. 1 STEERING COLUMN HOLE COVER SUB-ASSEMBLY
43498A
50.REMOVE NO. 1 DRIVE SHAFT HEAT INSULATOR
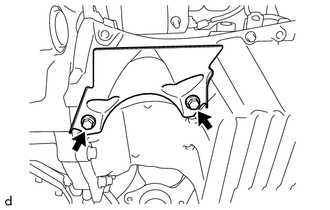
Remove the 2 bolts and No. 1 drive shaft heat insulator from the oil pan sub-assembly.
12137
51.REMOVE OIL PAN PROTECTOR (w/ Metal Type Under Cover)
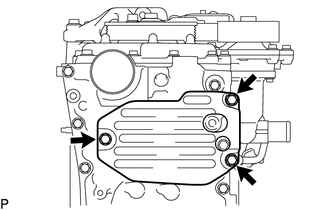
Remove the 3 bolts and oil pan protector from the oil pan sub-assembly.
12144
52.REMOVE OIL PAN COVER SILENCER (w/ Metal Type Under Cover)
- HINT:
-
Perform this procedure only when replacement of the oil pan cover silencer is necessary.
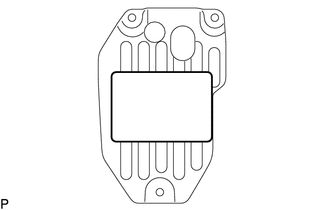
Remove the oil pan cover silencer from the oil pan protector.
53.REMOVE ENGINE ASSEMBLY WITH MANUAL TRANSAXLE ASSEMBLY
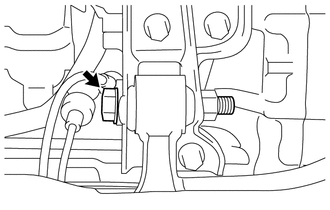
Loosen the engine moving control rod bolt.
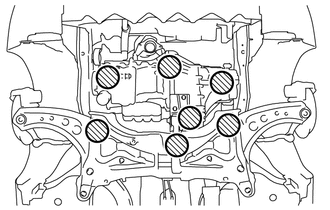

|
Attachment Placement Positions |
Place the height adjustment or plate lift attachments in the positions shown in the illustration and set an engine lifter underneath the engine assembly with manual transaxle assembly and front suspension crossmember sub-assembly.
- NOTICE:
- ·
Place the height adjustment and plate lift attachments so that the engine assembly with manual transaxle assembly is level.
·Do not perform any procedure while the engine assembly is suspended because doing so may cause the engine assembly to drop, resulting in injury. However, the engine assembly needs to be suspended when it is installed to or removed from an engine stand.
·As the engine assembly with manual transaxle assembly is very heavy, be sure to support it securely.
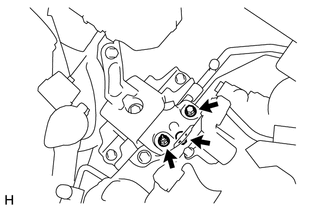
Remove the bolt and 2 nuts to disconnect the engine mounting insulator sub-assembly RH from the engine mounting bracket RH.
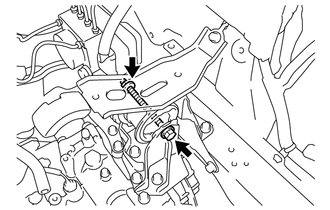
Remove the through bolt and nut to disconnect the engine mounting insulator LH from the engine mounting bracket LH.
- HINT:
-
Loosen by holding the nut and turning the bolt.
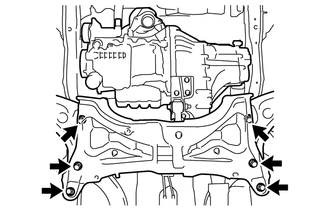
Remove the 6 bolts and engine assembly with manual transaxle assembly with front suspension crossmember sub-assembly from the vehicle.
- NOTICE:
-
When removing the engine assembly with manual transaxle assembly and front suspension crossmember sub-assembly, be careful not to damage any wire harnesses or the steering shaft.
28100
54.REMOVE STARTER ASSEMBLY
11363A
55.REMOVE FLYWHEEL HOUSING SIDE COVER
56.INSTALL ENGINE HANGER
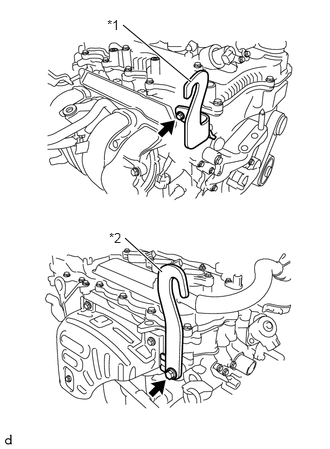
| *1 | No. 1 Engine Hanger |
| *2 | No. 2 Engine Hanger |
Install the No. 1 engine hanger and No. 2 engine hanger to the cylinder head sub-assembly with the 2 bolts.
- Torque:
- 43 N*m (438 kgf*cm, 32 ft.*lbf)
- HINT:
Part Name Part No. No. 1 engine hanger 12281-0Y070 No. 2 engine hanger 12282-0Y060 Bolt 90105-T0125
51201
57.REMOVE FRONT SUSPENSION CROSSMEMBER SUB-ASSEMBLY
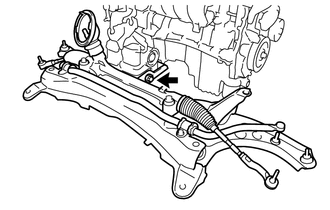
Using an engine sling device and a chain block, suspend the engine assembly with manual transaxle assembly.
Remove the through bolt and front suspension crossmember from the engine moving control rod bracket.
82121
58.REMOVE ENGINE WIRE
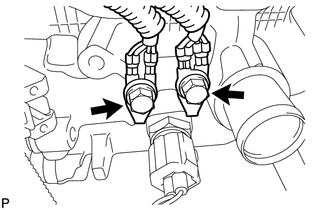
Remove the 2 bolts to disconnect the engine wire from the cylinder head sub-assembly.
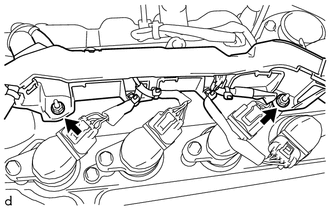
Remove the 2 nuts to disconnect the engine wire from the cylinder head cover sub-assembly.
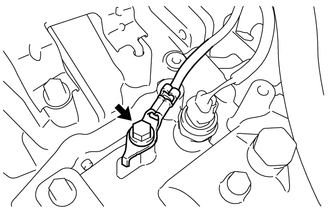
Remove the bolt to disconnect the engine wire from the manual transaxle assembly.
Disconnect all the engine wire connectors.
- NOTICE:
-
Make sure that no engine wires are connected to the engine.
59.FIX ENGINE ASSEMBLY
Attach the sling device to the engine hangers and chain block.
- NOTICE:
-
Make sure that the sling angle is correct to prevent the engine assembly and engine hangers from being damaged or deformed.
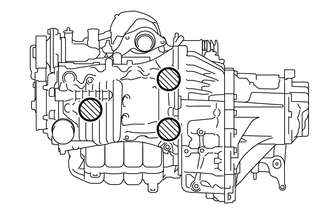
|
|
Attachment Placement Position |
To enable removal of the manual transaxle assembly, adjust the positions of the height adjustment or plate lift attachments and set them in place.
- NOTICE:
- ·
Place the height adjustment or plate lift attachments so that the engine assembly with manual transaxle assembly is level.
·As the engine assembly with manual transaxle assembly is very heavy, be sure to support it securely.
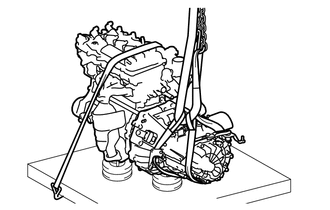
Use a belt with a tightening mechanism or a rope to secure the engine assembly to the engine lifter.
- NOTICE:
-
Do not tighten the belt with a tightening mechanism or the rope any more than is necessary.
30300
60.REMOVE MANUAL TRANSAXLE ASSEMBLY
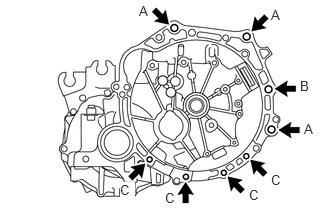
Remove the 8 bolts and manual transaxle assembly from the engine assembly.
- NOTICE:
-
To prevent damage to the knock pins, do not pry between the manual transaxle assembly and engine assembly.
- HINT:
- ·
Bolt A, B: Remove from manual transaxle assembly side
·Bolt C: Remove from engine assembly side
31210
61.REMOVE CLUTCH COVER ASSEMBLY
31250
62.REMOVE CLUTCH DISC ASSEMBLY
13405
63.REMOVE FLYWHEEL SUB-ASSEMBLY
Using height adjustable attachments or plate lift attachments, place the engine assembly on a flat, level surface.
- NOTICE:
- ·
Using height adjustable attachments or plate lift attachments, place the engine assembly horizontally.
·Using an engine sling device and engine lifter, secure the engine assembly before servicing.
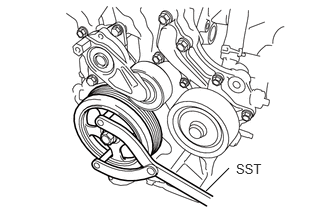
Using SST, hold the crankshaft pulley.
- SST
- 09960-10010 (09962-01000, 09963-01000)
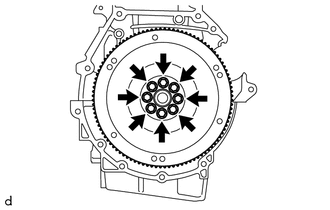
Remove the 8 bolts and flywheel sub-assembly from the crankshaft.
64.INSTALL ENGINE STAND
Using a sling device and chain block, install the engine assembly to the engine stand.
- NOTICE:
- ·
Make sure that the sling angle is correct to prevent the engine assembly and engine hangers from being damaged or deformed.
·Securely support the engine assembly to prevent it from turning upside down until it is secured to an engine stand.
12305
65.REMOVE ENGINE MOUNTING INSULATOR SUB-ASSEMBLY RH
- HINT:
-
Only perform this procedure when replacement of the engine mounting insulator sub-assembly RH is necessary.
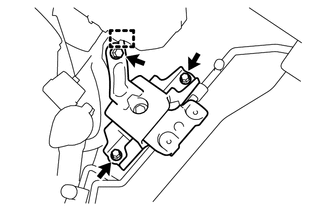
Remove the 3 bolts.
Disengage the hook and remove the engine mounting insulator sub-assembly RH from the vehicle.
12372A
66.REMOVE ENGINE MOUNTING INSULATOR LH
- HINT:
-
Only perform this procedure when replacement of the engine mounting insulator LH is necessary.
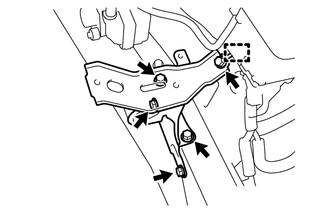
Remove the 5 bolts.
Disengage the hook and remove the engine mounting insulator LH from the vehicle.