AXLE AND DIFFERENTIAL FRONT AXLE HUB INSTALLATION
CAUTION / NOTICE / HINT
- HINT:
- ·
Use the same procedure for the RH side and LH side.
·The procedure listed below is for the LH side.
PROCEDURE

 43502C
1.INSTALL FRONT AXLE HUB SUB-ASSEMBLY
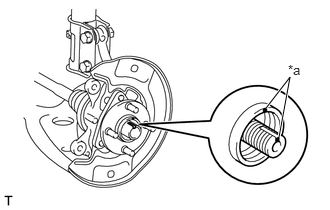
| *a | Matchmark |
Align the matchmarks on the front drive shaft assembly and front axle hub sub-assembly.
- NOTICE:
-
Be careful not to damage the thread portion of the front drive shaft assembly.
Install the front axle hub sub-assembly and front disc brake dust cover to the steering knuckle with the 3 bolts.
- Torque:
- 145 N*m (1479 kgf*cm, 107 ft.*lbf)
- NOTICE:
-
Be careful not to damage the drive shaft boot.
43512
2.INSTALL FRONT DISC
3.INSTALL FRONT DISC BRAKE CALIPER ASSEMBLY
43502H
4.TEMPORARILY INSTALL FRONT AXLE SHAFT NUT
Clean the threaded parts on the front drive shaft assembly and a new front axle shaft nut using non-residue solvent.
- NOTICE:
- ·
Be sure to perform this work even when using a new front drive shaft assembly.
·Keep the threaded parts free of oil and foreign matter.
Using a 30 mm socket wrench, while applying the brakes, temporarily install the front axle shaft nut.
- Torque:
- 216 N*m (2203 kgf*cm, 159 ft.*lbf)
- NOTICE:
-
Stake the front axle shaft nut after inspecting for looseness and runout in the following steps.
- HINT:
-
Keep depressing the brake pedal to prevent the front drive shaft assembly from rotating.
5.SEPARATE FRONT DISC BRAKE CALIPER ASSEMBLY
43512
6.REMOVE FRONT DISC
Click hereBrake>BRAKE (FRONT)>FRONT BRAKE>REMOVAL
7.INSPECT FRONT AXLE HUB BEARING LOOSENESS
8.INSPECT FRONT AXLE HUB RUNOUT
43512
9.INSTALL FRONT DISC
10.INSTALL FRONT DISC BRAKE CALIPER ASSEMBLY
43502H
11.INSTALL FRONT AXLE SHAFT NUT
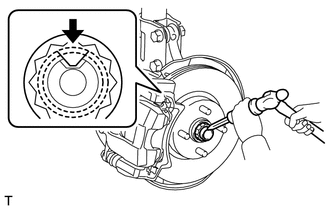
Using a chisel and hammer, stake the front axle shaft nut.
12.INSTALL FRONT SPEED SENSOR WIRE
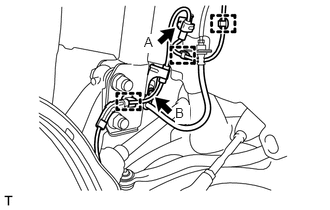
Install the front speed sensor wire and front flexible hose to the body and front shock absorber assembly with the 2 bolts.
- Torque:
- Bolt A : 8.5 N*m (87 kgf*cm, 75 in.*lbf)
- Bolt B : 30.4 N*m (310 kgf*cm, 22 ft.*lbf)
- NOTICE:
-
Do not twist the front speed sensor wire and front flexible hose when installing them.
- HINT:
-
Install the front speed sensor harness bracket first and then the front flexible hose bracket.
Engage the 3 clamps.
Engage the 2 clamps to the body.
Connect the front speed sensor connector.
53876A
13.INSTALL FRONT FENDER LINER
for TMMIN Made:
Install the front fender liner to the body with the 7 clips, 3 screws and 4 new grommets.
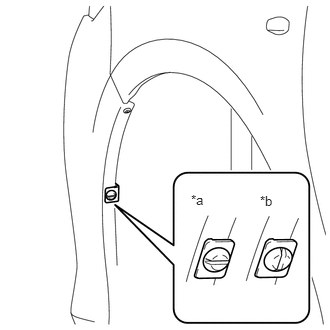
| *a | Incorrect |
| *b | Correct |
Install the pin hold clip.
- NOTICE:
-
Install the pin hold clip with the slot aligned vertically. Do not rotate the clip after inserting it. After installation, confirm that the slot is vertical.
for TMT Made:
Install the front fender liner to the body with the 7 clips, 3 screws and 4 new grommets.
Engage the 2 claws to install the pin hold clip to the front fender liner retainer.
14.INSTALL FRONT WHEEL
- Torque:
- 103 N*m (1050 kgf*cm, 76 ft.*lbf)
15.INSPECT AND ADJUST FRONT WHEEL ALIGNMENT
16.CHECK FOR SPEED SENSOR SIGNAL (w/ ABS)
17.CHECK FOR SPEED SENSOR SIGNAL (w/ VSC)