K411 CVT PARK / NEUTRAL POSITION SWITCH INSTALLATION
PROCEDURE

 84540
1.INSTALL PARK/NEUTRAL POSITION SWITCH
Temporarily install the park/neutral position switch to the continuously variable transaxle assembly with the 2 bolts.
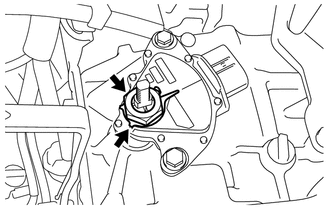
Install a new lock plate and lock nut to the park/neutral position switch.
- Torque:
- 6.9 N*m (70 kgf*cm, 61 in.*lbf)
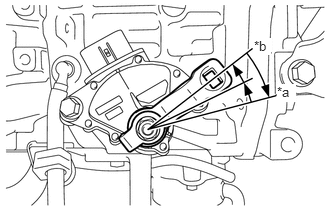
| *a | P Position |
| *b | N Position |
Temporarily install the transmission control shaft lever to the continuously variable transaxle assembly.
Rotate the transmission control shaft lever clockwise until it stops, and then from that position rotate it counterclockwise by 2 notches to set it to the N position.
Remove the transmission control shaft lever from the continuously variable transaxle assembly.
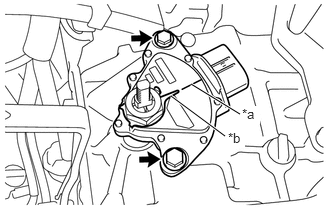
| *a | Neutral Basic Line |
| *b | Protrusion |
Rotate the park/neutral position switch clockwise or counterclockwise to align the neutral basic line with the protrusion as shown in the illustration.
Hold the park/neutral position switch in this position and tighten the 2 bolts.
- Torque:
- 5.4 N*m (55 kgf*cm, 48 in.*lbf)
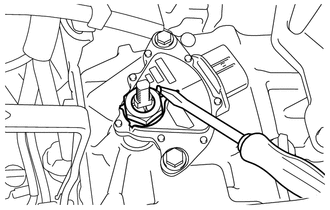
Using a screwdriver, secure the lock nut with the lock plate.
Install the transmission control shaft lever to the continuously variable transaxle assembly with the washer and nut.
- Torque:
- 12.3 N*m (125 kgf*cm, 9 ft.*lbf)
Connect the park/neutral position switch connector.
33820B
2.CONNECT TRANSMISSION CONTROL CABLE ASSEMBLY
- NOTICE:
-
To prevent damage to the transmission control cable assembly and transmission floor shift assembly, connect the continuously variable transaxle assembly side of the transmission control cable assembly before connecting the transmission floor shift assembly side.
| *a | P Position |
| *b | N Position |
Rotate the transmission control shaft lever clockwise until it stops, and then from that position rotate it counterclockwise by 2 notches to set it to the N position.
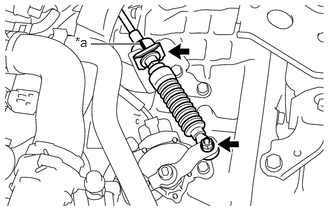
| *a | Paint Mark |
Install the transmission control cable assembly to the No. 1 transmission control cable bracket with a new clip.
- NOTICE:
-
Make sure that the paint mark on the transmission control cable assembly is aligned with the slit in the No. 1 transmission control cable bracket before installing the clip.
Connect the transmission control cable assembly to the transmission control shaft lever with the nut.
- Torque:
- 12 N*m (122 kgf*cm, 9 ft.*lbf)
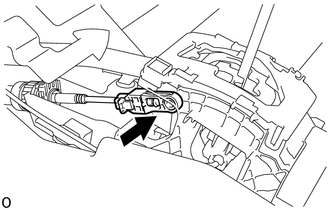
Confirm that the shift lever is in N, and then connect the end of the transmission control cable assembly to the transmission floor shift assembly.
- NOTICE:
- ·
Securely install the end of the transmission control cable assembly to the transmission floor shift assembly.
·Install the end of the transmission control cable assembly so that its adjustment lock section is on the driver side.
3.ADJUST SHIFT LEVER POSITION
58810J
4.INSTALL CONSOLE BOX ASSEMBLY (for TMT Made)
58839A
5.INSTALL CONSOLE BOX HOLE COVER (for TMT Made)
58916
6.INSTALL BOX BOTTOM MAT (for TMT Made)
58912C
7.INSTALL NO. 2 SIDE BOX PANEL (for TMT Made)
58911A
8.INSTALL NO. 1 SIDE BOX PANEL (for TMT Made)
58817A
9.INSTALL NO. 2 FRONT CONSOLE BOX INSERT (for TMT Made)
58816D
10.INSTALL NO. 1 FRONT CONSOLE BOX INSERT (for TMT Made)
for LHD:
Click hereVehicle Interior>INTERIOR PANELS / TRIM>UPPER INSTRUMENT PANEL>INSTALLATION
for RHD:
Click hereVehicle Interior>INTERIOR PANELS / TRIM>LOWER INSTRUMENT PANEL>INSTALLATION
58910C
11.INSTALL REAR CONSOLE BOX ASSEMBLY (for Integrated Type)
58910C
12.INSTALL REAR CONSOLE BOX ASSEMBLY (for Separate Type)
74410
13.INSTALL BATTERY CARRIER ASSEMBLY
74431
14.INSTALL BATTERY TRAY
28800
15.INSTALL BATTERY
17701
16.INSTALL AIR CLEANER CASE SUB-ASSEMBLY
17801
17.INSTALL AIR CLEANER FILTER ELEMENT SUB-ASSEMBLY
18.INSTALL AIR CLEANER CAP SUB-ASSEMBLY
17880
19.INSTALL AIR CLEANER HOSE ASSEMBLY
20.CONNECT CABLE TO NEGATIVE BATTERY TERMINAL
- Torque:
- 5.4 N*m (55 kgf*cm, 48 in.*lbf)
- NOTICE:
-
When disconnecting the cable, some systems need to be initialized after the cable is reconnected.
-
Click hereGeneral>INTRODUCTION>REPAIR INSTRUCTION>INITIALIZATION
84540
21.INSPECT PARK/NEUTRAL POSITION SWITCH
22.INSPECT SHIFT LEVER POSITION