K320 MULTIDRIVE / CVT CONTINUOUSLY VARIABLE TRANSAXLE ASSEMBLY(When Using the Engine Support Bridge) REMOVAL
CAUTION / NOTICE / HINT
The necessary procedures (adjustment, calibration, initialization, or registration) that must be performed after parts are removed, installed, or replaced during the continuously variable transaxle assembly removal/installation are shown below.
| Replaced Part or Performed Procedure | Necessary Procedure | Effect/Inoperative Function when Necessary Procedure not Performed | Link |
|---|---|---|---|
|
*1: When the ECM is replaced with a new one, reset memory is unnecessary. |
|||
| Auxiliary battery terminal is disconnected/reconnected | Memorize steering angle neutral point | Parking assist monitor system | ( ) |
·
Air intake system parts ·
Exhaust system parts |
Inspection after repair | ·
Poor idle, etc. ·
Engine start function, etc. |
()
|
| Replacement of ECM | Perform Vehicle Identification Number (VIN) or frame number registration | DTC P063051 is output | ()
|
If possible, read the transaxle compensation code from the previous ECM:
1.
Reset memory*1 2.
Transfer transaxle compensation code 3.
Perform road test to allow ECM to learn |
·
Large shift shock ·
Deterioration of fuel efficiency |
()
|
|
If impossible, read the transaxle compensation code from the previous ECM:
1.
Reset memory*1 2.
Reset transaxle compensation code 3.
Perform road test to allow ECM to learn |
|||
| ECU security key | ·
DTCs are stored ·
Vehicle control history (RoB) are stored |
()
|
|
| Replacement of continuously variable transaxle assembly | 1.
Reset memory 2.
Transaxle compensation code (Input) 3.
CVT oil pressure calibration |
·
Large shift shock ·
Deterioration of fuel efficiency |
for Initialization:
( )
for Registration: ( )
|
| Replacement of TCM | If transaxle compensation code read from TCM:
1.
Transfer transaxle compensation code 2.
Perform reset memory 3.
CVT oil pressure calibration 4.
Perform road test to allow TCM to learn |
||
If transaxle compensation code not read from TCM:
1.
Reset transaxle compensation code 2.
Perform reset memory 3.
CVT oil pressure calibration 4.
Perform road test to allow TCM to learn |
|||
| ECU security key | ·
DTCs are stored ·
Vehicle control history (RoB) are stored |
()
|
|
| Replacement of CVT fluid | ATF thermal degradation estimate reset | The value of the Data List item "ATF Thermal Degradation Estimate" is not estimated correctly | ()
|
| Front wheel alignment adjustment | Calibration | ·
DTCs are stored ·
ABS warning light illuminates ·
Slip indicator light illuminates ·
VSC disabled or malfunctions |
()
|
| Suspension, tires, etc. | ·
Ultrasonic sensor detection angle ·
Ultrasonic sensor detection angle registration |
Parking support brake system | ()
|
| Rear television camera assembly optical axis (Back camera position setting) | Parking assist monitor system | ()
|
|
- CAUTION:
- ·
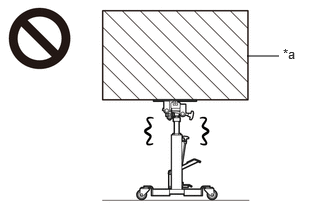 2.573,0.583 2.906,0.583 false 2.948,0.479 3.26,0.677 0.313,0.198 10 false *a
*a Heavy object exceeding the capacity of the transmission jack
Because the continuously variable transaxle assembly is extremely heavy, make sure to follow the work procedures described in the repair manual.
·If work is not performed according to the procedures described in the repair manual, there is a danger that the transmission jack could drop and components could fall down.
- ·
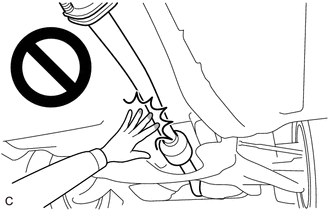
When the engine is hot, do not touch high-temperature areas such as the engine or exhaust pipe.
·Touching high-temperature areas such as the engine and exhaust pipe could result in burns.
- HINT:
-
When the cable is disconnected / reconnected to the auxiliary battery terminal, systems temporarily stop operating. However, each system has a function that completes learning the first time the system is used.
- ·
Learning completes when vehicle is driven
Effect/Inoperative Function When Necessary Procedures are not Performed Necessary Procedures Link Lane tracing assist system Drive the vehicle straight ahead at 35 km/h (22 mph) or more for 5 second or more. ( )
Pre-collision system
·Learning completes when vehicle is operated normally
Effect/Inoperative Function When Necessary Procedures are not Performed Necessary Procedures Link Power door lock control system
·Back door opener
Perform door unlock operation with door control switch or electrical key transmitter sub-assembly switch. ( )
Air conditioning system After the ignition switch is turned to ON, the servo motor standard position is recognized. -
PROCEDURE

 1. PRECAUTION
- NOTICE:
-
After turning the ignition switch off, waiting time may be required before disconnecting the cable from the negative (-) auxiliary battery terminal.
-
Click hereGeneral>SETUP>WHEN DISCONNECTING OR RECONNECTING BATTERY TERMINAL>BEFORE DISCONNECTING BATTERY
2.DISCONNECT CABLE FROM NEGATIVE AUXILIARY BATTERY TERMINAL
3.ALIGN FRONT WHEELS FACING STRAIGHT AHEAD
4.REMOVE FRONT WHEELS
51451A
5.REMOVE CENTER ENGINE UNDER COVER
51442C
6.REMOVE ENGINE UNDER COVER LH
51441C
7.REMOVE ENGINE UNDER COVER RH
53876A
8.REMOVE FRONT FENDER LINER LH
53875A
9.REMOVE FRONT FENDER LINER RH
10.DRAIN ENGINE COOLANT
11.DRAIN CONTINUOUSLY VARIABLE TRANSAXLE FLUID
12.REMOVE WINDSHIELD WIPER MOTOR AND LINK ASSEMBLY
55815E
13.REMOVE FRONT NO. 1 VENTILATOR SEAL
55735A
14.REMOVE WATER GUARD PLATE LH
55701J
15.REMOVE OUTER COWL TOP PANEL SUB-ASSEMBLY
16.REMOVE AIR CLEANER CAP WITH AIR CLEANER HOSE
17701
17.REMOVE AIR CLEANER CASE SUB-ASSEMBLY
89661
18.REMOVE ECM
74404A
19.REMOVE BATTERY CLAMP SUB-ASSEMBLY
33820B
20.DISCONNECT TRANSMISSION CONTROL CABLE ASSEMBLY
82121
21.DISCONNECT ENGINE WIRE
Disengage the claw, rotate the lever and disconnect the transmission wire connector.
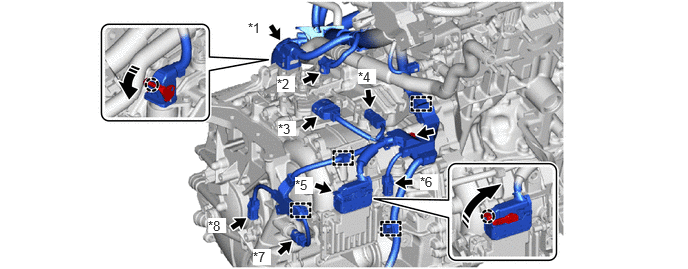
| *1 | Transmission Wire Connector | *2 | Shift Stroke Sensor Connector |
| *3 | Park/Neutral Position Switch Connector | *4 | Transmission Revolution Sensor (NOUT) Connector |
| *5 | TCM Connector | *6 | Transmission Revolution Sensor (NSS) Connector |
| *7 | Oil Pressure Sensor Connector | *8 | Transmission Revolution Sensor (NT) Connector |

|
Remove in this Direction | - | - |
Disconnect the shift stroke sensor connector.
Disconnect the park/neutral position switch connector.
Disconnect the transmission revolution sensor (NOUT) connector.
Disengage the claw, rotate the lever and disconnect the TCM connector.
Disconnect the transmission revolution sensor (NSS) connector.
Disconnect the oil pressure sensor connector.
Disconnect the transmission revolution sensor (NT) connector.
Remove the bolt.
Disengage the 4 clamps.
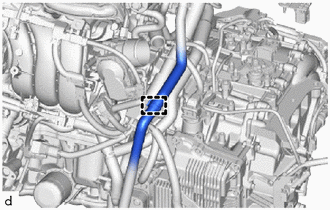
Disconnect the No. 3 water by-pass hose assembly.
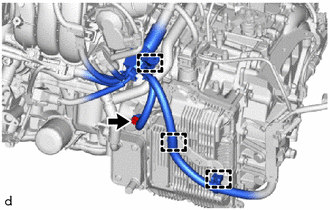
Disengage the 3 clamps.
Remove the bolt to disconnect the engine wire from the continuously variable transaxle assembly.
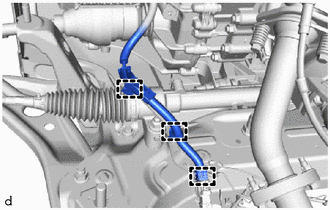
Disengage the 3 clamps to disconnect the engine wire from the front suspension crossmember sub-assembly.
89535B
22.REMOVE TCM
- NOTICE:
-
To prevent coolant from entering the TCM through its connector portion, be sure to remove the TCM before disconnecting any of the coolant system hoses.
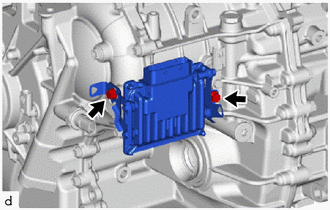
Remove the 2 bolts and TCM from the continuously variable transaxle assembly.
16281N
23.DISCONNECT NO. 4 WATER BY-PASS HOSE
16290F
24.DISCONNECT NO. 3 WATER BY-PASS HOSE ASSEMBLY
33823
25.REMOVE NO. 1 TRANSMISSION CONTROL CABLE BRACKET
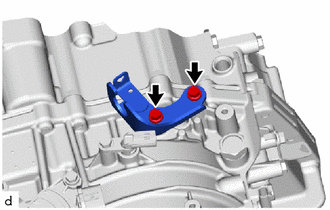
Remove the 2 bolts and No. 1 transmission control cable bracket from the continuously variable transaxle assembly.
28100
26.REMOVE STARTER ASSEMBLY
45100
27.SECURE STEERING WHEEL ASSEMBLY
45259A
28.REMOVE COLUMN HOLE COVER SILENCER SHEET
45260
29.DISCONNECT NO. 2 STEERING INTERMEDIATE SHAFT ASSEMBLY
51447D
30.REMOVE CENTER NO. 4 ENGINE UNDER COVER
17410
31.REMOVE FRONT EXHAUST PIPE ASSEMBLY
32.REMOVE FRONT DRIVE SHAFT ASSEMBLIES
33.INSTALL ENGINE HANGERS
34.INSTALL ENGINE SUPPORT BRIDGE
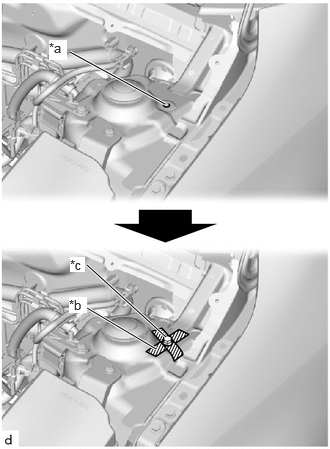
| *a | Existing Hole |
| *b | Protective Tape |
| *c | Bolt |
Cover the existing holes in the left and right suspension tower with protective tape, then use a thin-bladed screwdriver to make holes in the tape, and insert the 2 bolts for setting the sub-beam of the engine support bridge.
| Item | Part No. |
|---|---|
| Bolt | 9010-10226 |
Install SST to the vehicle body as shown in the illustration.
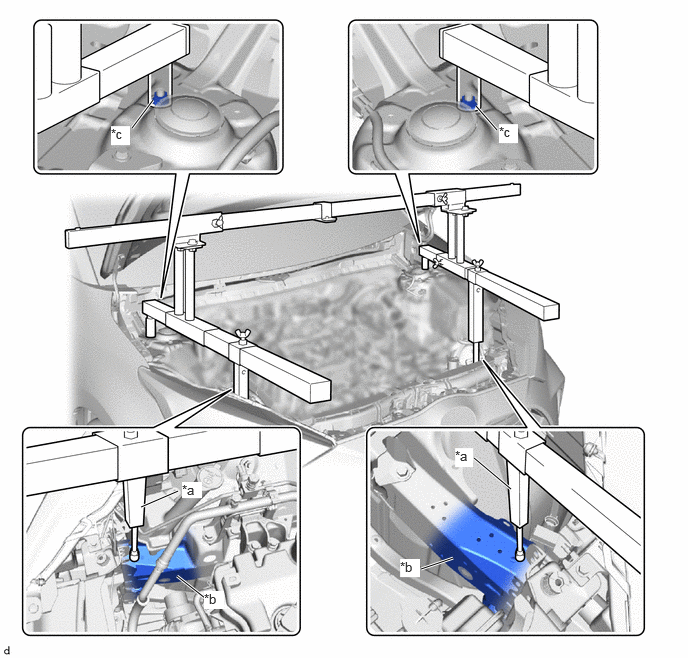
| *a | Support Shaft | *b | Front Side Member |
| *c | Front Suspension Nut | - | - |
- SST
- 09940-10010
- CAUTION:
- ·
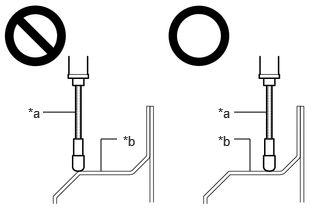 0.448,1.167 0.781,1.167 false 2.438,1.167 2.771,1.167 false 1.052,1.781 1.052,1.448 1.052,1.448 1.219,1.448 false 2.604,1.781 2.604,1.448 2.604,1.448 2.438,1.448 false 0.292,1.094 0.604,1.25 0.313,0.156 10 false *a 2.271,1.094 2.583,1.25 0.313,0.156 10 false *a 1.281,1.385 1.594,1.542 0.313,0.156 10 false *b 2.271,1.385 2.583,1.542 0.313,0.156 10 false *b
*a Support Shaft *b Front Side Member
Make sure that no oil or grease is on the front side member, and set the support shaft on the level surface of the front side member.
·The engine support bridge may fall off if any oil or grease is still on or it is installed on the unlevel surface.
- NOTICE:
- ·
Prevent SST from contacting the vehicle body exterior and windshield glass.
·To prevent damage to the engine hood, place pieces of cloth between the engine hood and SST.
·Lightly shake SST by hand to make sure it is securely installed before performing work.
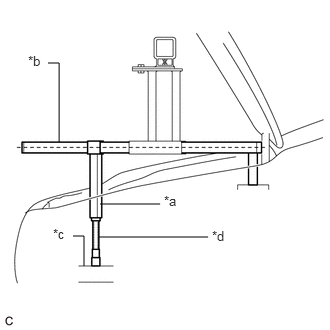
| *a | Support Shaft |
| *b | Sub Beam |
| *c | Front Side Member |
| *d | Threaded Portion |
Turn the threaded portion of each support shaft to adjust its height until the sub beams are parallel to the ground.
Install the chain block to the sling bracket.
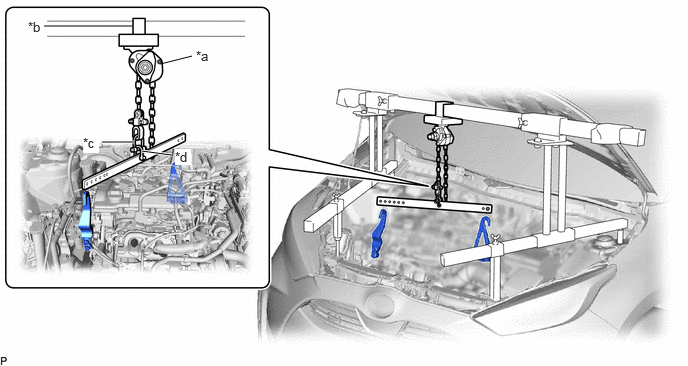
| *a | Chain Block | *b | Sling Bracket |
| *c | Fuse Shackle | *d | Shackle (A) |
Install the division bar to the chain block with the shackles.
- CAUTION:
- ·
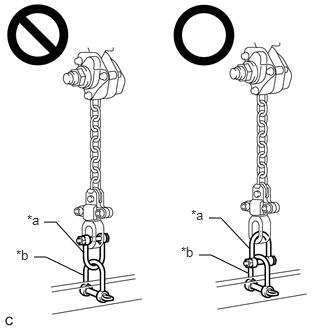 0.458,2.313 0.583,2.313 0.583,2.313 0.875,2.635 false 0.354,2.677 0.479,2.677 0.479,2.677 0.865,2.865 false 2.177,2.271 2.302,2.271 2.302,2.271 2.604,2.594 false 2.073,2.656 2.198,2.656 2.198,2.656 2.583,2.844 false 0.281,2.208 0.604,2.469 0.323,0.26 10 false *a 0.167,2.573 0.51,2.844 0.344,0.271 10 false *b 1.99,2.156 2.313,2.417 0.323,0.26 10 false *a 1.885,2.542 2.229,2.813 0.344,0.271 10 false *b
*a Fuse Shackle *b Shackle (A)
Make sure the fuse shackle is on the chain block side and the shackle (A) is on the division bar side as shown in the illustration so that the fuse bolt is visible and can be checked for deformation easily.
·If the fuse shackle is installed upside down, deformation of the fuse bolt will not be visible and cannot be used to tell if the load capacity of the engine support bridge has been exceeded. If the load capacity is exceeded, it may cause the engine support bridge to damage the vehicle and the engine assembly with continuously variable transaxle assembly may fall.
·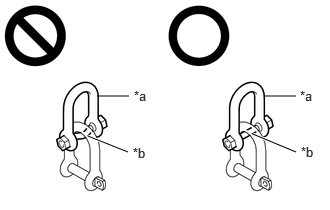 2.75,1 3.083,1 false 1.01,1 1.344,1 false 0.917,1.417 1.333,1.583 true 2.635,1.396 3.083,1.583 true 1.396,0.917 1.708,1.073 0.313,0.156 10 false *a 1.385,1.51 1.698,1.667 0.313,0.156 10 false *b 3.125,0.917 3.354,1.083 0.229,0.167 10 false *a 3.135,1.5 3.354,1.667 0.219,0.167 10 false *b
*a Fuse Shackle *b Fuse Bolt
Make sure that the fuse bolt of the fuse shackle is free of damage, such as deformation or cracks. If damaged, replace the fuse shackle.
·If a deformed fuse bolt is used, it cannot be used to tell if the load capacity of the engine support bridge has been exceeded. If the load capacity is exceeded, it may cause the engine support bridge to damage the vehicle and the engine assembly with transaxle assembly may fall.
Connect the division bar to the No. 1 engine hanger with the shackle (A) and chain.
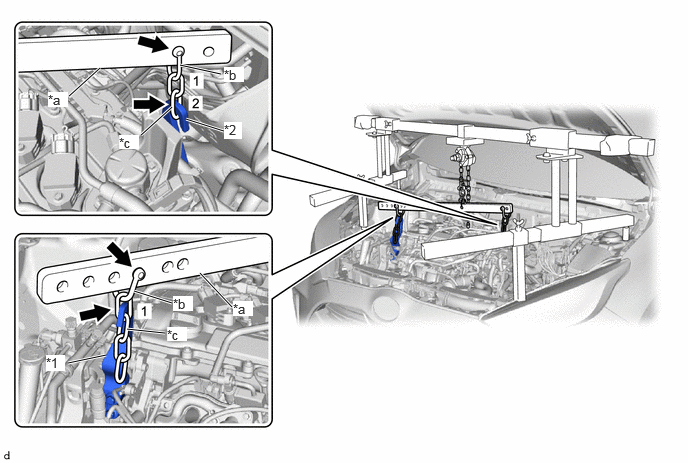
| *1 | No. 1 Engine Hanger | *2 | No. 2 Engine Hanger |
| *a | Division Bar | *b | Shackle (A) |
| *c | Chain | - | - |
- NOTICE:
-
Connect the 1st link of the chain to the No. 1 engine hanger.
Connect the division bar to the No. 2 engine hanger with the shackle (A) and chain.
- NOTICE:
-
Connect the 2nd link of the chain to the No. 2 engine hanger.
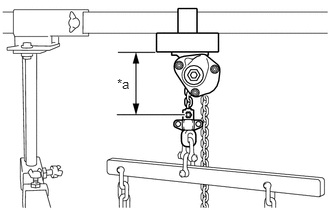
| *a | 120 mm (4.72 in.) or more |
Make sure the distance between the chain block assembly and suspension ring is 120 mm (4.72 in.) or more.
- HINT:
-
If the suspension height is less than 120 mm, adjust the links of the chain which connect the division bar and engine hanger.
Adjust the positions of the chain block assembly, support brackets and main beam so that the chain of the chain block assembly is perpendicular to the main beam and the length of the main beam on the outer side of the support bracket LH and RH is the same as shown in the illustration.
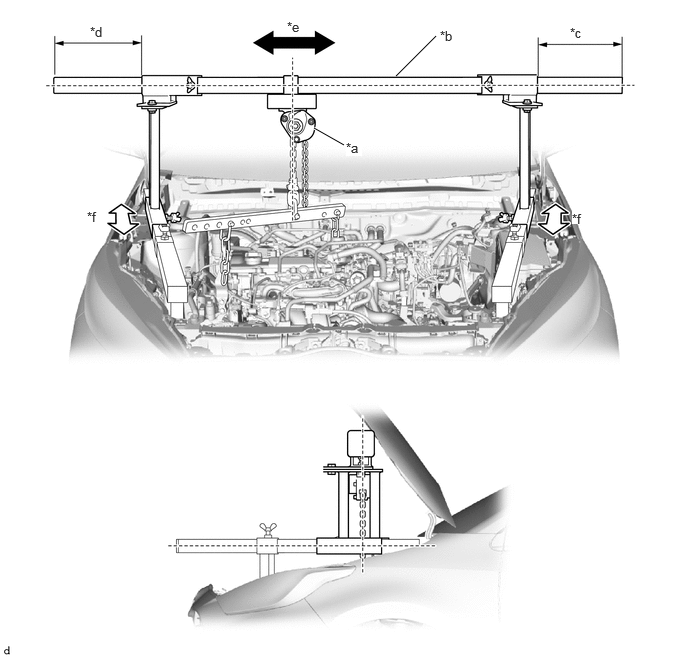
| *a | Chain Block | *b | Main Beam |
| *c | Dimension (A) | *d | Dimension (B) |
| *e | Right to Left Adjustment | *f | Front to Rear Adjustment |
- CAUTION:
- ·
To prevent the engine with continuously variable transaxle assembly from falling, make sure that the length of dimension (A) and dimension (B) are equal.
·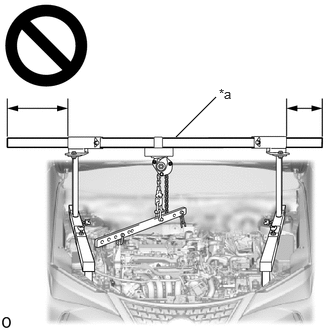 1.833,1.427 2.25,1.01 false 2.281,0.896 2.594,1.052 0.313,0.156 10 false *a
*a Main Beam
Do not perform any procedures if the length of dimension (A) and dimension (B) are not equal.
·Performing any procedure when the length of dimension (A) and dimension (B) are not equal may cause the engine assembly with continuously variable transaxle assembly and engine support bridge to fall, possibly causing serious injury.
- NOTICE:
-
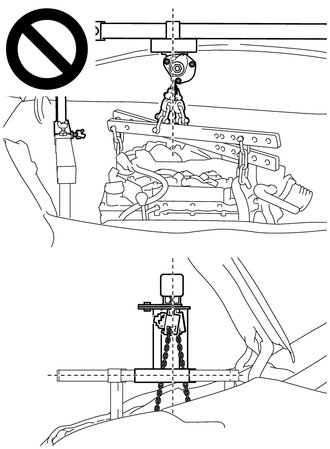
- ·
Do not perform any procedures if the chain of the chain block assembly is not straight.
·When removing the engine mount, if the chain of the chain block assembly is not straight, the engine assembly or transaxle assembly may contact the vehicle body.
Confirm the appropriate installation state of the engine support bridge and tighten the 6 wing bolts and 2 bolts.
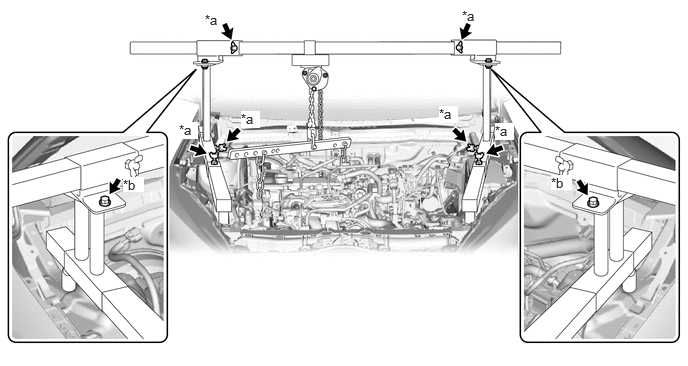
| *a | Wing Bolt | *b | Bolt |
- Torque:
- Bolt : 30 N*m (306 kgf*cm, 22 ft.*lbf)
- CAUTION:
- ·
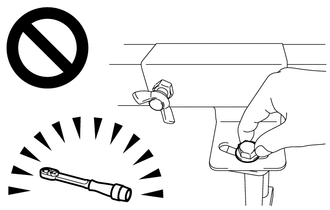
Do not perform any procedures before tightening the bolts to the specified torque.
·Performing procedures without tightening the bolts to the specified torque, may cause the engine support bridge to fall.
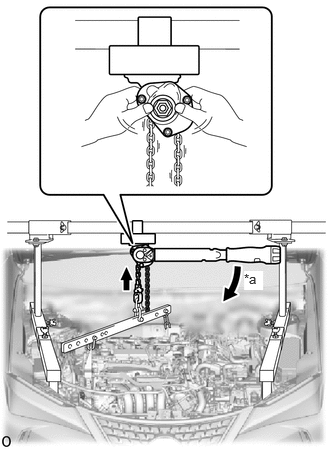
| *a | Turn |
Tighten the chain block assembly until it cannot be moved any further by hand.
- CAUTION:
-
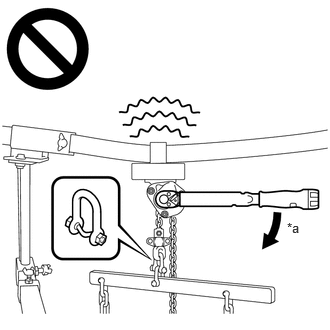 2.99,2.292 3.302,2.448 0.313,0.156 10 false *a
*a 41 N*m (418 kgf*cm, 30 ft.*lbf) or more
- ·
When suspending the engine with continuously variable transaxle assembly, do not tighten the chain block assembly more than 41 N*m (418 kgf*cm, 30 ft.*lbf).
·Tightening the chain block assembly more than 41 N*m (418 kgf*cm, 30 ft.*lbf) will cause the load capacity (400 kg (881.8 lb)) to be exceeded and may cause damage to the engine support bridge and vehicle body.
51201
35.REMOVE FRONT SUSPENSION CROSSMEMBER SUB-ASSEMBLY
12364B
36.REMOVE NO. 2 ENGINE MOVING CONTROL ROD
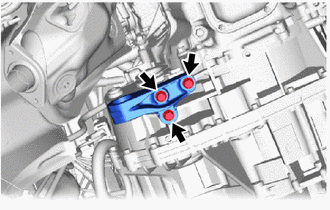
Remove the 3 bolts and No. 2 engine moving control rod from the continuously variable transaxle assembly.
30400
37.SUPPORT CONTINUOUSLY VARIABLE TRANSAXLE ASSEMBLY
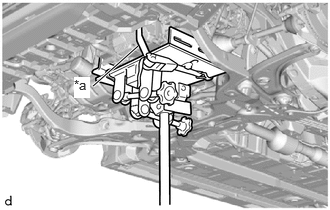
| *a | Lashing Belt |
Using a transmission jack, support the continuously variable transaxle assembly.
- NOTICE:
- ·
Adjust the attachment of the transmission jack to securely fix the continuously variable transaxle assembly to the transmission jack.
·Using a lashing belt or a rope, fix the continuously variable transaxle assembly to the transmission jack.
17118
38.REMOVE MANIFOLD STAY
11361J
39.REMOVE FLYWHEEL HOUSING UNDER COVER
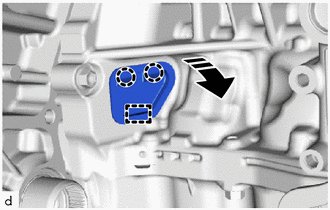
|
|
Remove in this Direction |
Remove the flywheel housing under cover from the cylinder block sub-assembly.
32101G
40.REMOVE DRIVE PLATE AND TORQUE CONVERTER ASSEMBLY SETTING BOLT
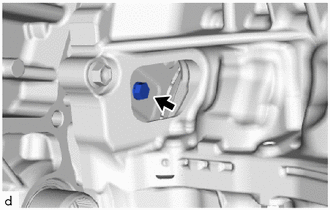
Turn the crankshaft to gain access to the 6 drive plate and torque converter assembly setting bolts and remove each drive plate and torque converter assembly setting bolt while holding the crankshaft pulley bolt with a wrench.
- HINT:
-
There will be one black colored drive plate and torque converter assembly setting bolt.
12372A
41.REMOVE ENGINE MOUNTING INSULATOR LH
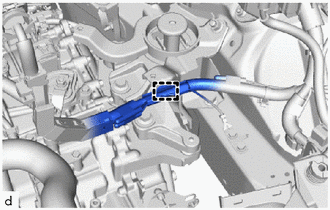
Disengage the clamp to disconnect the engine wire from the engine mounting insulator LH.
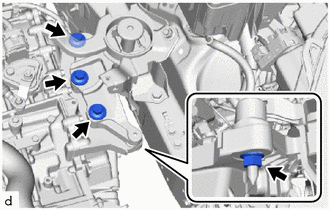
Remove the nut and 3 bolts from the continuously variable transaxle assembly.
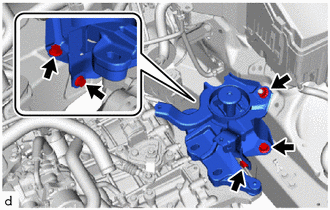
Remove the 4 bolts, nut and engine mounting insulator LH from the vehicle body.
30400
42.REMOVE CONTINUOUSLY VARIABLE TRANSAXLE ASSEMBLY
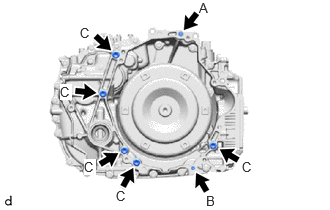
Remove the 7 bolts and continuously variable transaxle assembly from the engine assembly.
- NOTICE:
-
To prevent damage to the 2 knock pins, do not pry between the continuously variable transaxle assembly and engine assembly.
- HINT:
- ·
Bolt (A), (B): Remove from continuously variable transaxle assembly side.
·Bolt (C): Remove from engine assembly side.
32000A
43.REMOVE TORQUE CONVERTER ASSEMBLY
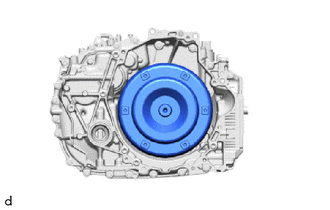
Remove the torque converter assembly from the continuously variable transaxle assembly.
- NOTICE:
-
Remove the torque converter assembly from the input shaft horizontally.
30400E
44.REMOVE CVT OIL PUMP TYPE T OIL SEAL
- NOTICE:
- ·
Do not remove the stator shaft assembly from the CVT main body, as there is a possibility of the entry of dust and foreign matter.
·Clean the work area, the tools to be used, and other equipment, etc. thoroughly before the operation, as there is the possibility that a CVT malfunction, which could prevent the vehicle from being able to be driven, could occur if dust or fine foreign matter enters the CVT.
·Do not use cotton work gloves, cloths, or paper towels, etc. that may produce lint, dust or foreign matter.
·Perform the operation as quickly as possible, as dust and foreign matter could enter the CVT while the torque converter assembly is removed.
·Do not use an air gun until the torque converter assembly has been installed, as it could cause dust and foreign matter to be stirred up.
Clean the tips of both the claws of SST and the center bolt.
- SST
- 09308-10010
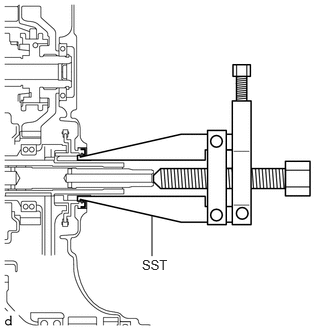
Using SST, remove the CVT type T oil seal.
- NOTICE:
-
Pay attention to the angle of the claws when opening them, and ensure that they do not come into contact with the oil pump housing, as there is the possibility that metal particles could be produced if they do.
45.REMOVE WIRE HARNESS CLAMP BRACKET
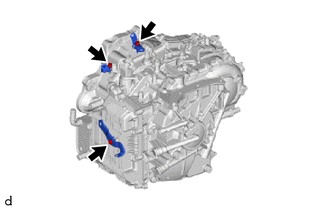
Remove the 3 bolts and 3 wire harness clamp brackets from the continuously variable transaxle assembly.
35150B
46.REMOVE TRANSMISSION CASE PLUG ASSEMBLY
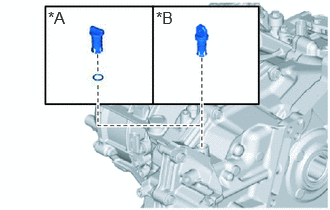
| *A | for Type A |
| *B | for Type B |
for Type A:
Remove the transmission case plug assembly from the continuously variable transaxle assembly.
Remove the O-ring from the transmission case plug assembly.
for Type B:
Remove the transmission case plug assembly from the continuously variable transaxle assembly.
32000A
47.INSPECT TORQUE CONVERTER ASSEMBLY
32101B
48.INSPECT DRIVE PLATE AND RING GEAR SUB-ASSEMBLY