HYBRID / BATTERY CONTROL HV BATTERY STACK REMOVAL
CAUTION / NOTICE / HINT
The necessary procedures (adjustment, calibration, initialization, or registration) that must be performed after parts are removed and installed, or replaced during HV supply stack sub-assembly removal/installation are shown below.
| Replaced Part or Performed Procedure | Necessary Procedures | Effect/Inoperative Function when Necessary Procedure not Performed | Link |
|---|---|---|---|
| Auxiliary battery terminal is disconnected/reconnected | Memorize steering angle neutral point | Parking assist monitor system | ( ) |
·
Replacement of No. 1 HV supply stack sub-assembly ·
Replacement of No. 2 HV supply stack sub-assembly |
1.
Prediagnostic Battery Charge 2.
Battery Diagnosis 3.
Battery Status Info Update |
HV battery status information cannot be updated | ()
|
·
Replacement of battery ECU assembly ·
Replacement of HV battery junction block assembly |
Current sensor offset learning | DTCs are stored | ()
|
| Replacement of hybrid battery terminal block | Perform high voltage fuse accumulated load history reset | ()
|
- CAUTION:
- ·
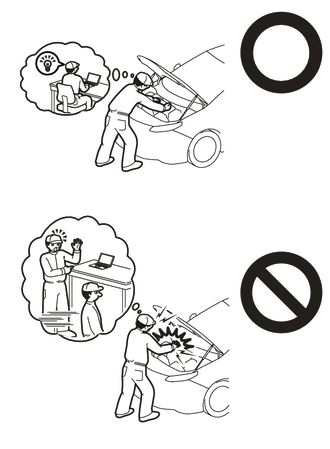
Orange wire harnesses and connectors indicate high-voltage circuits. To prevent electric shock, always follow the procedure described in the repair manual.
Click hereEngine / Hybrid System>HYBRID / BATTERY CONTROL>HYBRID CONTROL SYSTEM>PRECAUTION
·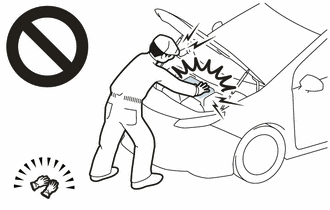
To prevent electric shock, wear insulated gloves when working on wire harnesses and components of the high voltage system.
·The hybrid system has high-voltage circuits. Accidents, such as electric shock, or electric leaks may result if the hybrid system is not operated in a correct manner. Make sure to follow the correct procedure.
·When disposing of an HV battery assembly or hybrid vehicle supply stack sub-assembly, make sure to return them through an authorized collection agent who is capable of handling them safely.
·Before returning an HV battery assembly, make sure to perform a recovery inspection.
·Before returning an HV supply stack sub-assembly, make sure to perform a recovery inspection.
·Make a note of the output DTCs as some of them may be necessary for "Recovery Inspection" of the HV battery assembly and HV supply stack sub-assemblies.
- NOTICE:
-
When replacing the No. 1 hybrid vehicle supply stack sub-assembly or No. 2 hybrid vehicle supply stack sub-assembly, it is necessary to check, adjust and equalize the SOC of the HV battery. Otherwise, the engine may run longer than normal, resulting in a decrease in fuel efficiency.
-
Click hereEngine / Hybrid System>HYBRID / BATTERY CONTROL>HV BATTERY STACK>BASIC INSPECTION
- HINT:
- ·
When the cable is disconnected / reconnected to the auxiliary battery terminal, systems temporarily stop operating. However, each system has a function that completes learning the first time the system is used.
·Learning completes when vehicle is driven
Effect/Inoperative Function When Necessary Procedures are not Performed Necessary Procedures Link Lane tracing assist system Drive the vehicle straight ahead at 35 km/h (22 mph) or more for 5 second or more. ( )
Pre-collision system
·Learning completes when vehicle is operated normally
Effect/Inoperative Function When Necessary Procedures are not Performed Necessary Procedures Link Power door lock control system
·Back door opener
Perform door unlock operation with door control switch or electrical key transmitter sub-assembly switch. ( )
Air conditioning system After the ignition switch is turned to ON, the servo motor standard position is recognized. -
PROCEDURE

 1. PRECAUTION
- NOTICE:
- ·
After turning the ignition switch off, waiting time may be required before disconnecting the cable from the negative (-) auxiliary battery terminal.
Click hereGeneral>SETUP>WHEN DISCONNECTING OR RECONNECTING BATTERY TERMINAL>BEFORE DISCONNECTING BATTERY
2. READ VALUE USING GTS
Connect the GTS to the DLC3.
Turn the ignition switch on (IG).
Enter the following menus: Powertrain / HV Battery / Data List / Hybrid/EV Battery Temperature 1 to 6.
- Powertrain > HV Battery > Data List
-
Tester Display Hybrid/EV Battery Temperature 1 Hybrid/EV Battery Temperature 2 Hybrid/EV Battery Temperature 3 Hybrid/EV Battery Temperature 4 Hybrid/EV Battery Temperature 5 Hybrid/EV Battery Temperature 6 - 50003 398 62,63,64,65,66,67
Read the Data List.
- NOTICE:
-
If any of the temperatures listed in "Hybrid/EV Battery Temperature 1 to 6" are 50°C or more, leave the vehicle until the temperature drops to less than 50°C.
G9510
3.REMOVE HV BATTERY
G920NB
4.REMOVE UPPER HV BATTERY COVER SUB-ASSEMBLY
G3830A
5.REMOVE ELECTRIC VEHICLE BATTERY PLUG ASSEMBLY
G3850
6.REMOVE NO. 1 TRACTION BATTERY DEVICE BOX ASSEMBLY
G92Z2
7.REMOVE HYBRID BATTERY TERMINAL BLOCK
G92E1A
8.REMOVE NO. 1 HYBRID BATTERY INTAKE DUCT
- CAUTION:
-
Be sure to wear insulated gloves and protective goggles.
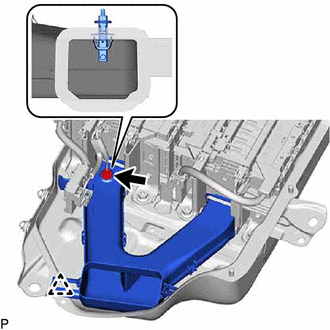
Disengage the claw of hybrid battery thermistor (sensor portion) and disconnect the hybrid battery thermistor from the No. 1 hybrid battery intake duct.
Remove the clip and No. 1 hybrid battery intake duct from the HV battery.
G929A
9.REMOVE NO. 1 HV BATTERY HOSE
G920Q
10.REMOVE NO. 1 HYBRID BATTERY SHIELD SUB-ASSEMBLY
- CAUTION:
-
Be sure to wear insulated gloves and protective goggles.
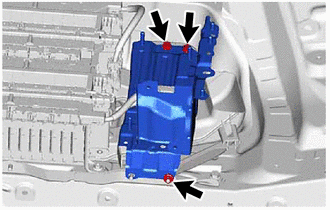
Remove the nut, 2 bolts and No. 1 hybrid battery shield sub-assembly from the HV battery.
89890A
11.REMOVE BATTERY ECU ASSEMBLY
G92PC
12.REMOVE NO. 1 HV BATTERY PROTECTOR
- CAUTION:
-
Be sure to wear insulated gloves and protective goggles.
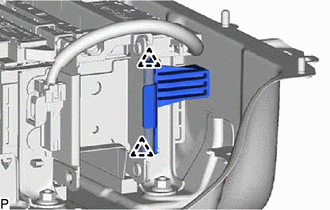
Remove the 2 claws and No. 1 hybrid battery protector from the No. 1 HV supply stack sub-assembly.
G9509
13.REMOVE NO. 2 HV SUPPLY STACK SUB-ASSEMBLY
- CAUTION:
-
Be sure to wear insulated gloves and protective goggles.
- NOTICE:
-
Insulate each disconnected high-voltage connector with insulating tape. Wrap the connector from the wire harness side to the end of the connector.
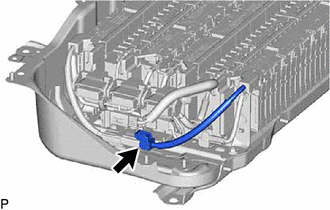
Disconnect the connector.
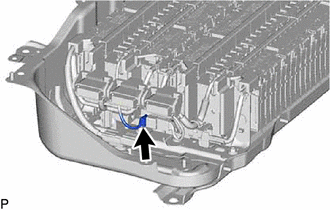
Disconnect the connector.
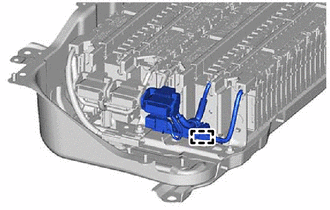
Disengage the claw.
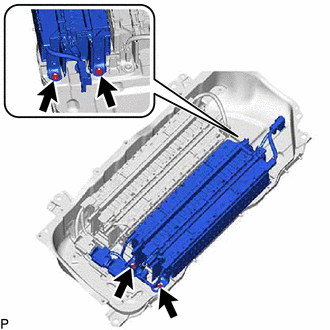
Remove the 4 nuts and No. 2 HV supply stack sub-assembly.
G9508
14.REMOVE NO. 1 HV SUPPLY STACK SUB-ASSEMBLY
- CAUTION:
-
Be sure to wear insulated gloves and protective goggles.
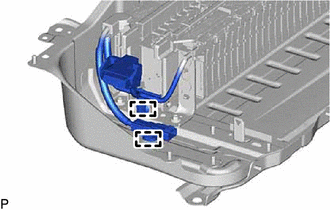
Disengage the 2 clamps.
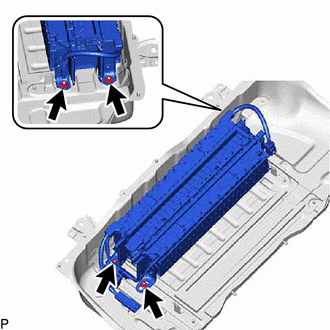
Remove the 4 nuts and No. 1 HV supply stack sub-assembly.
15.PERFORM RECOVERY INSPECTION
Before returning the HV supply stack sub-assembly, make sure to perform a recovery inspection.
Click hereEngine / Hybrid System>HYBRID / BATTERY CONTROL>HV BATTERY STACK>RECOVERY INSPECTION