1KR-FE ENGINE CONTROL SFI SYSTEM Engine Stalls
DESCRIPTION
| Problem Symptom | Suspected Area | Trouble Area | |
|---|---|---|---|
·
Engine speed fluctuation due to abnormal combustion ·
Idle speed too low or high Strong engine vibration due to above symptoms |
·
Ignition malfunction ·
Deviation in air fuel ratio (Excessive or insufficient intake air volume or fuel supply) ·
Insufficient compression ·
Changes in load from another system |
Ignition system | ·
Spark plug ·
No. 1 ignition coil |
| Fuel system | ·
Fuel injector assembly ·
Fuel pump ·
Fuel pump control circuit ·
Fuel pressure regulator assembly ·
Fuel line ·
Purge VSV system ·
Fuel quality (existence of foreign matter, degradation) |
||
| Intake and exhaust systems | ·
EGR system ·
Manifold absolute pressure sensor ·
Intake system (Air leaks or deposit accumulation) ·
Throttle body with motor assembly ·
Heated oxygen sensor (sensor 1) ·
Heated oxygen sensor (sensor 2) ·
Camshaft timing oil control valve assembly ·
Variable Valve Timing system (VVT system) ·
Brake booster assembly |
||
| Other control systems | ·
ECM ·
Wire harness or connector ·
Knock control sensor ·
Engine coolant temperature sensor |
||
| Engine | ·
Thermostat ·
Engine assembly |
||
| High load from another system | ·
Air conditioning system ·
Power steering system ·
Electrical load signal system ·
CVT system |
||
SYMPTOM AND CAUSE OF SYSTEM MALFUNCTION
- HINT:
-
The following are descriptions of the characteristics of each system malfunction. After understanding the link between the causes and symptoms, perform the inspection of each component. Even if the problem symptom does not recur, signs of the malfunction may be found in the Data List.
Ignition system
| Main cause of malfunction | Performance degradation (wear, existence of foreign matter, etc.) |
| Symptom | Engine speed fluctuation due to abnormal combustion |
| Data List | ·
Misfire Count Cylinder #1 to #3 ·
All Cylinders Misfire Count |
|
|
| Main cause of malfunction | Internal malfunction |
| Problem symptom | Engine speed fluctuation due to abnormal combustion |
| Data List | ·
Misfire Count Cylinder #1 to #3 ·
All Cylinders Misfire Count |
Fuel system
| Main cause of malfunction | Blockage |
| Problem symptom | ·
Engine speed fluctuation due to abnormal combustion ·
Idle speed too low or high |
| Data List | ·
Target Air-Fuel Ratio ·
Short FT B1S1 ·
Long FT B1S1 |
|
|
| Main cause of malfunction | Purge VSV stuck open |
| Symptom | Engine speed fluctuation due to abnormal combustion |
| Data List | ·
EVAP (Purge) VSV ·
Evap Purge VSV ·
Purge Cut VSV Duty |
|
| Main cause of malfunction | ·
Fuel degradation due to age or water contamination ·
Low fuel quality ·
Addition of fuel additive |
| Problem symptom | ·
Engine speed fluctuation due to abnormal combustion ·
Idle speed too low or high ·
Engine is difficult to start |
Intake and exhaust systems
| Main cause of malfunction | Improper operation, sticking |
| Problem symptom | ·
Engine speed fluctuation due to abnormal combustion ·
Idle speed too low or high ·
Engine is difficult to start, lacks power or stalls |
| Data List | ·
Target EGR Valve Position No.1 ·
EGR Step Position -
Normal condition: Actual EGR valve position = Target EGR valve position +/-5% (Fully closed: 0%, Fully open: 100%) -
Perform the Active Test "Control the EGR Step Position" and check if the vehicle condition changes when the EGR valve position is changed -
When the ignition switch is turned to ON (engine not started), the EGR valve is fully closed |
| Main cause of malfunction | Performance degradation (existence of foreign matter, etc.) |
| Problem symptom | Lack of power |
| Data List | Intake Manifold Absolute Pressure |
|
|
| Main cause of malfunction | Inappropriate trim volume adjustment due to accumulation of deposits |
| Problem symptom | ·
Engine speed fluctuation due to abnormal combustion ·
Idle speed too low or high ·
Lack of power |
| Data List | ·
Throttle Position Sensor No.1 Voltage % ·
Throttle Position Sensor No.2 Voltage % ·
Throttle Sensor Position ·
Throttle Position Sensor No.1 Voltage ·
Throttle Position Sensor No.2 Voltage ·
Throttle Position Command ·
Throttle Position Sensor Open Position No.1 ·
Throttle Position Sensor Open Position No.2 ·
Throttle Motor Current ·
Throttle Motor Duty Ratio ·
Throttle Motor Duty Ratio (Open) ·
Throttle Motor Duty Ratio (Close) ·
Throttle Position Sensor Fully Closed Learn Value ·
Throttle Position |
| Main cause of malfunction | Deviation in sensor characteristics |
| Problem symptom | Abnormal combustion due to deviation of actual air fuel ratio from calculated ratio |
| Data List | ·
O2 Sensor Voltage B1S1 ·
O2 Sensor Voltage B1S2 |
Engine
| Main cause of malfunction | ·
Compression loss ·
Accumulation of deposits (Combustion chamber, intake valve or intake manifold) |
| Problem symptom | ·
Engine speed fluctuation due to abnormal combustion ·
Idle speed too low or high ·
Hesitation during acceleration or stalling |
|
|
| Main cause of malfunction | Camshaft timing oil control valve assembly stuck open |
| Symptom | Abnormal combustion due to excessive valve overlap |
| Data List | ·
VVT Advance Fail ·
Intake VVT Change Angle Bank 1 ·
Intake VVT OCV Control Duty Ratio Bank 1 ·
Intake VVT Target Angle Bank 1 ·
Exhaust VVT Change Angle Bank 1 ·
Exhaust VVT OCV Control Duty Ratio Bank 1 ·
Exhaust VVT Target Angle Bank 1 |
Data List Items Related to Engine Stalls
- HINT:
-
Depending on the vehicle model, the applicable Data List items may vary. Data List items other than the ones used in the diagnostic procedure are for reference only.
- ·
Intake Manifold Absolute Pressure
·Throttle Position Sensor Fully Closed Learn Value
·Target Air-Fuel Ratio
·O2 Sensor Voltage B1S1
·O2 Sensor Voltage B1S2
·Short FT B1S1
·Long FT B1S1
·Target EGR Valve Position No.1
·EGR Step Position
·VVT Advance Fail
·Intake VVT OCV Control Duty Ratio Bank 1
·Intake VVT Target Angle Bank 1
·Exhaust VVT OCV Control Duty Ratio Bank 1
·Exhaust VVT Target Angle Bank 1
·Misfire Count Cylinder #1
·Misfire Count Cylinder #2
·Misfire Count Cylinder #3
·All Cylinders Misfire Count
CAUTION / NOTICE / HINT
- HINT:
- ·
If any other DTCs are output, perform troubleshooting for those DTCs first.
·Make sure to reproduce the conditions present when the malfunction occurred.
·Using the GTS, read the Data List to confirm the engine operating conditions. This information can be useful when troubleshooting.
·The vehicle condition when the problem symptoms occurred can be determined using the Vehicle Control History.
·As the Vehicle Control History data may be overwritten whenever the trigger conditions are met, make sure to save the Vehicle Control History data before performing any inspections.
·If the problem symptoms do not recur, attempt to reproduce the symptoms and conditions when the malfunction occurred based on the result of the customer problem analysis and Vehicle Control History. Place the priority on confirming the symptoms.
·When performing inspections, jiggle the relevant wire harnesses and connectors in an attempt to reproduce malfunctions that do not always occur.
·The suspected cause of the problem symptoms can be determined using the codes, items, and Freeze Frame Data within the Vehicle Control History.
·When confirming the Freeze Frame Data, be sure to check all multi Freeze Frame Data.
·When confirming the Freeze Frame Data, if there are multiple items related to the cause of the malfunction, perform troubleshooting for all related items.
·If the malfunction is currently occurring, use the Data List to confirm the current vehicle condition. By using the Data List, more detailed vehicle information can be confirmed than by using the Vehicle Control History Freeze Frame Data by itself.
·As Vehicle Control History may be stored when performing an Active Test, learning, etc., make sure to clear the Vehicle Control History before returning the vehicle to the customer.
PROCEDURE
Interview the customer for details about the conditions when the engine stalled.
- HINT:
- ·
Use any information from the customer problem analysis about the conditions of the vehicle when the malfunction occurred (how the engine stalled, conditions when the engine was restarted, etc.)
·Depending on the conditions when the engine stalled, a malfunction in one of the following areas is suspected.
Symptom Suspected Area Engine vibration occurs and engine stalls ·Abnormal manifold absolute pressure sensor output due to existence of foreign matter
·Abnormal air fuel ratio due to malfunction of heated oxygen sensors, air leaks in intake system or insufficient fuel supply
Engine stalls without vibration Ignition stoppage, fuel injection stoppage or high load from another system Engine can be started with accelerator pedal depressed Insufficient air volume Engine stalls or is difficult to start immediately after engine stalled, regardless of whether engine is cold or warm Deposits in intake system or combustion chamber caught temporarily on intake or exhaust valve
- Result:
Proceed to NEXT
NEXT
Perform a road test.
Read the DTCs.
- Powertrain > Engine > Trouble Codes
- 50001 372
- Result:
Result Proceed to DTCs are not output A DTC is output B
A
B
Check if the problem symptoms reported in the customer problem analysis recur.
- HINT:
-
If the problem symptoms do not recur, attempt to reproduce the conditions when the malfunction occurred based on the result of the customer problem analysis.
- Result:
Result Proceed to The problem symptom recurs A The problem symptom does not recur (occurred in the past) B
A
B
Read the value displayed on the GTS.
- Powertrain > Engine > Data List
-
Tester Display Short FT B1S1 Long FT B1S1 - 50003 372 207,209
- Result:
Data List Result Proceed to Short FT B1S1 + Long FT B1S1 -15% or higher, or less than 15% A Other than above B
A
B
Start the engine.
- HINT:
-
Reproduce the vehicle conditions when the malfunction occurred. (such as after the engine is warmed up or after a cold start).
According to the display on the GTS, perform the Active Test and check for a malfunctioning cylinder.
- Powertrain > Engine > Active Test
-
Active Test Display Control the Select Cylinder F/C (with Ignition) -
Data List Display Engine Speed - 50004 372 42029 211
- HINT:
- ·
Perform fuel-cut of injection for each cylinder and check the change in the engine speed.
·If the engine speed of a cylinder does not change while performing the Active Test, it can be determined that the cylinder is malfunctioning.
·If the engine speed of all cylinders change while performing the Active Test, it can be determined that multiple cylinders are malfunctioning.
·A cylinder for which the Data List item "Misfire Count Cylinder #1 to #3" increases may be malfunctioning.
- Result:
Result Proceed to One cylinder is malfunctioning A Multiple or all cylinders are malfunctioning, or the malfunctioning cylinder cannot be determined. B
A
B
Warm up the engine.
Turn the ignition switch off.
Perform the Check the Cylinder Compression.
- Powertrain > Engine > Active Test
-
Active Test Display Check the Cylinder Compression -
Data List Display Engine Speed Cylinder #1 Engine Speed Cylinder #2 Engine Speed Cylinder #3 Average Engine Speed of All Cylinder - 50004 372 42007 1220,1221,1222,1219
Push the snapshot button to turn the snapshot function on.
While the engine is not running, press the Active button to change Check the Cylinder Compression to "Start".
- HINT:
-
After performing the above procedure, Check the Cylinder Compression will start. Fuel injection for all cylinders is prohibited and each cylinder engine speed measurement enters standby mode.
Crank the engine for about 10 seconds.
Monitor the engine speed (Engine Speed Cylinder #1 to #3 and Average Engine Speed of All Cylinder) displayed on the GTS.
- NOTICE:
- ·
Do not crank the engine continuously for 20 seconds or more.
·If it is necessary to crank the engine again after Check the Cylinder Compression has been changed to "Start" and the engine has been cranked once, press Exit to return to the Active Test menu screen. Then change Check the Cylinder Compression to "Start" and crank the engine.
·Make sure the battery is fully charged before performing this Active Test.
- HINT:
-
At first, the GTS will display extremely high cylinder engine speed values. After approximately 10 seconds of engine cranking, the engine speed measurement of each cylinder will change to the actual engine speed.
Stop cranking the engine, and then change "Check the Cylinder Compression" to "Stop" after the engine stops.
- NOTICE:
- ·
If the Active Test is changed to "Stop" while the engine is being cranked, the engine will start.
·When performing the Active Test, Vehicle Control History code X0810 (Engine Difficult to Start (Engine Starting Time Long)) may be stored.
·After performing the Active Test, make sure to check and clear DTCs.
Push the snapshot button to turn the snapshot function off.
Select "Stored Data" on the GTS screen, select the recorded data and display the data as a graph.
- HINT:
-
If the data is not displayed as a graph, the change of the values cannot be observed.
Read the value.
- HINT:
- ·
If the value of Data List item "Engine Speed Cylinder" of a cylinder is higher than other cylinders, the cylinder may be malfunctioning.
·If the value of Data List item "Engine Speed Cylinder" is high for only one cylinder, compression loss is suspected.
- Result:
Result Proceed to There is no variation in "Engine Speed Cylinder"
(All cylinders display approximately the same value for "Engine Speed Cylinder")A There is variation in "Engine Speed Cylinder"
(Only one cylinder displays a value for "Engine Speed Cylinder" that differs considerably)B
A
B
Start the engine and warm it up until the engine coolant temperature 75°C (167°F) or higher with all the accessories switched off.
Idle the engine.
According to the display on the GTS, perform the Active Test and check the vehicle conditions when increasing and decreasing the fuel injection volume.
- Powertrain > Engine > Active Test
-
Active Test Display Control the Injection Volume -
Data List Display Coolant Temperature Injection Volume - 50004 372 7 205,277
- HINT:
- ·
Increase and decrease the fuel injection volume and check the vehicle condition.
·Change the fuel injection volume between the minimum and maximum range of correction (e.g. -12.5% to 24.8%).
- Result:
Result Proceed to Malfunction is still present even if the fuel injection volume is changed A Malfunction disappears when the fuel injection volume is changed B
A
B
Check the ignition system.
- HINT:
- ·
Interchange the No. 1 ignition coil and spark plug of the malfunctioning cylinder with those of a known good cylinder and check if the malfunctioning cylinder returns to normal.
·If the spark plug of the malfunctioning cylinder is abnormally wet with fuel even after the No. 1 ignition coil and spark plug are replaced, a leaking fuel injector assembly is suspected.
- Result:
Result Proceed to The malfunctioning cylinder does not return to normal A The malfunctioning cylinder returned to normal B
A
B
Check the power source circuit, wire harness and connectors.
- Result:
Proceed to NEXT
NEXT
Measure the cylinder compression pressure. If the compression pressure of a cylinder is low, inspect the engine assembly and repair or replace parts as necessary.
Click hereEngine / Hybrid System>1KR-FE (ENGINE MECHANICAL)>ENGINE>ON-VEHICLE INSPECTION
- Result:
Proceed to NEXT
NEXT
Replace the abnormal fuel injector assembly.
Click hereEngine / Hybrid System>1KR-FE (FUEL)>FUEL INJECTOR>REMOVAL
- Result:
Proceed to NEXT
NEXT
According to the display on the GTS, read the Data List.
- Powertrain > Engine > Data List
-
Tester Display Intake Manifold Absolute Pressure - 50003 372 385
- OK:
Same value as the actual atmospheric pressure
- HINT:
-
Standard atmospheric pressure is 101 kPa(abs) [758 mmHg(abs)]. For every 100 m (328 ft.) increase in altitude, pressure drops by 1 kPa (7.5 mmHg). The pressure also varies due to the weather (high atmospheric pressure, low atmospheric pressure).
- Result:
Proceed to OK NG
OK
NG
Start the engine and warm it up until the engine coolant temperature reaches 75°C (167°F) or higher.
- HINT:
-
The A/C switch and all accessory switches should be off.
Perform the Active Test and check the vehicle condition when operating the EGR valve assembly.
- Powertrain > Engine > Active Test
-
Active Test Display Control the EGR Step Position -
Data List Display Engine Speed Intake Manifold Absolute Pressure Coolant Temperature Closed Throttle Position SW - 50004 372 25 211,385,205,550
- NOTICE:
- ·
Do not leave the EGR valve open for 10 seconds or more during the Active Test.
·Be sure to return the EGR valve to step 0 when the Active Test is completed.
·Do not open the EGR valve 20 steps or more during the Active Test.
- HINT:
-
Confirm that Closed Throttle Position SW is ON while performing the Active Test.
- Result:
Result Proceed to Vehicle condition changes during the Active Test
(Malfunction occurs when the EGR valve is open and disappears when the EGR valve is closed)A Vehicle condition does not change during the Active Test
(Malfunction occurs whether the EGR valve is open or closed)B
- HINT:
-
During Active Test, if the idling condition does not change in response to EGR step position, then there is probably a malfunction in the EGR valve.
A
B
Start the engine and warm it up until the engine coolant temperature 75°C (167°F) or higher with all the accessories switched off.
Warm up the heated oxygen sensors at an engine speed of 2500 rpm for 3 minutes.
Idle the engine.
According to the display on the GTS, perform the Active Test and check the vehicle conditions when increasing and decreasing the fuel injection volume.
- Powertrain > Engine > Active Test
-
Active Test Display Control the Injection Volume -
Data List Display Coolant Temperature Injection Volume O2 Sensor Voltage B1S1 O2 Sensor Voltage B1S2 - 50004 372 7 205,277,1305,218
- NOTICE:
- ·
The heated oxygen sensor (sensor 1) has an output delay of a few seconds and the heated oxygen sensor (sensor 2) has a maximum output delay of approximately 20 seconds.
·Read the output voltage immediately after warming up the heated oxygen sensors to avoid an inaccurate reading due to a sensor cooling.
- HINT:
- ·
Increase and decrease the fuel injection volume and check the vehicle condition.
·Change the fuel injection volume between -12 to 12%.
- Standard:
GTS Display
(Sensor)Injection Volume Voltage O2 Sensor Voltage B1S1
(Heated oxygen sensor (sensor 1))12% Higher than 0.55 V (Rich condition) -12% Below 0.4 V (Lean condition) O2 Sensor Voltage B1S2
(Heated oxygen sensor (sensor 2))12% Higher than 0.55 V (Rich condition) -12% Below 0.4 V (Lean condition)
- Result:
Result Proceed to Output voltage values are abnormal A Malfunction disappears when fuel injection volume is increased B Malfunction is still present when fuel injection volume is increased, even if output voltage values are normal C
A
B
C
Replace the heated oxygen sensor (sensor 1).
Click hereEngine / Hybrid System>1KR-FE (ENGINE CONTROL)>HEATED OXYGEN SENSOR (for Sensor 1)>REMOVAL
Replace the heated oxygen sensor (sensor 2).
Click hereEngine / Hybrid System>1KR-FE (ENGINE CONTROL)>HEATED OXYGEN SENSOR (for Sensor 2)>REMOVAL
- Result:
Proceed to NEXT
NEXT
Check for air leaks or blockage in the intake system components. If a connection problem or foreign matter is found, repair the connection or remove the foreign matter.
- HINT:
- ·
If there is foreign matter in the intake system components, remove it before proceeding to the next step.
·If there is no foreign matter in the intake system components, check for foreign matter in the manifold absolute pressure sensor. If there is foreign matter in the manifold absolute pressure sensor, remove it.
- Result:
Proceed to NEXT
NEXT
Click hereEngine / Hybrid System>1KR-FE (EMISSION CONTROL)>EGR VALVE>REMOVAL
- Result:
Proceed to NEXT
NEXT
Replace the fuel injector assemblies of all cylinders.
- Result:
Proceed to NEXT
NEXT
When performing the Active Test, check for an operating sound from the fuel pump (for low pressure side).
- Powertrain > Engine > Active Test
-
Tester Display Activate the Circuit Relay - 50004 372 40
- OK:
Activate the Circuit Relay Specified Condition ON Operating sound heard OFF Operating sound not heard
- Result:
Proceed to OK NG
OK
NG
Attach a fuel pressure gauge and check the fuel pressure when cranking the engine and after stopping the engine.
Click hereEngine / Hybrid System>1KR-FE (FUEL)>FUEL SYSTEM>ON-VEHICLE INSPECTION
- Standard:
Vehicle State Specified Condition Cranking engine 304 to 343 kPa (3.1 to 3.5 kgf/cm2, 44 to 50 psi) 5 minutes after stopping engine 147 kPa (1.5 kgf/cm2, 21 psi) or higher
- HINT:
- ·
If there is foreign matter such as iron particles on the fuel pump, remove it.
·Make sure that there are no leaks from the fuel lines, signs of fuel leakage or fuel odors.
- Result:
Proceed to OK NG
OK
NG
Inspect other related components.
- HINT:
-
If the malfunctioning part could not be determined by performing the preceding inspections, one of the following malfunctions is suspected.
- ·
Deposits in the intake manifold or on an intake valve
·Delay in fuel supply due to adherence of the fuel to the deposits
- Result:
Proceed to NEXT
NEXT
Inspect the following fuel pump related parts:
Fuel pump
Fuel pressure regulator assembly
Fuel lines and connecting parts
Fuel filter
- Result:
Proceed to NEXT
NEXT
Repair or replace the malfunctioning part.
- Result:
Proceed to NEXT
NEXT
Check that the engine has returned to normal.
- Result:
Proceed to OK NG
OK
NG
Inspect the fuel pump control system.
- Result:
Proceed to NEXT
NEXT
Clean off any deposits from the inside of the throttle body with motor assembly.
Push open the throttle valve and wipe off any carbon from the valve and bore using a piece of cloth soaked in non-residue solvent.
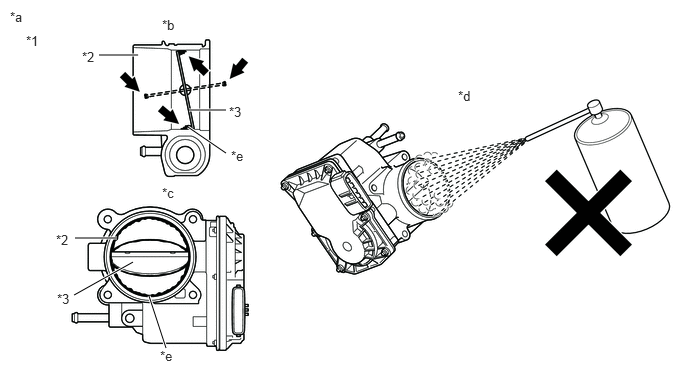
| *1 | Throttle Body with Motor Assembly | *2 | Bore |
| *3 | Valve | - | - |
| *a | Reference | *b | Throttle Body with Motor Assembly Cross-section Diagram |
| *c | When valve fully opened | *d | Do not directly apply cleaner |
| *e | Deposits | - | - |
- NOTICE:
- ·
Make sure that the cloth or your fingers do not get caught in the valve.
·Make sure that foreign matter does not enter the throttle valve.
·Do not directly apply non-residue solvent to the throttle body with motor assembly or wash the throttle body with motor assembly. Cleaning solvent may leak into the motor from the shaft and cause problems such as rust or valve movement problems.
·If there is coating material on the edge of the valve, be careful not to remove it.
- HINT:
-
The illustrations are for reference only. Actual parts may differ.
- Result:
Proceed to NEXT
NEXT
Click hereEngine / Hybrid System>1KR-FE (ENGINE CONTROL)>SFI SYSTEM>INITIALIZATION
- Result:
Proceed to NEXT
NEXT
Check that the idle has returned to normal.
- Result:
Proceed to NEXT
NEXT