EC6E MANUAL TRANSMISSION / TRANSAXLE MANUAL TRANSAXLE ASSEMBLY(When Using the Engine Support Bridge) INSTALLATION
CAUTION / NOTICE / HINT
- NOTICE:
-
When the manual transaxle assembly is removed, be sure to use a new clutch release with bearing cylinder assembly and new installation bolts. Removal of the manual transaxle assembly allows the compressed clutch release with bearing cylinder assembly to return to its original position. Dust from the moving section may damage the seal of the clutch release with bearing cylinder assembly, possibly causing clutch fluid leaks.
PROCEDURE

 35150D
1.INSTALL TRANSMISSION CASE PLUG ASSEMBLY
2.INSTALL WIRE HARNESS CLAMP BRACKET
87121V
3.INSTALL HEATER BRACKET
31400
4.INSTALL CLUTCH RELEASE CYLINDER WITH BEARING ASSEMBLY
31407B
5.REMOVE CLUTCH RELEASE BLEEDER SUB-ASSEMBLY
6.INSPECT CLUTCH PIPE LINE
31407B
7.INSTALL CLUTCH RELEASE BLEEDER SUB-ASSEMBLY
31484
8.INSTALL CLUTCH FLEXIBLE HOSE BRACKET
31483
9.INSTALL BLEEDER CLUTCH RELEASE TUBE
30300
10.SUPPORT MANUAL TRANSAXLE ASSEMBLY
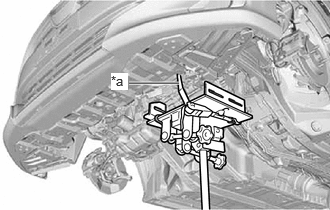
| *a | Lashing Belt |
Using a transmission jack, support the manual transaxle assembly.
- NOTICE:
- ·
Adjust the attachment of the transmission jack to securely support the manual transaxle assembly.
·Using a lashing belt or a rope, secure the manual transaxle assembly to the transmission jack.
30300
11.INSTALL MANUAL TRANSAXLE ASSEMBLY
12372A
12.INSTALL ENGINE MOUNTING INSULATOR LH
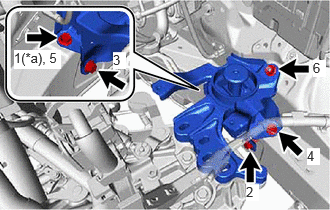
| *a | Temporarily Tighten |
Install the 4 bolts and nut in the order shown in the illustration.
- Torque:
- 42 N*m (428 kgf*cm, 31 ft.*lbf)
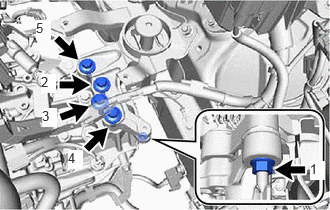
Install the 4 bolts and nut in the order shown in the illustration.
- Torque:
- Bolt : 42 N*m (428 kgf*cm, 31 ft.*lbf)
- Nut : 20 N*m (204 kgf*cm, 15 ft.*lbf)
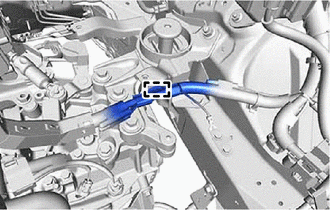
Engage the clamp and connect the engine wire from the engine mounting insulator LH.
43409E
13.INSTALL DRIVE SHAFT HEAT INSULATOR SUB-ASSEMBLY
12364B
14.INSTALL NO. 2 ENGINE MOVING CONTROL ROD
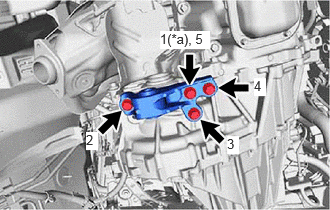
| *a | Temporarily Tighten |
Install the No. 2 engine moving control rod to the manual transmission case with the 4 bolts in the order shown in the illustration.
- Torque:
- 44 N*m (449 kgf*cm, 32 ft.*lbf)
51201
15.INSTALL FRONT SUSPENSION CROSSMEMBER SUB-ASSEMBLY
16.REMOVE ENGINE SUPPORT BRIDGE
Remove SST from the vehicle body.
- NOTICE:
-
Prevent SST from contacting the vehicle body or windshield glass.
Install the No. 3 radiator hose to the fan shroud with the 2 bolts.
Connect the inlet hose to the vehicle body with the clip.
17.REMOVE ENGINE HANGERS
18.INSTALL FRONT DRIVE SHAFT ASSEMBLY
28100
19.INSTALL STARTER ASSEMBLY
45260
20.CONNECT NO. 2 STEERING INTERMEDIATE SHAFT ASSEMBLY
45259A
21.INSTALL COLUMN HOLE COVER SILENCER SHEET
31481A
22.INSTALL NO. 1 CLUTCH HOSE
82121
23.CONNECT ENGINE WIRE
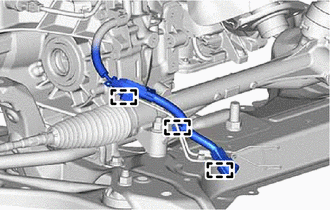
Engage the 3 clamps.
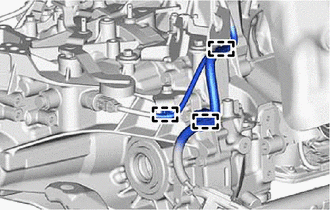
Engage the 3 clamps.
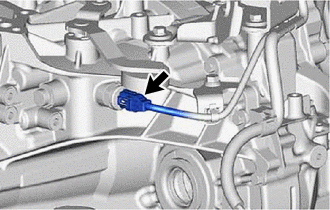
Connect the neutral position switch connector.
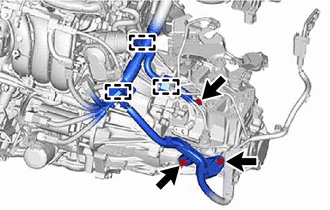
Engage the 3 clamps.
Install the 3 bolts.
- Torque:
- 20 N*m (204 kgf*cm, 15 ft.*lbf)
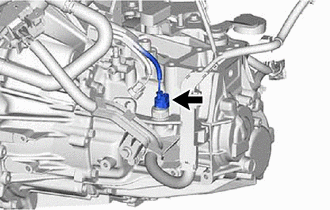
Connect the back-up light switch assembly connector.
Engage the clamp.
17410
24.INSTALL FRONT EXHAUST PIPE ASSEMBLY
33820B
25.CONNECT TRANSMISSION CONTROL CABLE ASSEMBLY
74404A
26.INSTALL BATTERY CLAMP SUB-ASSEMBLY
89661
27.INSTALL ECM
17701
28.INSTALL AIR CLEANER CASE SUB-ASSEMBLY
29.INSTALL AIR CLEANER CAP WITH AIR CLEANER HOSE
55701J
30.INSTALL OUTER COWL TOP PANEL SUB-ASSEMBLY (for LHD)
55734A
31.INSTALL WATER GUARD PLATE RH (for LHD)
55815E
32.INSTALL NO. 1 FRONT VENTILATOR SEAL (for LHD)
55701J
33.INSTALL OUTER COWL TOP PANEL SUB-ASSEMBLY (for RHD)
55735A
34.INSTALL WATER GUARD PLATE LH (for RHD)
55815E
35.INSTALL NO. 1 FRONT VENTILATOR SEAL (for RHD)
36.INSTALL WINDSHIELD WIPER MOTOR AND LINK
37.INSTALL FRONT WHEELS
38.CONNECT CABLE TO NEGATIVE BATTERY TERMINAL
33820B
39.ADJUST TRANSMISSION CONTROL CABLE ASSEMBLY
40.ADD MANUAL TRANSAXLE OIL
41.BLEED CLUTCH LINE
42.INSPECT MANUAL TRANSAXLE OIL
43.INSPECT MANUAL TRANSAXLE OIL LEAK
44.INSPECT FOR EXHAUST GAS LEAK
57543C
45.INSTALL CENTER NO. 1 FLOOR BRACE (for TMMF Made)
51447D
46.INSTALL CENTER NO. 4 ENGINE UNDER COVER (for TMMF Made)
51447D
47.INSTALL CENTER NO. 4 ENGINE UNDER COVER (for TMC Made)
53876A
48.CONNECT FRONT FENDER LINER LH
53875A
49.CONNECT FRONT FENDER LINER RH
51442C
50.INSTALL ENGINE UNDER COVER LH
51441C
51.INSTALL ENGINE UNDER COVER RH
51451A
52.INSTALL CENTER ENGINE UNDER COVER
53.INSPECT AND ADJUST FRONT WHEEL ALIGNMENT
54. INITIALIZATION AFTER RECONNECTING BATTERY TERMINAL
Click hereGeneral>SETUP>WHEN DISCONNECTING OR RECONNECTING BATTERY TERMINAL>WORK PROCEDURE
- HINT:
-
When disconnecting and reconnecting the battery, there is an automatic learning function that completes learning when the respective system is used.
-
Click hereGeneral>SETUP>WHEN DISCONNECTING OR RECONNECTING BATTERY TERMINAL>AUTOMATIC LEARNING CHART