EA67F MANUAL TRANSMISSION / TRANSAXLE MANUAL TRANSAXLE UNIT REASSEMBLY
PROCEDURE

 33242L
1.INSTALL SHIFT FORK SHAFT BEARING
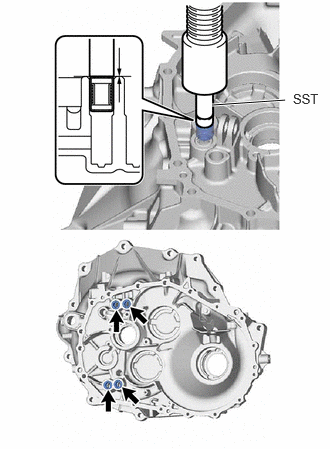
Using SST and a press, press in 4 new shift fork shaft bearings to the front transaxle case.
- SST
- 09820-00031
- Clearance:
0 to 0.5 mm (0 to 0.0197 in.)
33134B
2.INSTALL OUTPUT SHAFT COVER
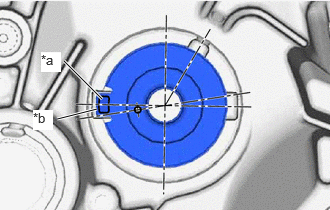
| *a | Protrusion |
| *b | Groove |
Align the protrusion on the output shaft cover with the groove on the front transaxle case as shown in the illustration, and install the output shaft cover to the front transaxle case.
33322B
3.INSTALL NO. 2 OUTPUT SHAFT FRONT BEARING
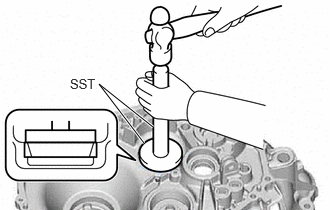
Using SST and a hammer, install the No. 2 output shaft front bearing to the front transaxle case.
- SST
- 09950-60021 (09951-00770)
09950-70010 (09951-07100)
33134B
4.INSTALL OUTPUT SHAFT COVER
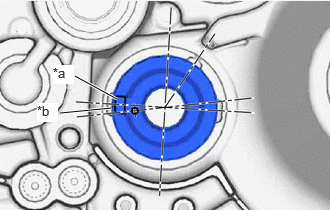
| *a | Protrusion |
| *b | Groove |
Align the protrusion on the output shaft cover with the groove on the front transaxle case as shown in the illustration, and install the output shaft cover to the front transaxle case.
33321N
5.INSTALL OUTPUT SHAFT FRONT BEARING
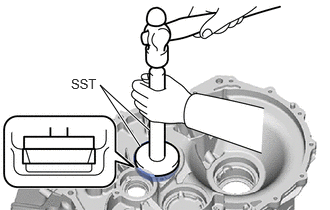
Using SST and a hammer, , install the output shaft front bearing to the front transaxle case.
- SST
- 09950-60021 (09951-00790)
09950-70010 (09951-07100)
31105D
6.INSTALL FRONT TRANSAXLE CASE OIL SEAL
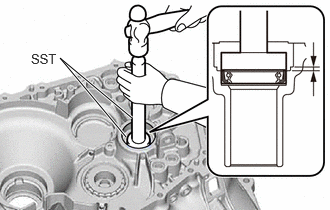
Using SST and a hammer, install a new front transaxle case oil seal to the front transaxle case.
- SST
- 09950-60011 (09951-00410)
09950-70010 (09951-07200)
- Drive in Depth:
4.4 to 5.0 mm (0.173 to 0.197 in.)
Coat the front transaxle case oil seal lip with MP grease.
33311A
7.INSTALL INPUT SHAFT FRONT BEARING
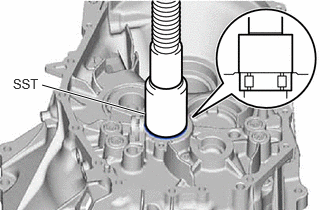
Using SST and a press, install a new input shaft front bearing to the front transaxle case.
- SST
- 09223-00010
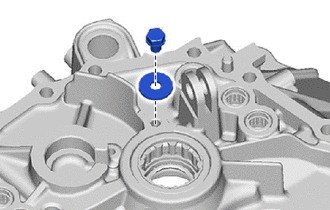
Install the bearing lock plate to the front transaxle case with the bolt.
- Torque:
- 11.3 N*m (115 kgf*cm, 8 ft.*lbf)
33311P
8.INSTALL INPUT SHAFT REAR BEARING SHAFT SNAP RING
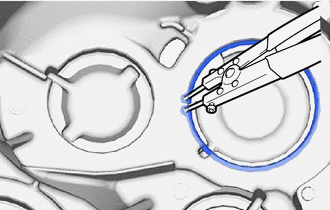
Using snap ring pliers, install a new input shaft rear bearing shaft snap ring to the manual transmission case.
33261K
9.INSTALL SHIFT AND SELECT LEVER SHAFT NEEDLE ROLLER BEARING
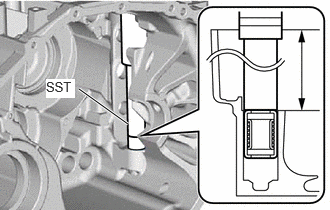
Using SST and a press, press in a new shift and select lever shaft needle roller bearing to the manual transmission case.
- SST
- 09285-76010
- Clearance:
177.8 to 178.7 mm (7.00 to 7.04 in.)
33242L
10.INSTALL SHIFT FORK SHAFT BEARING
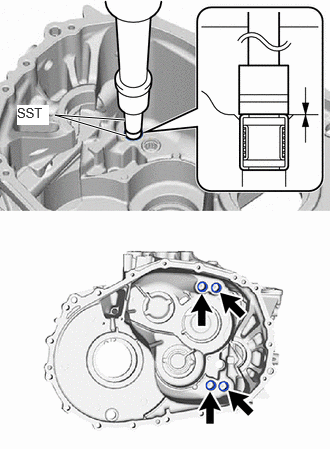
Using SST and a press, press in 4 new shift fork shaft bearings to the manual transmission case.
- SST
- 09307-12010
09820-00031
- Clearance:
0 to 0.5 mm (0 to 0.0197 in.)
41311E
11.INSTALL FRONT DIFFERENTIAL CASE FRONT TAPERED ROLLER BEARING
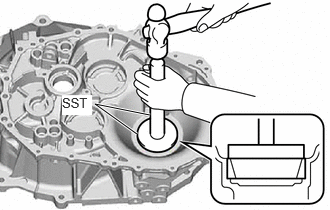
Using SST and a hammer, install the front differential case front tapered roller bearing outer race to the front transaxle case.
- SST
- 09950-60021 (09951-00790)
09950-70010 (09951-07200)
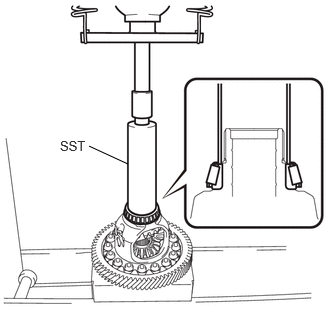
Using SST and a press, install a new front differential case front tapered roller bearing to the front No. 1 differential case sub-assembly.
- SST
- 09316-60012 (09316-00011)
- NOTICE:
-
Be sure to install the front differential case front tapered roller bearing so that there is no clearance between the bearing inner race and front No. 1 differential case sub-assembly.
12.INSTALL TRANSMISSION SLEEVE YOKE
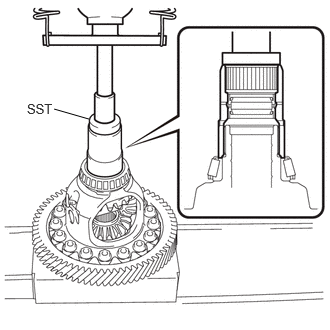
Using SST and a press, install the transmission sleeve yoke to the front No. 1 differential case sub-assembly.
- SST
- 09950-60011 (09951-00550)
43410M
13.INSTALL FRONT DRIVE SHAFT OIL SEAL RH
Coat the lip of a new front drive shaft oil seal RH with MP grease.
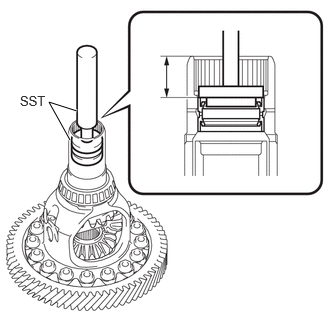
Using SST and a hammer, tap in the front drive shaft oil seal RH to the transmission sleeve yoke.
- SST
- 09950-60011 (09951-00410)
09950-70010 (09951-07200)
- Drive in Depth:
23.9 to 24.9 mm (0.941 to 0.980 in.)
- NOTICE:
-
Do not damage the front drive shaft oil seal RH lip.
41311C
14.INSTALL FRONT DIFFERENTIAL CASE REAR SHIM
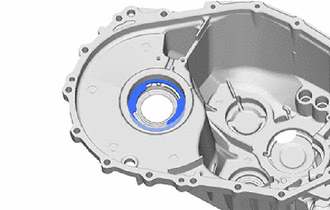
Install the front differential case rear shim to the manual transmission case.
41311F
15.INSTALL FRONT DIFFERENTIAL CASE REAR TAPERED ROLLER BEARING
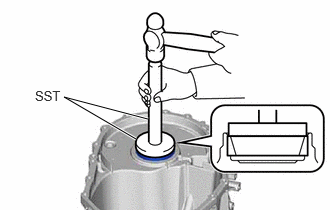
Using SST and a hammer, install the front differential case rear tapered roller bearing outer race to the manual transmission case.
- SST
- 09950-70010 (09951-07100)
09951-00850
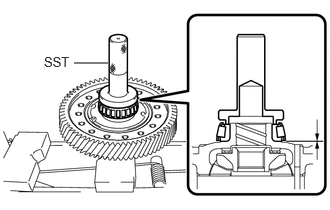
Using SST and a press, install a new front differential case rear tapered roller bearing to the front No. 1 differential case sub-assembly.
- SST
- 09554-22010
- NOTICE:
-
Be sure to install the front differential case rear tapered roller bearing so that there is no clearance between the bearing inner race and front No. 1 differential case sub-assembly.
33111J
16.INSTALL MANUAL TRANSMISSION CASE STRAIGHT PIN
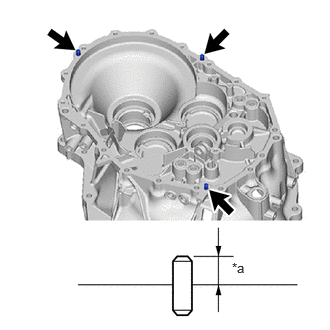
| *a | 10.5 to 11.5 mm (0.413 to 0.453 in.) |
Using a plastic-faced hammer, tap in 3 new manual transmission case straight pins to the front transaxle case.
- Protrusion Height:
10.5 to 11.5 mm (0.413 to 0.453 in.)
17.ADJUST DIFFERENTIAL SIDE BEARING PRELOAD
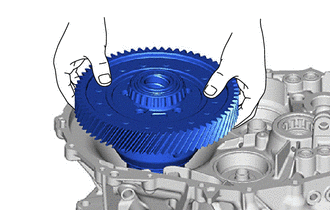
Coat the differential gear assembly with gear oil and install it to the front transaxle case.
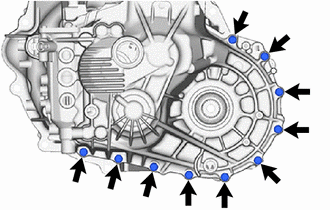
Install the manual transmission case to the front transaxle case with the 10 bolts.
- Torque:
- 29.4 N*m (300 kgf*cm, 22 ft.*lbf)
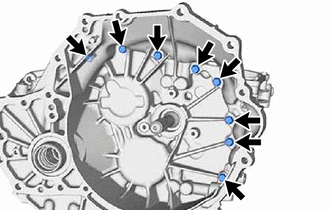
Install the 8 bolts to the front transaxle case side.
- Torque:
- 29.4 N*m (300 kgf*cm, 22 ft.*lbf)
w/o LSD:
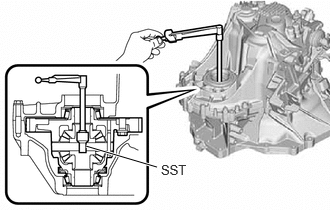
Turn the differential case in both directions to settle it.
Using SST and a torque wrench, measure the starting preload.
- SST
- 09564-33010
- Bearing Preload:
0.35 to 1.75 N*m (4 to 17 kgf*cm, 4 to 15 in.*lbf)
Select a front differential case rear shim.
| Mark | Thickness mm (in.) | Mark | Thickness mm (in.) | Mark | Thickness mm (in.) |
|---|---|---|---|---|---|
| 0 | 1.99 to 2.01
(0.0783 to 0.0791) |
6 | 2.29 to 2.31
(0.0902 to 0.0909) |
C | 2.59 to 2.61
(0.1020 to 0.1028) |
| 1 | 2.04 to 2.06
(0.0803 to 0.0811) |
7 | 2.34 to 2.36
(0.0921 to 0.0929) |
D | 2.64 to 2.66
(0.1039 to 0.1047) |
| 2 | 2.09 to 2.11
(0.0823 to 0.0831) |
8 | 2.39 to 2.41
(0.0941 to 0.0949) |
E | 2.69 to 2.71
(0.1059 to 0.1067) |
| 3 | 2.14 to 2.16
(0.0843 to 0.0850) |
9 | 2.44 to 2.46
(0.0961 to 0.0969) |
F | 2.74 to 2.76
(0.1079 to 0.1087) |
| 4 | 2.19 to 2.21
(0.0862 to 0.0870) |
A | 2.49 to 2.51
(0.0980 to 0.0988) |
G | 2.79 to 2.81
(0.1098 to 0.1106) |
| 5 | 2.24 to 2.26
(0.0882 to 0.0890) |
B | 2.54 to 2.56
(0.1000 to 0.1008) |
H | 2.84 to 2.86
(0.1118 to 0.1126) |
w/ LSD:
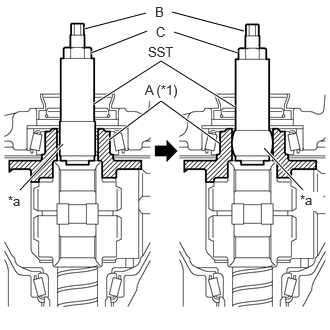
| *1 | Front Differential Case |
| *a | Urethane |
Insert the urethane portion of SST until it reaches portion A shown in the illustration.
- SST
- 09564-52020
09564-52030
Hold the B portion of SST and rotate the C portion, and continue expanding until the urethane portion of SST contacts the differential case assembly.
- HINT:
-
If the urethane portion does not contact the differential case assembly, the rotation of SST and the differential case assembly will not be synchronized, and accurate measurement will be impossible.
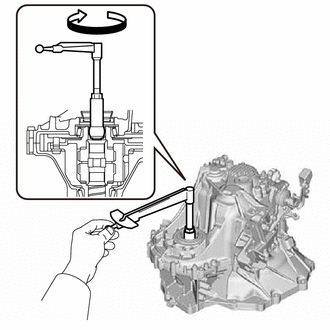
Using SST and a torque wrench, turn the differential case assembly clockwise and counterclockwise 2 or 3 times to allow the bearings to settle.
- SST
- 09564-52020
09564-52030
Using SST and a torque wrench, measure the differential side bearing preload.
- SST
- 09564-52020
09564-52030
- Bearing Preload:
0.35 to 1.75 N*m (4 to 17 kgf*cm, 4 to 15 in.*lbf)
- HINT:
- ·
If the preload is not as specified, select a front differential case rear shim to adjust it.
·If the preload is higher than specified, select a thinner front differential case rear shim, and if the preload is lower than specified, select a thicker front differential case rear shim.
·In order to adjust the output shaft bearing preload, make a memo of the differential side bearing preload in advance.
| Mark | Thickness mm (in.) | Mark | Thickness mm (in.) | Mark | Thickness mm (in.) |
|---|---|---|---|---|---|
| 0 | 1.99 to 2.01
(0.0783 to 0.0791) |
6 | 2.29 to 2.31
(0.0902 to 0.0909) |
C | 2.59 to 2.61
(0.1020 to 0.1028) |
| 1 | 2.04 to 2.06
(0.0803 to 0.0811) |
7 | 2.34 to 2.36
(0.0921 to 0.0929) |
D | 2.64 to 2.66
(0.1039 to 0.1047) |
| 2 | 2.09 to 2.11
(0.0823 to 0.0831) |
8 | 2.39 to 2.41
(0.0941 to 0.0949) |
E | 2.69 to 2.71
(0.1059 to 0.1067) |
| 3 | 2.14 to 2.16
(0.0843 to 0.0850) |
9 | 2.44 to 2.46
(0.0961 to 0.0969) |
F | 2.74 to 2.76
(0.1079 to 0.1087) |
| 4 | 2.19 to 2.21
(0.0862 to 0.0870) |
A | 2.49 to 2.51
(0.0980 to 0.0988) |
G | 2.79 to 2.81
(0.1098 to 0.1106) |
| 5 | 2.24 to 2.26
(0.0882 to 0.0890) |
B | 2.54 to 2.56
(0.1000 to 0.1008) |
H | 2.84 to 2.86
(0.1118 to 0.1126) |
Remove the 8 bolts from the front transaxle case side.
Remove the 10 bolts from the manual transmission case side.
Remove the manual transmission case from the front transaxle case.
Remove the differential gear assembly from the front transaxle case.
33134B
18.INSTALL OUTPUT SHAFT COVER
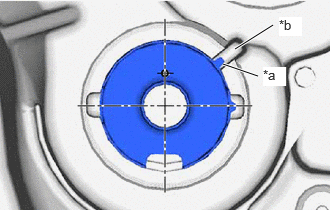
| *a | Protrusion |
| *b | Groove |
Align the protrusion on the output shaft cover with the groove on the manual transmission case as shown in the illustration, and install the output shaft cover to the manual transmission case.
33321H
19.INSTALL OUTPUT SHAFT REAR BEARING SHIM
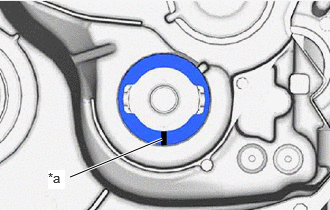
| *a | Mark |
Install the output shaft rear bearing shim to the manual transmission case.
- HINT:
-
When reusing the No. 2 output shaft rear bearing outer race, first install a output shaft rear bearing shim of the same thickness as the original. When installing a new No. 2 output shaft rear bearing outer race, first select and install a output shaft rear bearing shim which is thinner than the original.
33322A
20.INSTALL NO. 2 OUTPUT SHAFT REAR BEARING OUTER RACE
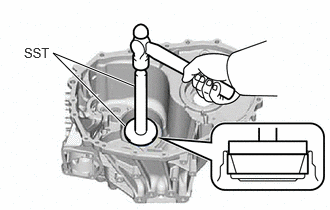
Using SST and a hammer, install the No. 2 output shaft rear bearing outer race to the manual transmission case.
- SST
- 09950-60011 (09951-00640)
09950-70010 (09951-07200)
21.ADJUST NO. 2 OUTPUT SHAFT REAR BEARING PRELOAD
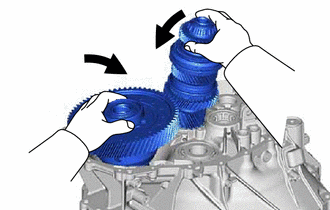
Install the No. 2 output shaft assembly and differential gear assembly to the front transaxle case.
Install the manual transmission case to the front transaxle case with the 10 bolts.
- Torque:
- 29.4 N*m (300 kgf*cm, 22 ft.*lbf)
Install the 8 bolts to the front transaxle case side.
- Torque:
- 29.4 N*m (300 kgf*cm, 22 ft.*lbf)
w/o LSD:
Using SST, measure the No. 2 output shaft rear bearing preload. Subtract the value of the differential side bearing preload from the measured No. 2 output shaft rear bearing preload. Select a output shaft rear bearing shim that will set the preload within the specified range below and install the output shaft rear bearing shim.
- SST
- 09564-33010
- Bearing Preload:
1.18 to 5.88 N*m (13 to 59 kgf*cm, 11 to 52 in.*lbf)
- HINT:
- ·
If the preload is not as specified, select a output shaft rear bearing shim to adjust it.
·If the preload is higher than specified, select a thinner output shaft rear bearing shim, and if the preload is lower than specified, select a thicker output shaft rear bearing shim.
| Mark | Thickness mm (in.) | Mark | Thickness mm (in.) | Mark | Thickness mm (in.) |
|---|---|---|---|---|---|
| A | 1.79 to 1.81
(0.0705 to 0.0713) |
G | 2.09 to 2.11
(0.0823 to 0.0831) |
N | 2.39 to 2.41
(0.0941 to 0.0949) |
| B | 1.84 to 1.86
(0.0724 to 0.0732) |
H | 2.14 to 2.16
(0.0843 to 0.0850) |
P | 2.44 to 2.46
(0.0961 to 0.0969) |
| C | 1.89 to 1.91
(0.0744 to 0.0752) |
J | 2.19 to 2.21
(0.0862 to 0.0870) |
Q | 2.49 to 2.51
(0.0980 to 0.0988) |
| D | 1.94 to 1.96
(0.0764 to 0.0772) |
K | 2.24 to 2.26
(0.0882 to 0.0890) |
R | 2.54 to 2.56
(0.1000 to 0.1008) |
| E | 1.99 to 2.01
(0.0783 to 0.0791) |
L | 2.29 to 2.31
(0.0902 to 0.0909) |
S | 2.59 to 2.61
(0.1020 to 0.1028) |
| F | 2.04 to 2.06
(0.0803 to 0.0811) |
M | 2.34 to 2.36
(0.0921 to 0.0929) |
T | 2.64 to 2.66
(0.1039 to 0.1047) |
w/ LSD:
| *1 | Front Differential Case |
| *a | Urethane |
Insert the urethane portion of SST until it reaches portion A shown in the illustration.
- SST
- 09564-52020
09564-52030
Hold the B portion of SST and rotate the C portion, and continue expanding until the urethane portion of SST contacts the differential case assembly.
- HINT:
-
If the urethane portion does not contact the differential case assembly, the rotation of SST and the differential case assembly will not be synchronized, and accurate measurement will be impossible.
Using SST and a torque wrench, turn the differential case assembly clockwise and counterclockwise 2 or 3 times to allow the bearings to settle.
- SST
- 09564-52030
09564-52030
Using SST and a torque wrench, measure the No. 2 output shaft rear bearing preload.
- SST
- 09564-52020
09564-52030
- Bearing Preload:
1.18 to 5.88 N*m (13 to 59 kgf*cm, 11 to 52 in.*lbf)
- HINT:
- ·
If the preload is not as specified, select a output shaft rear bearing shim to adjust it.
·If the preload is higher than specified, select a thinner output shaft rear bearing shim, and if the preload is lower than specified, select a thicker output shaft rear bearing shim.
| Mark | Thickness mm (in.) | Mark | Thickness mm (in.) | Mark | Thickness mm (in.) |
|---|---|---|---|---|---|
| A | 1.79 to 1.81
(0.0705 to 0.0713) |
G | 2.09 to 2.11
(0.0823 to 0.0831) |
N | 2.39 to 2.41
(0.0941 to 0.0949) |
| B | 1.84 to 1.86
(0.0724 to 0.0732) |
H | 2.14 to 2.16
(0.0843 to 0.0850) |
P | 2.44 to 2.46
(0.0961 to 0.0969) |
| C | 1.89 to 1.91
(0.0744 to 0.0752) |
J | 2.19 to 2.21
(0.0862 to 0.0870) |
Q | 2.49 to 2.51
(0.0980 to 0.0988) |
| D | 1.94 to 1.96
(0.0764 to 0.0772) |
K | 2.24 to 2.26
(0.0882 to 0.0890) |
R | 2.54 to 2.56
(0.1000 to 0.1008) |
| E | 1.99 to 2.01
(0.0783 to 0.0791) |
L | 2.29 to 2.31
(0.0902 to 0.0909) |
S | 2.59 to 2.61
(0.1020 to 0.1028) |
| F | 2.04 to 2.06
(0.0803 to 0.0811) |
M | 2.34 to 2.36
(0.0921 to 0.0929) |
T | 2.64 to 2.66
(0.1039 to 0.1047) |
Remove the 8 bolts from the front transaxle case side.
Remove the 10 bolts from the manual transmission case side.
Remove the manual transmission case from the front transaxle case.
Remove the No. 2 output shaft assembly from the front transaxle case.
Remove the differential gear assembly from the front transaxle case.
33321H
22.INSTALL OUTPUT SHAFT REAR BEARING SHIM
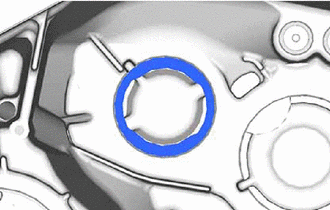
Install the output shaft rear bearing shim to the manual transmission case.
- HINT:
-
When reusing the output shaft rear bearing outer race, first install a output shaft rear bearing shim of the same thickness as the original. When installing a new output shaft rear bearing outer race, first select and install a output shaft rear bearing shim which is thinner than the original.
33321A
23.INSTALL OUTPUT SHAFT REAR BEARING OUTER RACE
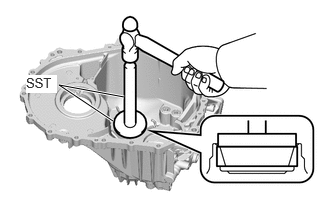
Using SST and a hammer, install the output shaft rear bearing outer race to the manual transmission case.
- SST
- 09950-60011 (09951-00610)
09950-70010 (09951-07200)
24.ADJUST OUTPUT SHAFT REAR BEARING PRELOAD
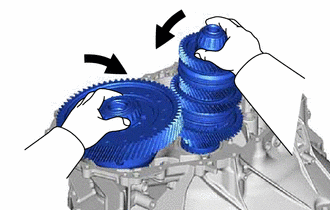
Install the No. 1 output shaft assembly and differential gear assembly to the front transaxle case.
Install the manual transmission case to the front transaxle case with the 10 bolts.
- Torque:
- 29.4 N*m (300 kgf*cm, 22 ft.*lbf)
Install the 8 bolts to the front transaxle case side.
- Torque:
- 29.4 N*m (300 kgf*cm, 22 ft.*lbf)
w/o LSD:
Using SST, measure the output shaft rear bearing preload. Subtract the value of the differential side bearing preload from the measured output shaft rear bearing preload. Select an output shaft rear bearing shim that will set the preload within the specified range below and install the output shaft rear bearing shim.
- SST
- 09564-33010
- Bearing Preload:
4.73 to 7.76 N*m (49 to 79 kgf*cm, 42 to 68 in.*lbf)
- HINT:
- ·
If the preload is not as specified, select a output shaft rear bearing shim to adjust it.
·If the preload is higher than specified, select a thinner output shaft rear bearing shim, and if the preload is lower than specified, select a thicker output shaft rear bearing shim.
| Mark | Thickness mm (in.) | Mark | Thickness mm (in.) | Mark | Thickness mm (in.) |
|---|---|---|---|---|---|
| A | 1.66 to 1.68
(0.0654 to 0.0661) |
G | 1.96 to 1.98
(0.0772 to 0.0780) |
N | 2.26 to 2.28
(0.0890 to 0.0898) |
| B | 1.71 to 1.73
(0.0673 to 0.0681) |
H | 2.01 to 2.03
(0.0791 to 0.0799) |
P | 2.31 to 2.33
(0.0909 to 0.0917) |
| C | 1.76 to 1.78
(0.0693 to 0.0701) |
J | 2.06 to 2.08
(0.0811 to 0.0819) |
Q | 2.36 to 2.38
(0.0929 to 0.0937) |
| D | 1.81 to 1.83
(0.0713 to 0.0720) |
K | 2.11 to 2.13
(0.0831 to 0.0839) |
R | 2.41 to 2.43
(0.0949 to 0.0957) |
| E | 1.86 to 1.88
(0.0732 to 0.0740) |
L | 2.16 to 2.18
(0.0850 to 0.0858) |
S | 2.46 to 2.48
(0.0969 to 0.0976) |
| F | 1.91 to 1.93
(0.0752 to 0.0760) |
M | 2.21 to 2.23
(0.0870 to 0.0878) |
T | 2.51 to 2.53
(0.0988 to 0.0996) |
w/ LSD:
| *1 | Front Differential Case |
| *a | Urethane |
Insert the urethane portion of SST until it reaches portion A shown in the illustration.
- SST
- 09564-52020
09564-52030
Hold the B portion of SST and rotate the C portion, and continue expanding until the urethane portion of SST contacts the differential case assembly.
- HINT:
-
If the urethane portion does not contact the differential case assembly, the rotation of SST and the differential case assembly will not be synchronized, and accurate measurement will be impossible.
Using SST and a torque wrench, turn the differential case assembly clockwise and counterclockwise 2 or 3 times to allow the bearings to settle.
- SST
- 09564-52020
09564-52030
Using SST and a torque wrench, measure the output shaft rear bearing preload.
- SST
- 09564-52020
09564-52030
- Bearing Preload:
4.73 to 7.76 N*m (49 to 79 kgf*cm, 42 to 68 in.*lbf)
- HINT:
- ·
If the preload is not as specified, select a output shaft rear bearing shim to adjust it.
·If the preload is higher than specified, select a thinner output shaft rear bearing shim, and if the preload is lower than specified, select a thicker output shaft rear bearing shim.
| Mark | Thickness mm (in.) | Mark | Thickness mm (in.) | Mark | Thickness mm (in.) |
|---|---|---|---|---|---|
| A | 1.66 to 1.68
(0.0654 to 0.0661) |
G | 1.96 to 1.98
(0.0772 to 0.0780) |
N | 2.26 to 2.28
(0.0890 to 0.0898) |
| B | 1.71 to 1.73
(0.0673 to 0.0681) |
H | 2.01 to 2.03
(0.0791 to 0.0799) |
P | 2.31 to 2.33
(0.0909 to 0.0917) |
| C | 1.76 to 1.78
(0.0693 to 0.0701) |
J | 2.06 to 2.08
(0.0811 to 0.0819) |
Q | 2.36 to 2.38
(0.0929 to 0.0937) |
| D | 1.81 to 1.83
(0.0713 to 0.0720) |
K | 2.11 to 2.13
(0.0831 to 0.0839) |
R | 2.41 to 2.43
(0.0949 to 0.0957) |
| E | 1.86 to 1.88
(0.0732 to 0.0740) |
L | 2.16 to 2.18
(0.0850 to 0.0858) |
S | 2.46 to 2.48
(0.0969 to 0.0976) |
| F | 1.91 to 1.93
(0.0752 to 0.0760) |
M | 2.21 to 2.23
(0.0870 to 0.0878) |
T | 2.51 to 2.53
(0.0988 to 0.0996) |
Remove the 8 bolts from the front transaxle case side.
Remove the 10 bolts from the manual transmission case side.
Remove the No. 1 output shaft assembly from the front transaxle case.
Remove the differential gear assembly from the front transaxle case.
33449
25.INSTALL TRANSMISSION MAGNET
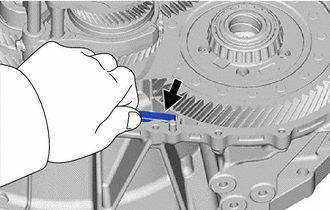
Clean and install the transmission magnet to the front transaxle case.
26.INSTALL DIFFERENTIAL GEAR ASSEMBLY
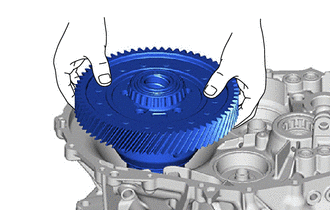
Coat the front differential case tapered roller bearings with gear oil and install the differential gear assembly to the front transaxle case.
33211
27.INSTALL REVERSE SHIFT FORK
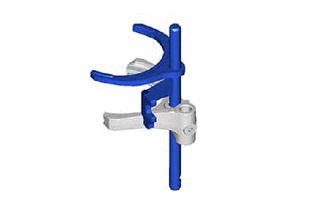
Install the reverse shift fork to the No. 3 gear shift fork.
33214G
28.INSTALL NO. 3 GEAR SHIFT FORK
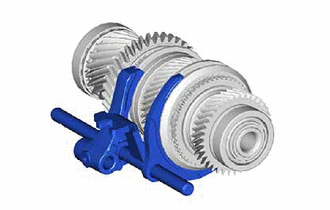
Install the No. 3 gear shift fork to the No. 2 output shaft assembly.
33213G
29.INSTALL NO. 2 GEAR SHIFT FORK
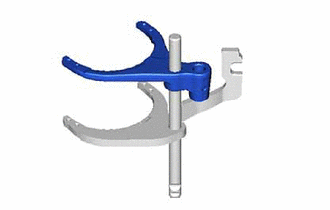
Install the No. 2 gear shift fork to the No. 1 gear shift fork.
33212A
30.INSTALL NO. 1 GEAR SHIFT FORK
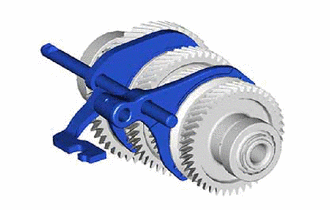
Install the No. 1 gear shift fork to the No. 1 output shaft assembly.
31.INSTALL INPUT SHAFT, NO. 1 OUTPUT SHAFT AND NO. 2 OUTPUT SHAFT
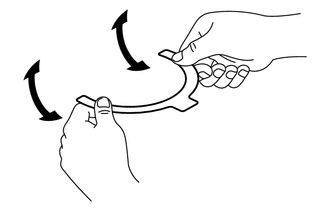
Bend left and right sides of SST in opposite directions.
- SST
- 09312-52010
- NOTICE:
-
Do not bend SST more than necessary.
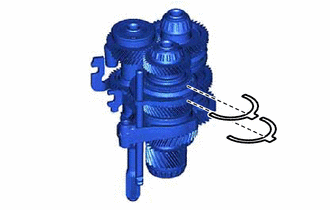
Install SST to the top and bottom of the No. 3 transmission hub sleeve.
- SST
- 09312-52010
- NOTICE:
-
Make sure that SST does not easily come loose.
- HINT:
-
Install SST in a tensioned state so that the No. 3 transmission hub sleeve does not shift out of position.
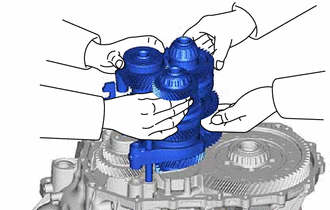
Install the 3 shafts at the same time.
33461A
32.INSTALL REVERSE IDLER GEAR BEARING
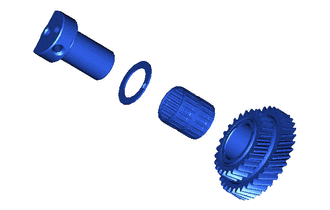
Coat the reverse idler gear, needle roller bearing, and reverse idler thrust washer with MP grease, and install them to the reverse idler gear shaft.
- HINT:
-
Make sure that the protruding part on the reverse idler thrust washer is fitted into the groove of the reverse idler shaft.
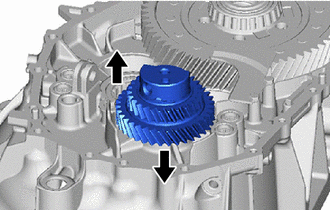
Install the reverse idler gear shaft by sliding and lifting it.
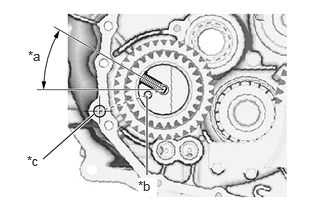
| *a | 30° |
| *b | Align the Mark |
| *c | Front Transaxle Case Screw Hole |
Align the mark of the reverse idler gear shaft with the hole of the bolt.
33245H
33.INSTALL REVERSE SHIFT FORK SHAFT
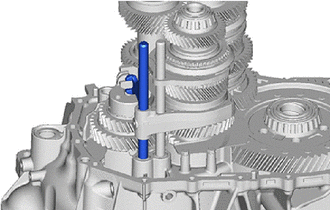
Install the reverse shift fork shaft to the front transaxle case.
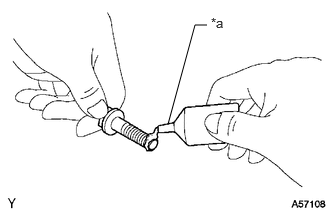
| *a | Adhesive 1344 |
Coat the threads of the bolt with adhesive.
- Adhesive:
Toyota Genuine Adhesive 1344, Three Bond 1344 or equivalent
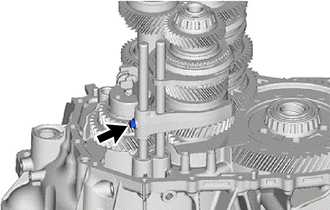
Install the bolt to the reverse shift fork shaft.
- Torque:
- 19.6 N*m (200 kgf*cm, 14 ft.*lbf)
33222F
34.INSTALL SHIFT ARM
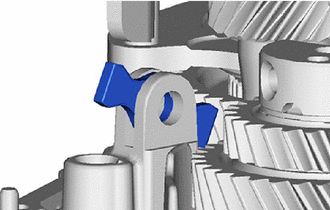
Install the shift arm to the front transaxle case.
33234A
35.INSTALL NO. 3 GEAR SHIFT HEAD
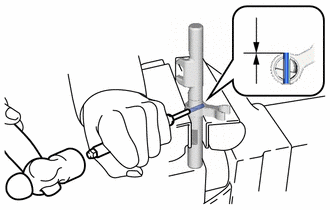
Install the No. 3 gear shift head to the No. 5 gear shift fork shaft.
Using a 5 mm pin punch and a hammer, drive a new slotted spring pin into the No. 3 gear shift head.
- Drive in Depth:
-0.5 to 0.5 mm (-0.0197 to 0.0197 in.)
33246C
36.INSTALL NO. 5 GEAR SHIFT FORK SHAFT
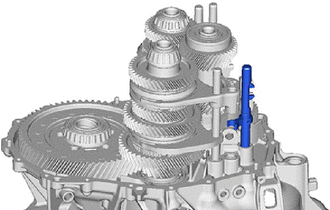
Install the No. 5 gear shift fork shaft to the front transaxle case.
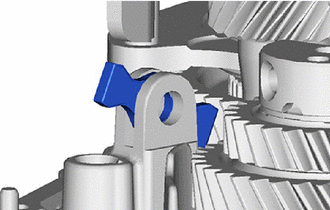
Install the shift arm to the No. 5 gear shift fork shaft.
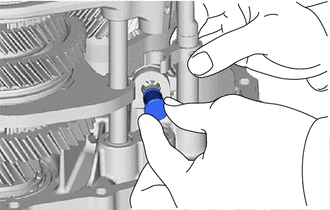
Install the shift arm pivot to the shift arm.
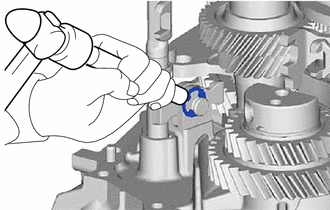
Using a brass bar and a hammer, install a new E-ring to the shift arm pivot.
33243F
37.INSTALL 3RD AND 4TH SHIFT FORK SHAFT
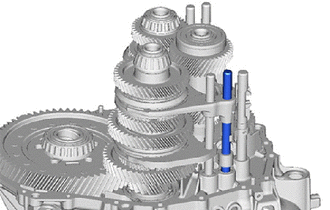
Install the No. 2 gear shift head to the 3rd and 4th shift fork shaft.
Install the 3rd and 4th shift fork shaft to the front transaxle case.
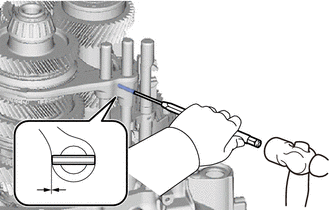
Using a 5 mm pin punch and a hammer, drive a new slotted spring pin into the No. 2 gear shift fork.
- Drive in Depth:
-0.5 to 0.5 mm (-0.0197 to 0.0197 in.)
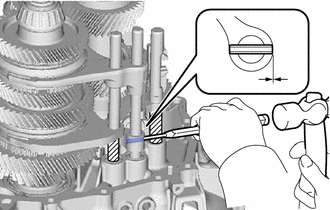

|
Protective Tape |
Using a 5 mm pin punch and a hammer, drive a new slotted spring pin into the No. 2 gear shift head.
- Drive in Depth:
-0.5 to 0.5 mm (-0.0197 to 0.0197 in.)
Remove the protective tape.
33176B
38.INSTALL TRANSMISSION OIL SEPARATOR
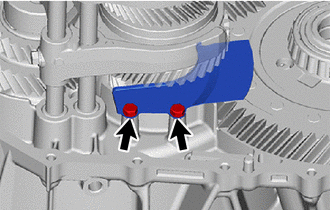
Install the transmission oil separator to the front transaxle case with the 2 bolts.
- Torque:
- 8.5 N*m (87 kgf*cm, 75 in.*lbf)
33176B
39.INSTALL TRANSMISSION OIL SEPARATOR
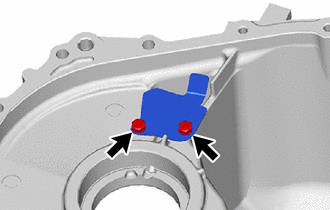
Install the transmission oil separator to the manual transmission case with the 2 bolts.
- Torque:
- 8.5 N*m (87 kgf*cm, 75 in.*lbf)
33124C
40.INSTALL NO. 1 OIL RECEIVER PIPE
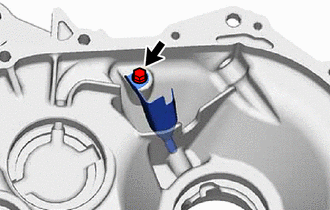
Install the No. 1 oil receiver pipe to the manual transmission case with the bolt.
- Torque:
- 8.5 N*m (87 kgf*cm, 75 in.*lbf)
- NOTICE:
-
Do not damage the No. 1 oil receiver pipe.
33111
41.INSTALL MANUAL TRANSMISSION CASE
Clean the seal packing attached on the manual transmission case and front transaxle case using a scraper and wire brush. Then remove the oil with non-residue solvent.
- NOTICE:
-
Do not scratch the fitting surface.
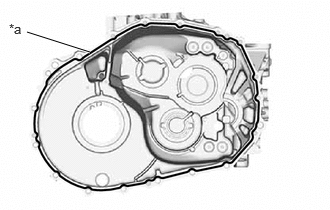
| *a | Seal Packing |
Apply seal packing to the manual transmission case as shown in the illustration.
- Seal packing:
Toyota Genuine Seal Packing 1281, Three Bond 1281 or equivalent
- NOTICE:
-
Assemble parts within 10 minutes of application. Otherwise, the seal packing must be removed and reapplied.
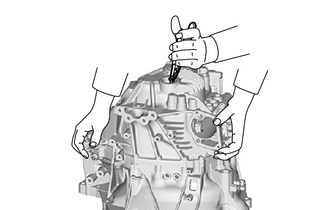
Using snap ring pliers, keep the snap ring stretched and install the manual transmission case.
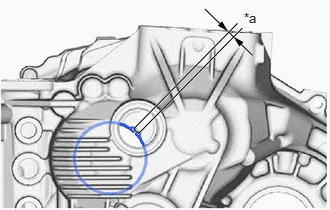
| *a | 9.3 mm (0.366 in. ) |
Make sure that the snap ring is positioned correctly in the bearing groove by checking that the distance between the centers of the snap ring holes are as shown in the illustration.
Install the manual transmission case to the front transaxle case with the 10 bolts.
- Torque:
- 29.4 N*m (300 kgf*cm, 22 ft.*lbf)
Install the 8 bolts to the front transaxle case side.
- Torque:
- 29.4 N*m (300 kgf*cm, 22 ft.*lbf)
33451H
42.INSTALL REVERSE IDLER GEAR SHAFT BOLT
| *a | Adhesive 1344 |
Coat the threads of the reverse idler gear shaft bolt with adhesive.
- Adhesive:
Toyota Genuine Adhesive 1344, Three Bond 1344 or equivalent
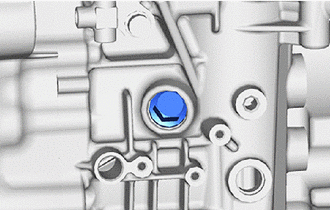
Install a new gasket and the reverse idler gear shaft bolt to the manual transmission case.
- Torque:
- 80 N*m (816 kgf*cm, 59 ft.*lbf)
33275C
43.INSTALL SHIFT DETENT BALL
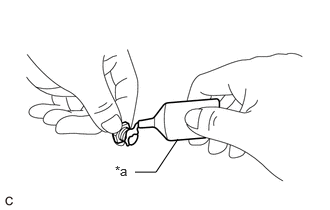
| *a | Adhesive 1344 |
Coat the threads of the 4 detent ball plugs with adhesive.
- Adhesive:
Toyota Genuine Adhesive 1344, Three Bond 1344 or equivalent
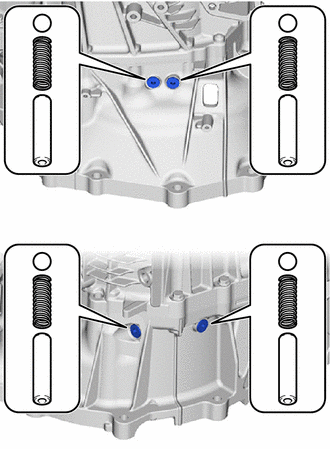
Using a 6 mm hexagon wrench, install the 4 shift detent balls, 4 springs, 4 spring seats and 4 detent ball plugs to the front transaxle case.
- Torque:
- 22.4 N*m (228 kgf*cm, 17 ft.*lbf)
33111A
44.INSTALL MANUAL TRANSMISSION CASE PLUG
Clean the seal packing attached on the manual transmission case using a scraper and wire brush. Then remove the oil with non-residue solvent or equivalent.
- NOTICE:
-
Do not scratch the fitting surface.
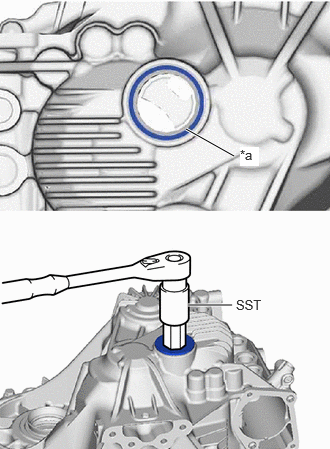
| *a | Seal Packing |
Apply seal packing to the manual transmission case as shown in the illustration.
- Seal packing:
Toyota Genuine Seal Packing 1281, Three Bond 1281 or equivalent
- NOTICE:
-
Assemble parts within 10 minutes of application. Otherwise, the seal packing must be removed and reapplied.
Coat the threads of the manual transmission case plug with adhesive.
- Adhesive:
Toyota Genuine Adhesive 1344, Three Bond 1344 or equivalent
Using SST and 27 mm straight hexagon, install the manual transmission case plugs to the manual transmission case.
- Torque:
- 55 N*m (561 kgf*cm, 41 ft.*lbf)
33223B
45.INSTALL SHIFT ARM PIVOT O-RING
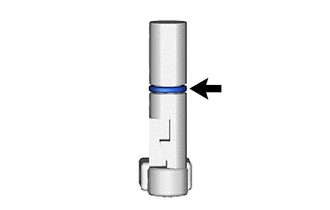
Coat a new O-ring with the MP grease, and install it to the shift and select lever shaft straight pin.
33261F
46.INSTALL SHIFT AND SELECT LEVER SHAFT STRAIGHT PIN
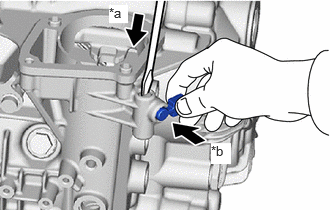
| *a | Press and hold |
| *b | Push in the shift and select pin. |
Install the spring.
While pressing in the shift and select lever shaft straight pin in as far as it will go, push in the shift and select lever shaft straight pin to install it.
33101A
47.INSTALL MANUAL TRANSMISSION FILLER PLUG
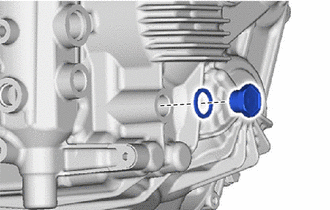
Install a new gasket and the manual transmission filler plug to the manual transmission case.
- Torque:
- 39.2 N*m (400 kgf*cm, 29 ft.*lbf)
33104
48.INSTALL DRAIN PLUG
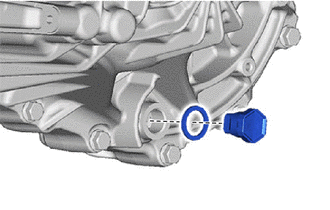
Install a new gasket and the drain plug to the manual transmission case.
- Torque:
- 39.2 N*m (400 kgf*cm, 29 ft.*lbf)
43420H
49.INSTALL FRONT DRIVE SHAFT OIL SEAL LH
31105H
50.INSTALL TRANSAXLE CASE OIL SEAL
51.INSTALL SHIFT AND SELECT LEVER ASSEMBLY
33295B
52.INSTALL SHIFT GATE PIN
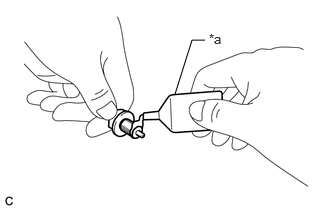
| *a | Adhesive 1344 |
Coat the threads of the shift gate pin with adhesive.
- Adhesive:
Toyota Genuine Adhesive 1344, Three Bond 1344 or equivalent
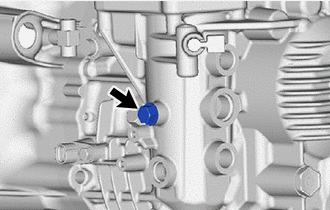
Install the shift gate pin to the manual transmission case.
- Torque:
- 30 N*m (306 kgf*cm, 22 ft.*lbf)
33290B
53.INSTALL NO. 2 LOCK BALL ASSEMBLY
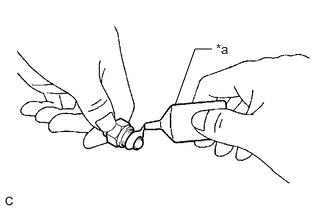
| *a | Adhesive 1344 |
Coat the threads of the No. 2 lock ball assembly with adhesive.
- Adhesive:
Toyota Genuine Adhesive 1344, Three Bond 1344 or equivalent
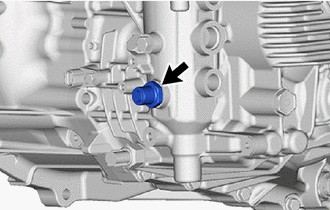
Install the No. 2 lock ball assembly to the manual transmission case.
- Torque:
- 29.4 N*m (300 kgf*cm, 22 ft.*lbf)
33290
54.INSTALL NO. 1 LOCK BALL ASSEMBLY
| *a | Adhesive 1344 |
Coat the threads of the No. 1 lock ball assembly with adhesive.
- Adhesive:
Toyota Genuine Adhesive 1344, Three Bond 1344 or equivalent
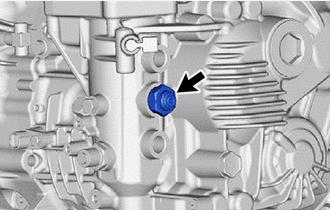
Install the No. 1 lock ball assembly to the manual transmission case.
- Torque:
- 39.2 N*m (400 kgf*cm, 29 ft.*lbf)
89413B
55.INSTALL TRANSMISSION REVOLUTION SENSOR
89429A
56.INSTALL TEMPERATURE SENSOR
84545
57.INSTALL NEUTRAL POSITION SWITCH
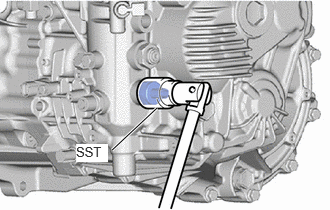
Using SST, install a new gasket and the neutral position switch to the manual transmission case.
- SST
- 09816-30010
- Torque:
- 40.2 N*m (410 kgf*cm, 30 ft.*lbf)
84210
58.INSTALL BACK-UP LIGHT SWITCH ASSEMBLY
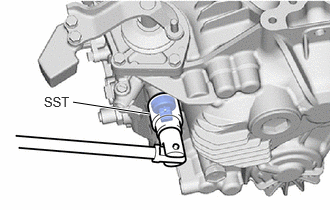
Using SST, install a new gasket and the back-up light switch assembly to the manual transmission case.
- SST
- 09816-30010
- Torque:
- 40.2 N*m (410 kgf*cm, 30 ft.*lbf)
59.INSTALL SELECTING BELL CRANK ASSEMBLY
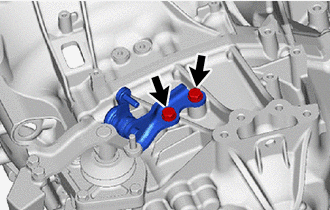
Install the selecting bell crank assembly to the manual transmission case with the 2 bolts.
- Torque:
- 20 N*m (204 kgf*cm, 15 ft.*lbf)
335A0
60.INSTALL CONTROL CABLE BRACKET
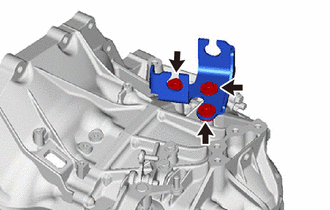
Install the control cable bracket to the manual transmission case with the 3 bolts.
- Torque:
- 17 N*m (173 kgf*cm, 13 ft.*lbf)
31400
61.INSTALL CLUTCH RELEASE CYLINDER WITH BEARING ASSEMBLY
31224
62.INSTALL CLUTCH RELEASE BEARING PLATE
31407B
63.REMOVE CLUTCH RELEASE BLEEDER SUB-ASSEMBLY
64.INSPECT CLUTCH PIPE LINE
31407B
65.INSTALL CLUTCH RELEASE BLEEDER SUB-ASSEMBLY
31483
66.INSTALL BLEEDER CLUTCH RELEASE TUBE
67.INSTALL RELEASE CYLINDER BLEEDER PLUG
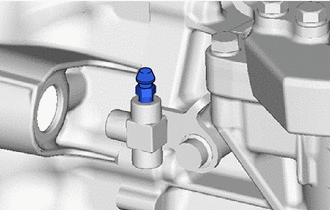
Install the release cylinder bleeder plug to the clutch release bleeder sub-assembly.
31478
68.INSTALL RELEASE CYLINDER BLEEDER PLUG CAP
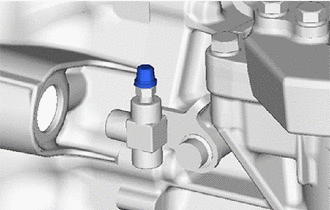
Install the release cylinder bleeder plug cap to the release cylinder bleeder plug.
31121
69.INSTALL NO. 1 CLUTCH HOUSING COVER
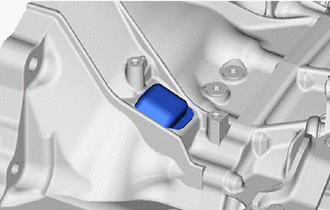
Install the No. 1 clutch housing cover to the front transaxle case.