8NR-FTS FUEL FUEL PUMP(for High Pressure) INSTALLATION
PROCEDURE

 23100X
1.TEMPORARILY INSTALL FUEL PUMP ASSEMBLY
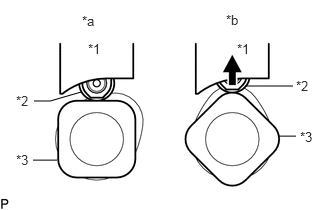
| *1 | Fuel Pump Lifter Guide |
| *2 | Fuel Pump Lifter Assembly |
| *3 | Camshaft |
| *a | Correct |
| *b | Incorrect |
Turn the crankshaft pulley until the flat of the camshaft faces the fuel pump lifter assembly.
- HINT:
-
This prevents the camshaft nose from pushing up the fuel pump lifter assembly when installing the fuel pump assembly.
Apply engine oil to a new O-ring and install it to the fuel pump assembly.
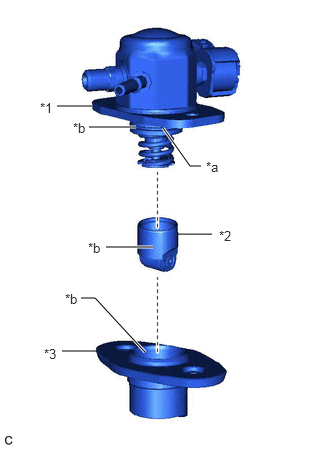
| *1 | Fuel Pump Assembly |
| *2 | Fuel Pump Lifter Assembly |
| *3 | Fuel Pump Lifter Guide |
| *a | O-ring |
| *b | Engine Oil Application Area |
Apply engine oil to the O-ring of the fuel pump assembly, inside of the fuel pump lifter guide and the outside of the fuel pump lifter assembly.
Install the fuel pump lifter assembly to the fuel pump lifter guide.
Install the fuel pump assembly to the fuel pump lifter guide.
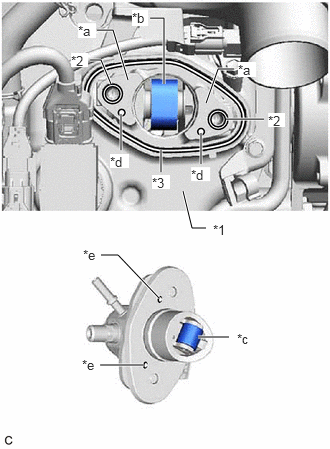
| *1 | Cylinder Head Cover Sub-assembly |
| *2 | O-ring |
| *3 | Fuel Pump Spacer Gasket |
| *a | No. 4 Camshaft Bearing Cap |
| *b | Pump Drive Cam (Engine Oil Application Area) |
| *c | Pump Lifter (Engine Oil Application Area) |
| *d | Knock Pin |
| *e | Pin Hole |
Apply 30 cc (1.8 cu. in.) of engine oil to the pump drive cam.
Apply engine oil to the fuel pump lifter assembly.
Apply engine oil to 2 new O-rings and install them to the No. 4 camshaft bearing cap.
Install a new fuel pump spacer gasket to the cylinder head cover sub-assembly.
Set the fuel pump assembly and fuel pump protector on the cylinder head cover sub-assembly.
- HINT:
-
Align the pin holes of the fuel pump lifter guide with the knock pins of the No. 4 camshaft bearing cap.
Temporarily install the fuel pump assembly with the 2 bolts, leaving some allowance for left and right movement.
23801P
2.TEMPORARILY INSTALL NO. 1 FUEL PIPE SUB-ASSEMBLY
- NOTICE:
-
Do not damage the seals of the union nuts of the No. 1 fuel pipe sub-assembly when installing.
Temporarily install the bolt.
Connect the No. 1 fuel pipe sub-assembly to the fuel pump assembly and tighten the union nut by hand.
Connect the No. 1 fuel pipe sub-assembly to the fuel delivery pipe sub-assembly and tighten the union nut by hand.
23100X
3.INSTALL FUEL PUMP ASSEMBLY
- HINT:
-
Perform "Inspection After Repair" after replacing the fuel pump assembly.
-
Click hereEngine / Hybrid System>8NR-FTS (ENGINE CONTROL)>SFI SYSTEM>INITIALIZATION
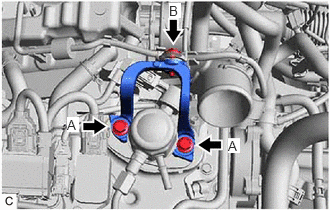
Tighten the bolt (B).
- Torque:
- 10 N*m (102 kgf*cm, 7 ft.*lbf)
Tighten the 2 bolts (A).
- Torque:
- 28 N*m (286 kgf*cm, 21 ft.*lbf)
Connect the fuel pump assembly connector.
23801P
4.INSTALL NO. 1 FUEL PIPE SUB-ASSEMBLY
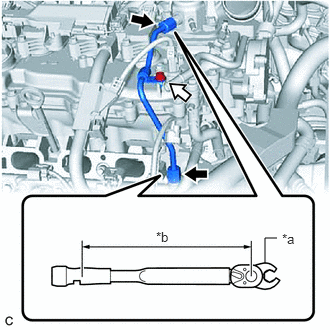
| *a | 17 mm Union Nut Wrench |
| *b | Torque Wrench Fulcrum Length |

|
Union Nut |

|
Bolt |
Using a 17 mm union nut wrench, tighten the union nut on the fuel delivery pipe side of the No. 1 fuel pipe sub-assembly.
- Torque:
- Specified tightening torque : 35 N*m (357 kgf*cm, 26 ft.*lbf)
- HINT:
- ·
Calculate the torque wrench reading when changing the fulcrum length of the torque wrench.
Click hereGeneral>INTRODUCTION>REPAIR INSTRUCTION>PRECAUTION
·When using a 17 mm union nut wrench (fulcrum length of 30 mm (1.18 in.)) + torque wrench (fulcrum length of 180 mm (7.09 in.)): 30 N*m (306 kgf*cm, 22 ft.*lbf)
Using a 17 mm union nut wrench, tighten the union nut on the fuel pump assembly side of the No. 1 fuel pipe sub-assembly.
- Torque:
- Specified tightening torque : 35 N*m (357 kgf*cm, 26 ft.*lbf)
- HINT:
- ·
Calculate the torque wrench reading when changing the fulcrum length of the torque wrench.
Click hereGeneral>INTRODUCTION>REPAIR INSTRUCTION>PRECAUTION
·When using a 17 mm union nut wrench (fulcrum length of 30 mm (1.18 in.)) + torque wrench (fulcrum length of 180 mm (7.09 in.)): 30 N*m (306 kgf*cm, 22 ft.*lbf)
Tighten the bolt.
- Torque:
- 10 N*m (102 kgf*cm, 7 ft.*lbf)
23901
5.CONNECT FUEL TUBE SUB-ASSEMBLY
- NOTICE:
-
Check that there is no damage or foreign matter on the connecting parts of the fuel lines.
Connect the fuel tube sub-assembly to the fuel pump assembly.
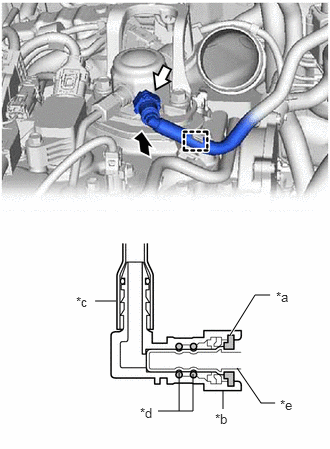
| *a | Retainer |
| *b | Fuel Tube Connector |
| *c | Nylon Tube |
| *d | O-ring |
| *e | Fuel Pipe |
|
|
Push |
|
|
Push in |
Engage the clamp to connect the fuel tube sub-assembly.
Align the fuel tube connector with the fuel pipe, and push them together until the fuel tube connector makes a "click" sound. If it is difficult to push the fuel pipe into the fuel tube connector, apply a small amount of clean gasoline to the tip of the fuel pipe and reinsert it.
Connect the fuel lines and push in the retainer. Check that the fuel pipe and fuel tube connector are securely connected by pulling on them.
17111
6.INSTALL INTAKE MANIFOLD
17705
7.INSTALL AIR CLEANER CAP WITH AIR CLEANER HOSE
17751
8.INSTALL NO. 1 AIR CLEANER INLET
53141F
9.INSTALL RADIATOR COVER
55701J
10.INSTALL OUTER COWL TOP PANEL SUB-ASSEMBLY (for LHD)
55701J
11.INSTALL OUTER COWL TOP PANEL SUB-ASSEMBLY (for RHD)
55735C
12.INSTALL COWL BODY MOUNTING REINFORCEMENT RH
55736D
13.INSTALL COWL BODY MOUNTING REINFORCEMENT LH
55735A
14.INSTALL WATER GUARD PLATE LH (for TMC Made RHD)
55737B
15.INSTALL NO. 1 HEATER AIR DUCT SPLASH SHIELD SEAL
16.INSTALL WINDSHIELD WIPER MOTOR AND LINK
17.CONNECT CABLE TO NEGATIVE BATTERY TERMINAL
18. INITIALIZATION AFTER RECONNECTING BATTERY TERMINAL
Click hereGeneral>SETUP>WHEN DISCONNECTING OR RECONNECTING BATTERY TERMINAL>WORK PROCEDURE
- HINT:
-
When disconnecting and reconnecting the battery, there is an automatic leaning function that completes learning when the respective system is used.
-
Click hereGeneral>SETUP>WHEN DISCONNECTING OR RECONNECTING BATTERY TERMINAL>AUTOMATIC LEARNING CHART
19.INSPECT FOR FUEL LEAK
20.PERFORM INITIALIZATION
Perform "Inspection After Repair" after replacing the fuel pump assembly.
Click hereEngine / Hybrid System>8NR-FTS (ENGINE CONTROL)>SFI SYSTEM>INITIALIZATION