2AR-FE ENGINE MECHANICAL CYLINDER HEAD GASKET INSTALLATION
CAUTION / NOTICE / HINT
- HINT:
-
Perform "Inspection After Repair" after replacing the cylinder head sub-assembly.
-
Click hereEngine / Hybrid System>2AR-FE ENGINE CONTROL>SFI SYSTEM>INITIALIZATION
PROCEDURE

 11101A
1.INSPECT CYLINDER HEAD BOLT
11101
2.INSPECT CYLINDER HEAD SUB-ASSEMBLY
11115
3.INSTALL CYLINDER HEAD GASKET
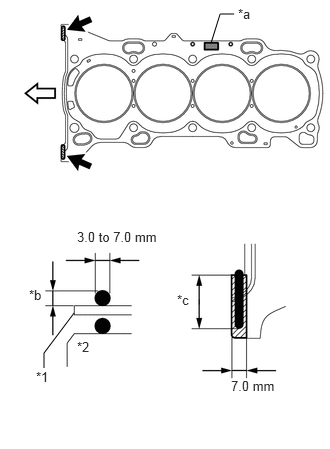
| *1 | Cylinder Head Gasket |
| *2 | Cylinder Block |
| *a | Lot No. |
| *b | 3.0 mm or more |
| *c | 20 mm or more |

|
Seal Packing |

|
Front |
Clean the cylinder block and cylinder head sub-assembly with solvent.
Apply a continuous line of seal packing to a new cylinder head gasket as shown in the illustration.
- Seal Packing:
Toyota Genuine Seal Packing Black, Three Bond 1207B or equivalent
- Standard Seal Dimension:
3.0 to 7.0 mm (0.118 to 0.276 in.) wide and 3.0 mm (0.118 in.) thick
- HINT:
-
Apply at least 20 mm (0.787 in.) of seal packing from the inside edge of the protrusion of the cylinder block.
- NOTICE:
- ·
Remove any oil from the contact surface.
·Install the cylinder head gasket within 3 minutes and tighten the bolts within 15 minutes after applying seal packing.
Place a new cylinder head gasket on the cylinder block surface with the front face of the Lot No. stamp facing upward.
- NOTICE:
-
Pay attention to the installation direction.
11101
4.INSTALL CYLINDER HEAD SUB-ASSEMBLY
- HINT:
-
The cylinder head bolts are tightened in 4 progressive steps.
Place the cylinder head sub-assembly on the cylinder block.
- NOTICE:
- ·
Ensure that no oil is on the mounting surface of the cylinder head sub-assembly.
·Place the cylinder head sub-assembly on the cylinder block gently in order not to damage the gasket with the bottom part of the head.
Install the 10 plate washers to the 10 cylinder head bolts.
Apply a light coat of engine oil to the threads and under the heads of the cylinder head bolts.
Step 1:
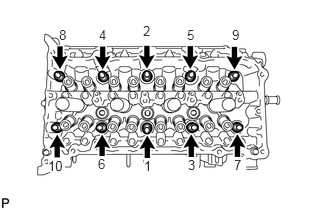
Using a 10 mm bi-hexagon wrench, install and uniformly tighten the 10 cylinder head bolts in several steps, in the sequence shown in the illustration.
- Torque:
- 36 N*m (367 kgf*cm, 27 ft.*lbf)
- NOTICE:
-
Do not drop the plate washer for the cylinder head bolt into the cylinder head sub-assembly.
Step 2:
Tighten the cylinder head bolts again in the sequence shown in the illustration to make sure that they are tightened to the specified torque.
- Torque:
- 36 N*m (367 kgf*cm, 27 ft.*lbf)
Step 3:
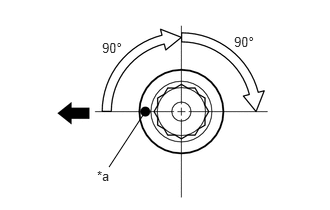
| *a | Painted Mark |
|
|
Front |
Mark each cylinder head bolt head with paint as shown in the illustration.
Tighten the cylinder head bolts 90° in the sequence shown in step 1.
Step 4:
Tighten the cylinder head bolts another 90° in the sequence shown in step 1.
Check that the paint marks are now facing rearward.
- NOTICE:
- ·
Do not apply oil for at least 2 hours after installation.
·Do not start the engine for at least 2 hours after installation.
·After installation, if the seal packing has seeped out, wipe it off.
- HINT:
-
Perform "Inspection After Repair" after replacing the cylinder head sub-assembly.
-
Click hereEngine / Hybrid System>2AR-FE ENGINE CONTROL>SFI SYSTEM>INITIALIZATION
13716
5.INSTALL VALVE STEM CAP
Apply a light coat of engine oil to the valve stem ends.
Install the 16 valve stem caps to the cylinder head sub-assembly.
- NOTICE:
-
Do not drop the valve stem caps into the cylinder head sub-assembly.
13050
6.SET CAMSHAFT TIMING GEAR ASSEMBLY
- HINT:
-
When installing the camshaft timing gear assembly, release the lock pin and set the camshaft timing gear assembly to the advanced position before installation.
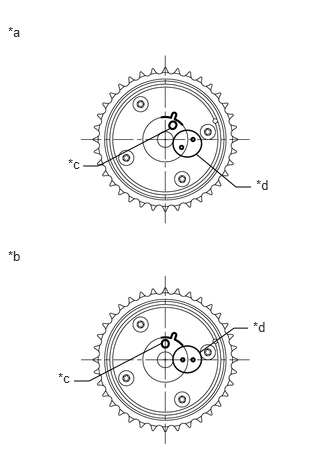
| *a | Advanced Position |
| *b | Retarded Position |
| *c | Knock Pin Hole |
| *d | Alignment Mark |
Check the camshaft timing gear assembly position.
- NOTICE:
-
If the camshaft timing gear assembly is set to the advanced position, do not let the camshaft timing gear assembly rotate clockwise during installation.
-
If the camshaft timing gear rotates to the retarded position, release the lock pin and set the camshaft timing gear assembly to the advanced position.
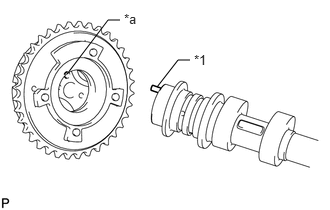
| *1 | Knock Pin |
| *a | Pin Hole |
Align and attach the knock pin of the No. 1 camshaft with the pin hole of the camshaft timing gear assembly.
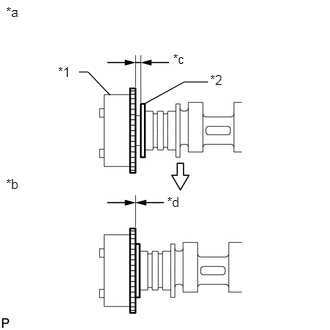
| *1 | Camshaft Timing Gear Assembly |
| *2 | Camshaft Flange |
| *a | Incorrect |
| *b | Correct |
| *c | Clearance |
| *d | No Clearance |
Check that there is no clearance between the camshaft timing gear assembly and camshaft flange.
Secure the camshaft in place by hand, and then install the installation bolt of the camshaft timing gear assembly by hand.
- NOTICE:
-
Do not use any tools to install the bolt. If the bolt is installed using a tool, the lock pin will be damaged.
Release the lock pin.
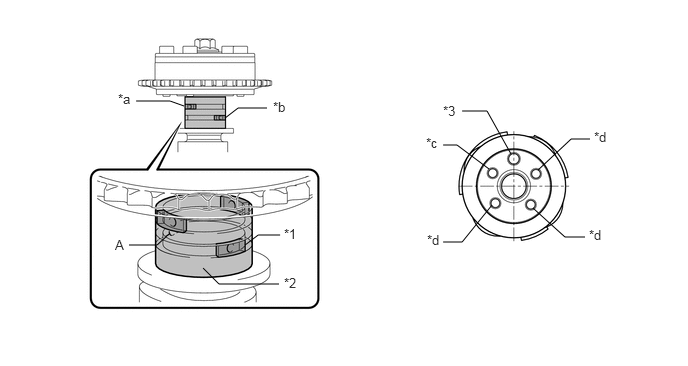
| *1 | Rubber | *2 | Vinyl Tape |
| *3 | Knock Pin | - | - |
| *a | Retard Side Path | *b | Advance Side Path |
| *c | Open | *d | Close |
Clean the camshaft journal with non-residue solvent.
Cover the 4 oil paths of the camshaft journal with vinyl tape as shown in the illustration.
- HINT:
-
There are 4 oil paths in the grooves of the camshaft. Plug three of the paths with pieces of rubber.
Open a hole at the port (A) shown in the illustration.
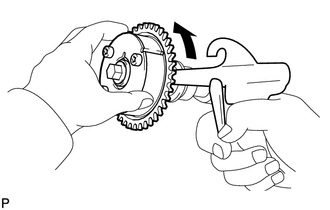
While applying approximately 200 kPa (2.0 kgf/ cm2, 29 psi) of air pressure to the oil path, forcibly turn the camshaft timing gear assembly in the advance direction (counterclockwise).
- CAUTION:
-
Cover the paths with a piece of cloth when applying pressure to keep oil from spraying.
- NOTICE:
-
Do not allow the camshaft timing gear assembly to lock. If it locks, release the lock pin again.
- HINT:
- ·
The camshaft timing gear assembly may be turned in the advance direction without applying any force.
·If enough air pressure cannot be applied because of air leakage from the port, releasing the lock pin may be difficult.
Remove the vinyl tape and rubber pieces from the camshaft.
Remove the bolt and camshaft timing gear assembly.
- NOTICE:
-
Do not allow the camshaft timing gear assembly to lock. If it locks, release the lock pin again.
13750
7.INSTALL VALVE LASH ADJUSTER ASSEMBLY
Inspect the valve lash adjuster assemblies before installing them.
Click hereEngine / Hybrid System>2AR-FE ENGINE MECHANICAL>ENGINE UNIT>INSPECTION
Install the 16 valve lash adjuster assemblies to the cylinder head sub-assembly.
- NOTICE:
-
Install the valve lash adjuster assembly to the same place it was removed from.
13801
8.INSTALL NO. 1 VALVE ROCKER ARM SUB-ASSEMBLY
Apply engine oil to the valve lash adjuster assembly tips and valve stem caps.
Install the 16 No. 1 valve rocker arm sub-assemblies as shown in the illustration.
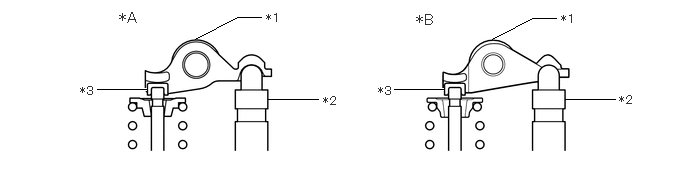
| *A | Type A | *B | Type B |
| *1 | No. 1 Valve Rocker Arm Sub-assembly | *2 | Valve Lash Adjuster Assembly |
| *3 | Valve Stem Cap | - | - |
11821
9.INSTALL NO. 2 CAMSHAFT BEARING
11811
10.INSTALL NO. 1 CAMSHAFT BEARING
15678A
11.INSTALL OIL CONTROL VALVE FILTER
13511
12.INSTALL CAMSHAFT
Clean the camshaft journals, camshaft housing sub-assembly and camshaft bearing caps.
Apply a light coat of engine oil to the camshaft journal, camshaft housing sub-assembly and camshaft bearing caps.
Install the camshaft and No. 2 camshaft to the camshaft housing sub-assembly.
- HINT:
-
Perform "Inspection After Repair" after replacing the camshaft or No. 2 camshaft.
-
Click hereEngine / Hybrid System>2AR-FE ENGINE CONTROL>SFI SYSTEM>INITIALIZATION
13.INSTALL CAMSHAFT BEARING CAP
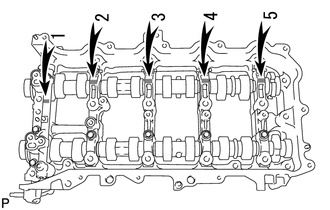
Confirm the marks and numbers on the camshaft bearing caps and place them in their proper positions and directions.
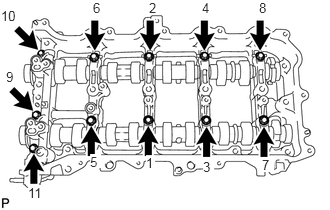
Install the 11 bolts in the order shown in the illustration.
- Torque:
- 16 N*m (163 kgf*cm, 12 ft.*lbf)
- NOTICE:
-
Make sure that the camshaft rotates smoothly after installing the camshaft bearing caps.
11103
14.INSTALL CAMSHAFT HOUSING SUB-ASSEMBLY
Check that the No. 1 valve rocker arm sub-assemblies are installed as shown in the illustration.
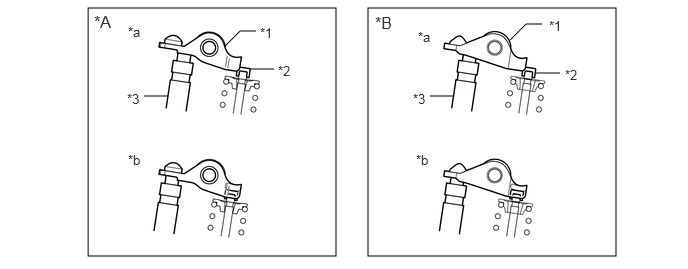
| *A | Type A | *B | Type B |
| *1 | No. 1 Valve Rocker Arm Sub-assembly | *2 | Valve Stem Cap |
| *3 | Valve Lash Adjuster Assembly | - | - |
| *a | INCORRECT | *b | CORRECT |
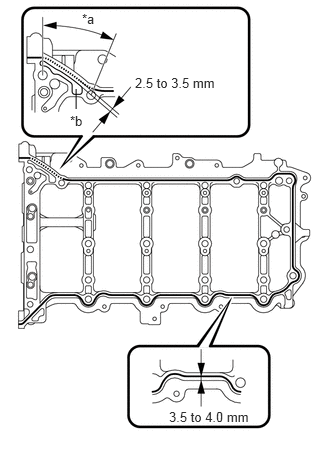
| *a | Dashed Line |
| *b | Groove |
Apply seal packing in a continuous line as shown in the illustration.
- Seal Packing:
Toyota Genuine Seal Packing Black, Three Bond 1207B or equivalent
Apply Seal Packing as Follows Area Seal Packing Diameter Application Position Continuous Line 3.0 to 4.0 mm (0.118 to 0.157 in.) Distance from outside edge of camshaft housing sub-assembly to center of seal packing: 3.5 to 4.0 mm (0.138 to 0.157 in.) Dashed Line Distance from outside edge of groove to center of seal packing: 2.5 to 3.5 mm (0.0984 to 0.138 in.)
- NOTICE:
- ·
Remove any oil from the contact surface.
·Install the camshaft housing sub-assembly within 3 minutes and tighten the bolts within 10 minutes after applying seal packing.
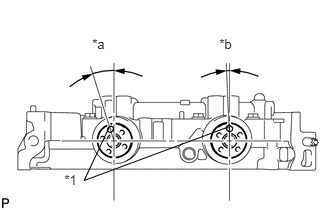
| *1 | Knock Pin |
| *a | Approximately 17° |
| *b | Approximately 2° |
Position the knock pin of the No. 1 camshaft and No. 2 camshaft as shown in the illustration.
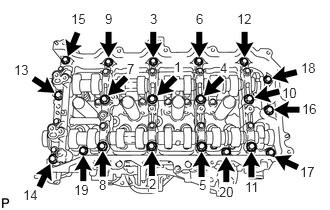
Install the camshaft housing sub-assembly, and then install the 20 bolts in the order shown in the illustration.
- Torque:
- 27 N*m (275 kgf*cm, 20 ft.*lbf)
- NOTICE:
- ·
Do not apply oil for at least 2 hours after the installation.
·Do not start the engine for at least 2 hours after the installation.
·After installation, if the seal packing has seeped out, wipe it off.
13050
15.INSTALL CAMSHAFT TIMING GEAR ASSEMBLY
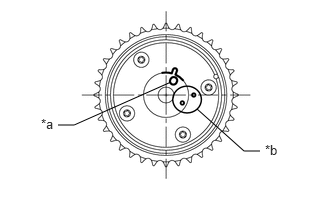
| *a | Knock Pin Hole |
| *b | Alignment Mark |
Check the camshaft timing gear position.
If the camshaft timing gear assembly is not set to the advanced position, release the lock pin and reset the camshaft timing gear assembly (Refer to the "Set Camshaft Timing Gear Assembly" procedures).
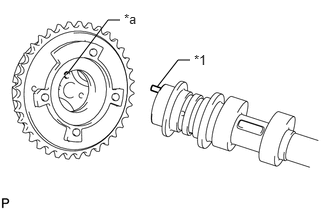
| *1 | Knock Pin |
| *a | Pin Hole |
Align and attach the knock pin of the camshaft with the pin hole of the camshaft timing gear assembly.
| *1 | Camshaft Timing Gear Assembly |
| *2 | Camshaft Flange |
| *a | Incorrect |
| *b | Correct |
| *c | Clearance |
| *d | No Clearance |
Check that there is no clearance between the camshaft timing gear assembly and camshaft flange.
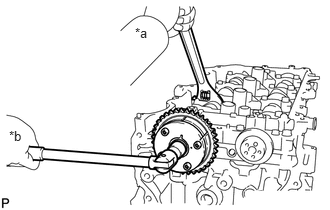
| *a | Hold |
| *b | Turn |
Using a wrench to hold the hexagonal portion of the camshaft, install the bolt.
- Torque:
- 85 N*m (867 kgf*cm, 63 ft.*lbf)
- NOTICE:
- ·
Be careful not to damage the cylinder head sub-assembly or spark plug tube with the wrench.
·Do not disassemble the camshaft timing gear assembly.
- HINT:
-
Perform "Inspection After Repair" after replacing the camshaft timing gear assembly.
-
Click hereEngine / Hybrid System>2AR-FE ENGINE CONTROL>SFI SYSTEM>INITIALIZATION
13070A
16.INSTALL CAMSHAFT TIMING EXHAUST GEAR ASSEMBLY
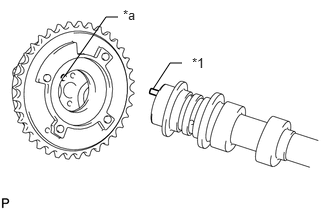
| *1 | Knock Pin |
| *a | Pin Hole |
Align and attach the knock pin of the No. 2 camshaft with the pin hole of the camshaft timing exhaust gear assembly.
| *1 | Camshaft Timing Exhaust Gear Assembly |
| *2 | No. 2 Camshaft Flange |
| *a | Incorrect |
| *b | Correct |
| *c | Clearance |
| *d | No Clearance |
Check that there is no clearance between the camshaft timing exhaust gear assembly and No. 2 camshaft flange.
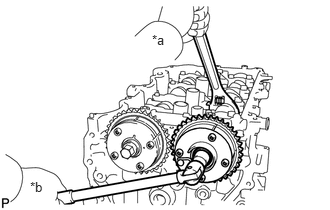
| *a | Hold |
| *b | Turn |
Using a wrench to hold the hexagonal portion of the No. 2 camshaft, install the bolt.
- Torque:
- 85 N*m (867 kgf*cm, 63 ft.*lbf)
- NOTICE:
- ·
Be careful not to damage the cylinder head sub-assembly or spark plug tube with the wrench.
·Do not disassemble the camshaft timing exhaust gear assembly.
- HINT:
-
Perform "Inspection After Repair" after replacing the camshaft timing exhaust gear assembly.
-
Click hereEngine / Hybrid System>2AR-FE ENGINE CONTROL>SFI SYSTEM>INITIALIZATION
17.ADD ENGINE OIL
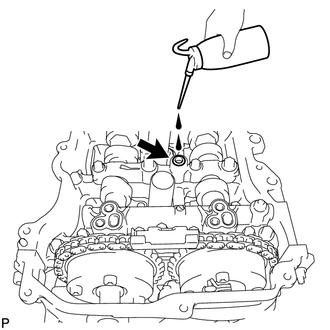
Add 50 cc (3.1 cu.in) of engine oil into the oil hole shown in the illustration.
- NOTICE:
- ·
Oil must be added if the valve lash adjuster assemblies were removed.
·Make sure that the low pressure chamber and oil paths of the valve lash adjuster assemblies are full of engine oil.
18.SET NO. 1 CYLINDER TO TDC/COMPRESSION
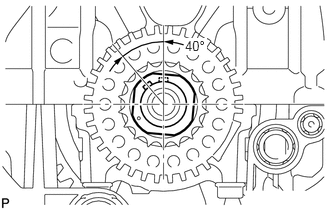
Temporarily install the crankshaft pulley bolt.
Rotate the crankshaft 40° counterclockwise to position the crankshaft pulley key as shown in the illustration.
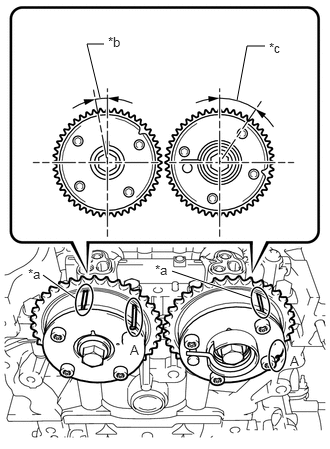
| *a | Timing Mark |
| *b | Approximately 7° |
| *c | Approximately 32° |
Check that the timing marks of the camshaft timing exhaust gear assembly and camshaft timing gear assembly are as shown in the illustration.
- HINT:
-
"A" is not a timing mark.
13561
19.INSTALL NO. 1 CHAIN VIBRATION DAMPER
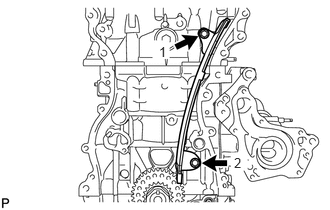
Install the No. 1 chain vibration damper with the 2 bolts in the order shown in the illustration.
- Torque:
- 21 N*m (214 kgf*cm, 15 ft.*lbf)
13506
20.INSTALL CHAIN SUB-ASSEMBLY
- HINT:
-
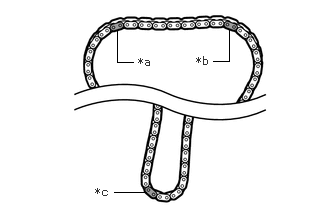 1.385,0.646 1.219,0.646 1.219,0.646 1.219,0.313 false 2.219,0.635 2.385,0.635 2.385,0.635 2.385,0.302 false 1.188,2 1.521,2 false 1.438,0.573 1.75,0.771 0.313,0.198 10 false *a 2.042,0.563 2.354,0.76 0.313,0.198 10 false *b 0.99,1.927 1.302,2.125 0.313,0.198 10 false *c
*a for Intake Side *b for Exhaust Side *c for Crankshaft
-
Confirm the color of each mark plate before installing the chain sub-assembly.
Type of Chain Sub-assembly for Exhaust Side for Intake Side for Crankshaft Type A Yellow Yellow Pink Type B Gold Gold Gold Type C Orange Orange Yellow
Place the chain sub-assembly onto the camshaft timing gear assemblies and crankshaft timing sprocket.
- HINT:
- ·
Make sure the mark plate of the chain sub-assembly faces away from the engine.
·It is not necessary to install the chain sub-assembly to the teeth of the gears and sprocket.
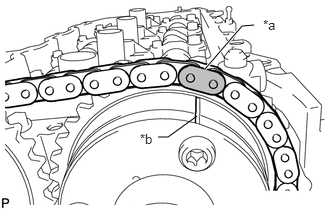
| *a | Mark Plate (for Exhaust Side) |
| *b | Timing Mark |
Align the mark plate (for Exhaust Side) of the chain sub-assembly with the timing mark of the camshaft timing exhaust gear assembly and install the chain sub-assembly to the camshaft timing exhaust gear assembly.
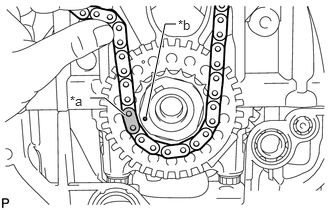
| *a | Mark Plate (for Crankshaft) |
| *b | Timing Mark |
Align the mark plate (for Crankshaft) of the chain sub-assembly with the timing mark of the crankshaft timing sprocket and install the chain sub-assembly to the crankshaft timing sprocket.
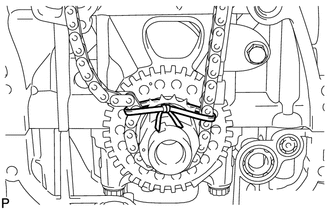
Tie a string above the crankshaft timing sprocket so that the chain sub-assembly is secure.
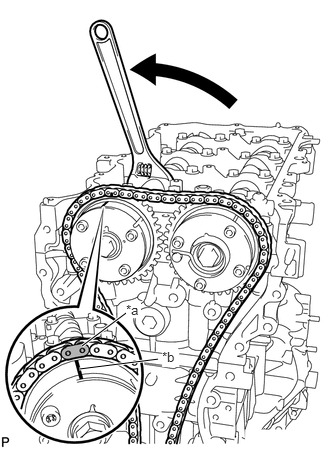
| *a | Mark Plate (for Intake Side) |
| *b | Timing Mark |
Using the hexagonal portion of the intake camshaft, rotate the intake camshaft counterclockwise with a wrench, align the timing mark of the camshaft timing gear assembly with the mark plate (for Intake Side) of the chain sub-assembly and install the chain sub-assembly to the camshaft timing gear assembly.
- HINT:
-
Hold the intake camshaft in place with a wrench until the No. 1 chain tensioner assembly is installed.
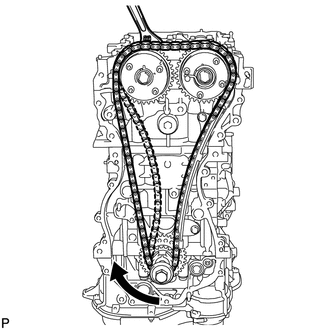
Remove the string above the crankshaft timing sprocket, rotate the crankshaft clockwise, and loosen the chain sub-assembly so that the chain tensioner slipper can be installed.
- NOTICE:
-
Make sure the chain sub-assembly is secure.
13559
21.INSTALL CHAIN TENSIONER SLIPPER
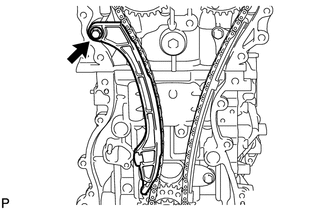
Install the chain tensioner slipper with the bolt.
- Torque:
- 21 N*m (214 kgf*cm, 15 ft.*lbf)
13540
22.INSTALL NO. 1 CHAIN TENSIONER ASSEMBLY
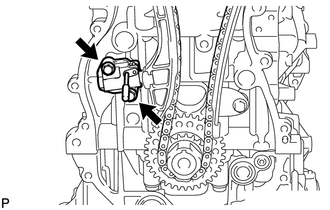
Install a new gasket and the No. 1 chain tensioner assembly with the 2 bolts.
- Torque:
- 10 N*m (102 kgf*cm, 7 ft.*lbf)
Remove the pin from the stopper plate.
13566B
23.INSTALL TIMING CHAIN GUIDE
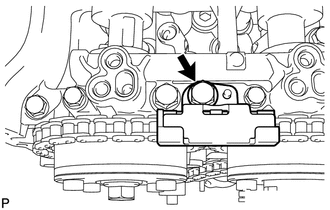
Install the timing chain guide with the bolt.
- Torque:
- 21 N*m (214 kgf*cm, 15 ft.*lbf)
24.CHECK NO. 1 CYLINDER AT TDC/COMPRESSION
Temporarily install the crankshaft pulley bolt.
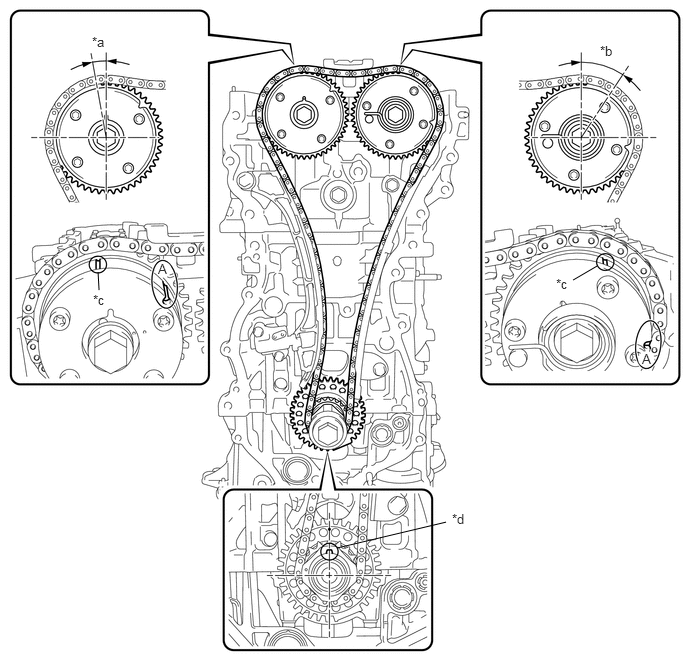
| *a | Approximately 7° | *b | Approximately 32° |
| *c | Timing Mark | *d | Key |
Rotate the crankshaft clockwise, and check that the timing marks on the crankshaft timing sprocket and camshaft timing gear assemblies are as shown in the illustration.
- HINT:
-
"A" is not a timing mark.
Remove the crankshaft pulley bolt.
17111
25.INSTALL INTAKE MANIFOLD
12262
26.CONNECT NO. 2 VENTILATION HOSE
23814B
27.INSTALL FUEL DELIVERY PIPE SUB-ASSEMBLY
17650
28.INSTALL VACUUM SWITCHING VALVE ASSEMBLY (for ACIS)
22030
29.INSTALL THROTTLE WITH MOTOR BODY ASSEMBLY
25051
30.INSTALL EXHAUST MANIFOLD CONVERTER SUB-ASSEMBLY
17167
31.INSTALL NO. 1 EXHAUST MANIFOLD HEAT INSULATOR
17139
32.INSTALL NO. 2 MANIFOLD STAY
17118
33.INSTALL MANIFOLD STAY
11302
34.INSTALL TIMING CHAIN COVER SUB-ASSEMBLY