HYBRID / BATTERY CONTROL HV BATTERY REMOVAL
PROCEDURE

 1. PRECAUTION
2.CHECK FOR DTCS
Check for DTCs.
Click hereEngine / Hybrid System>HYBRID / BATTERY CONTROL>HYBRID CONTROL SYSTEM>DTC CHECK / CLEAR
- NOTICE:
-
Confirm that P0AA6 (Hybrid Battery Voltage System Isolation Fault) is not output before doing removal or installation work inside the battery. If this DTC is output, perform troubleshooting for this DTC first.
G3834
3.REMOVE SERVICE PLUG GRIP
4.REMOVE CONNECTOR COVER ASSEMBLY
5.CHECK TERMINAL VOLTAGE
6.INSTALL CONNECTOR COVER ASSEMBLY
58387
7.REMOVE REAR FLOOR FINISH PLATE
64725D
8.REMOVE NO. 1 LUGGAGE COMPARTMENT TRIM HOOK
64722
9.REMOVE LUGGAGE COMPARTMENT INNER TRIM COVER LH
64721
10.REMOVE LUGGAGE COMPARTMENT INNER TRIM COVER RH
11.REMOVE REAR SEAT CUSHION ASSEMBLY
72693
12.REMOVE REAR SEAT CUSHION LOCK HOOK
73480
13.DISCONNECT REAR SEAT INNER WITH CENTER BELT ASSEMBLY LH
14.REMOVE REAR SEATBACK ASSEMBLY RH
64277C
15.REMOVE NO. 2 ROOM PARTITION COVER
16.REMOVE REAR SEATBACK ASSEMBLY LH
17.REMOVE REAR SIDE SEATBACK ASSEMBLY LH
18.REMOVE REAR SIDE SEATBACK ASSEMBLY RH
73370C
19.DISCONNECT REAR NO. 1 SEAT OUTER BELT ASSEMBLY LH
73360C
20.DISCONNECT REAR NO. 1 SEAT OUTER BELT ASSEMBLY RH
62332A
21.DISCONNECT REAR DOOR OPENING TRIM WEATHERSTRIP LH
62331A
22.DISCONNECT REAR DOOR OPENING TRIM WEATHERSTRIP RH
62471A
23.REMOVE ROOF SIDE INNER GARNISH RH
62472A
24.REMOVE ROOF SIDE INNER GARNISH LH
- HINT:
-
Use the same procedure as for the RH side.
73373
25.REMOVE REAR SEAT SHOULDER BELT COVER
64330
26.REMOVE PACKAGE TRAY TRIM PANEL ASSEMBLY (w/o Rear Sunshade)
64330
27.REMOVE PACKAGE TRAY TRIM PANEL ASSEMBLY (w/ Rear Sunshade)
64272B
28.REMOVE ROOM PARTITION BOARD LH
64271G
29.REMOVE ROOM PARTITION BOARD RH
30.REMOVE AUXILIARY BATTERY
G92D1
31.REMOVE NO. 1 HYBRID BATTERY INTAKE DUCT
G92Q6
32.REMOVE NO. 4 HYBRID BATTERY SHIELD PANEL
82164C
33.DISCONNECT NO. 4 FLOOR WIRE
34.DISCONNECT LOW VOLTAGE CONNECTOR
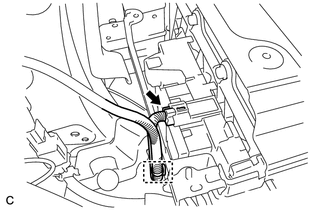
Disconnect the connector and clamp.
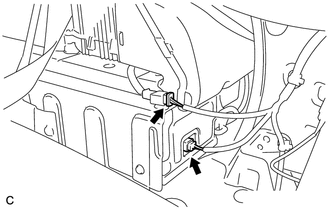
Disconnect the 2 connectors.
G9510
35.REMOVE HV BATTERY
- CAUTION:
-
Wear insulated gloves.
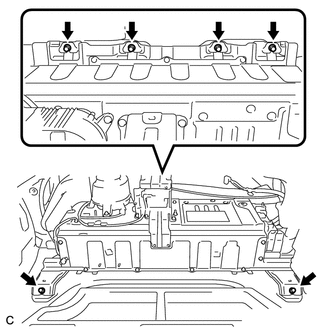
Remove the 6 bolts from the HV battery.
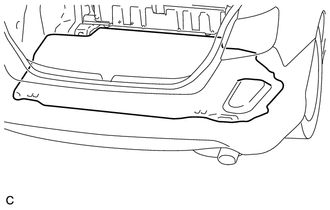
Install the luggage compartment floor mat upside down.
Cut and shape a piece of cardboard so that it fits the area between the HV battery bolt attachment positions, and then insert it as shown in the illustration.
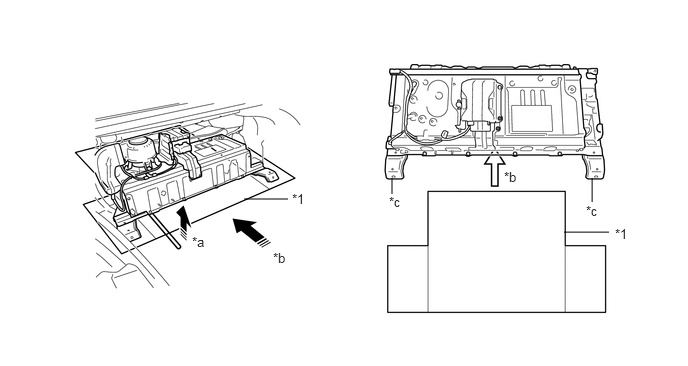
| *1 | Cardboard | - | - |
| *a | Hold up | *b | Insert |
| *c | HV battery bolt attachment position | - | - |
Using a tire lever to hold up the HV battery, insert the cardboard until it cannot be inserted any further.
- NOTICE:
-
Secure the No. 4 floor wire with electrical tape to prevent it from getting caught when moving the battery or other parts.
- HINT:
-
Attach tape to the feet and edges of the battery to protect tools and the vehicle body.
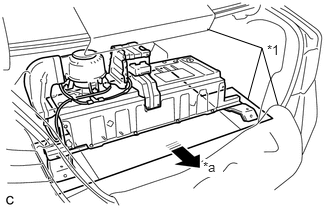
| *1 | Cardboard |
| *a | Pull |
Pull the cardboard and HV battery together to the middle of the luggage compartment.
- NOTICE:
-
Use cardboard or other similar material to protect the HV battery and vehicle body from damage.
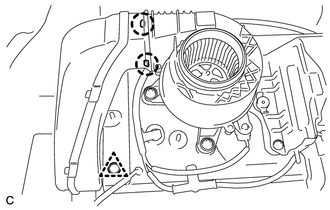
Remove the clip.
Disengage the 2 claws and remove the No. 2 hybrid battery intake duct.
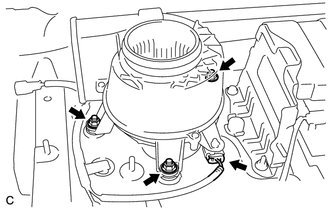
Disconnect the connector from the battery cooling blower assembly.
Remove the 3 nuts and battery cooling blower assembly.
- NOTICE:
- ·
Be sure not to touch the fan part of the battery cooling blower assembly.
·Do not lift the battery cooling blower assembly using the wire harness.
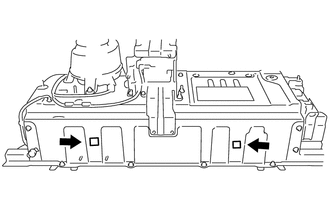
Remove the 2 clips.
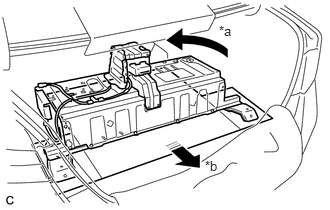
| *a | Turn 180° |
| *b | Pull |
Turn the cardboard and HV battery 180° together.
Pull the HV battery together with the cardboard toward the rear of the vehicle.
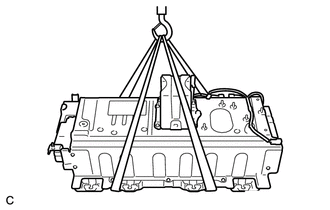
Using a suitable adaptor such as a rope, remove the HV battery while tilting it.
- NOTICE:
-
While lowering the HV battery from the vehicle, do not allow it to contact the vehicle.
G92Q2
36.REMOVE NO. 2 HYBRID VEHICLE BATTERY SHIELD PANEL
- CAUTION:
-
Wear insulated gloves.
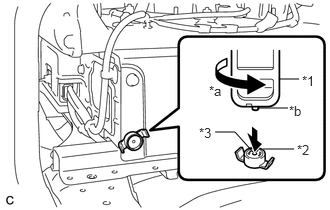
| *1 | Service Plug Grip |
| *2 | Battery Cover Lock Striker |
| *3 | Button |
| *a | Turn |
| *b | Projection |
Using the service plug grip, remove the battery cover lock striker.
- HINT:
-
Insert the projection part of the service plug grip, and turn the button of the battery cover lock striker counterclockwise, and release the lock.
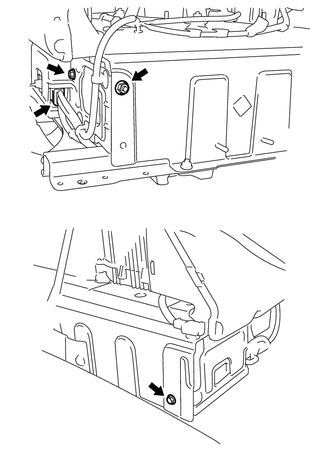
Disconnect the connector.
Remove the 2 bolts, nut and No. 2 hybrid vehicle battery shield panel.
Disconnect the 3 wire harness clamps.
89892A
37.REMOVE BATTERY SMART UNIT
G920Q
38.REMOVE NO. 1 HYBRID BATTERY SHIELD SUB-ASSEMBLY
- CAUTION:
-
Wear insulated gloves.
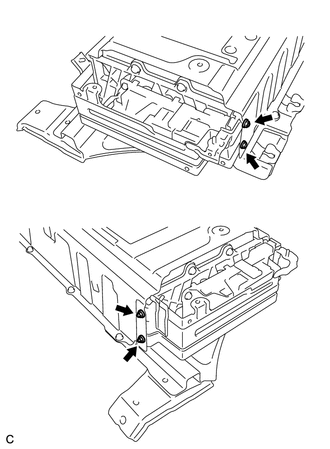
Remove the bolt, 3 nuts and No. 1 hybrid battery shield sub-assembly.
G92Z0
39.REMOVE HYBRID BATTERY JUNCTION BLOCK ASSEMBLY
G92X2
40.SEPARATE NO. 2 HYBRID BATTERY PACK WIRE
- CAUTION:
-
Wear insulated gloves.
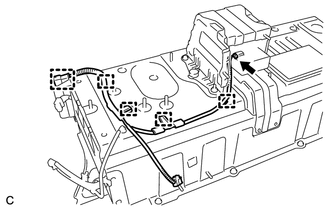
Disconnect the connector and 5 clamps, and remove the No. 2 hybrid battery pack wire.