2AR-FXE ENGINE MECHANICAL CYLINDER HEAD GASKET REMOVAL
PROCEDURE

 11302
1.REMOVE TIMING CHAIN COVER SUB-ASSEMBLY
17167
2.REMOVE NO. 1 EXHAUST MANIFOLD HEAT INSULATOR
16261G
3.DISCONNECT NO. 1 WATER BY-PASS HOSE
22030
4.REMOVE THROTTLE WITH MOTOR BODY ASSEMBLY
25612
5.REMOVE NO. 2 EGR PIPE
17139
6.REMOVE NO. 2 MANIFOLD STAY
17118
7.REMOVE MANIFOLD STAY
25051
8.REMOVE EXHAUST MANIFOLD CONVERTER SUB-ASSEMBLY
25680
9.REMOVE EGR COOLER ASSEMBLY
25611A
10.REMOVE NO. 1 EGR PIPE
17111
11.REMOVE INTAKE MANIFOLD
23814B
12.REMOVE FUEL DELIVERY PIPE
13.SET NO. 1 CYLINDER TO TDC/COMPRESSION
Temporarily install the crankshaft pulley bolt.
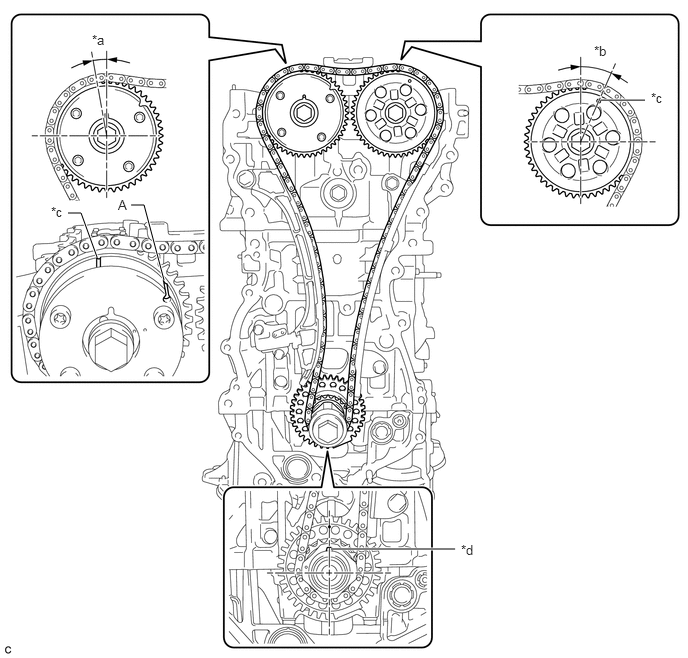
| *a | Approximately 7° | *b | Approximately 32° |
| *c | Timing Mark | *d | Crankshaft pulley set key |
- HINT:
-
"A" is not a timing mark.
Rotate the crankshaft clockwise so that the timing marks on the crankshaft timing gear and camshaft timing gears are as shown in the illustration.
- HINT:
-
If the timing marks do not align, rotate the crankshaft clockwise again and align the timing marks.
Remove the crankshaft pulley bolt.
13566B
14.REMOVE TIMING CHAIN GUIDE
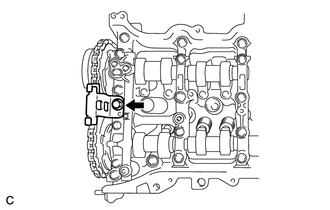
Remove the bolt and timing chain guide.
13540
15.REMOVE NO. 1 CHAIN TENSIONER ASSEMBLY
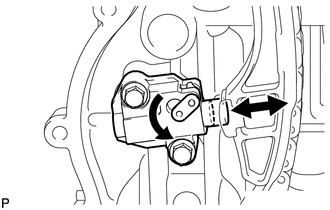
| *1 | Stopper Plate |
| *2 | Plunger |
Allow the plunger to extend slightly, and then rotate the stopper plate counterclockwise to release the lock. Once the lock is released, push the plunger into the tensioner.
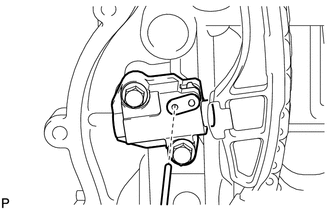
| *1 | Pin |
Move the stopper plate clockwise to set the lock, and insert a pin into the stopper plate hole.
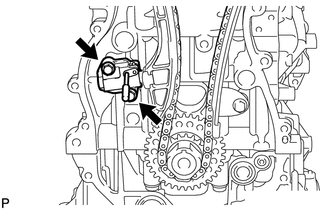
Remove the 2 bolts, chain tensioner and gasket.
13559
16.REMOVE CHAIN TENSIONER SLIPPER
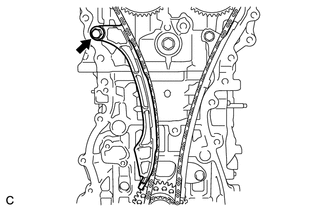
Remove the bolt and chain tensioner slipper.
13506
17.REMOVE CHAIN SUB-ASSEMBLY
13561
18.REMOVE NO. 1 CHAIN VIBRATION DAMPER
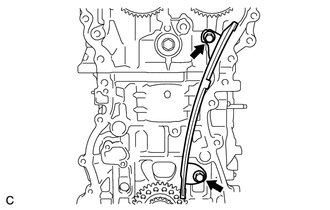
Remove the 2 bolts and chain vibration damper.
13050
19.REMOVE CAMSHAFT TIMING GEAR ASSEMBLY
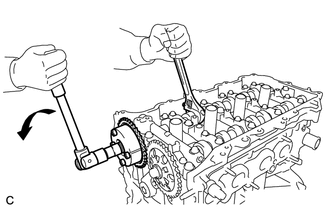
| *a | Hold |
| *b | Turn |
Hold the hexagonal portion of the camshaft with a wrench and remove the bolt and camshaft timing gear.
- NOTICE:
- ·
Be careful not to damage the cylinder head or spark plug tube with the wrench.
·Do not disassemble the camshaft timing gear.
13523
20.REMOVE CAMSHAFT TIMING SPROCKET
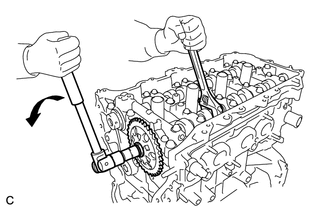
| *a | Hold |
| *b | Turn |
Hold the hexagonal portion of the camshaft with a wrench and remove the bolt and camshaft timing sprocket.
- NOTICE:
-
Be careful not to damage the cylinder head or spark plug tube with the wrench.
11103
21.REMOVE CAMSHAFT HOUSING SUB-ASSEMBLY
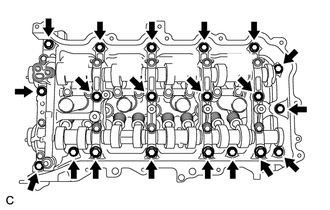
Uniformly loosen and remove the 20 bearing cap bolts in the sequence shown in the illustration.
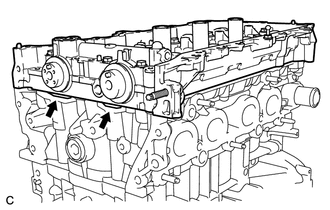
Remove the camshaft housing by prying between the cylinder head and camshaft housing with a screwdriver.
- HINT:
-
Tape the screwdriver tip before use.
- NOTICE:
-
Be careful not to damage the contact surfaces of the cylinder head and camshaft housing.
22.REMOVE CAMSHAFT BEARING CAP
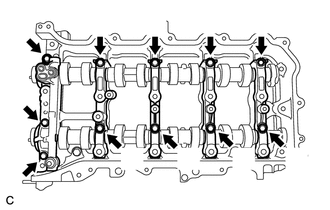
Remove the 11 bearing cap bolts in the sequence shown in the illustration.
Remove the 5 bearing caps.
- HINT:
-
Arrange the removed parts in the correct order.
15678A
23.REMOVE OIL CONTROL VALVE FILTER
11811
24.REMOVE NO. 1 CAMSHAFT BEARING
13511
25.REMOVE CAMSHAFT
Remove the camshaft and No. 2 camshaft.
11821
26.REMOVE NO. 2 CAMSHAFT BEARING
13801
27.REMOVE NO. 1 VALVE ROCKER ARM SUB-ASSEMBLY
Remove the 16 valve rocker arms from the cylinder head.
- HINT:
-
Arrange the removed parts in the correct order.
13750
28.REMOVE VALVE LASH ADJUSTER ASSEMBLY
Remove the 16 valve lash adjusters from the cylinder head.
- HINT:
-
Arrange the removed parts in the correct order.
13716
29.REMOVE VALVE STEM CAP
Remove the 16 valve stem caps from the cylinder head.
- HINT:
-
Arrange the removed parts in the correct order.
11101
30.REMOVE CYLINDER HEAD SUB-ASSEMBLY
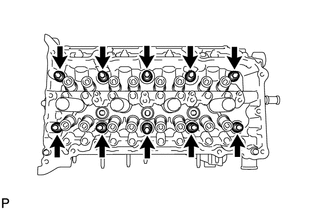
Using a 10 mm bi-hexagon wrench, uniformly loosen the 10 bolts in the sequence shown in the illustration. Remove the 10 cylinder head bolts and plate washers.
- HINT:
-
Be sure to keep the removed parts separate for each installation position.
- NOTICE:
- ·
Be careful not to drop washers into the cylinder head.
·Head warpage or cracking could result from removing bolts in the incorrect order.
Remove the cylinder head.
11115
31.REMOVE CYLINDER HEAD GASKET
Remove the cylinder head gasket from the cylinder block.