6AR-FSE ENGINE MECHANICAL CAMSHAFT INSTALLATION
CAUTION / NOTICE / HINT
- HINT:
-
Perform inspection after repair after replacing the camshaft, No. 2 camshaft, camshaft timing gear assembly or camshaft timing exhaust gear assembly.
-
Click hereEngine / Hybrid System>6AR-FSE (ENGINE CONTROL)>SFI SYSTEM>INITIALIZATION
PROCEDURE

 11811
1.INSTALL NO. 1 CAMSHAFT BEARING
11821
2.INSTALL NO. 2 CAMSHAFT BEARING
15678A
3.INSTALL OIL CONTROL VALVE FILTER
13070A
4.INSTALL CAMSHAFT TIMING EXHAUST GEAR ASSEMBLY
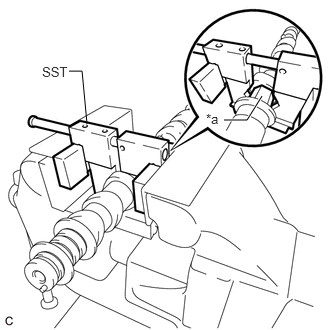
| *a | Hexagonal Portion |
Using SST, grip the hexagonal portion, and then secure the SST and No. 2 camshaft in a vise as shown in the illustration.
- SST
- 09212-31010
- NOTICE:
- ·
Do not damage the No. 2 camshaft.
·Never grip areas other than the hexagonal portion, as this may cause damage.
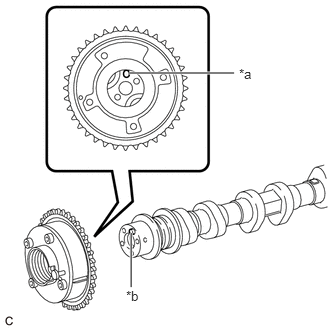
| *a | Knock Pin Hole |
| *b | Knock Pin |
Align and fit the knock pin of the No. 2 camshaft with the knock pin hole of the camshaft timing exhaust gear assembly.
- NOTICE:
-
Be careful not to damage the contact surface of the camshaft timing exhaust gear assembly with the knock pin of the No. 2 camshaft.
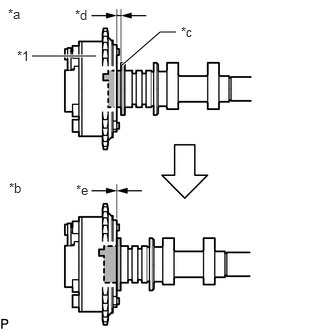
| *1 | Camshaft Timing Exhaust Gear Assembly |
| *a | Incorrect |
| *b | Correct |
| *c | No. 2 Camshaft Flange |
| *d | Gap |
| *e | No Gap |
Check that there is no gap between the camshaft timing exhaust gear assembly and No. 2 camshaft flange.
Secure the camshaft timing exhaust gear assembly with the bolt.
- Torque:
- 85 N*m (867 kgf*cm, 63 ft.*lbf)
- NOTICE:
-
Do not disassemble the camshaft timing exhaust gear assembly.
- HINT:
-
Perform "Inspection After Repair" after replacing the camshaft timing exhaust gear assembly.
-
Click hereEngine / Hybrid System>6AR-FSE (ENGINE CONTROL)>SFI SYSTEM>INITIALIZATION
5.SET NO. 1 CYLINDER TO TDC/COMPRESSION
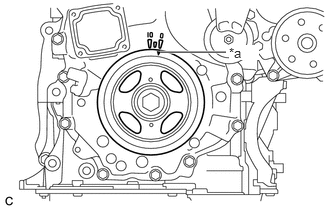
| *a | Timing Notch (Groove) |
Turn the crankshaft pulley until its timing notch (groove) and the timing mark "0" of the timing chain cover sub-assembly are aligned.
13512
6.INSTALL NO. 2 CAMSHAFT
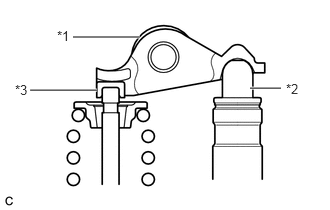
| *1 | No. 1 Valve Rocker Arm Sub-assembly |
| *2 | Valve Lash Adjuster Assembly |
| *3 | Valve Stem Cap |
Make sure that the No. 1 valve rocker arm sub-assemblies are installed as shown in the illustration.
Clean the camshaft journals.
Apply a light coat of engine oil to the camshaft journals, camshaft housing sub-assembly and camshaft bearing caps.
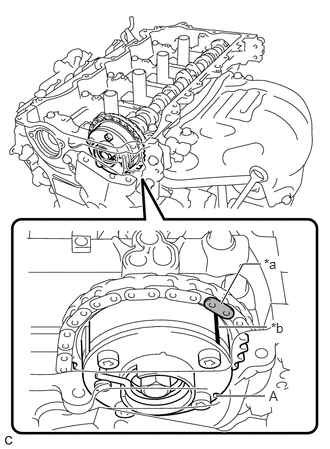
| *a | Paint Mark |
| *b | Timing Mark |
Hold up the chain sub-assembly, align the timing mark and the paint mark, and install the No. 2 camshaft to the camshaft housing sub-assembly.
- HINT:
- ·
"A" is not a timing mark.
·Perform "Inspection After Repair" after replacing the No. 2 camshaft.
Click hereEngine / Hybrid System>6AR-FSE (ENGINE CONTROL)>SFI SYSTEM>INITIALIZATION
13050
7.INSTALL CAMSHAFT TIMING GEAR ASSEMBLY
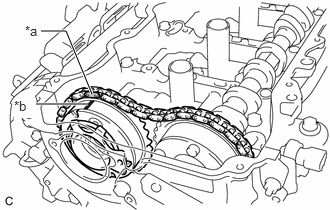
| *a | Paint Mark |
| *b | Timing Mark |
Align the paint mark of the chain sub-assembly and the timing mark of the camshaft timing gear assembly. Then install the camshaft timing gear assembly.
- HINT:
-
Perform "Inspection After Repair" after replacing the camshaft timing gear assembly.
-
Click hereEngine / Hybrid System>6AR-FSE (ENGINE CONTROL)>SFI SYSTEM>INITIALIZATION
13511
8.INSTALL CAMSHAFT
| *1 | No. 1 Valve Rocker Arm Sub-assembly |
| *2 | Valve Lash Adjuster Assembly |
| *3 | Valve Stem Cap |
Make sure that the No. 1 valve rocker arm sub-assemblies are installed as shown in the illustration.
Clean the camshaft journals.
Apply a light coat of engine oil to the camshaft journals and camshaft housing sub-assembly.
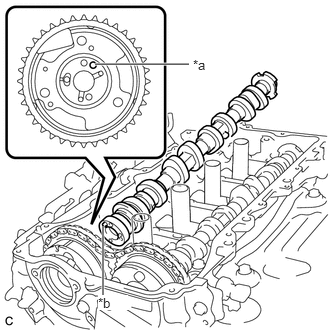
| *a | Knock Pin Hole |
| *b | Knock Pin |
Align and fit the knock pin of the camshaft with the knock pin hole of the camshaft timing gear assembly.
- NOTICE:
-
Be careful not to damage the contact surface of the camshaft timing gear assembly with the knock pin of the camshaft.
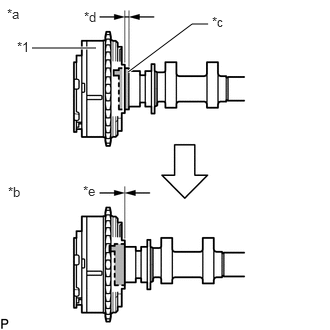
| *1 | Camshaft Timing Gear Assembly |
| *a | Incorrect |
| *b | Correct |
| *c | Portion (A) of Camshaft |
| *d | Gap |
| *e | No Gap |
Check that there is no gap between the camshaft timing gear assembly and portion (A) of the camshaft shown in the illustration.
- HINT:
-
Perform "Inspection After Repair" after replacing the camshaft.
-
Click hereEngine / Hybrid System>6AR-FSE (ENGINE CONTROL)>SFI SYSTEM>INITIALIZATION
13523F
9.TEMPORARILY INSTALL CAMSHAFT TIMING GEAR BOLT
- NOTICE:
-
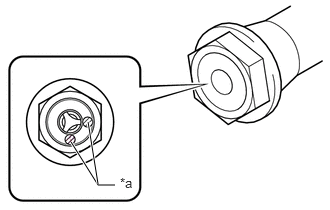 0.74,1.479 1.021,1.927 1.021,1.927 1.198,1.927 true 1.021,1.917 0.917,1.271 true 1.25,1.823 1.563,1.979 0.313,0.156 10 false *a
*a Identification Mark Stamp
-
There are different types of camshaft timing gear bolts. Make sure to check the identification mark to determine the tightening torque.
Identification Mark Item Identification Mark Stamp Type A A Type B D
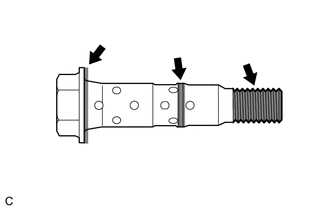
Apply engine oil to the areas of the camshaft timing gear bolt shown in the illustration.
Temporarily install the camshaft timing gear bolt.
- HINT:
-
Make sure that the camshaft timing gear bolt is screwed in by at least 3 threads.
10.INSTALL CAMSHAFT BEARING CAP
Place the No. 1 camshaft bearing cap, No. 2 camshaft bearing cap, No. 3 camshaft bearing cap and No. 4 camshaft bearing cap in their correct positions.
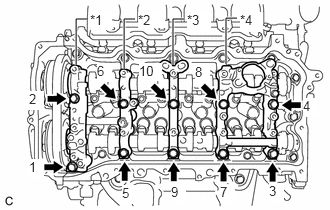
| *1 | No. 1 Camshaft Bearing Cap |
| *2 | No. 2 Camshaft Bearing Cap |
| *3 | No. 3 Camshaft Bearing Cap |
| *4 | No. 4 Camshaft Bearing Cap |
Uniformly tighten the 10 bolts in several steps in the order shown in the illustration.
- Torque:
- 27 N*m (275 kgf*cm, 20 ft.*lbf)
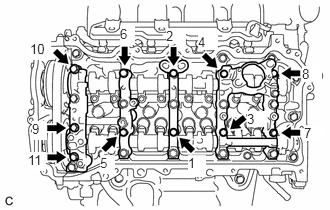
Uniformly tighten the 11 bolts in several steps in the order shown in the illustration.
- Torque:
- 16 N*m (163 kgf*cm, 12 ft.*lbf)
Check the torque of each bolt again.
13523F
11.TIGHTEN CAMSHAFT TIMING GEAR BOLT
- NOTICE:
-
0.74,1.479 1.021,1.927 1.021,1.927 1.198,1.927 true 1.021,1.917 0.917,1.271 true 1.25,1.823 1.563,1.979 0.313,0.156 10 false *a
*a Identification Mark Stamp
-
There are different types of camshaft timing gear bolts. Make sure to check the identification mark to determine the tightening torque.
Identification Mark Item Identification Mark Stamp Type A A Type B D
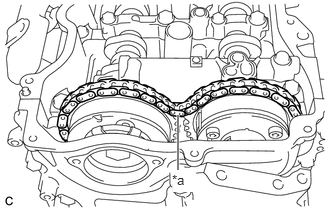
| *a | Slack |
Check that there is some slack in the chain sub-assembly as shown in the illustration.
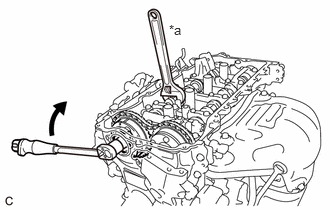
| *a | Hold |

|
Turn |
Use a wrench to hold the hexagonal portion of the camshaft.
Tighten the camshaft timing gear bolt.
- Torque:
- Type A : 120 N*m (1224 kgf*cm, 89 ft.*lbf)
- Type B : 95 N*m (969 kgf*cm, 70 ft.*lbf)
- NOTICE:
-
Be careful not to damage the cylinder head sub-assembly or spark plug tube with the wrench.
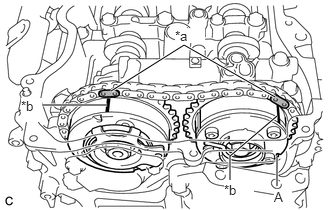
| *a | Paint Mark |
| *b | Timing Mark |
Check that the paint marks of the chain sub-assembly are aligned with the timing mark of the camshaft timing gear assembly and the camshaft timing exhaust gear assembly.
- HINT:
-
"A" is not a timing mark.
12.ADD ENGINE OIL
13566B
13.INSTALL TIMING CHAIN GUIDE
13540
14.INSTALL NO. 1 CHAIN TENSIONER ASSEMBLY
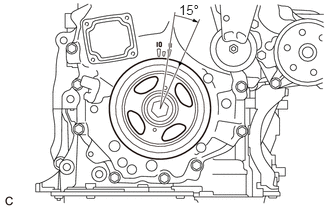
Turn the crankshaft pulley approximately 15° clockwise.
Install a new gasket and the No. 1 chain tensioner assembly with the 2 bolts.
- Torque:
- 10 N*m (102 kgf*cm, 7 ft.*lbf)
- NOTICE:
-
Make sure not to drop the gasket inside the timing chain cover sub-assembly.
Remove the pin from the stopper plate.
15.SET NO. 1 CYLINDER TO TDC/COMPRESSION
Turn the crankshaft pulley until its timing notch (groove) and the timing mark "0" of the timing chain cover sub-assembly are aligned.
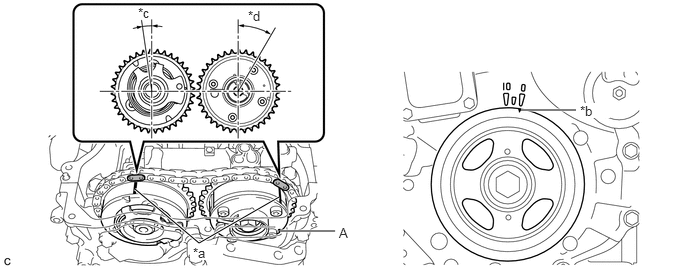
| *a | Timing Mark | *b | Timing Notch (Groove) |
| *c | Approximately 7° | *d | Approximately 32° |
Check that both timing marks on the camshaft timing gear assembly and camshaft timing exhaust gear assembly are facing upward as shown in the illustration. If not, turn the crankshaft 1 revolution (360°) to align the timing marks as shown in the illustration.
- HINT:
-
"A" is not a timing mark.
11324
16.INSTALL TIMING CHAIN COVER PLATE
Install the timing chain cover plate and a new gasket with the 4 bolts.
- Torque:
- 10 N*m (102 kgf*cm, 7 ft.*lbf)
15370
17.INSTALL CAMSHAFT TIMING OIL CONTROL SOLENOID ASSEMBLY
11201
18.INSTALL CYLINDER HEAD COVER SUB-ASSEMBLY
12262
19.CONNECT NO. 2 VENTILATION HOSE
19500
20.INSTALL IGNITION COIL ASSEMBLY
29300
21.INSTALL VACUUM PUMP ASSEMBLY
82121
22.CONNECT ENGINE WIRE
Connect the engine wire to the engine with the bolts and nuts.
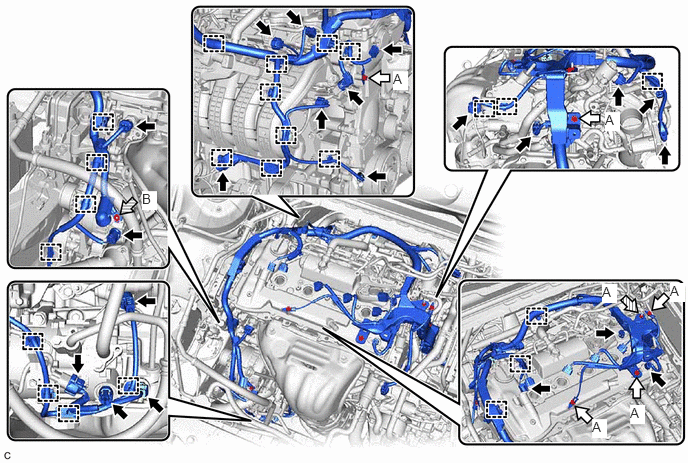

|
Bolt | 
|
Nut |
- Torque:
- (A) : 10 N*m (102 kgf*cm, 7 ft.*lbf)
- (B) : 9.8 N*m (100 kgf*cm, 87 in.*lbf)
Connect the connectors and engage the clamps.
Engage the clamp.
23021
23.INSTALL FUEL PUMP WITH SEAL SUB-ASSEMBLY (for High Pressure)
24.INSTALL FUEL HOSE BRACKET
Install the fuel hose bracket to the EGR valve bracket with the engine cover joint.
- Torque:
- 13 N*m (133 kgf*cm, 10 ft.*lbf)
Engage the 2 clamps to connect the 2 fuel hoses.
25.CONNECT HOSES
Engage the 3 clamps.
26.INSTALL AIR CLEANER ASSEMBLY WITH AIR CLEANER HOSE
27.CONNECT CABLE TO NEGATIVE BATTERY TERMINAL
- NOTICE:
-
When disconnecting the cable, some systems need to be initialized after the cable is reconnected.
-
Click hereGeneral>INTRODUCTION>REPAIR INSTRUCTION>PRECAUTION
28.INSPECT FOR ENGINE OIL LEAK
17750A
29.INSTALL INLET AIR CLEANER ASSEMBLY
12601B
30.INSTALL NO. 1 ENGINE COVER SUB-ASSEMBLY
53295E
31.INSTALL COOL AIR INTAKE DUCT SEAL
53736
32.INSTALL FRONT FENDER APRON SEAL RH
33.INSTALL FRONT WHEEL RH
34. OPERATION CHECK