N04C-VL ENGINE MECHANICAL CAMSHAFT INSTALLATION
PROCEDURE

 13501
1.INSTALL CAMSHAFT
Apply engine oil to the camshaft journal and bearing.
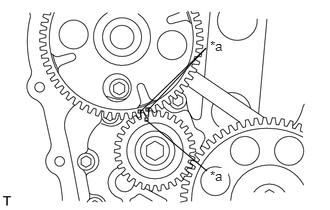
Match the alignment marks on the camshaft timing gear and oil pump gear and install the camshaft.
| *a | Alignment Mark |
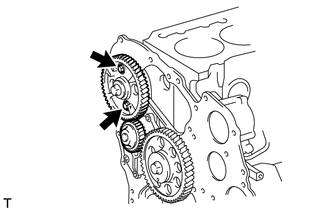
Install the camshaft with the 2 bolts.
- Torque:
29 N*m (291 kgf*cm, 21 ft.*lbf)
11301C
2.INSTALL TIMING CHAIN OR BELT COVER OIL SEAL
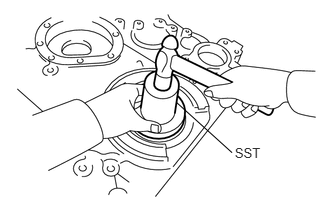
Using SST and a hammer, tap a new timing chain or belt cover oil seal into the timing gear case until the timing chain or belt cover oil seal is flush with the timing gear edge.
- SST
- 09223-78010
- NOTICE:
- ·
Be careful not to tap the oil seal at an angle.
·Keep the gap between the gear case edge and the oil seal free of foreign matter.
Apply MP grease to the oil seal lip.
3.INSTALL TIMING GEAR CASE
Remove any old seal packing material from the contact surface.
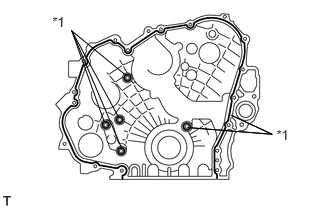
Apply a continuous bead of seal packing (diameter: 1.5 to 2.5 mm (0.059 to 0.098 in.)) as shown in the illustration.
- Seal packing:
Toyota Genuine Seal Packing Black, ThreeBond 1207B or equivalent
| *1 | Seal Packing |
- NOTICE:
- ·
Remove any oil from the contact surface.
·Install the timing gear case within 3 minutes of applying the seal packing.
·Do not expose the seal packing to engine oil for at least 2 hours after installing.
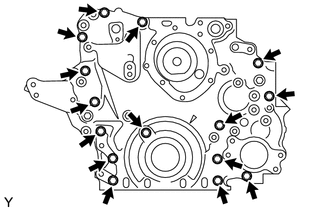
Install the timing gear case with the 15 bolts.
- Torque:
29 N*m (291 kgf*cm, 21 ft.*lbf)
12270
4.INSTALL OIL SEPARATOR ASSEMBLY
Install 3 new O-rings to the oil separator assembly and cylinder block.
Install the oil separator assembly with the 5 bolts.
- Torque:
55 N*m (561 kgf*cm, 41 ft.*lbf)
12101
5.INSTALL OIL PAN SUB-ASSEMBLY
Remove any old seal packing material from the contact surface.
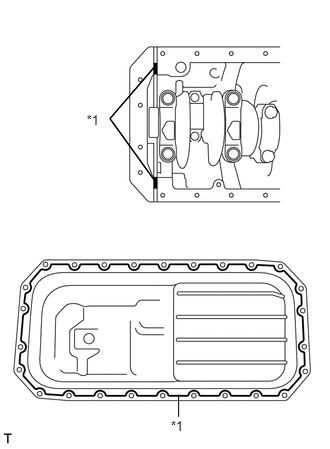
Apply a continuous bead of seal packing (diameter: 3.0 to 4.0 mm (0.118 to 0.157 in.)) as shown in the illustration.
- Seal packing:
Toyota Genuine Seal Packing Black, ThreeBond 1207B or equivalent
| *1 | Seal Packing |
- NOTICE:
- ·
Remove any oil from the contact surface.
·Install the oil pan sub-assembly within 3 minutes of applying the seal packing.
·Do not expose the seal packing to engine oil for at least 2 hours after installing.
Install the oil pan sub-assembly with the 26 bolts.
- Torque:
29 N*m (291 kgf*cm, 21 ft.*lbf)
11351H
6.INSTALL FLYWHEEL HOUSING STAY RH
Install the flywheel housing stay RH with the 4 bolts.
- Torque:
- M14 bolt:
132 N*m (1346 kgf*cm, 97 ft.*lbf)
- M12 bolt:
97 N*m (989 kgf*cm, 72 ft.*lbf)
11351G
7.INSTALL FLYWHEEL HOUSING STAY LH
Install the flywheel housing stay LH with the 4 bolts.
- Torque:
- M14 bolt:
132 N*m (1346 kgf*cm, 97 ft.*lbf)
- M12 bolt:
97 N*m (989 kgf*cm, 72 ft.*lbf)
13470
8.INSTALL CRANKSHAFT PULLEY ASSEMBLY
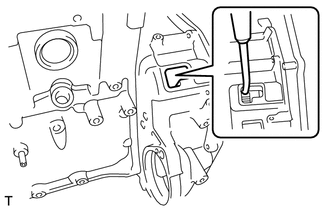
Install the crankshaft pulley and crankshaft pulley spacer onto the crankshaft.
- HINT:
-
Align the pulley set key with the key groove of the pulley.
Using a 46 mm socket wrench, tighten the nut.
- Torque:
100 N*m (1020 kgf*cm, 74 ft.*lbf)
- HINT:
-
Insert a screwdriver through the inspection hole of the flywheel housing into the ring gear of the flywheel to keep it from turning together with the crankshaft.
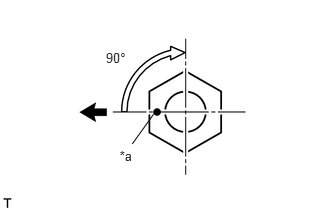
Mark the front side of the nut with paint as shown in the illustration.
| *a | Paint |

|
Front Side of Engine |
Retighten the nut by 90°.
13751
9.INSTALL VALVE LIFTER
- NOTICE:
-
Be sure to install the valve lifter to its original position.
11115
10.INSTALL CYLINDER HEAD GASKET
11101
11.INSTALL CYLINDER HEAD SUB-ASSEMBLY
13819
12.INSTALL VALVE BRIDGE
13781
13.INSTALL VALVE PUSH ROD
13901
14.INSTALL NO. 1 VALVE ROCKER SHAFT SUB-ASSEMBLY
15.ADJUST VALVE CLEARANCE
29300
16.INSTALL VACUUM PUMP ASSEMBLY
29601B
17.INSTALL VACUUM PUMP OIL PIPE SUB-ASSEMBLY
19971E
18.INSTALL VACUUM PIPE
19.INSTALL CAMSHAFT POSITION SENSOR
27020
20.INSTALL GENERATOR ASSEMBLY
16100
21.INSTALL ENGINE WATER PUMP ASSEMBLY
88420
22.INSTALL IDLE PULLEY ASSEMBLY WITH BRACKET (w/ Air Conditioning System)
16630G
23.INSTALL IDLER PULLEY ASSEMBLY
88431
24.INSTALL NO. 1 COMPRESSOR MOUNTING BRACKET (w/ Air Conditioning System)
88320
25.INSTALL COOLER COMPRESSOR ASSEMBLY (w/ Air Conditioning System)
16206
26.INSTALL WATER BY-PASS PIPE SUB-ASSEMBLY
16206B
27.INSTALL NO. 3 WATER BY-PASS PIPE SUB-ASSEMBLY
87208L
28.INSTALL WATER PIPE SUB-ASSEMBLY
16577C
29.INSTALL RADIATOR PIPE
22100
30.INSTALL INJECTION OR SUPPLY PUMP ASSEMBLY
23670
31.INSTALL INJECTOR ASSEMBLY
17201
32.INSTALL TURBOCHARGER SUB-ASSEMBLY
16400
33.INSTALL RADIATOR ASSEMBLY