N04C-VL FUEL FUEL SUPPLY PUMP INSTALLATION
PROCEDURE

 13613
1.INSTALL INJECTION PUMP DRIVE GEAR
Install a new O-ring onto the timer cover.
Install the timer cover onto the injection or supply pump assembly with the 2 bolts.
- Torque:
29 N*m (291 kgf*cm, 21 ft.*lbf)
Install the crankshaft angle plate and the injection pump drive gear with the nut.
- Torque:
64 N*m (650 kgf*cm, 47 ft.*lbf)
22100
2.INSTALL INJECTION OR SUPPLY PUMP ASSEMBLY
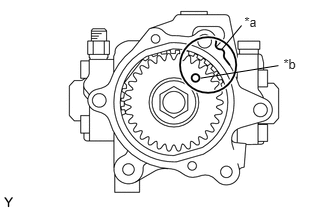
Install a new O-ring onto the timer cover.
Turn the drive gear and align the hole with the matchmark as shown in the illustration.
| *a | Matchmark |
| *b | Hole |
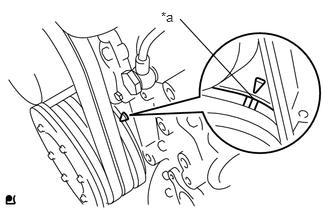
Check that the No. 1 cylinder is at TDC/ compression.
| *a | Timing Mark |
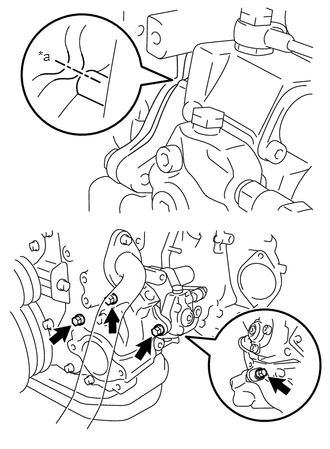
Align the matchmarks of the timer cover and the front end plate, and then install the supply pump assembly with the 4 bolts.
- Torque:
29 N*m (291 kgf*cm, 21 ft.*lbf)
| *a | Matchmark |
- NOTICE:
- ·
Be sure to prevent foreign matter or water from entering the lines.
·Check that the installation part has no foreign matter attached.
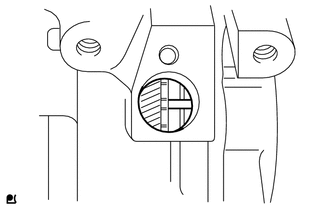
When the crankshaft position sensor's installation hole can be accessed directly:
Check that the knock pin of the injection pump drive gear is at the center of the hole. Then, proceed to step (g).
If not, perform steps (b), (c), and (d) again.
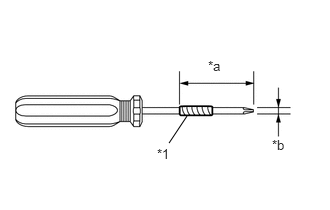
When the crankshaft position sensor installation hole cannot be accessed directly:
| *1 | Vinyl Tape |
| *a | 36 mm (1.42 in.) |
| *b | 6 mm (0.236 in.) or less |
Tape the screwdriver as shown in the illustration.
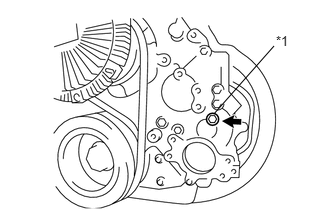
Remove the service plug and gasket from the timing chain or belt cover sub-assembly.
| *1 | Service Plug |
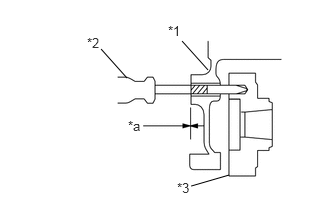
Insert the screwdriver into the service plug hole.
| *1 | Timing Chain Cover |
| *2 | Screwdriver |
| *3 | Drive Gear |
| *a | 0 to 2 mm (0 to 0.0787 in.) |
Check that the tape end and timing chain or belt cover sub-assembly are aligned as shown in the illustration.
Install the service plug and a new gasket to the timing chain cover sub-assembly.
- Torque:
8.0 N*m (82 kgf*cm, 71 in.*lbf)
Install the holder clip with the bolt.
- Torque:
29 N*m (291 kgf*cm, 21 ft.*lbf)
Connect the 2 connectors.
3.INSTALL CRANKSHAFT POSITION SENSOR
23803H
4.INSTALL FUEL RETURN PIPE SUB-ASSEMBLY
Temporarily install the fuel return pipe sub-assembly, No.4 fuel pipe sub-assembly and 3 new gaskets with the 2 union bolts.
Tighten the 2 union bolts.
- Torque:
- Bolt A:
20 N*m (204 kgf*cm, 15 ft.*lbf)
- Bolt B:
10 N*m (102 kgf*cm, 7 ft.*lbf)
- NOTICE:
- ·
Be sure to prevent foreign matter or water from entering the lines.
·Check that the installation part has no foreign matter attached.
23811
5.INSTALL FUEL FILTER TO INJECTION PUMP FUEL PIPE
Temporarily install the fuel pipe with the union nuts.
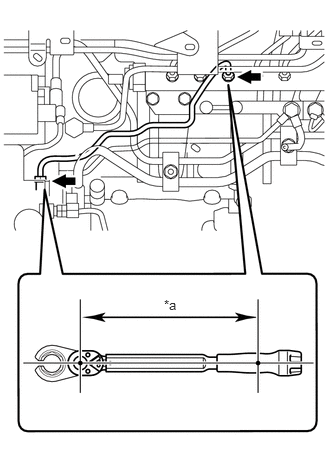
Using a union nut wrench (17 mm), tighten the union nuts.
- Torque:
- Specified tightening torque:
35 N*m (357 kgf*cm, 26 ft.*lbf)
| *a | Torque Wrench Fulcrum Length |
- NOTICE:
-
If the supply pump assembly has been replaced, the fuel filter to injection pump fuel pipe must also be replaced.
- HINT:
- ·
Calculate the torque wrench reading when changing the fulcrum length of the torque wrench.
(Click hereGeneral>INTRODUCTION>REPAIR INSTRUCTION>PRECAUTION)
·When using a union nut wrench (fulcrum length of 30mm (1.1811 in.)) + torque wrench (fulcrum length of 180 mm (7.0866 in.)): 30 N*m (306 kgf*cm, 22 ft.*lbf)
Install the pipe clamp with the nut. Tighten the nut until the clamp's edges make contact with the engine side clamp's edges.
6.INSTALL NO. 1 HARNESS BRACKET
Install the No. 1 wire harness bracket with the 2 bolts.
- Torque:
29 N*m (291 kgf*cm, 21 ft.*lbf)
7.INSTALL NO. 2 HARNESS BRACKET
23814D
8.INSTALL FUEL DELIVERY PIPE SUB-ASSEMBLY
Install 2 new gaskets and the fuel delivery pipe with the union bolt.
- Torque:
17 N*m (173 kgf*cm, 13 ft.*lbf)
- NOTICE:
- ·
Be sure to prevent foreign matter or water from entering the lines.
·Check that the installation part has no foreign matter attached.
9.CONNECT NO. 1 FUEL HOSE RETURN TUBE
Connect the NO. 1 fuel hose return tube with the hose clamp.
- NOTICE:
- ·
Be sure to prevent foreign matter or water from entering the lines.
·Check that the installation part has no foreign matter attached.
22100A
10.CONNECT INJECTION PUMP TO FUEL FILTER FUEL HOSE OR PIPE
Connect the injection pump to fuel filter fuel hose with the hose clamp.
- NOTICE:
- ·
Be sure to prevent foreign matter or water from entering the lines.
·Check that the installation part has no foreign matter attached.
17113
11.INSTALL INTAKE PIPE
12.INSTALL INTAKE PIPE WITH DIESEL THROTTLE BODY
11409
13.INSTALL OIL LEVEL GAUGE GUIDE SUB-ASSEMBLY
17342P
14.INSTALL NO. 2 AIR HOSE
44360
15.INSTALL VANE PUMP OIL RESERVOIR ASSEMBLY
16.ADD ENGINE COOLANT
58701A
17.INSTALL FRONT ENGINE SERVICE COVER PANEL SUB-ASSEMBLY
33503F
18.INSTALL FLOOR SHIFT SHIFT LEVER SUB-ASSEMBLY
33820B
19.CONNECT TRANSMISSION CONTROL CABLE ASSEMBLY
58286
20.INSTALL NO. 1 SHIFT AND SELECT LEVER BOOT
21.BLEED AIR FROM FUEL SYSTEM
22.INSPECT FOR COOLANT LEAK
23.INSPECT FOR OIL LEAK
24.INSPECT FOR FUEL LEAK
25.INITIALIZE INJECTION OR SUPPLY PUMP ASSEMBLY
53712C
26.INSTALL FRONT FENDER APRON LH
51441D
27.INSTALL NO. 1 ENGINE UNDER COVER
58534A
28.INSTALL TRANSMISSION COVER MAT
33504F
29.INSTALL SHIFT KNOB
58420
30.INSTALL NO. 2 ENGINE SERVICE HOLE COVER ASSEMBLY
58521D
31.INSTALL ENGINE SERVICE HOLE COVER MAT
58734B
32.INSTALL REAR ENGINE SERVICE COVER WEATHERSTRIP
58410
33.INSTALL ENGINE SERVICE HOLE COVER