BRAKE BRAKE MASTER CYLINDER(for LHD) INSTALLATION
PROCEDURE

 47201
1.INSTALL BRAKE MASTER CYLINDER SUB-ASSEMBLY
- NOTICE:
- ·
The master cylinder and piston are designed so that the piston can easily fall out. Prevent this by making sure that the tip of the master cylinder points downward when handling the master cylinder.
·Make sure foreign matter does not attach to the master cylinder's piston. If foreign matter attaches, clean it off with a cloth. Then apply lithium soap base glycol grease to the entire outer circumference contact surface area of the piston.
Install a new O-ring to the master cylinder.
Install the master cylinder to the booster.
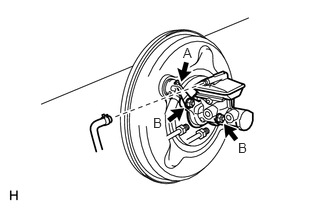
Install the vacuum check valve bracket (labeled A) and tighten the 2 nuts (labeled B).
- Torque:
- 13 N*m (130 kgf*cm, 9 ft.*lbf)
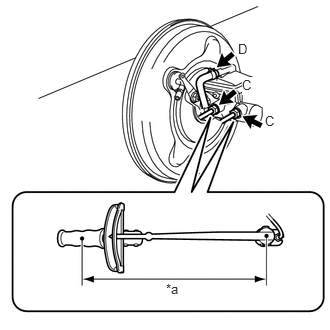
Using a union nut wrench, connect the 2 brake lines (labeled C) to the master cylinder.
| *a | Torque Wrench Fulcrum Length |
- Torque:
- 20 N*m (199 kgf*cm, 14 ft.*lbf)
- NOTICE:
- ·
Do not kink or damage the brake lines.
·Do not allow any foreign matter such as dirt or dust to enter the brake lines from the connecting parts.
- HINT:
- ·
Calculate the torque wrench reading when changing the fulcrum length for the torque wrench (See page General>INTRODUCTION>REPAIR INSTRUCTION>PRECAUTION).
·When using a union nut wrench (fulcrum length of 20 mm (0.787 in.)) + torque wrench (fulcrum length of 250 mm (9.84 in.)):
18 N*m (184 kgf*cm, 13 ft.*lbf)
Connect the No. 1 reservoir tube (labeled D) to the master cylinder.
44781D
2.INSTALL RESERVOIR HOSE BRACKET
Install the bracket with the nut.
- Torque:
- 5.4 N*m (55 kgf*cm, 48 in.*lbf)
Install the No. 1 reservoir tube to the clamps of the bracket.
47202
3.INSTALL BRAKE MASTER CYLINDER RESERVOIR SUB-ASSEMBLY
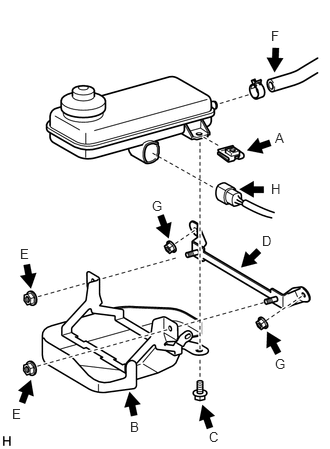
Install the nut (labeled A) to the reservoir.
Install the reservoir to the reservoir bracket (labeled B) with the bolt (labeled C).
- Torque:
- 8.8 N*m (90 kgf*cm, 78 in.*lbf)
Install the reservoir bracket (labeled D) to the reservoir with bracket with the 2 nuts (labeled E).
- Torque:
- 8.8 N*m (90 kgf*cm, 78 in.*lbf)
Connect the No. 1 reservoir tube (labeled F) to the reservoir.
Install the reservoir with brackets to the body with the 2 nuts (labeled G).
- Torque:
- 8.8 N*m (90 kgf*cm, 78 in.*lbf)
Connect the brake fluid level warning switch connector (labeled H) to the reservoir.
4.BLEED BRAKE SYSTEM
(See page Brake>BRAKE>BRAKE FLUID>BLEEDING)
17700
5.INSTALL AIR CLEANER CASE SUB-ASSEMBLY (for 2AZ-FE)
17700
6.INSTALL AIR CLEANER CASE SUB-ASSEMBLY (for 2GR-FE)
17705
7.INSTALL AIR CLEANER CAP SUB-ASSEMBLY (for 2AZ-FE)
17705
8.INSTALL AIR CLEANER CAP SUB-ASSEMBLY (for 2GR-FE)
74431
9.INSTALL BATTERY TRAY
28800
10.INSTALL BATTERY (for 2AZ-FE)
28800
11.INSTALL BATTERY (for 2GR-FE)
12.CONNECT CABLE TO NEGATIVE BATTERY TERMINAL
- NOTICE:
-
When disconnecting the cable, some systems need to be initialized after the cable is reconnected (See page General>INTRODUCTION>REPAIR INSTRUCTION>INITIALIZATION).