BRAKE CONTROL / DYNAMIC CONTROL SYSTEMS VEHICLE STABILITY CONTROL SYSTEM Brake Warning Light Remains ON
DESCRIPTION
The skid control ECU (brake actuator assembly) is connected to the combination meter assembly via CAN communication.
If any of the following is detected, the brake warning light remains on:
The skid control ECU (brake actuator assembly) connector is disconnected from the skid control ECU (brake actuator assembly).
The brake fluid level is insufficient.
The parking brake is applied.
EBD operation is not possible.
The brake booster assembly is judged to be defective.
WIRING DIAGRAM
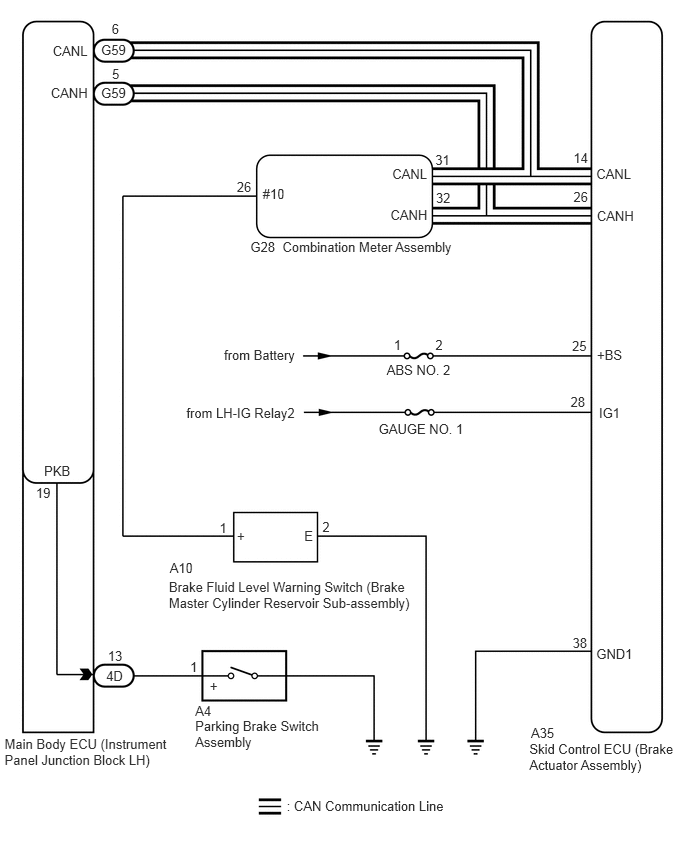
CAUTION / NOTICE / HINT
- NOTICE:
- ·
When replacing the skid control ECU (brake actuator assembly), perform system variant learning and acceleration sensor zero point calibration (See page Brake>BRAKE CONTROL / DYNAMIC CONTROL SYSTEMS>VEHICLE STABILITY CONTROL SYSTEM>CALIBRATION).
·Inspect the fuses for circuits related to this system before performing the following procedure.
PROCEDURE
Check if CAN communication system DTCs are output (See page Power Source / Network>CAN COMMUNICATION>CAN COMMUNICATION SYSTEM>DIAGNOSIS SYSTEM).
- Result:
Result Proceed to DTCs are not output. A DTCs are output. B
A
B
Check if the skid control ECU (brake actuator assembly) connector is securely connected.
- OK:
The connector is securely connected.
OK
NG
Check the battery voltage.
- Standard Voltage:
11 to 14 V
OK
NG
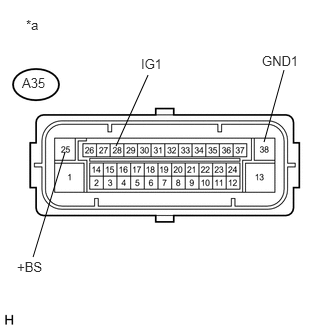
Disconnect the A35 skid control ECU (brake actuator assembly) connector.
Measure the voltage according to the value(s) in the table below.
- Standard Voltage:
Tester Connection Condition Specified Condition A35-25 (+BS) - Body ground Always 11 to 14 V A35-25 (+BS) - A35-38 (GND1) Always 11 to 14 V A35-28 (IG1) - Body ground Engine switch on (IG) 11 to 14 V A35-28 (IG1) - A35-38 (GND1) Engine switch on (IG) 11 to 14 V
| *a | Front view of wire harness connector
(to Skid Control ECU (Brake Actuator Assembly)) |
OK
NG
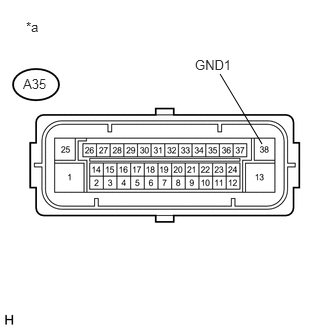
Turn the engine switch off.
Measure the resistance according to the value(s) in the table below.
- Standard Resistance:
Tester Connection Condition Specified Condition A35-38 (GND1) - Body ground Always Below 1 Ω
| *a | Front view of wire harness connector
(to Skid Control ECU (Brake Actuator Assembly)) |
OK
NG
Reconnect the A35 skid control ECU (brake actuator assembly) connector.
Connect the GTS to the DLC3.
Turn the engine switch on (IG).
Select the Data List using the GTS (See page Brake>BRAKE CONTROL / DYNAMIC CONTROL SYSTEMS>VEHICLE STABILITY CONTROL SYSTEM>DATA LIST / ACTIVE TEST).
| Tester Display | Measurement Item/Range | Normal Condition | Diagnostic Note |
|---|---|---|---|
| Parking Brake SW | Parking brake switch assembly / ON or OFF | ON: Parking brake applied
OFF: Parking brake released |
- |
Using the GTS, check that the switch condition displayed on the GTS changes according to the parking brake operation.
- OK:
The GTS displays ON or OFF according to parking brake operation.
OK
NG
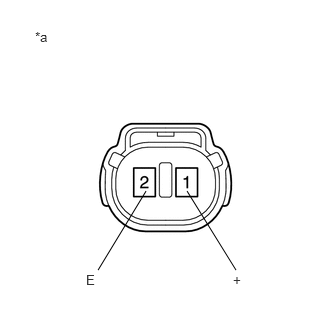
Turn the engine switch off.
Remove the reservoir filler cap and strainer.
Disconnect the A10 brake fluid level warning switch (brake master cylinder reservoir sub-assembly) connector.
Measure the resistance according to the value(s) in the table below.
- HINT:
-
A float is located inside the reservoir. Its position changes according to the brake fluid level.
- Standard Resistance:
Tester Connection Condition Specified Condition 1 (+) - 2 (E) Switch OFF (Float up) 10 kΩ or higher 1 (+) - 2 (E) Switch ON (Float down) Below 1 Ω
| *a | Component without harness connected
(Brake Fluid Level Warning Switch (Brake Master Cylinder Reservoir Sub-assembly)) |
- Result:
Result Proceed to OK A NG (for LHD) B NG (for RHD) C
- HINT:
-
If the switch condition is normal, adjust the brake fluid level to the MAX level.
A
B
C
Disconnect the G28 combination meter assembly connector.
Measure the resistance according to the value(s) in the table below.
- Standard Resistance:
Tester Connection Condition Specified Condition G28-26 (#10) - A10-1 (+) Always Below 1 Ω G28-26 (#10) or A10-1 (+) - Body ground Always 10 kΩ or higher A10-2 (E) - Body ground Always Below 1 Ω
OK
NG
Reconnect the A10 brake fluid level warning switch (brake master cylinder reservoir sub-assembly) connector.
Reconnect the G28 combination meter assembly connector.
Select the Data List on the GTS (See page Brake>BRAKE CONTROL / DYNAMIC CONTROL SYSTEMS>VEHICLE STABILITY CONTROL SYSTEM>DATA LIST / ACTIVE TEST).
| Tester Display | Measurement Item/Range | Normal Condition | Diagnostic Note |
|---|---|---|---|
| Brake Warning Light | Brake warning light / ON or OFF | ON: Warning light on
OFF: Warning light off |
- |
Check the GTS display condition of the brake warning light.
- Result:
Result Proceed to Display of the Data List remains ON. A Display of the Data List remains OFF. B
- HINT:
-
If troubleshooting has been carried out according to Problem Symptoms Table, refer back to the table and proceed to the next step before replacing parts (See page Brake>BRAKE CONTROL / DYNAMIC CONTROL SYSTEMS>VEHICLE STABILITY CONTROL SYSTEM>PROBLEM SYMPTOMS TABLE).
A
B
(See pageVehicle Interior>METER / GAUGE / DISPLAY>METER / GAUGE SYSTEM>HOW TO PROCEED WITH TROUBLESHOOTING)
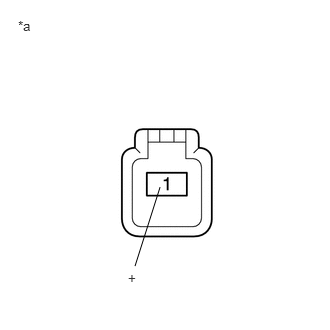
Turn the engine switch off.
Disconnect the A4 parking brake switch assembly connector.
Measure the resistance according to the value(s) in the table below.
- Standard Resistance:
Tester Connection Condition Specified Condition 1 (+) - Body ground Switch ON (Switch pin free) Below 1 Ω 1 (+) - Body ground Switch OFF (Switch pin pushed in) 10 kΩ or higher
| *a | Component without harness connected
(Parking Brake Switch Assembly) |
OK
NG
Disconnect the 4D main body ECU connector.
Measure the resistance according to the value(s) in the table below.
- Standard Resistance:
Tester Connection Condition Specified Condition 4D-13 - A4-1 (+) Always Below 1 Ω 4D-13 or A4-1 (+) - Body ground Always 10 kΩ or higher
- HINT:
-
If troubleshooting has been carried out according to Problem Symptoms Table, refer back to the table and proceed to the next step before replacing parts (See page Brake>BRAKE CONTROL / DYNAMIC CONTROL SYSTEMS>VEHICLE STABILITY CONTROL SYSTEM>PROBLEM SYMPTOMS TABLE).
OK
NG