BRAKE CONTROL / DYNAMIC CONTROL SYSTEMS VEHICLE STABILITY CONTROL SYSTEM C1426 Stop Light Switch OFF Stuck Malfunction
DESCRIPTION
The skid control ECU (brake actuator assembly) receives stop light switch assembly signals and uses them to determine whether or not the brakes are applied.
The skid control ECU (brake actuator assembly) has a detection circuit that it uses to detect a short in the stop light input line or the ground line of the stop light circuit with the stop light switch assembly on (brake pedal depressed).
If the skid control ECU (brake actuator assembly) detects a short in this circuit, it will store this DTC.
| DTC No. | Detection Item | DTC Detection Condition | Trouble Area |
|---|---|---|---|
| C1426 | Stop Light Switch OFF Stuck Malfunction | Either of the following is detected:
1.
With the stop light switch assembly off, the stop light switch assembly is judged to be on based on the master cylinder pressure value for 3 seconds or more. 2.
With the stop light switch assembly off, the master cylinder pressure is more than 8 MPa (81.6 kgf/cm2, 1160 psi) for 3 seconds or more. |
·
Wire harness or connector (STP circuit) ·
Wire harness or connector (GND1 circuit) ·
Stop light switch assembly ·
Skid control ECU (brake actuator assembly) |
WIRING DIAGRAM
Refer to DTC C1249 (See page Brake>BRAKE CONTROL / DYNAMIC CONTROL SYSTEMS>VEHICLE STABILITY CONTROL SYSTEM>C1249).
CAUTION / NOTICE / HINT
- NOTICE:
- ·
When replacing the skid control ECU (brake actuator assembly), perform system variant learning and acceleration sensor zero point calibration (See page Brake>BRAKE CONTROL / DYNAMIC CONTROL SYSTEMS>VEHICLE STABILITY CONTROL SYSTEM>CALIBRATION).
·Inspect the fuses for circuits related to this system before performing the following procedure.
PROCEDURE
Check the brake pedal height installation (See page Brake>BRAKE>BRAKE PEDAL>ADJUSTMENT).
Check the stop light switch assembly installation (See page Brake>BRAKE>BRAKE PEDAL>INSTALLATION).
- OK:
The brake pedal height and stop light switch assembly installation are normal.
- HINT:
-
If the on/off status of the stop light switch assembly and pressure increase information from the master cylinder pressure sensor do not match due to an improperly installed brake pedal or stop light switch assembly, this DTC may be stored. Therefore, be sure to check the installation condition of the pedal and switch before inspecting the input signals and other related parts.
OK
NG
Check that the stop lights come on when the brake pedal is depressed, and go off when the brake pedal is released.
- OK:
Condition Illumination Condition Brake pedal depressed. On Brake pedal released. Off
OK
NG
Connect the GTS to the DLC3.
Turn the engine switch on (IG).
Select the Data List using the GTS (See page Brake>BRAKE CONTROL / DYNAMIC CONTROL SYSTEMS>VEHICLE STABILITY CONTROL SYSTEM>DATA LIST / ACTIVE TEST).
| Tester Display | Measurement Item/Range | Normal Condition | Diagnostic Note |
|---|---|---|---|
| Stop Light SW | Stop light switch assembly / ON or OFF | ON: Brake pedal depressed
OFF: Brake pedal released |
- |
Check that the stop light switch assembly display observed on the GTS changes according to brake pedal operation.
- OK:
The GTS displays ON or OFF according to brake pedal operation.
OK
NG
Turn the engine switch off.
Clear the DTCs (See page Brake>BRAKE CONTROL / DYNAMIC CONTROL SYSTEMS>VEHICLE STABILITY CONTROL SYSTEM>DTC CHECK / CLEAR).
Turn the engine switch off.
Start the engine.
Depress the brake pedal several times to test the stop light circuit.
Check if the same DTC is output (See page Brake>BRAKE CONTROL / DYNAMIC CONTROL SYSTEMS>VEHICLE STABILITY CONTROL SYSTEM>DTC CHECK / CLEAR).
- Result:
Result Proceed to DTC C1426 is not output. A DTC C1426 is output. B
- HINT:
-
If troubleshooting has been carried out according to Problem Symptoms Table, refer back to the table and proceed to the next step before replacing parts (See page Brake>BRAKE CONTROL / DYNAMIC CONTROL SYSTEMS>VEHICLE STABILITY CONTROL SYSTEM>PROBLEM SYMPTOMS TABLE).
A
(See pageGeneral>INTRODUCTION>HOW TO TROUBLESHOOT ECU CONTROLLED SYSTEMS>HOW TO PROCEED WITH TROUBLESHOOTING)
B
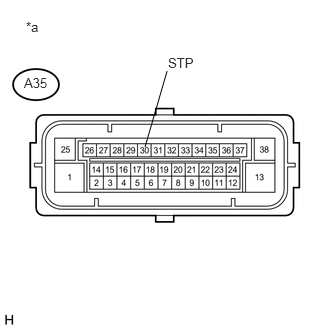
Turn the engine switch off.
Make sure that there is no looseness at the locking part and the connecting part of the connector.
Disconnect the A35 skid control ECU (brake actuator assembly) connector.
Measure the voltage according to the value(s) in the table below.
- Standard Voltage:
Tester Connection Condition Specified Condition A35-30 (STP) - Body ground Stop light switch assembly ON (Brake pedal depressed) 11 to 14 V*
| *a | Front view of wire harness connector
(to Skid Control ECU (Brake Actuator Assembly)) |
- HINT:
-
*: The standard voltage value varies depending on the +BS terminal voltage value. The standard voltage is 85% of the +BS terminal voltage.
OK
NG
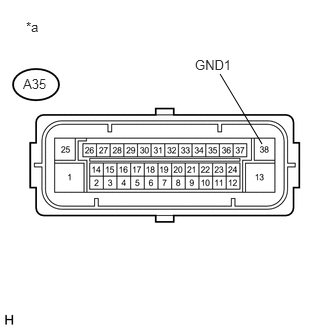
Measure the resistance according to the value(s) in the table below.
- Standard Resistance:
Tester Connection Condition Specified Condition A35-38 (GND1) - Body ground Always Below 1 Ω
| *a | Front view of wire harness connector
(to Skid Control ECU (Brake Actuator Assembly)) |
- HINT:
-
If troubleshooting has been carried out according to Problem Symptoms Table, refer back to the table and proceed to the next step before replacing parts (See page Brake>BRAKE CONTROL / DYNAMIC CONTROL SYSTEMS>VEHICLE STABILITY CONTROL SYSTEM>PROBLEM SYMPTOMS TABLE).
OK
NG
Check the stop light switch assembly (See page Vehicle Interior>LIGHTING>STOP LIGHT SWITCH>INSPECTION).
- OK:
The stop light switch assembly is normal.
OK
NG
Reconnect the A33 stop light switch assembly connector.
Make sure that there is no looseness at the locking part and the connecting part of the connector.
Disconnect the A35 skid control ECU (brake actuator assembly) connector.
Measure the voltage according to the value(s) in the table below.
- Standard Voltage:
Tester Connection Condition Specified Condition A35-30 (STP) - Body ground Stop light switch assembly ON (Brake pedal depressed) 11 to 14 V* A35-30 (STP) - Body ground Stop light switch assembly OFF (Brake pedal released) Below 1.5 V
| *a | Front view of wire harness connector
(to Skid Control ECU (Brake Actuator Assembly)) |
- HINT:
-
*: The standard voltage value varies depending on the +BS terminal voltage value. The standard voltage is 85% of the +BS terminal voltage.
OK
NG
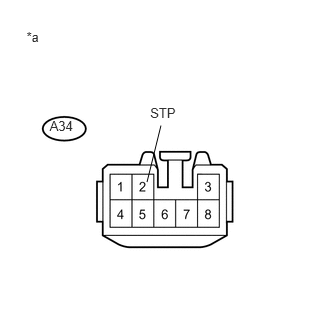
Make sure that there is no looseness at the locking part and the connecting part of the connector.
Disconnect the A34 stop light control relay connector.
Measure the voltage according to the value(s) in the table below.
- Standard Voltage:
Tester Connection Condition Specified Condition A34-2 (STP) - Body ground Stop light switch assembly ON (Brake pedal depressed) 11 to 14 V* A34-2 (STP) - Body ground Stop light switch assembly OFF (Brake pedal released) Below 1.5 V
| *a | Front view of wire harness connector
(to Stop Light Control Relay) |
- HINT:
-
*: The standard voltage value varies depending on the +BS terminal voltage value. The standard voltage is 85% of the +BS terminal voltage.
OK
NG
Reconnect the A35 skid control ECU (brake actuator assembly) connector.
Reconnect the A34 stop light control relay connector.
Clear the DTCs (See page Brake>BRAKE CONTROL / DYNAMIC CONTROL SYSTEMS>VEHICLE STABILITY CONTROL SYSTEM>DTC CHECK / CLEAR).
Turn the engine switch off.
Start the engine.
Depress the brake pedal several times to test the stop light circuit.
Check if the same DTC is output (See page Brake>BRAKE CONTROL / DYNAMIC CONTROL SYSTEMS>VEHICLE STABILITY CONTROL SYSTEM>DTC CHECK / CLEAR).
- Result:
Result Proceed to DTC C1426 is not output. A DTC C1426 is output. B
- HINT:
- ·
If the lighting system is normal but the DTC is still output, replace the skid control ECU (brake actuator assembly) (See page Brake>BRAKE CONTROL / DYNAMIC CONTROL SYSTEMS>BRAKE ACTUATOR(w/ VSC)>REMOVAL).
·If troubleshooting has been carried out according to Problem Symptoms Table, refer back to the table and proceed to the next step before replacing parts (See page Brake>BRAKE CONTROL / DYNAMIC CONTROL SYSTEMS>VEHICLE STABILITY CONTROL SYSTEM>PROBLEM SYMPTOMS TABLE).
A
(See pageGeneral>INTRODUCTION>HOW TO TROUBLESHOOT ECU CONTROLLED SYSTEMS>HOW TO PROCEED WITH TROUBLESHOOTING)
B
(See pageVehicle Interior>LIGHTING>LIGHTING SYSTEM(except LED Headlight)>HOW TO PROCEED WITH TROUBLESHOOTING)