P2440 Secondary Air Injection System Switching Valve Stuck Open Bank1
Diagnostic trouble codes · Vehicles built from Aug 2014
Also covers:
- P2441 Secondary Air Injection System Switching Valve Stuck Close Bank1
- P2442 Secondary Air Injection System Switching Valve Stuck Open Bank 2
- P2443 Secondary Air Injection System Switching Valve Stuck Closed Bank 2
DESCRIPTION
Refer to DTC P0412 (Click here).| DTC No. |
DTC Detection Condition |
Trouble Area |
| P2440 |
Cumulative pressure pulsation is 60 kPa (450 mmHg) or more for 2 seconds (1 trip detection logic). |
|
| The emission control valve set (for bank 1) is stuck open for 7 seconds while the engine is running (2 trip detection logic). | ||
| P2441 |
The emission control valve set (for bank 1) is stuck closed for 7 seconds while the engine is running (2 trip detection logic). |
|
| P2442 |
Cumulative pressure pulsation is 60 kPa (450 mmHg) or more for 2 seconds (1 trip detection logic). |
|
| The No. 2 emission control valve set (for bank 2) is stuck open for 7 seconds while the engine is running (2 trip detection logic). | ||
| P2443 |
The No. 2 emission control valve set (for bank 2) is stuck closed for 7 seconds while the engine is running (2 trip detection logic). |
|
- HINT:
- Emission control valve set normal operation:
- When the emission control valve set is open, exhaust gas pulsation occurs in the secondary air passage.
- When the emission control valve set is closed, exhaust gas pulsation does not occur in the secondary air passage.
MONITOR DESCRIPTION
DTCs P2440 and P2442 indicate that the emission control valve set is stuck open. DTCs P2441 and P2443 indicate that the emission control valve set is stuck closed. The ECM performs diagnosis of the secondary air injection system based on the changes in pressure and the pressure pulsation. If a malfunction is detected, the ECM illuminates the MIL and stores a DTC.CONFIRMATION DRIVING PATTERN
- NOTICE:
- This Secondary Air Injection Check only allows technicians to operate the secondary air injection system for a maximum of 5 seconds. Furthermore, the check can only be performed up to 4 times per trip. If the test is repeated, intervals of at least 30 seconds are required between checks. While secondary air injection system operation using the intelligent tester is prohibited, the intelligent tester display indicates the prohibition (WAIT or ERROR). If ERROR is displayed on the intelligent tester during the test, stop the engine for 10 minutes, and then try again.
- Performing Secondary Air Injection Check repeatedly may cause damage to the secondary air injection system. If it is necessary to repeat the check, leave an interval of several minutes between System Check operations to prevent the system from overheating.
- When performing the Secondary Air Injection Check operation after the battery cable has been reconnected, wait for 7 minutes with the ignition switch turned to ON or the engine running.
- Turn the ignition switch off when the Secondary Air Injection Check operation finishes.
- This Secondary Air Injection Check only allows technicians to operate the secondary air injection system for a maximum of 5 seconds. Furthermore, the check can only be performed up to 4 times per trip. If the test is repeated, intervals of at least 30 seconds are required between checks. While secondary air injection system operation using the intelligent tester is prohibited, the intelligent tester display indicates the prohibition (WAIT or ERROR). If ERROR is displayed on the intelligent tester during the test, stop the engine for 10 minutes, and then try again.
- Start the engine and warm it up.
- Turn the ignition switch off.
- Connect the intelligent tester to the DLC3.
- Turn the ignition switch to ON.
- Turn the tester on.
- Clear the DTCs (even if no DTCs are stored, perform the clear DTC operation).
- Turn the ignition switch off and wait for at least 30 seconds.
- Turn the ignition switch to ON and turn the tester on.
- Enter the following menus: Powertrain / Engine and ECT / Utility / Secondary Air Injection Check / Automatic Mode.
- Start the engine after the tester initialization is finished.
- Perform the System Check operation by pressing Next.
- Perform the following to confirm the secondary air injection system pending DTCs: Press the Exit.
- Enter the following menus: Powertrain / Engine and ECT / DTC.
- Read pending DTCs.
- HINT:
- If a pending DTC is output, the system is malfunctioning.
- If a pending DTC is not output, perform the following procedure.
- If a pending DTC is output, the system is malfunctioning.
- After Secondary Air Injection Check is completed, check All Readiness by entering the following menus: Powertrain / Engine and ECT / Utility / All Readiness.
- Input the DTC: P2440, P2441, P2442 or P2443.
- Check the DTC judgment result.
Tester Display
Description
NORMAL
- DTC judgment completed
- System normal
ABNORMAL
- DTC judgment completed
- System abnormal
INCOMPLETE
- DTC judgment not completed
- Perform driving pattern after confirming DTC enabling conditions
N/A
- Unable to perform DTC judgment
- Number of DTCs which do not fulfill DTC preconditions has reached ECU memory limit
- HINT:
- If the judgment result shows NORMAL, the system is normal.
- If the judgment result shows ABNORMAL, the system has a malfunction.
- If the judgment result shows INCOMPLETE or N/A, perform the Confirmation Driving Pattern and the DTC judgment result again.
- If the judgment result shows NORMAL, the system is normal.
- DTC judgment completed
WIRING DIAGRAM
Refer to DTC P0412 (Click here).Refer to DTC P0416, P0417 (Click here).
INSPECTION PROCEDURE
- HINT:
- Refer to "Data List / Active Test" [Air Pump Pressure (Absolute), Air Pump2 Pressure (Absolute) and Air Pump Pulsation Pressure] (Click here).
- HINT:
- Determination by ECM monitoring:
- The ECM detects malfunctions in the secondary air injection system by detecting the pressure in the secondary air injection passage between the air pump assembly and emission control valve set and stores a DTC. Soon after a cold engine start, the monitor runs for a short time while the secondary air injection system is both ON and OFF. The ECM detects both the pressure and the exhaust pulsation and compares them.
- The following 8 patterns are secondary air injection system pressure conditions in the secondary air injection system passage.
| Air Pump Assembly |
ON |
| Emission Control Valve Set |
Open |
| Pressure |
1 kPa (7.5 mmHg) or higher |
| Pulsation Detection |
Exhaust gas pulsation detected |
| Air Pump Assembly |
OFF |
| Emission Control Valve Set |
Open |
| Pressure |
Below 2.5 kPa (18.7 mmHg) |
| Pulsation Detection |
Exhaust gas pulsation detected |
| Air Pump Assembly |
ON |
| Emission Control Valve Set |
Closed |
| Pressure |
1 kPa (7.5 mmHg) or higher |
| Pulsation Detection |
Exhaust gas pulsation not detected |
| Air Pump Assembly |
OFF |
| Emission Control Valve Set |
Closed |
| Pressure |
Below 2.5 kPa (18.7 mmHg) |
| Pulsation Detection |
Exhaust gas pulsation not detected |
| Air Pump Assembly |
ON |
| Emission Control Valve Set |
Open |
| Pressure |
1 kPa (7.5 mmHg) or higher |
| Pulsation Detection |
Exhaust gas pulsation detected |
| Air Pump Assembly |
OFF |
| Emission Control Valve Set |
Open |
| Pressure |
Below 2.5 kPa (18.7 mmHg) |
| Pulsation Detection |
Exhaust gas pulsation detected |
| Air Pump Assembly |
ON |
| Emission Control Valve Set |
Closed |
| Pressure |
1 kPa (7.5 mmHg) or higher |
| Pulsation Detection |
Exhaust gas pulsation not detected |
| Air Pump Assembly |
OFF |
| Emission Control Valve Set |
Closed |
| Pressure |
Below 2.5 kPa (18.7 mmHg) |
| Pulsation Detection |
Exhaust gas pulsation not detected |
- HINT:
- The exhaust pulsation value is calculated in the ECM. If the calculated value exceeds a certain level, the ECM determines that the exhaust pulsation is in the secondary air injection system.
- HINT:
- In cases 3 and 7, as the pressure sensor detects a slight pump operation pulsation, the detected value is not constant. Since the pump outlet is blocked by closing the emission control valve set, the average pressure is higher than in case 1 (approximately 15 to 25 kPa (112.5 to 187.5 mmHg)).
- In case 1, the average pressure is approximately 3 to 11 kPa (22.5 to 82.5 mmHg). The value of 1 kPa indicated in the table above is a threshold for detecting pump malfunctions.
- In cases 3 and 7, as the pressure sensor detects a slight pump operation pulsation, the detected value is not constant. Since the pump outlet is blocked by closing the emission control valve set, the average pressure is higher than in case 1 (approximately 15 to 25 kPa (112.5 to 187.5 mmHg)).
| Detected Condition while Secondary Air Injection Operating: Air Pump Assembly ON, Emission Control Valve Set Open |
Detected Condition while Secondary Air Injection not Operating: Air Pump Assembly OFF, Emission Control Valve Set Closed |
ECM Determination |
DTC Output |
| Case 1 |
Case 8 |
Normal or emission control valve set stuck open |
- or P2441 or P2443 |
| Case 1 |
Case 6 |
Emission control valve set stuck open |
P2440 and P2442 or P2442 (only) |
| Case 1 |
Case 7 |
Normal |
- |
| Case 2 |
Case 8 |
Air pump assembly stuck OFF |
P2445 |
| Case 3 |
Case 8 |
Normal |
- |
| Case 1 |
Case 5 |
Normal |
- |
| Case 2 |
Case 6 |
Emission control valve set stuck open and air pump assembly stuck OFF |
P2440 and/or P2442 and P2445 |
| Case 3 |
Case 7 |
Normal |
- |
| Case 4 |
Case 8 |
Normal |
- |
- HINT:
- By using the intelligent tester to perform the Secondary Air Injection Check operation in the System Check, the air fuel ratio and the pressure in the secondary air injection system passage can be checked while the secondary air injection system is operating. This helps technicians to troubleshoot the system when it malfunctions. Furthermore, pending codes also can be checked by performing Utility / Secondary Air Injection Check / Automatic Mode after the repair.
- Read freeze frame data using the intelligent tester. Freeze frame data records the engine condition when malfunctions are detected. When troubleshooting, freeze frame data can help determine if the vehicle was moving or stationary, if the engine was warmed up or not, if the air fuel ratio was lean or rich, and other data from the time the malfunction occurred.
- By using the intelligent tester to perform the Secondary Air Injection Check operation in the System Check, the air fuel ratio and the pressure in the secondary air injection system passage can be checked while the secondary air injection system is operating. This helps technicians to troubleshoot the system when it malfunctions. Furthermore, pending codes also can be checked by performing Utility / Secondary Air Injection Check / Automatic Mode after the repair.
- System Check:
- NOTICE:
- This Secondary Air Injection Check only allows technicians to operate the secondary air injection system for a maximum of 5 seconds. Furthermore, the check can only be performed up to 4 times per trip. If the test is repeated, intervals of at least 30 seconds are required between checks. While secondary air injection system operation using the intelligent tester is prohibited, the intelligent tester display indicates the prohibition (WAIT or ERROR). If ERROR is displayed on the intelligent tester during the test, stop the engine for 10 minutes, and then try again.
- Performing Secondary Air Injection Check repeatedly may cause damage to the secondary air injection system. If it is necessary to repeat the check, leave an interval of several minutes between System Check operations to prevent the system from overheating.
- When performing the Secondary Air Injection Check operation after the battery cable has been reconnected, wait for 7 minutes with the ignition switch turned to ON or the engine running.
- Turn the ignition switch off when the Secondary Air Injection Check operation finishes.
- This Secondary Air Injection Check only allows technicians to operate the secondary air injection system for a maximum of 5 seconds. Furthermore, the check can only be performed up to 4 times per trip. If the test is repeated, intervals of at least 30 seconds are required between checks. While secondary air injection system operation using the intelligent tester is prohibited, the intelligent tester display indicates the prohibition (WAIT or ERROR). If ERROR is displayed on the intelligent tester during the test, stop the engine for 10 minutes, and then try again.
- The pressure in the secondary air passage can be checked using the intelligent tester.
- Start the engine and warm it up.
- Turn the ignition switch off.
- Connect the intelligent tester to the DLC3.
- Turn the ignition switch to ON.
- Turn the tester on.
- Enter the following menus: Powertrain / Engine and ECT / Utility / Secondary Air Injection Check / Manual Mode / AIR PUMP: ON, ASV 1: OPEN, ASV 2: OPEN and AIR PUMP: OFF, ASV 1: CLOSE, ASV 2: CLOSE.
- HINT:
- When Manual Mode is selected, the tester initialization (atmospheric pressure measurement) is performed automatically. The initialization takes 10 seconds. After the initialization, AIR PUMP and ASV operation can be selected.
- Start the engine.
- Perform the secondary air injection system forced operation while the engine is idling.
- Check that the Data List values for the air pump (AIR PUMP), emission control valve (ASV) and pressure in the secondary air injection system passage (PRESSURE) displayed on the tester are as shown in the table below.
- Standard:
Tester Operation
Air Pump Assembly
Emission Control Valve Set
Pressure*1
Pulsation*2
AIR PUMP: ON, ASV: OPEN
ON
OPEN
1 kPa (7.5 mmHg) or higher
1.25 kPa (9.3 mmHg) or higher
AIR PUMP: OFF, ASV: CLOSE
OFF
CLOSE
Below 2.5 kPa (18.7 mmHg)
Below 10 kPa (75 mmHg)
*2: The cumulative exhaust pulsation calculated by the ECM. If the calculated value exceeds a certain level, the ECM determines that the exhaust pulsation is in the secondary air injection system.
- Turn the ignition switch off.
- NOTICE:
- Inspect the fuses for circuits related to this system before performing the following inspection procedure.
- HINT:
- Bank 1 refers to the bank that includes the No. 1 cylinder*.
*: The No. 1 cylinder is the cylinder which is farthest from the transmission.
- Bank 2 refers to the bank that does not include the No. 1 cylinder.
- Bank 1 refers to the bank that includes the No. 1 cylinder*.
| 1. CHECK FOR ANY OTHER DTCS OUTPUT (IN ADDITION TO SECONDARY AIR INJECTION SYSTEM DTCS) |

Connect the intelligent tester to the DLC3.
Turn the ignition switch to ON.
Turn the tester on.
Enter the following menus: Powertrain / Engine and ECT / DTC.
Read the DTCs and freeze frame data.
Result Result
Proceed to
P2440, P2441, P2442 and/or P2443 is output
A
P2440 and/or P2441 and P0412 are output
B
P2442 and/or P2443 and P0416 and/or P0417 are output
C
P2440, P2441, P2442 and/or P2443 and other DTCs (except P0412, P0416 and P0417) are output
D
- HINT:
- If any DTCs other than P0412, P0416, P0417, P2440, P2441, P2442 and P2443 are output, troubleshoot those DTCs first.
|
|
||||
|
|
||||
|
|
||||

| A | |
 |
| 2. CHECK FREEZE FRAME DATA (AIR PUMP FREEZE, AIR SWITCHING VALVE FREEZE AND AIR SWITCHING VALVE2 FREEZE) |
Connect the intelligent tester to the DLC3.
Turn the ignition switch to ON and turn the tester on.
Read the values of Air Pump Freeze, Air Switching Valve Freeze and Air Switching Valve2 Freeze from the freeze frame data recorded previously.
Referring to the following table, proceed to the appropriate step according to the result of the data reading.
Result Result
Proceed to
Air Pump Freeze
Air Switching Valve Freeze
Air Switching Valve2 Freeze
OFF
OFF
OFF
B
Except above
A
|
|
||||

| A | |
|
| 3. PERFORM ACTIVE TEST USING INTELLIGENT TESTER (ACTIVE THE AIR PUMP HEATER) |
Disconnect the air pump assembly connector.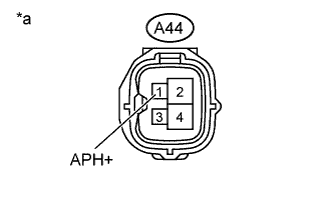

Connect the intelligent tester to the DLC3.
Turn the ignition switch to ON and turn the tester on.
Enter the following menus: Powertrain / Engine and ECT/ Active Test / Activate the Air Pump Heater.
Measure the voltage according to the value(s) in the table below.
- Standard Voltage:
Tester Connection
Switch Condition
Specified Condition
A44-1 (APH+) - Body ground
Activate the Air Pump Heater is ON
11 to 14 V
Text in Illustration *a
Front view of wire harness connector
(to Air Pump Assembly)
|
|
||||
| OK | |
|
| 4. INSPECT AIR PUMP ASSEMBLY (HEATER RESISTANCE) |
Inspect the air pump assembly (Click here).
|
|
||||
| OK | |
|
| 5. INSPECT AIR PMP HTR RELAY |
Inspect the AIR PMP HTR relay (Click here).
|
|
||||
| OK | |
|
| 6. CHECK TERMINAL VOLTAGE (POWER SOURCE OF AIR PMP HTR RELAY) |
Remove the AIR PMP HTR relay from the engine room relay block.
Measure the voltage according to the value(s) in the table below.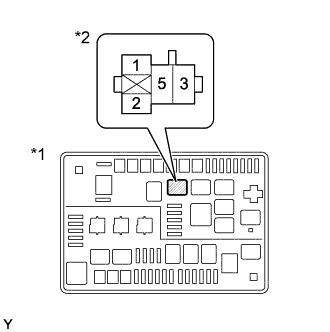
- Standard Voltage:
Tester Connection
Switch Condition
Specified Condition
5 (AIR PMP HTR relay holder) - Body ground
Always
11 to 14 V
Text in Illustration *1
Engine Room Relay Block
*2
AIR PMP HTR Relay Holder
|
|
||||
| OK | |
|
| 7. CHECK HARNESS AND CONNECTOR (AIR PUMP ASSEMBLY - AIR PMP HTR RELAY - BODY GROUND) |
Remove the air pump heater relay (AIR PMP HTR) from the engine room relay block.
Disconnect the A44 air pump assembly connector.
Measure the resistance according to the value(s) in the table below.
- Standard Resistance:
Tester Connection
Condition
Specified Condition
3 (AIR PMP HTR relay holder) - A44-1 (APH+)
Always
Below 1 Ω
A44-3 (APHG) - Body ground
Always
Below 1 Ω
3 (AIR PMP HTR relay holder) or A44-1 (APH+) - Body ground
Always
10 kΩ or higher
|
|
||||
| OK | |
|
| 8. INSPECT AIR PUMP ASSEMBLY |
Inspect the air pump assembly (Click here).
|
|
||||
| OK | |
|
| 9. PERFORM ACTIVE TEST USING INTELLIGENT TESTER (SECONDARY AIR INJECTION SYSTEM OPERATION) |
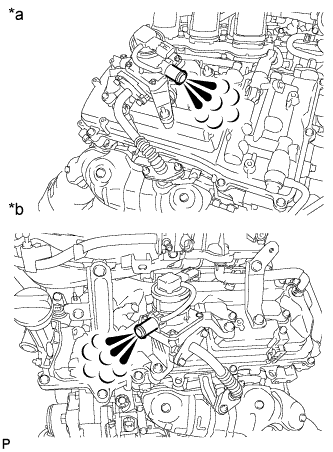 |
Perform a visual check:
Start the engine and warm it up.
Turn the ignition switch off.
Disconnect the air hoses.
Connect the intelligent tester to the DLC3.
Turn the ignition switch to ON.
Turn the tester on.
Enter the following menus: Powertrain / Engine and ECT / Utility / Secondary Air Injection Check / Manual Mode / AIR PUMP: ON, ASV1: OPEN, ASV2: OPEN.
- HINT:
- When Manual Mode is selected, the intelligent tester initialization (atmospheric pressure measurement) is performed automatically. The initialization takes 10 seconds. After the initialization, AIR PUMP and ASV operation can be selected.
Start the engine.
Perform the secondary air injection system forced operation while the engine is idling.
Place your hand near the emission control valve port and check that the exhaust gas pressure pulsates when the emission control valve is turned on.
- CAUTION:
- To avoid the danger of being burned by the exhaust gas, bring your hand close to the valve port slowly.
Enter the following menus: Powertrain / Engine and ECT / Utility / Secondary Air Injection Check / Manual Mode / AIR PUMP: ON, ASV1: OPEN, ASV2: OPEN and AIR PUMP: ON, ASV1: CLOSE, ASV2: CLOSE.
Check that the exhaust gas does not pulsate when the emission control valve is turned off.
Turn the ignition switch off.
- NOTICE:
- This Secondary Air Injection Check only allows technicians to operate the secondary air injection system for a maximum of 5 seconds. Furthermore, the check can only be performed up to 4 times per trip. If the test is repeated, intervals of at least 30 seconds are required between checks. While secondary air injection system operation using the intelligent tester is prohibited, the intelligent tester display indicates the prohibition (WAIT or ERROR). If ERROR is displayed on the intelligent tester during the test, stop the engine for 10 minutes, and then try again.
- Performing Secondary Air Injection Check repeatedly may cause damage to the secondary air injection system. If it is necessary to repeat the check, leave an interval of several minutes between System Check operations to prevent the system from overheating.
- When performing the Secondary Air Injection Check operation after the battery cable has been reconnected, wait for 7 minutes with the ignition switch turned to ON or the engine running.
- Turn the ignition switch off when the Secondary Air Injection Check operation finishes.
- This Secondary Air Injection Check only allows technicians to operate the secondary air injection system for a maximum of 5 seconds. Furthermore, the check can only be performed up to 4 times per trip. If the test is repeated, intervals of at least 30 seconds are required between checks. While secondary air injection system operation using the intelligent tester is prohibited, the intelligent tester display indicates the prohibition (WAIT or ERROR). If ERROR is displayed on the intelligent tester during the test, stop the engine for 10 minutes, and then try again.
- OK:
Air Pump Operation
Emission Control Valve Operation
Exhaust Gas Pulsation
ON
OFF
Not detected
ON
ON
Detected
Text in Illustration *a
for Bank 1
*b
for Bank 2
|
|
||||
| OK | |
|
| 10. INSPECT EMISSION CONTROL VALVE SET (PRESSURE SENSOR) |
Connect the intelligent tester to the DLC3.
Turn the ignition switch to ON.
Turn the tester on.
Enter the following menus: Powertrain / Engine and ECT / Data List / Air Pump Pressure (Absolute) and Air Pump2 Pressure (Absolute).
Check the pressure displayed on the tester.
- Standard pressure:
- 45.63 to 135 kPa (342 to 1013 mmHg)
- HINT:
- The tester displays the air pump pressure as absolute pressure.
Result Result
Proceed to
OK
A
NG (for Bank 1)
B
NG (for Bank 2)
C
|
|
||||
|
|
||||
| A | ||
 |
||
| ||
| 11. INSPECT AIR TUBE FOR BLOCKAGE AND LEAKAGE |
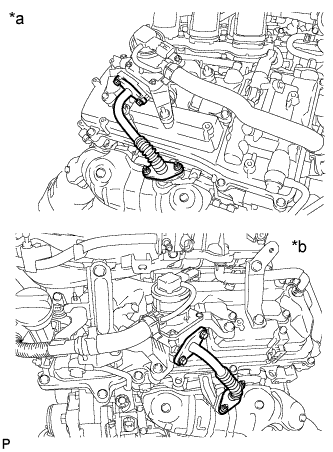 |
Check that the air tubes are securely connected to both the exhaust manifold and the emission control valve set.
Inspect the air tube for blockages and damage.
- OK:
- No blockages in or damage to air tubes.
Text in Illustration *a
for Bank 1
*b
for Bank 2
|
|
||||
| OK | |
|
| 12. INSPECT EMISSION CONTROL VALVE SET |
Inspect the emission control valve set (Click here).
Inspect the No. 2 emission control valve set (Click here).
Result Result
Proceed to
OK
A
NG (for Bank 1)
B
NG (for Bank 2)
C
|
|
||||
|
|
||||
| A | |
|
| 13. INSPECT AI-VSV RELAY |
Inspect the AI-VSV relay (Click here).
|
|
||||
| OK | |
|
| 14. CHECK TERMINAL VOLTAGE (POWER SOURCE OF AI-VSV RELAY) |
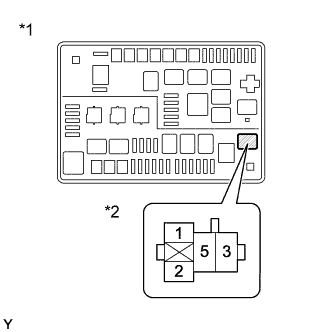 |
Remove the AI-VSV relay from the engine room relay block.
Measure the voltage according to the value(s) in the table below.
- Standard Voltage:
Tester Connection
Switch Condition
Specified Condition
1 (AI-VSV relay holder) - Body ground
Ignition switch ON
11 to 14 V
5 (AI-VSV relay holder) - Body ground
Always
11 to 14 V
Text in Illustration *1
Engine Room Relay Block
*2
AI-VSV Relay Holder
|
|
||||
| OK | |
|
| 15. CHECK HARNESS AND CONNECTOR (AI-VSV RELAY - ECM) |
Remove the AI-VSV relay from the engine room relay block.
Disconnect the B49 ECM connector.
Measure the resistance according to the value(s) in the table below.
- Standard Resistance:
Tester Connection
Condition
Specified Condition
2 (AI-VSV relay holder) - B49-21 (AIR1)
Always
Below 1 Ω
2 (AI-VSV relay holder) or B49-21 (AIR1) - Body ground
Always
10 kΩ or higher
|
|
||||
| OK | |
|
| 16. CHECK HARNESS AND CONNECTOR (NO. 2 EMISSION CONTROL VALVE SET - AI-VSV RELAY) |
Disconnect the B68 No. 2 emission control valve set connector.
Remove the AI-VSV relay from the engine room relay block.
Measure the resistance according to the value(s) in the table below.
- Standard Resistance:
Tester Connection
Condition
Specified Condition
B68-5 (+BL) - 3 (AI-VSV relay holder)
Always
Below 1 Ω
B68-1 (GNDL) - Body ground
Always
Below 1 Ω
B68-5 (+BL) or 3 (AI-VSV relay holder) - Body ground
Always
10 kΩ or higher
|
|
||||
| OK | |
|
| 17. INSPECT AIR INJECTION CONTROL DRIVER (POWER SOURCE OF AIR INJECTION CONTROL DRIVER) |
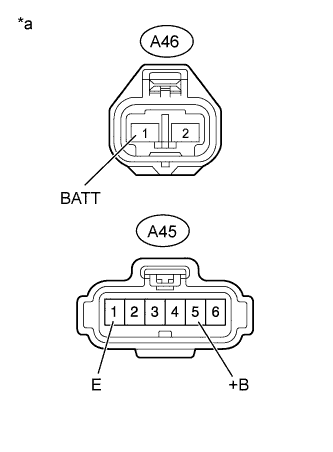 |
Disconnect the air injection control driver connectors.
Measure the resistance according to the value(s) in the table below.
- Standard Resistance:
Tester Connection
Condition
Specified Condition
A45-1 (E) - Body ground
Always
Below 1 Ω
Turn the ignition switch to ON.
Measure the voltage according to the value(s) in the table below.
- Standard Voltage:
Tester Connection
Switch Condition
Specified Condition
A46-1 (BATT) - Body ground
Always
11 to 14 V (near battery voltage)
A45-5 (+B) - Body ground
Ignition switch ON
11 to 14 V (near battery voltage)
| *a |
Front view of wire harness connector (to Air Injection Control Driver) |
|
|
||||
| OK | |
|
| 18. CHECK HARNESS AND CONNECTOR (ECM - AIR INJECTION CONTROL DRIVER) |
Disconnect the B47 ECM connector.
Disconnect the A45 air injection control driver connector.
Measure the resistance according to the value(s) in the table below.
- Standard Resistance:
Tester Connection
Condition
Specified Condition
B47-26 (AIRV) - A45-3 (SIV)
Always
Below 1 Ω
B47-26 (AIRV) or A45-3 (SIV) - Body ground
Always
10 kΩ or higher
|
|
||||
| OK | |
|
| 19. PERFORM ACTIVE TEST USING INTELLIGENT TESTER |
Disconnect the air injection control driver connector.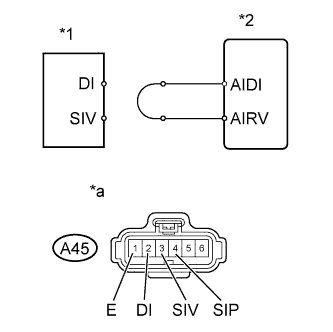
Connect terminals DI and SIV of the wire harness connector for the air injection control driver.
Connect the intelligent tester to the DLC3.
Turn the ignition switch to ON and turn the tester on.
Enter the following menus: Powertrain / Engine and ECT / Utility / Secondary Air Injection Check / Manual Mode / AIR PUMP: ON, ASV 1: OPEN, ASV 2: OPEN.
- HINT:
- When Manual Mode is selected, the tester initialization (atmospheric pressure measurement) is performed automatically. The initialization takes 10 seconds. After the initialization, AIR PUMP and ASV operation can be selected.
Start the engine.
Perform the secondary air injection system forced operation while the engine is idling.
Measure the voltage between the SIV and E terminals of the ECM connector when the secondary air injection system is ON and OFF.
Turn the ignition switch off.
- NOTICE:
- Performing Secondary Air Injection Check repeatedly may cause damage to the secondary air injection system. If it is necessary to repeat the check, leave an interval of several minutes between System Check operations to prevent the system from overheating.
- When performing the Secondary Air Injection Check operation after the battery cable has been reconnected, wait for 7 minutes with the ignition switch turned to ON or the engine running.
- Turn the ignition switch off when the Secondary Air Injection Check operation finishes.
- Performing Secondary Air Injection Check repeatedly may cause damage to the secondary air injection system. If it is necessary to repeat the check, leave an interval of several minutes between System Check operations to prevent the system from overheating.
- Standard Voltage:
Tester Connection
Condition
Specified Condition
A45-3 (SIV) - A45-1 (E)
AIR PUMP: ON, ASV: OPEN
0.5 to 2 V
A45-3 (SIV) - A45-1 (E)
AIR PUMP: OFF, ASV: CLOSE
11 to 14 V
Text in Illustration *1
Air Injection Control Driver
*2
ECM
*a
Front view of wire harness connector
(to Air Injection Control Driver)
Connect terminals DI and SIP of the wire harness connector for the air injection control driver.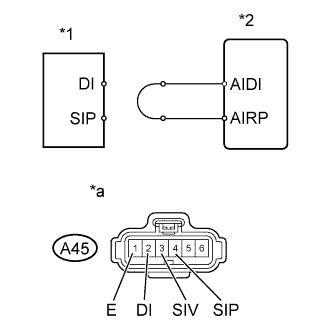
Connect the intelligent tester to the DLC3.
Turn the ignition switch to ON and turn the tester on.
Enter the following menus: Powertrain / Engine and ECT / Utility / Secondary Air Injection Check / Manual Mode / AIR PUMP: ON, ASV 1: OPEN, ASV 2: OPEN.
- HINT:
- When Manual Mode is selected, the tester initialization (atmospheric pressure measurement) is performed automatically. The initialization takes 10 seconds. After the initialization, AIR PUMP and ASV operation can be selected.
Start the engine.
Perform the secondary air injection system forced operation while the engine is idling.
Measure the voltage between the SIP and E terminals of the ECM connector when the secondary air injection system is ON and OFF.
Turn the ignition switch off.
- NOTICE:
- Performing Secondary Air Injection Check repeatedly may cause damage to the secondary air injection system. If it is necessary to repeat the check, leave an interval of several minutes between System Check operations to prevent the system from overheating.
- When performing the Secondary Air Injection Check operation after the battery cable has been reconnected, wait for 7 minutes with the ignition switch turned to ON or the engine running.
- Turn the ignition switch off when the Secondary Air Injection Check operation finishes.
- Performing Secondary Air Injection Check repeatedly may cause damage to the secondary air injection system. If it is necessary to repeat the check, leave an interval of several minutes between System Check operations to prevent the system from overheating.
- Standard Voltage:
Tester Connection
Condition
Specified Condition
A45-4 (SIP) - A45-1 (E)
AIR PUMP: ON, ASV: OPEN
0.5 to 2 V
A45-4 (SIP) - A45-1 (E)
AIR PUMP: OFF, ASV: CLOSE
11 to 14 V
Text in Illustration *1
Air Injection Control Driver
*2
ECM
*a
Front view of wire harness connector
(to Air Injection Control Driver)
|
|
||||
| OK | |
|
| 20. REPLACE AIR INJECTION CONTROL DRIVER |
Replace the air injection control driver (Click here).
| NEXT | |
|
| 21. CHECK WHETHER DTC OUTPUT RECURS (DTC P2440, P2441, P2442 AND/OR P2443) |
Start the engine and warm it up.
Turn the ignition switch off.
Connect the intelligent tester to the DLC3.
Turn the ignition switch to ON.
Turn the tester on.
Clear the DTCs (if stored) (Click here).
Enter the following menus: Powertrain / Engine and ECT / Utility / Secondary Air Injection Check / Automatic Mode.
Start the engine after the tester initialization is finished.
Perform the System Check operation by pressing Next.
Perform the following to confirm the secondary air injection system pending DTCs: Press the Exit.
Enter the following menus: Powertrain / Engine and ECT / DTC.
Read pending DTCs.
- OK:
- No pending DTC is output.
Turn the ignition switch off.
- NOTICE:
- When performing the Secondary Air Injection Check operation after the battery cable has been reconnected, wait for 7 minutes with the ignition switch turned to ON or the engine running.
- Turn the ignition switch off when the Secondary Air Injection Check operation finishes.
- When performing the Secondary Air Injection Check operation after the battery cable has been reconnected, wait for 7 minutes with the ignition switch turned to ON or the engine running.
|
|
||||
| OK | ||
|
||
| ||